


Chapter 2
Getting Started — Installing/removing the projector
42 - ENGLISH
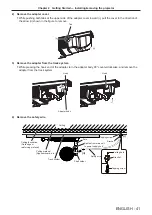
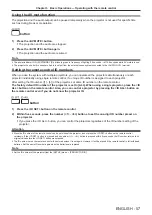
5) Loosen the lever locking screw.
f
Turn each lever locking screw (M3) for the levers A/B counterclockwise until they turn freely, using a Phillips
screwdriver (ISO No. 2, diameter: 6 mm (1/4")), and release the levers A/B.
Lever plate A
Lever A
Lever A locking screw
Lever plate B
Lever B
Lever B
Lever plate B
Lever B locking screw
Lever B locking screw
Cross section
6) Support the power supply unit with one hand, turn the lever B 90°, turn the lever A to the same side to
direct them 90° against the track system, and then remove the projector from the track system.
WARNING
Hold the projector with your hand when removing it from the track system.
Release the lever B first when removing the projector from the track system.
Failure to do so may result in the projector falling off and causing damage or deformation, or a serious accident or injury.
i) Completely turn the lever B in the direction of the allow shown in the figure.
ii) Turn the lever A in the direction of the arrow shown in the figure to direct it 90° against the track system.
f
Make sure to operate the lever A near the main unit last.
(i)
(ii)
Lever A
Lever B
f
Confirm that both hook clasps of the track mount parts A/B are removed from the track system, and then
remove the projector from the track system.
Содержание PT-JX200HBU
Страница 45: ...ENGLISH 45 Chapter 3 Basic Operations This chapter describes basic operations to start with ...
Страница 100: ...100 ENGLISH Chapter 5 Operations This chapter describes how to use each function ...
Страница 134: ...134 ENGLISH Chapter 6 Maintenance This chapter describes troubleshooting and maintenance methods ...
Страница 139: ...ENGLISH 139 Chapter 7 Appendix This chapter describes specifications and after sales service for the projector ...


