About your projector
24 - ENGLISH
Preparation
About your projector
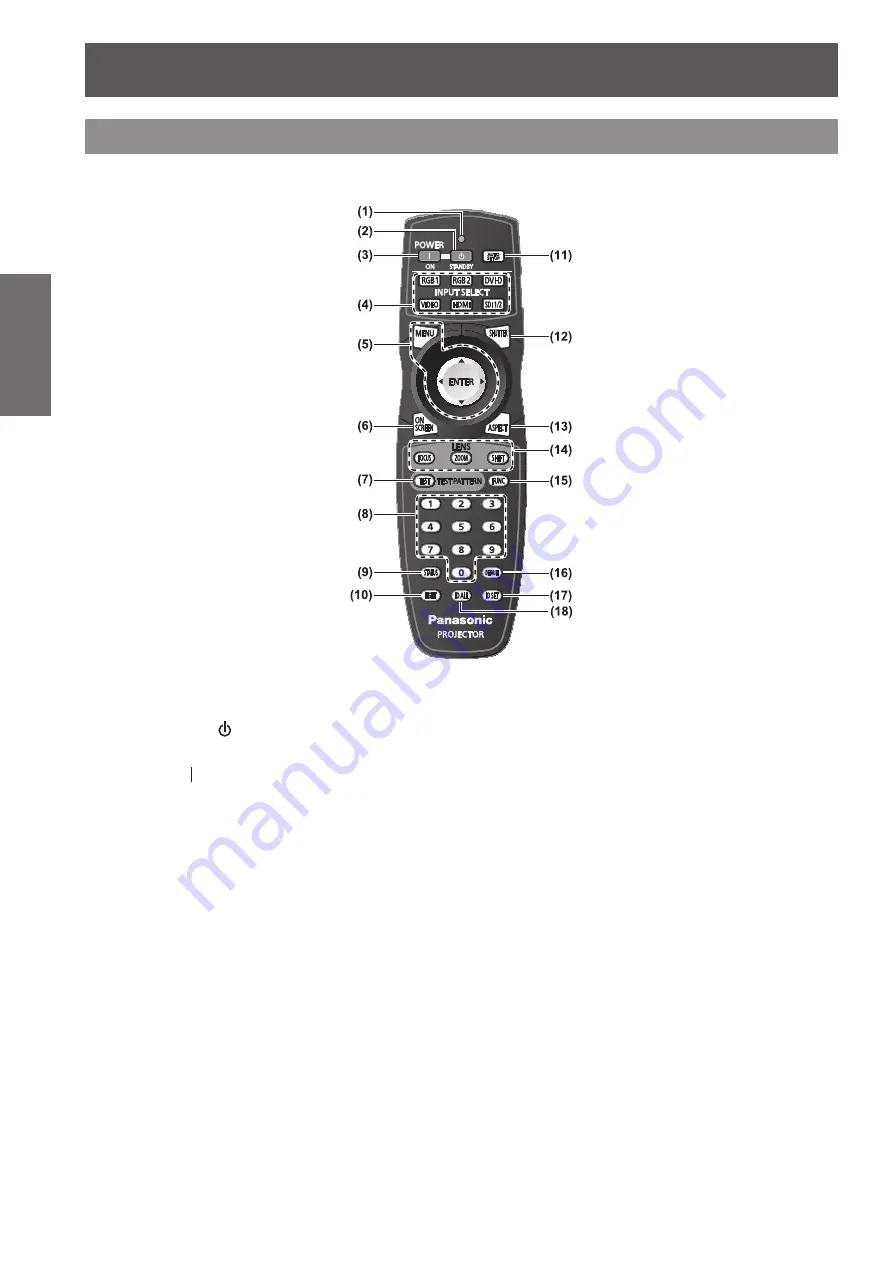
Remote control
▶
■
Front
(1) Remote control indicator
Flashes if any button in the remote control is pressed.
(2) Power standby < > button
Sets the projector to the standby mode when the <MAIN
POWER> switch on the projector is set to <ON>.
(3) Power on < > button
Starts projection when the <MAIN POWER> switch on
the projector is set to <ON> when the power is switched
off (standby mode).
(4) Input selection (<RGB1>, <RGB2>, <DVI-D>,
<VIDEO>, <HDMI>, <SDI 1/2>) buttons
Switches the input signal to project. (
page 60)
(5) <MENU> button/<ENTER> button/
▲▼◀▶
buttons
Used to operate the menu screen. (
page 63)
(6) <ON SCREEN> button
Switches on (display)/off (not display) the on-screen
display function. (
page 60)
(7) <TEST> button
Displays the test pattern. (
page 62)
(8) Number (<0> - <9>) buttons
Used when the system uses multiple projectors.
Used to input ID numbers or passwords.
(9) <STATUS> button
Displays the projector information.
(10) <LIGHT> button
Pressing this button lights up the remote control buttons.
The lights will go off when the remote control operation
goes idle for 10 seconds.
(11) <AUTO SETUP> button
Automatically adjusts the image display position while
projecting the image.
[PROGRESS] is displayed on the screen while the image
is adjusted automatically. (
page 61)
(12) <SHUTTER> button
Used to temporarily turn off the image. (
page 60)
(13) <ASPECT> button
Switches the aspect ratio of the image. (
page 62)
(14) Lens (<FOCUS>, <ZOOM>, <SHIFT>) buttons
Adjusts the projection lens. (
pages 52, 54)
(15) <FUNC> button
You can assign a frequently used operation to a shortcut
button. (
page 61)
(16) <DEFAULT> button
Restores the contents of the sub-menu to factory default.
(
page 64)
(17) <ID SET> button
Sets the ID number of the remote control when the
system uses multiple projectors.
(
page 29)
(18) <ID ALL> button
Simultaneously controls all the projectors with one
remote control when the system uses multiple projectors.
(
page 29)


