background image


PAN9420 Quick Start Guide 


Quick Start Guide Rev. 1.0 


Page 15 


4.2  Connecting the Evaluation Kit  

As mentioned above in 

 3.2 Interacting with the Evaluation Kit

 there are two optional methods 

to connect and interact with the PAN9420, please choose your preferred method, and use the 
following to interact with the PAN9420. 


4.2.1  Wired 

– Connecting through USB0 and a Terminal Program 

Simply connect the provided USB Type-B cable to USB0 of the MB and to a port in your 
computer. 


In the very first time connecting the USB0 of the MB to your PC, and given 
that the FTDI driver is NOT pre-installed on your machine, you will be asked to 
install the FTDI drivers. 


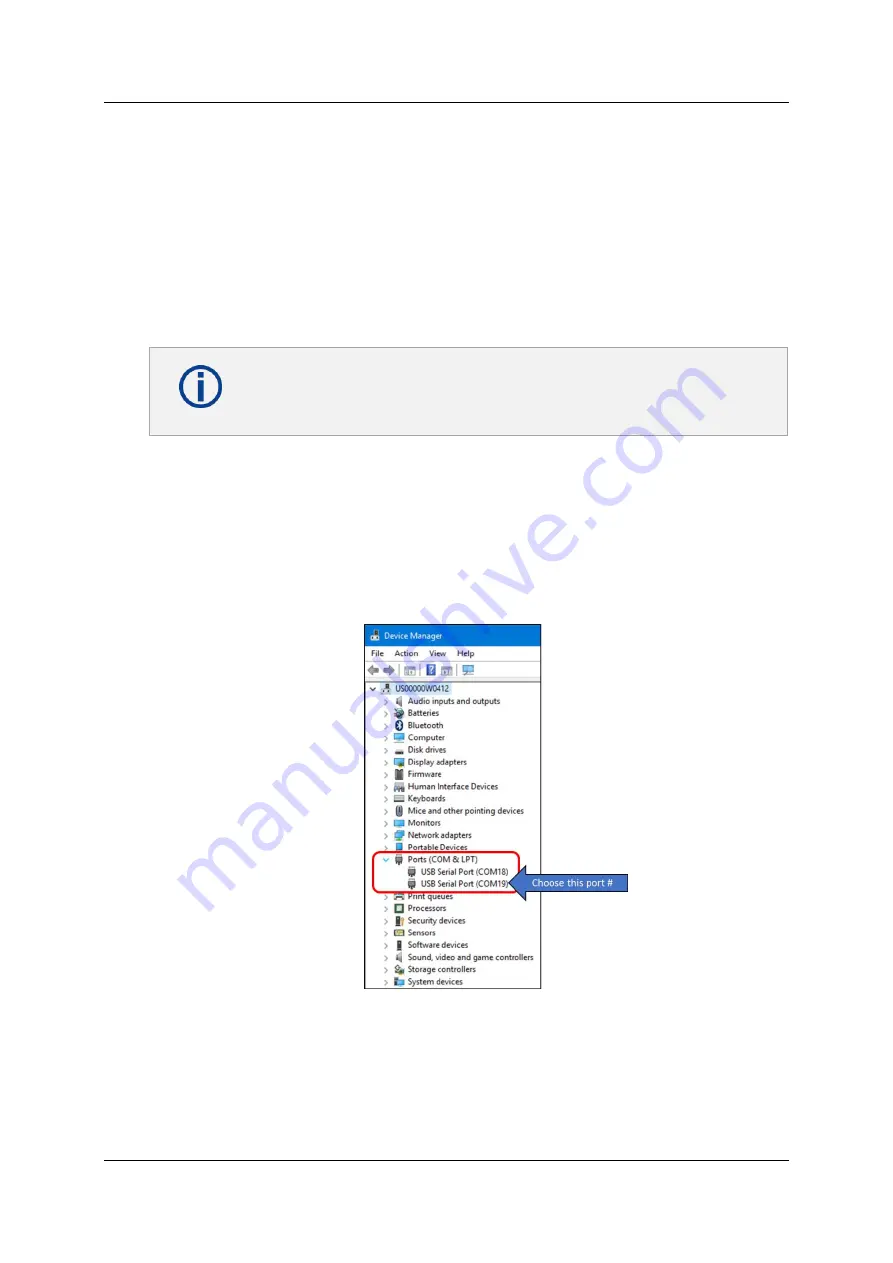
After successfully installing the FTDI driver, your PC will enumerate two virtual COM ports. One 
is for JTAG-via-USB (mostly it is the lowest COM number of the two) and the other one is 
connected 

to PAN9420’s UART0 (mostly it is the highest COM number of the two).  

On a Windows machine, use the device manager to discern which COM number corresponds to 
UART0. After connecting the evaluation kit to your PC, in 

device manager > ports

, you should 

see two COM ports (see below). Generally, the port with the highest number of the two 
corresponds with UART0. In the example below, you will use COM19. 


Figure 7: Device Manager and virtual COM ports 

To test the Command Interface via USB0 you could use any terminal program, Panasonic

’s 

terminal program of choice is HTerm. 


Содержание PAN9420

Страница 1: ...PAN9420 Quick Start Guide Rev 1 0 Wireless Modules...

Страница 2: ...icular application Any provided source code shall not be used or incorporated into any products or systems whose manufacture use or sale is prohibited under any applicable laws or regulations Any outl...

Страница 3: ...6 2 1 What is in the Box 6 2 2 Additional Equipment 9 3 PAN9420 Overview 10 3 1 Features 10 3 2 Interacting with the Evaluation Kit 10 3 3 Powering the Evaluation Kit 11 4 First Time Set Up 14 4 1 Po...

Страница 4: ...to understand the setup of the Evaluation Kit 1 2 Revision History Revision Date Modifications Remarks 1 0 15 June 2018 Initial version 1 0 1 3 Use of Symbols Symbol Description Note Indicates importa...

Страница 5: ...ndicates file names or messages and information displayed on the screen or to be selected or entered by the user Examples pan1760 c contains the actual module initialization The message Failed to save...

Страница 6: ...the Box The PAN9420 Evaluation Kit comes with the following three components The Mother Board MB The PAN9420ETU Easy To Use Mounted on the MB USB Type B cable For any further supportive documentation...

Страница 7: ...es 5V power via USB and the command UART0 o USB1 Data UART1 Netcat Webcat UDP etc Jumpers o JP2 JP6 and JP7 Set power source o JP5 UART0 RX and TX o JP1 UART1 RX TX CTS and RTS Switches o S1 Factory R...

Страница 8: ...U below Figure 2 The Evaluation Kit ETU The ETU comes pre mounted on the motherboard and can be swapped with other daughterboards You can order the ETU by itself 2 1 3 USB Type B Cable The USB Type B...

Страница 9: ...ver The Air wireless connectivity as described in 3 2 2 Wireless For the most comprehensive evaluation capabilities you will need to use a PC 2 2 1 The WIFIgurator The WIFIgurator is a handy evaluatio...

Страница 10: ...latform for the PAN9420 Module There are two optional methods to interact with the PAN9420 using the Evaluation Kit 3 2 1 Wired This method uses the provided USB ports with USB0 for commands and USB1...

Страница 11: ...5V DC 2 USB connection a Connect the MB s USB0 Port to your Computer s USB Port b Alternatively a portable power bank which provides 5V can be used to power up the Eval Kit Using USB0 to power up the...

Страница 12: ...oard are set properly In the picture below circled in Red are all related jumpers Figure 5 MB Jumpers Location Please refer to Figure 5 above as well to the pictures provided below Powering the kit us...

Страница 13: ...420 Quick Start Guide Quick Start Guide Rev 1 0 Page 13 UART0 Jumpers JP5 1 connected across 2 connected across UART1 Jumpers JP1 1 connected across 2 connected across 3 connected across 4 connected a...

Страница 14: ...ively or additionally to the Terminal you will need the WIFIgurator Please choose your preferred powering method as per 3 3 Powering the Evaluation Kit above Once power is applied the Eval Kit will po...

Страница 15: ...hine you will be asked to install the FTDI drivers After successfully installing the FTDI driver your PC will enumerate two virtual COM ports One is for JTAG via USB mostly it is the lowest COM number...

Страница 16: ...the command get system firmware using your Terminal Program of choice to request the firmware version of the module A command MUST BE followed by CR Carriage Return and LF Line Feed as described in t...

Страница 17: ...9420 Quick Start Guide Quick Start Guide Rev 1 0 Page 17 The response from the PAN9420 should be received like in the received window of the HTerm based example below Figure 9 Terminal Set Up and Resp...

Страница 18: ...s Terminal like capabilities along with an easy to use GUI As in 4 2 1 Wired Connecting through USB0 and a Terminal Program connect the MB s USB0 to your PC s USB port using the provided USB Type B ca...

Страница 19: ...l number radio version bootloader version and hardware revision perform the following steps 1 On the top choose the corresponding COM port It is the same as used in 4 2 1 Wired Connecting through USB0...

Страница 20: ...Wi Fi all you need to do is to apply power to the Evaluation Kit see 3 3 Powering the Evaluation Kit Once the board is powered and initialized activate the WLAN Network Manager on your PC or Smart Dev...

Страница 21: ...pports mDNS you could alternatively use pan9420 local or pan9420 in the URL line instead of the IP Address Please note that some browsers support this feature and some do not The PAN9420 s webserver w...

Страница 22: ...user to experience some of the capabilities of the web server Among them Configuring the AP and STA parameters Scan for APs Get some training via the provided tutorials You are encouraged to navigate...

Страница 23: ...ult Web Server Home Page 5 2 Web App Page The Web App page allows you to choose between the on module tutorials and the Web Desktop Again all of which are hosted on the PAN9420 By clicking on one of t...

Страница 24: ...that allows the designer to provide the end user with an easy web based UI User Interface By combining HTML and JSON information can be retrieved in real time rendered and streamed to the user s brow...

Страница 25: ...llow tutorials Each designed to demonstrate a different feature or SW Modules of the stack From interaction with other web servers to controlling GPIOs Figure 19 Tutorials For a more detailed informat...

Страница 26: ...find assistance near you at https na industrial panasonic com distributors Email wireless us panasonic com For questions and to look to share your experience please visit the Panasonic Wireless Techni...

Отзывы: