background image

15

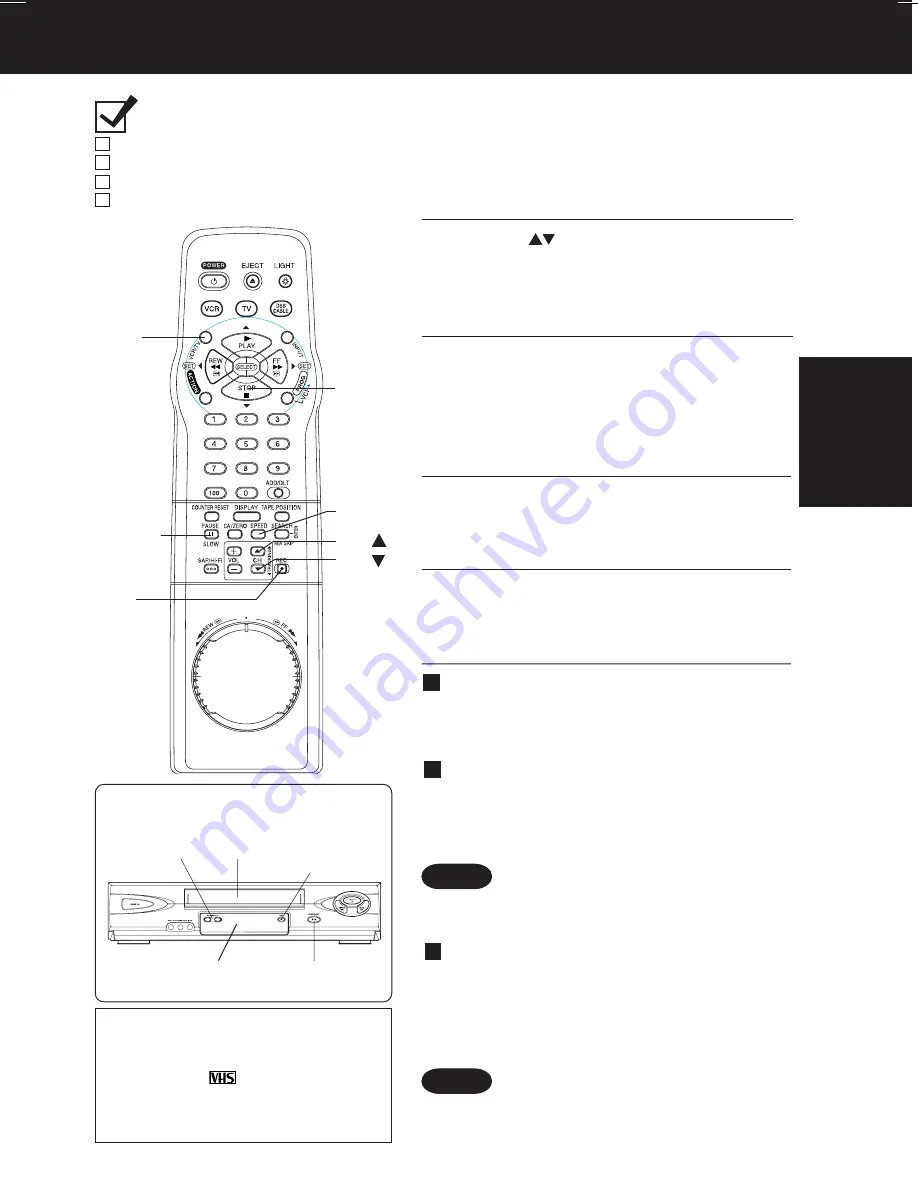
Multi Function
Display

• After 5 min. in Pause mode, VCR

stops to protect the tape and the
video head.

Insert a tape with a record tab 

(p. 4).

1

5

4

2

3

VCR power comes on.
“VCR” lights on Multi Function
Display. If Auto VCR/TV (p. 35) is set to
“OFF,” press VCR/TV until “VCR”
lights on the Multi Function Display.

Press CH 

or

 NUMBER keys

to select the channel.

• For “LINE” input, see p. 36.
• For channel over 100, first press 100

key then the other 2 digits.

Press SPEED

to select the record speed (p. 4).

SP

 = Standard Play    

        LP

 = Long Play

SLP

 = Super Long Play

Press REC

to start recording.

• To edit, press PAUSE/SLOW to pause,

and again to resume recording.

Press STOP

to stop recording.

One Touch  Recording 

(recording in progress)

,

• VCR shuts off after the preset record length.

each press of REC adds 30 min. to the
recording length up to 4 hours.

Record one station, watch another,

press VCR/TV (“VCR” goes out on Multi
Function Display),

select channels at TV (recording
continues).

Select channels at VCR,

• Other channels cannot be viewed during

recording.

press VCR/TV (“VCR” lights up on Multi

Function Display),

select channels at VCR.

This video recorder, equipped with HQ
(High Quality) system, is compatible
with existing VHS equipment. Only use
tapes with the 

 mark. Only tapes

tested and inspected for use in 2, 4, 6,
and 8 hour machines are
recommended.

Record using VCR controls

Press STOP/
EJECT to stop.

CH 
CH 

SPEED

REC

PAUSE/
SLOW

VCR/
TV

• Watching one channel and

recording another is NOT
possible when using a Cable
Box or a Satellite Receiver.

Ready Checklist

All connections are made (p. 8, 10, 24).
TV and VCR are plugged in.
TV is on and tuned to CH3, 4, or VIDEO.

Remote is in VCR mode. (Press VCR)

• Speed appears on-screen and on Multi

Function Display.

Record on a Tape

*

Important:

If a remote control button does not work
when pressed, press the VCR button on
the remote and try the button again.

5

STOP

2

Select
Channel.

1

Insert
a tape.

4

Press REC
to start
Recording.

Note

Note

Basic

Operation

V4622 P1-21 (2nd) [LSQT0509B].p65

2002/05/23, 18:28

15

Содержание Omnivision PV-V4622

Страница 1: ... incluida As an ENERGY STAR Partner Matsushita Electric Corporation of America has determined that this product or product model meets the ENERGY STAR guidelines for energy efficiency VCR Plus ALLSET and PlusCode are trademarks of Gemstar Development Corporation The VCR Plus system is manufactured under license from Gemstar Development Corporation LSQT0509B For assistance please call 1 800 211 PAN...

Страница 2: ...rs or outdoors or before leaving the unit unused for extended periods of time disconnect all equipment from the power source as well as the antenna and cable system 4 WHEN THE UNIT IS PLUGGED IN Never expose the unit to rain or water DO NOT OPERATE if liquid has been spilled into the unit Immediately unplug the unit and have it inspected by a service technician Fire and shock hazards can result fr...

Страница 3: ...ol warns the user that uninsulated voltage within the unit may have sufficient magnitude to cause electric shock Therefore it is dangerous to make any kind of contact with any inside part of this unit This symbol alerts the user that important literature concerning the operation and maintenance of this unit has been included Therefore it should be read carefully in order to avoid any problems FCC ...

Страница 4: ... 5368 Date of Purchase Dealer Purchased From Dealer Address Dealer Phone No Model No PV V4622 Serial No Prevent Accidental Tape Erasure Record Tab Screw driver Cover the hole with cellophane tape To record again Break off the tab to prevent recording Only use tapes with the mark in this unit Record Playback Time SP Standard Play 2 Hours 40 Minutes 1 Hour 2 Hours 2 Hours 4 Hours LP Long Play 3 Hour...

Страница 5: ...43 Index Back Cover Important Safeguards and Precautions 2 3 Accessories 4 Loading the Batteries 4 Prevent Accidental Tape Erasure 4 Record Playback Time 4 Location of Controls 6 7 Initial Setup for ANT Cable VCR TV Connection 8 9 Initial Setup for DSS Cable Box VCR TV Connection 10 11 Timer Recording 16 17 Timer Recording Using VCR Plus System 18 21 Reset Language Channels Clock VCR s Output Chan...

Страница 6: ...lay and Slow mode PLAY Plays a tape FAST FORWARD SEARCH Fast forwards tape forward visual search REWIND SEARCH Rewinds tape reverse visual search STOP Stops tape SAP Hi Fi Selects audio mode for play or record DSS CABLE mode Enables DSS CABLE functions INPUT For LINE or channel COMMERCIAL ADVANCE ZERO SEARCH Set MOVIE ADVANCE Zero search SHUTTLE Ring Variable speed search PLAY STOP REW and FF func...

Страница 7: ...ights up when power is on Clock Status Channel Speed Display Displays the current time Briefly displays VCR status when a function button is pressed Briefly displays the channel number or L1 or L2 when a channel or line input is selected Briefly displays the recording speed when SPEED is pressed Multi Function Display Timer Indicator Lights up when the VCR is set for Timer Recording or when One To...

Страница 8: ...all outlet VCR comes on and auto channel and clock set starts If screen at right does not appear check VCR TV connection and if TV is tuned to channel 3 try switching it to channel 4 To change VCR s output channel please refer to VCR s Output Channel on page 13 1 2 CH AUTO SET PROCEEDING CANCEL STOP Plugging the AC Power Plug into an AC outlet WARNING When using Nut type RF coaxial cables tighten ...

Страница 9: ...CH SELECT CONNECTION screen is displayed Press to select connection VCR TV or VCR CABLE DSS BOX TV and press to set 4 Press ACTION on remote to display CLOCK screen Manual Clock Set Press to select the month and to set In the same manner select and set the date year time and DST Daylight Saving Time Press ACTION to start clock and go to step 4 above left a b c If Auto Clock Set was incomplete Init...

Страница 10: ...ABLE Cable TV Converter Box 1 Turn TV on and tune to channel 3 Plug VCR Power Cord into AC wall outlet VCR comes on and auto channel and clock set starts If screen at right does not appear check VCR TV connection and if TV is tuned to channel 3 try switching it to channel 4 To change VCR s output channel please refer to VCR s Output Channel on page 13 1 2 CH AUTO SET PROCEEDING CANCEL STOP Pluggin...

Страница 11: ...REW FF Press ACTION on remote to display CLOCK screen Manual Clock Set Press to select the month and to set In the same manner select and set the date year time and DST Daylight Saving Time Press ACTION to start clock and go to step 4 above left a b c If Auto Clock Set was incomplete Important If a remote control button does not work when pressed press the VCR button on the remote and try the butt...

Страница 12: ...AY OFF CABLE DSS BOX SET UP VCR Plus CH SET UP VCR C A CLOCK CHANNEL SELECT EXIT ACT I ON Channels 1 Press to select CHANNEL 2 Press to select ANTENNA then press to set your antenna system TV or CABLE 3 Press to select AUTO SET then press If you use Cable Box set it to the PBS channel in your time zone After Channel Auto Set is finished Auto Clock Set will be performed 1 2 VCR C A CLOCK CHANNEL SE...

Страница 13: ...R 3 Press ACTION TIME ZONE ADJUST returns to 0 if clock is set manually and press to subtract or add hour s as necessary Add or Delete a Channel To add channel Select channel with NUMBER keys and press ADD DLT To delete channel Select channel with CH or NUMBER keys and press ADD DLT DST Daylight Saving Time VCR auto adjusts clock for DST p 9 Spring First Sunday in April DST ON Sets clock ahead one...

Страница 14: ...or eject tape PLAY Ready Checklist All connections are made p 8 10 24 TV and VCR are plugged in TV is on and tuned to CH 3 4 or VIDEO Remote is in VCR mode Press VCR Forward Reverse scene search Press FF or REW Press PLAY to release After search has begun each additional press of FF or REW changes speed as shown below SLP Approx 21X Approx 43X LP Approx 9X Approx 15X SP Approx 7X Approx 13X If pic...

Страница 15: ...ut on Multi Function Display select channels at TV recording continues Select channels at VCR Other channels cannot be viewed during recording press VCR TV VCR lights up on Multi Function Display select channels at VCR This video recorder equipped with HQ High Quality system is compatible with existing VHS equipment Only use tapes with the mark Only tapes tested and inspected for use in 2 4 6 and ...

Страница 16: ... TV and VCR plugged in and turned on VCR TV selector set to VCR Clock set correctly Tape has rec tab p 4 Remote is in VCR mode Press VCR Press PROG VCR button again to exit To Enter More Programs press to select and press to set an unused program number and repeat step 3 Or Press POWER off to set the Timer Recording TIMER lights up on Multi Function Display If a power interruption occurs while pro...

Страница 17: ... 10 SP SU 9 00P 10 00P L1 LP 1 2 3 4 1 Press PROG VCR button 2 Press to select LIST To cancel a Timer Recording in progress 1 Press to display 2 Repeat Step 3 p 16 to set new programs Press PROG VCR button to end the programming If there are set programs press POWER off to set timer Important If a remote control button does not work when pressed press the VCR button on the remote and try the butto...

Страница 18: ...ke each entry within 1 minute or VCR will leave this mode Once local channels have been programmed they will stay in memory even in the case of a power failure If the start time for a timer recording comes up during Auto VCR Plus System Setup the timer recording will have priority VCR Plus System is a feature that allows you to set most items of a timer recording by simply entering a special code ...

Страница 19: ...us System Channel Setup Part 1 section on page 18 If you selected SELECT VCR Plus CH perform steps 2 3 in the Auto VCR Plus System Channel Setup Part 2 section on this page Press ACTION to return to normal screen Make sure to leave VCR off overnight Repeat these steps as necessary If Auto Setup fails do Manual VCR Plus System Channel Setup on page 20 Channel map will be updated overnight If it was...

Страница 20: ... ON VCR C A CLOCK CHANNEL SELECT EXIT ACT I ON REPEAT PLAY OFF TIME STAMP ON REMOTE WARNING ON AUTO SHUT OFF OFF AUTO VCR TV ON IDIOMA LANGUE ENGLISH VCR S OUTPUT CH 3 VCR C A CLOCK CH CLEAR ADD DLT SELECT SET EXIT ACT I ON GUIDE CH RECEIVE CH 01 02 03 VCR C A CLOCK CHANNEL Initial Setup In order to use Timer Recording Using VCR Plus System the Initial Setup on page 8 to 11 must be completed for s...

Страница 21: ...R Plus channel setup is done channels stay in memory If a power interruption occurs VCR Plus channel setup may be lost Please do VCR Plus channel setup again Obtain unlisted PlusCode numbers by calling 1 900 454 7587 Call costs about 95 per minute Ready Checklist Clock is set VCR Plus Setup is complete see pp 18 20 VCR Plus PROG LIST 13 SAT TODAY CATEGORY N A SLP DATE START STOP CH SELECT EXIT PRO...

Страница 22: ... every TV cable box or DSS made by the manufacturer listed If you get no response your particular unit cannot be controlled There are NO additional codes for the products listed If your product is not listed then the remote is not compatible with that product 2 Mode Unit VCR TV VCR TV All VOL UP DOWN POWER INPUT number keys ENTER CH UP DOWN VOL UP DOWN VCR TV PLAY STOP EJECT SAP Hi Fi DISPLAY FF R...

Страница 23: ...Hitachi 31 Jerrold 01 84 83 34 03 02 04 55 65 66 67 68 120 106 121 122 115 117 118 124 Jasco 30 04 124 Macom 31 Magnavox 26 112 Matsushita 17 16 08 87 109 Movietime 32 39 42 44 126 38 40 Maestro 74 35 NEC 40 19 38 32 NSC 40 19 38 32 Novavision 08 09 25 61 53 87 Next Level 01 84 83 34 03 02 04 55 65 66 67 68 120 106 121 122 Oak 46 11 129 101 Oak Sigma 46 11 129 101 Panasonic 17 16 08 87 109 Philips...

Страница 24: ...IN terminals you can connect your VCR to them to receive higher quality picture and sound IN VIDEO AUDIO R L OUT IN FROM ANT OUT TO TV AUDIO IN1 VHF UHF R L VIDEO OUT TV IN 2 IN 1 CABLE BOX OUT IN OUT2 OUT1 2 Way Splitter CABLE BOX OUT A B Switch VCR ANT or CATV IN VHF UHF Connect With Two Cable Boxes VCR IN FROM ANT OUT TO TV AUDIO IN1 VHF UHF R L VIDEO OUT CABLE BOX OUT IN IN R L OUT TV VIDEO AU...

Страница 25: ...ith true stereo sound Standard stereo tapes will playback in monaural sound To listen to Hi Fi stereo playback the VCR AUDIO L R jacks must be connected to a stereo TV or an external stereo amplifier and speakers See top of this page If tracking is adjusted during playback Hi Fi audio may revert to normal audio Hi Fi and normal audio playback volume level may differ Arrow indicates selection Equip...

Страница 26: ... FF REW SELECT SET ACTION detects and marks the beginning and end points of commercials on your tape for recordings over 15 minutes in length When marked tape is played back the VCR a automatically advances through the commercial segments at high speed You can also set this feature to Manual so as to have more control over the advance process The effectiveness of this system can vary due to differ...

Страница 27: ...ing the program To view the portion of tape being incorrectly skipped press PLAY while the VCR is skipping reverse the tape to a point just prior to where the skipping began and press PLAY again This time the group will not be automatically skipped Automatic skipping will be re enabled when the end of the marked group is detected Press ACTION to display menu Press to select C A and display SET UP ...

Страница 28: ...finished Yes By setting the C A PLAYBACK to MANUAL see page 27 you can view or advance through commercials as desired Yes works in SP LP and SLP Yes As long as C A PLAYBACK is set to AUTO see page 27 the VCR should advance through commercials each time the tape is played back The tape stops at the end of the recording so that any additional timer recordings can be performed Yes marked recordings w...

Страница 29: ... the next preview long commercial or the start of the movie whichever is next If you want to playback press PLAY Important If a remote control button does not work when pressed press the VCR button on the remote and try the button again Ready Checklist All connections are made One time Setup completed VCR is plugged in TV is turned on and set to CH3 4 or Video on TV Advanced Operation Insert a tap...

Страница 30: ...Upon locating end point If Program End Search is started very close to an index mark that mark may be skipped over SEARCH INDEX PROG END MOVIE SEARCH START FF NEXT SEARCH M A SKIP EXIT STOP Fig 1 Program 2 or BLANK Program 1 the current tape position Press SEARCH button FF INDEX End Point Fig 2 Program 2 Program 1 the current tape position Press SEARCH button INDEX INDEX BLANK BLANK FF End Point F...

Страница 31: ...esired position to reset to 0 00 00 Continue to record playback etc Press STOP Unit will go into FF or REW mode and stop at the last point the Counter was set to 0 00 00 Press CA ZERO in Stop mode to start ZERO SEARCH 5 4 3 2 1 To quickly return to a specified tape location VCR C A CLOCK CH SELECT SET EXIT ACT I ON REPEAT PLAY OFF TIME STAMP ON REMOTE WARNING ON AUTO SHUT OFF ON AUTO VCR TV ON IDI...

Страница 32: ...or 10 manually created captions You need a list of stations and the channel numbers you receive them on To make corrections Press and to select the channel number then press to change or ADD DLT to delete the number 1 Press to highlight caption 2 Press to move cursor to the right 3 Press to select CH number 4 Press to set 5 4 3 2 1 SELECT EXIT ACT I ON REPEAT PLAY OFF TIME STAMP ON REMOTE WARNING ...

Страница 33: ... if invalid key is pressed Press ACTION to return to normal screen VCR C A CLOCK CH SELECT SET EXIT ACT I ON REPEAT PLAY OFF TIME STAMP ON REMOTE WARNING ON AUTO SHUT OFF ON AUTO VCR TV ON IDIOMA LANGUE ENGLISH VCR S OUTPUT CH 3 Remote Warning ON OFF Feature When set to ON all operations except for timer record and tape eject are prohibited Useful for households with small children To turn off rep...

Страница 34: ...IT ACT I ON REPEAT PLAY OFF TIME STAMP ON REMOTE WARNING ON AUTO SHUT OFF OFF AUTO VCR TV ON IDIOMA LANGUE ENGLISH VCR S OUTPUT CH 3 VCR C A CLOCK CH Press ACTION to display menu VCR C A CLOCK CH SELECT SET EXIT ACT I ON REPEAT PLAY OFF TIME STAMP ON REMOTE WARNING ON AUTO SHUT OFF ON AUTO VCR TV ON IDIOMA LANGUE ENGLISH VCR S OUTPUT CH 3 Press to select TIME STAMP and press to set PLAY STOP REW F...

Страница 35: ...l not function during Play or Record Note When set to ON picture is displayed regardless of signal strength ON Picture is displayed despite signal condition and may be of poor quality OFF Screen turns solid blue when signal is weak or non existent Selecting ON has no effect on connected equipment with blue back feature Press ACTION to return to normal screen 3 2 1 Press ACTION to display menu Pres...

Страница 36: ...ust be done on the playing and recording VCRs at the same time VCR IN FROM ANT OUT TO TV VIDEO OUT AUDIO OUT AUDIO IN VCR VIDEO IN TV VHF UHF R L R L R L R 1 2 Front of VCR Audio Video In Terminals on the front of VCR are available Connect VIDEO OUT terminal on Playing VCR to VIDEO IN terminal on Recording VCR To monitor the dubbing also connect a TV as shown Connect L and R AUDIO OUT terminals on...

Страница 37: ...tatic cleaner and polisher Cleaning the VCR Note Designs and specifications are subject to change without notice V I DEO HEADS MAY NEED CLEAN I NG PLEASE I NSERT HEAD CLEAN ING CASSETTE OR REFER TO MANUAL END PLAY Cleaning Tape Digital Auto Picture Automatically controls the video output signal for less noise depending on the tape condition Digital Auto Tracking Continuously analyzes the signal an...

Страница 38: ...tion Channel Displays Blank Tape No Video Signal Indications Whenever a blank section of a tape comes up in Play mode or when the selected channel has no broadcast signal with the Weak Signal Display Feature p 35 set to OFF the TV screen will turn solid blue On Screen Displays OSD REMOTE CONTROL IS SET TO CABLE DSS MODE USE VCR VCR KEY 22 23 35 37 If head cleaning becomes necessary while playing b...

Страница 39: ...eck connections between VCR external antenna and TV Press VCR button for VCR mode P 22 Check Remote batteries P 4 Correction Check connections between VCR external antenna and TV Check channel selections Make sure your antenna system CABLE or TV is correctly set Channels P 12 Make sure cassette record tab is intact P 4 Confirm that clock is set to current time and date Make sure Cable DSS box if u...

Страница 40: ...d as is Mail In Service For assistance in the continental U S A in obtaining repairs please ship the product to Panasonic Services Company Customer Servicenter Suite B 4900 George McVay Drive McAllen TX 78503 For assistance in Puerto Rico call Panasonic Sales Company 787 750 4300 or fax 787 768 2910 When shipping the unit carefully pack and send it prepaid adequately insured and preferably in the ...

Страница 41: ...DINGTHE WARRANTY OF MERCHANTABILITY ARE LIMITEDTOTHE PERIOD OFTHE LIMITEDWARRANTY Some states do not allow the exclusion or limitation of incidental or consequential damages or limitations on how long an implied warranty lasts so the exclusions may not apply to you This warranty gives you specific legal rights and you may also have other rights which vary from state to state If a problem with this...

Страница 42: ... y presione seleccionar Si la conexion es DSS Convertidor de cable VCR TV Presione para obtener la conexion CABLE DSS VCR TV y presione para seleccionar Confirme el canal de salida de su convertidor de cable o receptor de DSS presione que permitiran selecionar el mismo canal de salida que su convertidor o DSS Presione para seleccion 4 Terminal IN FROM ANT Televisor VCR VHF UHF Terminal OUT TO TV E...

Страница 43: ... quedan presione para seleccionar y presione para ajustar los tiempos de INICIO PARADA CANAL o entrada de LÍNEA pág 36 CATEGORIA y velocidad del cassette SP LP SLP Categoría NO DEPORTE CINE COMEDIA MUSICA DRAMA 1 Para ajustar la FECHA de grabación presione para seleccionar 1 31 una vez o DIARIO a la misma hora de lunes a viernes o SEMANA a la misma hora cada semana y presione para ajustar 2 Presio...

Страница 44: ... Channel Displays 38 H Head Cleaning 37 Hi Fi Indicator 7 I Important Safeguards and Precautions 2 Index Search 30 Initial Setup 8 11 L Limited Warranty 40 41 M Manual VCR Plus System Channel Setup 20 Movie Advance 29 MTS Broadcast 25 Multi Brand Control 22 23 O On Screen Display 38 P Playback 14 Play Button 6 Power Button 6 Power Indicator 7 Program End Search 30 R Record 15 Record Button 6 Remot...

Отзывы: