background image

24

Title

Procedure

SEARCH

SEARCH 

r

BLC

;

W.B

1

6

5

S

CAMERA

OFF

VCR

INFO-

WINDOW

CAMERA

V C R

TBC

BLC

1

TBC

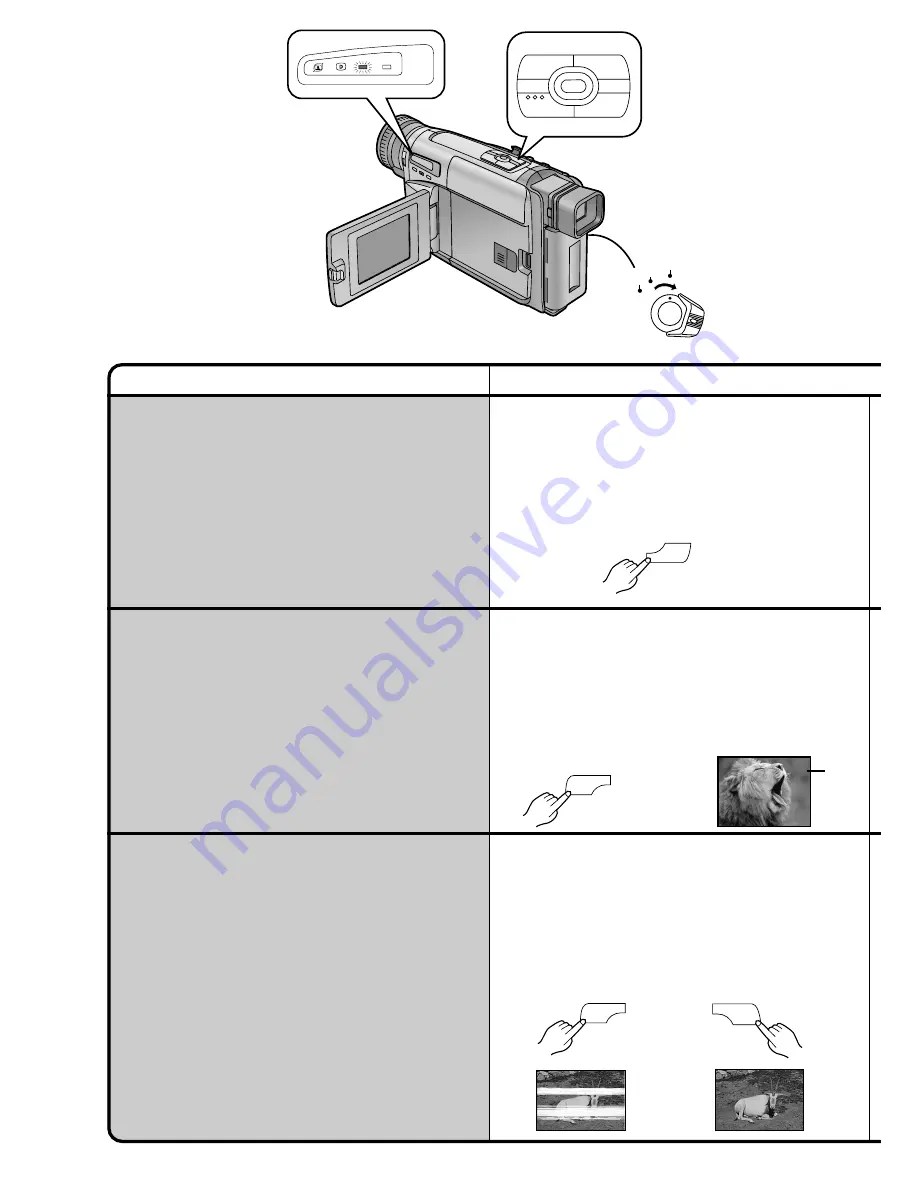
Viewing Recorded Scenes
During Recording Pause

(Camera Search)

You can view recorded scenes when the Movie
Camera is in the Recording Pause Mode.
The Camera Search Function is convenient to search
for a scene from which you want to start recording a
new scene with smooth scene-to-scene transition.

1

Keep the Reverse Search Button [

s

SEARCH] or the

Forward Search Button [SEARCH

r

] pressed for more

than 1 second.

Pressing the [

s

SEARCH] Button plays back the

picture in reverse direction.

Pressing the [SEARCH

r

] Button plays back the

picture in forward direction.

1

Keep the Backlight Button [BLC] pressed.

The backlight is being compensated as long as you
keep the Button pressed, and the subject is recorded
more brightly. (The picture brightens up as a whole.)

Recording Backlit Scenes

(Backlight Compensation)

To prevent the backlit subject from being recorded very
dark.
(Backlight means that the light falls on the subject from
behind, i.e. the subject is between the light source and
the Movie Camera.)

SEARCH

6

S

SEARCH 

r

5

!

Checking If the Picture Is
Recorded

(Recording Check)

To play back the final few seconds of the last recorded
scene in the Recording Pause Mode.

1

Press the Recording Check Button [

S

] briefly in

the Recording Pause Mode.

The [CHK] Indication 

1

 appears. After checking, the

Movie Camera returns to the Recording Pause Mode
and is ready for recording the next scene.
([CHK] means Check)

CHK

e

SEARCH

6

S

Содержание NV-VS40B

Страница 1: ...S VHS C Movie Camera VQT9093 Before use please read these instructions completely Operating Instructions Model No NV VS40B NV VS40B ...

Страница 2: ...Please read these Operating Instructions carefully and keep them handy for future reference Please note that the actual controls and components menu items etc of your Movie Camera may look somewhat different from those shown in the illustrations in these Operating Instructions Information for Your Safety S VHS C Movie Camera The rating plate is on the underside of the Movie Camera AC Adaptor The r...

Страница 3: ...t the VHS Formats 22 Recording Backlit Scenes 24 Checking If the Picture Is Recorded 24 Viewing Recorded Scenes During Recording Pause 24 Recording Yourself 26 Focusing on the Subject Manually 26 Enlarging Your Subject or Widening the Recording Angle 28 Recording with the Time and or Date Superimposed in the Picture 28 Voice Zoom 29 Viewing the Just Recorded Scenes on the Movie Camera 30 Adjusting...

Страница 4: ...n and does not affect the recorded picture 27 Cassette Compartment Lock Button LOCK p 18 28 Battery Holder p 8 1 Super Image Stabilizer Indication Lamp p 44 46 2 Digital Effect Indication Lamp p 44 46 48 3 Camera Mode Lamp CAMERA p 22 4 VCR Mode Lamp VCR p 30 5 0 Lux Recording Switch 0 LUX OFF ON p 56 6 White Balance Sensor p 52 7 Remote Control Sensor p 58 8 Built in Infra red Beam Emitters p 56 ...

Страница 5: ...ut Socket DC IN p 6 35 Battery Eject Lever 2BATTERY EJECT p 9 36 Recording Start Stop Buttons p 22 Use either of these buttons depending on the recording angle 37 Off On Mode Selector Switch CAMERA OFF VCR p 12 22 30 34 38 Grip Belt You can adjust the Grip Belt to the size of your hand 39Speaker 40 Cassette Eject Button EJECT p 18 34 41 Date Time Title Button DATE TITLE p 29 50 42 Zoom Lever W T p...

Страница 6: ...ed p 8 1 Supplying Power from an AC Mains Socket AC Adaptor AC Mains Lead DC Input Lead Start the engine and then plug the Car Battery Charger into the Cigarette Lighter Socket 2 Supplying Power from the Cigarette Lighter Socket in a Car The use of the Car Battery Charger VW KBC7E optional makes it possible to supply power to the Movie Camera in a car for recording and playback Connect the DC Inpu...

Страница 7: ...onnect the Car Battery Charger from the cigarette lighter socket The Car Battery Charger can be used with 12 V and 24 V DC negative grounded vehicles Do not start the car engine while the Movie Camera is being powered by the car battery If the voltage drops suddenly e g because the car air conditioner is turned on the Movie Camera is automatically turned off to protect it Wait about 10 seconds bef...

Страница 8: ...lide it in the direction of the arrow 5 Press the bottom of the Battery toward the Movie Camera until it locks with a click 2 Connect the AC Mains Lead to the AC Adaptor and an AC mains socket The POWER Lamp and the CHARGE Lamp light and charging starts When charging do not connect the DC Input Lead to the AC Adaptor Plug into AC Adaptor AC Mains Lead Plug into AC mains socket 1 ...

Страница 9: ... though the Battery is attached remove the Battery and then re attach it If you have any problems with charging the Battery refer to page 74 Charge the Battery at a room temperature between 10 C and 30 C When first charging a Battery that is completely discharged as a result of being in storage for an extended period of time etc the POWER Lamp and the CHARGE Lamp both flash Removing the Battery fr...

Страница 10: ...e Indication This Indication shows the remaining duration of continuous recording at an ambient temperature of 25 C when a fully charged Battery was attached Therefore in the following cases the actual available recording time is different from the times shown above When Recording Is Not Performed Continuously In most cases you will frequently start and stop recording turn the Movie Camera on and ...

Страница 11: ...s turned off and it consumes power from the button type battery Inserting the Button type Battery Before setting the date and time insert the button type battery supplied Information for your safety WARNING THE LITHIUM BATTERY IS A CRITICAL COMPONENT TYPE NUMBER CR2025 MANUFACTURED BY PANASONIC IT MUST NEVER BE SUBJECTED TO EXCESSIVE HEAT OR DISCHARGE IT MUST THEREFORE ONLY BE FITTED IN EQUIPMENT ...

Страница 12: ... Press the MENU Button When you press this button while the CAMERA Lamp is lit in red the Camera Mode Main Menu 1 appears When you press this button while the VCR Lamp is lit in green the VCR Mode Main Menu 2 appears 5 Turn the 34 Dial to select the item to be set MENU FOCUS SET MF TRACKING CAMERA OFF VCR INFO WINDOW CAMERA V C R MENU FOCUS SET 6 Press the SET Button to set the selected item to th...

Страница 13: ...rding Also it is possible to start playback while the menu is displayed but if you start recording the displayed menu disappears The method for making settings on the DATE TIME SETUP Sub Menu p 16 and LCD EVF SETUP Sub Menu p 17 differs slightly from that of other Sub Menus Do not turn off the power while performing a menu operation Exiting the Menu Press the MENU Button again 4 Press the SET Butt...

Страница 14: ...GE TITLE FOR TITLE NORMAL LARGE HAPPY BIRTHDAY RETURN YES ENGLISH DATE TIME SETUP PRESS MENU TO RETURN YEAR 2001 MONTH 2 DATE 28 HOUR 15 MIN 30 M SENSOR D ZOOM RETURN CAMERA SETUP PRESS MENU TO EXIT OFF ON 45t 100t 250t YES DIGITAL EFFECT PRESS MENU TO EXIT EFFECT1 OFF SIS D ZOOM EFFECT2 OFF NEGA SOLARI SEPIA B W D FADE1 D FADE2 D FADE3 SIS D ZOOM MOSAIC STRETCH RETURN YES CAMERA SETUP Sub Menu 1 ...

Страница 15: ... If you set S VHS ET on the OTHER FUNCTIONS Sub Menu to ON REC SPEED is automatically set to SP Even if you later set S VHS ET to OFF REC SPEED remains set to SP Therefore to use the LP Mode when recording in the VHS format set REC SPEED to LP C Recording Lamp TALLY LAMP p 23 D Voice Zoom VOICE ZOOM P 29 E Demonstration Mode DEMO MODE p 69 F S VHS ET Mode S VHS ET p 22 When an S VHS C cassette is ...

Страница 16: ... Press the SET Button to select MIN 9 Turn the 34 Dial to set to 30 10 Press the MENU Button to finish the date and time setting The operation of the clock starts from 00 seconds Pressing the button one more time makes the menu disappear If you select the DATE TIME SETUP Sub Menu when the button type battery is not inserted into the Movie Camera or is exhausted the Main Menu disappears and the 0 I...

Страница 17: ...e vertical bars are shown the brighter the screen is 1 Press the SET Button to select the item that you want to adjust 2 Turn the 34 Dial to increase or decrease the vertical bars of the Bar Indication The Bar Indication is divided into 8 steps The more vertical bars are shown the stronger the brightness or colour saturation is Exiting the Menu Press the MENU Button twice These adjustments have no...

Страница 18: ...g a Cassette If the AC Adaptor or Battery is used to supply power it is possible to insert or eject the cassette without turning on the Movie Camera Before inserting the cassette make sure that the tape is tight If it is loose turn the cog wheel in the direction of the arrow to tighten it Cog Wheel EJECT 3OPEN EJECT ...

Страница 19: ...ith the 1 Mark The Tape Length Indications change in the following order 5 Press the MENU Button to exit the Menu P P Confirming the Remaining Tape Time During recording and playback the Remaining Tape Time Indication 2 is automatically displayed so you always know how much time you have left on the cassette If you start recording or playback the R Indication flashes for a few seconds while the Mo...

Страница 20: ...n the Viewfinder again p 26 Due to limitations in production technology there may be some tiny bright or dark spots on the LCD however these are not recorded on the tape 1 Set the CAMERA OFF VCR Switch to CAMERA or VCR Turn the switch while pressing the button 1 1 Set the CAMERA OFF VCR Switch to CAMERA or VCR Turn the switch while pressing the button 2 2 If necessary adjust the angle of the Viewf...

Страница 21: ...nters the Viewfinder sparkling noise will occur on the Viewfinder screen If you block off the light this phenomenon disappears after a few minutes and does not affect the recorded picture 12 30 45 15 10 2001 12 30 45 15 10 2001 12 30 45 15 10 2001 12 30 45 15 10 2001 180 90 The picture seen on the LCD Monitor looks slightly Stretched vertically however the actually recorded picture remains unaffec...

Страница 22: ...nd the REC Indication appear REC means Recording PROG AE Button About the VHS Formats With this Movie Camera you can choose one of the following 3 different formats for recording 1 VHS also called normal or conventional VHS format 2 S VHS Super VHS developed based on the VHS format but featuring higher resolution and picture quality The Indication appears 3 S VHS ET Super VHS ExpansionTechnology T...

Страница 23: ...era know that recording is being performed If you set TALLY LAMP on the OTHER FUNCTIONS Sub Menu to OFF the Recording Lamp will not light up during a recording CAMERA OFF VCR When you insert an S VHS C cassette If you set S VHS on the OTHER FUNCTIONS Sub Menu to ON recording is performed in the S VHS format and if you set S VHS to OFF recording is performed in the VHS format p 15 A cassette that w...

Страница 24: ...ection 1 Keep the Backlight Button BLC pressed The backlight is being compensated as long as you keep the Button pressed and the subject is recorded more brightly The picture brightens up as a whole Recording Backlit Scenes Backlight Compensation To prevent the backlit subject from being recorded very dark Backlight means that the light falls on the subject from behind i e the subject is between t...

Страница 25: ...ts recording a new scene with smooth scene to scene transition If the Recording Speed Mode SP LP of the previous and the new recording are different the playback picture may be distorted The sky may appear whitish When recording with the sun striking the subject at an angle star shaped light reflections may be recorded in the picture When recording a subject in front of a very bright background th...

Страница 26: ...ndication appears 2 Turn the MF Dial until the subject is in focus The MF indication 1 appears MF means Manual Focus MENU FOCUS SET MF TRACKING PROG AE INFO WINDOW CAMERA V C R MF MF TRACKING 1 Turning the LCD Monitor so that it faces forward allows you to aim the Movie Camera and view the picture in the Viewfinder while the persons in front of the camera can check the picture on the LCD Monitor d...

Страница 27: ...ow It is not possible to adjust the focus when a menu is displayed Hint for Manual Focus Adjustment If you adjust the focus in the wide angle setting the subject may go out of focus when you enlarge it Therefore enlarge the subject 3 before you adjust the focus so that the picture remains focused when you zoom out 4 Mirror Mode for the Picture on the LCD Monitor You are used to looking at yourself...

Страница 28: ...ing Out Recording with the Time and or Date Superimposed in the Picture Confirm that CAMERA Lamp is lit 1 After displaying the TITLE SETUP Sub Menu p 14 Turn the 34 Dial to select DATE TITLE 2 Press the SET Button to select the desired indication FOCUS SET sVOLr W T MENU FOCUS SET MF TRACKING CAMERA OFF VCR CAMERA FUNCTIONS PRESS MENU TO EXIT 1 CAMERA SETUP 2 DIGITAL EFFECT 4 DATE TIME SETUP 5 DIS...

Страница 29: ...layed when you exit the TITLE SETUP Menu after having change the language of the title the type of Date Time Title Indication the title itself the size of the title or the colour of the title p 50 Deleting the Date Time Title Indication During recording or when the Movie Camera is in the Recording Pause Mode press the DATE TITLE Button to make the Date Time Title Indication disappear CAMERA OFF VC...

Страница 30: ...tch to VCR while pressing the Button 1 The VCR Lamp lights 2 Press the 6 Button to rewind the tape Rewind the tape to the point where the recording started When the tape reaches the beginning during rewinding it automatically stops s SEARCH SEARCH r BLC W B 1 6 5 S CAMERA OFF VCR INFO WINDOW CAMERA V C R TBC CAMERA OFF VCR 1 INFO WINDOW CAMERA V C R s SEARCH 6 S s SEARCH 6 S High Speed Rewinding P...

Страница 31: ...e Tape Counter shows 0 00 00 TBC Time Base Corrector Function Playback of certain cassettes can cause slight horizontal shaking of the picture or other distortion To minimize such distortion and ensure a stable playback picture this Movie Camera is equipped with the TBC Function This function is automatically activated within a few seconds after playback has started and the TBC Indication appears ...

Страница 32: ...utton pressed during playback s SEARCH 6 S SEARCH r 5 FOCUS SET MF TRACKING Eliminating Picture Distortions Manual Tracking Adjustment This Movie Camera adjusts the tracking automatically With certain cassettes however the tracking adjustment may not be precise In this case adjust the tracking manually White noise bars 1 Press the FOCUS SET Button briefly during playback The TRACK Indication appea...

Страница 33: ...n the SP mode and LP mode During Cue or Review Playback no indications are displayed on the LCD Monitor Search Lock Function For longer Cue or Review Playback press the 5 Button or the 6 Button only briefly As this locks the search function you do not need to keep the button pressed for a long time To resume normal playback press the 1 Button W B Still Playback Press the Button during Normal Playb...

Страница 34: ...deo Input Socket To Audio Input Socket To S Video Input Socket S Video Cable To S Video Output Socket OR S VHS Scart Cable universally available 1 S VHS Scart Adaptor universally available V A EJECT CAMERA OFF VCR 1 Connect the Audio Output Socket A and the Video Output Socket V on the Movie Camera with the audio and video input sockets on the TV Use the AV Cable supplied to connect to the TV If y...

Страница 35: ... input sockets an S VHS Scart Adaptor 1 universally available is necessary Consult your dealer When you use an S VHS Scart Adaptor it is not necessary to connect the plug for the video signal of the AV Cable Attaching the Lens Cap After use attach the supplied Lens Cap to the Lens to protect it OR On the TV select the AV input channel which corresponds to the audio and video input sockets that you...

Страница 36: ...ally at the end of a recording 1 With the Movie Camera in the Recording Pause Mode keep the FADE Button pressed The picture gradually disappears 1 During recording keep the FADE Button pressed The picture gradually disappears 2 When the picture has completely disappeared press the Recording Start Stop Button to start recording 2 After the picture has completely disappeared press the Recording Star...

Страница 37: ...Advanced Operations 37 Remarks etc 3 Approximately 3 seconds after the recording has started release the FADE Button The picture gradually appears again 3 Release the FADE Button FADE FADE ...

Страница 38: ...les and Inserting Them During Recording Digital Superimposer Function This function lets you store the image of a handwritten title signboard printed title or some similar object with strong contrast in the Movie Camera s digital image memory Then you can change the dark parts of this image to a desired colour and superimpose it during recording 1 Prepare a title that has strong contrast e g write...

Страница 39: ...title together with the picture p 48 It is not possible to apply the Negative Effect when storing a title in the digital image memory After turning the Movie Camera off and then on again the title that had been displayed in the picture is no longer displayed To make it appear again press the OFF ON Button When you want to capture a small title use the Macro Close up Function p 29 As the title pict...

Страница 40: ... to start recording 2 Press the Recording Start Stop Button to start recording CreatingYour OwnTitles and Inserting Them During Recording cont Digital Superimposer Function Inserting Your Own Title at the Beginning of a Recording Inserting Your Own Title During Recording 1 Press the OFF ON Button to make the title appear CAMERA OFF VCR CAMERA OFF VCR RED RED STORE OFF ON STORE OFF ON ...

Страница 41: ...rding Confirm that the colour indicated is suitable for the intended scene If necessary change the colour p 38 To make the title disappear while the recording of the scene continues press the OFF ON Button briefly To make the title disappear while the recording of the scene continues press the OFF ON Button briefly CAMERA OFF VCR CAMERA OFF VCR ...

Страница 42: ...mode 5 7 N Ω or º appears 5 Sports Mode To record scenes with fast moving subjects such as sports scenes 7 Portrait Mode To make subjects stand out sharply from the background 4 Low Light Mode To record dark scenes more brightly Ω Spotlight Mode To record subjects under bright spotlights such as at a party in the theatre etc º Surf Snow Mode To record subjects in brightly lit surroundings such as ...

Страница 43: ...atrium lamps in this mode as the colour and the brightness of the playback picture may fluctuate When recording subjects lit by strong lights or with much light reflection the playback picture may contain vertical streaks of light When the scene is not sufficiently lit the 5 indication flashes When using this mode for recording indoors the playback picture may flicker Portrait Mode When using this...

Страница 44: ...oom Mode D ZOOM p 46 It enlarges the subject beyond the optical zooming range 3 Super Image Stabilizer and Digital Zoom Mode SIS_D ZOOM p 46 This combination mode allows recording in the extreme tele range and prevents shaky picture 4 Mosaic Mode MOSAIC The picture becomes mosaic like 5 Stretch Mode STRETCH The picture is stretched horizontally while its height remains unchanged FOCUS SET MF TRACK...

Страница 45: ...tal Fade 2 Mode D FADE2 p 48 The picture fades in and fades out in small dots similar to snow melting or falling Digital Fade 3 Mode D FADE3 p 48 The picture fades in with a wipe effect screen and fades out When you select the Super Image Stabilizer Mode the Lamp lights When you select any other digital effect the Lamp lights If you set the CAMERA OFF VCR Switch to OFF and then set it to CAMERA ag...

Страница 46: ...ith Minimised Camera Shake Super Image Stabilizer In recording situations where shaking of the Movie Camera is likely to happen for example when you have zoomed in on a distant subject or when you record while walking you can use this function to stabilize the image In case of very strong camera shake it may not be possible to stabilize the picture FOCUS SET 1 After displaying the DIGITAL EFFECT S...

Страница 47: ... Button to exit the Menu The and or D ZOOM Indication appears Cancelling the Super Image Stabilizer Function Set EFFECT1 on the DIGITAL EFFECT Sub Menu to OFF MENU sVOLr W T MF TRACKING CAMERA SETUP PRESS MENU TO EXIT M SENSOR OFF 45t 100t 250t RETURN D ZOOM CAMERA FUNCTIONS PRESS MENU TO EXIT 1 CAMERA SETUP 2 DIGITAL EFFECT 3 TITLE SETUP 4 DATE TIME SETUP 5 DISPLAY SETUP 7 OTHER FUNCTIONS 6 LCD E...

Страница 48: ... Fade Functions There are 3 Digital Fade Modes available 1 Digital Fade 1 D FADE1 2 Digital Fade 2 D FADE2 3 Digital Fade 3 D FADE3 3 To Fade out During recording keep the FADE Button pressed The picture gradually disappears FADE FADE MENU FOCUS SET MF TRACKING CAMERA OFF VCR DIGITAL EFFECT PRESS MENU TO EXIT EFFECT1 OFF EFFECT2 OFF NEGA SOLARI SEPIA B W D FADE1 D FADE2 D FADE3 RETURN CAMERA FUNCT...

Страница 49: ...he following order 5 Release the FADE Button 5 Approximately 3 4 seconds after the recording has started release the FADE Button The picture gradually appears again FADE 2 While keeping the FADE Button pressed repeatedly press the COLOUR Button until the desired colour 1 is displayed COLOUR FADE WHT White YEL Yellow RED Red BLK Black BLU Blue CYN Cyan MAG Magenta GRN Green ...

Страница 50: ...s weddings and birthday parties These titles are available in 6 languages Be sure to turn the Movie Camera off before removing the Battery or disconnecting the AC Adaptor Disconnecting the power supply while the Movie Camera is on erases the Date Time Title Indication stored in memory MF TRACKING FOCUS SET 5 Turn the 34 Dial to select COLOUR 3 6 Press the SET Button repeatedly to select the desire...

Страница 51: ...e desired title 3 Turn the 34 Dial to select TITLE 2 MF TRACKING FOCUS SET 7 Turn the 34 Dial to select SIZE 4 8 Press the SET Button repeatedly to select NORMAL or LARGE HOLIDAY MF TRACKING FOCUS SET You can select the colour of the title from among 8 colours Repeatedly pressing the SET Button changes the colours of the title in the following order Deleting the Pre programmed Title Indication Dur...

Страница 52: ... this mode for special subjects and recording conditions for which the Full Auto Mode is not suitable and for light sources outside the Auto White Balance Adjustment range 1 p 68 Use it also when you want to manually adjust the white balance for each new scene as professionals do 1 Press the PROG AE Button repeatedly until the AUTO Indication appears 1 Press the PROG AE Button repeatedly until an ...

Страница 53: ...umination is weak In operation step 2 instead of attaching the Lens Cap point the Movie Camera at a pure white subject If you want to record under weak illumination precise Manual White Balance Adjustment may not be possible In this case record in the AUTO Mode When the Sepia Mode Black White Mode or 0 Lux Night View Mode is used it is not possible to manually adjust the white balance Also if the ...

Страница 54: ... by Mode Set M SENSOR on the CAMERA SETUP Sub Menu to OFF Cancelling the Motion Sensor Function During Recording Press the Recording Start Stop Button for more than 2 seconds MENU MF TRACKING CAMERA OFF VCR STDBY MOTION SENSOR REC MOTION SENSOR CAMERA SETUP PRESS MENU TO EXIT OFF ON D ZOOM 45X RETURN M SENSOR MENU FOCUS SET MF TRACKING CAMERA OFF VCR M SENSOR D ZOOM RETURN CAMERA SETUP PRESS MENU ...

Страница 55: ... to ON it is not possible to manually start recording by pressing the Recording Start Stop Button or to activate the Recording Check or Camera Search Function When you use the AC adaptor to power the Movie Camera the Motion Sensor Function Stand by Mode will continue when no movement is detected in the picture even when the tape has reached the end during recording When you use the Battery to powe...

Страница 56: ...The 0LUX Indication appears 5 Press the SET Button to select ON 2 Press the MENU Button The CAMERA FUNCTIONS Main Menu appears MENU FOCUS SET MF TRACKING O LUX OFF ON 0LUX 0LUX REC MOTION SENSOR STDBY MOTION SENSOR 0LUX 0LUX built in Infra red Beam Emitters O LUX OFF ON O LUX OFF ON MENU FOCUS SET MENU If you use the 0 Lux Night View Function together with the Motion Sensor Controlled Recording Fu...

Страница 57: ... Lux Night View Function it is not possible to adjust the white balance manually or to cancel the manually adjusted white balance setting It is not possible to use any of the Programme AE Modes when the 0 Lux Night View Mode is activated When using the 0 Lux Night View Function the subject should be within 3 metres from the Movie Camera When the automatic focusing is not precise adjust the focus m...

Страница 58: ...ng the Remote Controller Remove off the Battery Cover Insert the batteries with the polarity and correctly aligned Set the CAMERA OFF VCR Switch on the Movie Camera to CAMERA or VCR When the CAMERA Lamp lights you can use the recording functions When the VCR Lamp lights you can use the playback functions CAMERA OFF VCR CAMERA OFF VCR INFO WINDOW CAMERA V C R INFO WINDOW CAMERA V C R 15 15 5m 15 10...

Страница 59: ...layback and to rewind the tape p 30 if pressed in the Stop Mode Pressing it for more than 3 seconds in the Stop Mode rewinds the tape at high speed p 30 Also to activate the Camera Search Function p 24 in reverse direction if kept pressed in the Recording Pause Mode Pressing it briefly activates the Recording Check Function p 24 3 Stop Button To stop the tape p 31 4 Pause Button To pause playback ...

Страница 60: ...ubbing CAMERA OFF VCR By connecting the AV Cable supplied you can copy the cassette recorded with this Movie Camera onto a VCR s SEARCH SEARCH r BLC TBC W B 1 6 5 S CAMERA OFF VCR V A To Video Output Socket To Audio Output Socket AV Cable To Video Input Socket To Audio Input Socket To S Video Input Socket S Video Cable To S Video Output Socket OR S VHS Scart Cable universally available 1 S VHS Sca...

Страница 61: ...VCR is equipped with an S Video Socket also connect the S Video Cable not supplied If your VCR is not equipped with audio and video input sockets an S VHS Scart Adaptor 1 universally available is necessary Consult your dealer When you use an S VHS Scart Adaptor it is not necessary to connect the plug for the video signal of the AV Cable As the picture quality on the dubbed cassette is slightly red...

Страница 62: ... UK Ltd It couldn t be simpler Optional Accessories Some of the accessories listed below may not be available in some countries IR Video DC Light VZ LDR10E It requires the Shoe Adaptor VW SK11E for attaching to the Movie Camera Filter Kit VW LF43WE Cassette Adaptor VW TCA7E Tele Conversion Lens VW LT4314WE Tripod VZ CT55E Wide Conversion Lens VW LW4307WE Battery Pack CGR V14S CGR V610 Battery Pack...

Страница 63: ...ie Camera and cassette Be careful when inserting and removing the cassette Do not spray insecticide or volatile agents on the Movie Camera Such agents could deform the body and cause the surface coating to peel off Do not leave the Movie Camera in direct contact with rubber or plastic products for a long time Do not use benzine alcohol or thinner for cleaning They could deform the body and cause t...

Страница 64: ... safety wait about 1 more hour Remarks about Condensation Condensation can form if the Movie Camera is suddenly brought from cold surroundings to a place where it is hot or humid Since condensation forms gradually there may already be some condensation inside the Movie Camera even before the Condensation Indication begins to flash In an extremely cold place condensation may freeze and turn into fr...

Страница 65: ...re is 15 C 25 C and recommended relative humidity is 40 60 Movie Camera Wrap it with a soft cloth to prevent dust form entering Never leave the Movie Camera in place with high temperature Battery Extremely low or high temperature shortens the Battery life Storing it in places with oily smoke and a lot of dust could cause the terminals to get rusty and this can result in a malfunction Do not allow ...

Страница 66: ...not supplied If you use a cotton swab or similar to clean the inside of the Viewfinder use it very carefully to prevent scratching the screen inside the Viewfinder 3 To re attach the Viewfinder push it forward onto the Viewfinder Tube until it locks with a click Lens Hood When you want to attach the Tele Conversion Lens VW LT4314WE optional the Wide Conversion Lens VW LW4307WE optional or a filter...

Страница 67: ...em cannot provide precise adjustment Use the Manual Focus Mode instead p 26 1 Recording subjects with a part of it near the Movie Camera and another part far away from it As the Auto Focus adjusts on the centre part of the image it is often impossible to bring the nearby and distant parts of the subject into focus When you want to record a person with a distant mountain in the back it is not possi...

Страница 68: ...tion is called Auto White Balance Adjustment However as the white balance settings for only a few light sources are stored in memory the white balance is not correctly adjusted for other lighting conditions For the range of different types of lighting within which the Auto White Balance Function can provide precise adjustment refer to the chart For recording under lighting conditions outside this ...

Страница 69: ...ecording is finished Set the CAMERA OFF VCR Switch to VCR 5 Press the 5 or 6 Button The tape automatically stops approximately at the position at which you reset the counter to zero During High Speed Rewinding the Tape Counter shows 0 00 00 However this does not activate the Memory Stop Function Demonstration Mode When the Movie Camera is turned on and in the Camera Mode without any cassette inser...

Страница 70: ...ge Stabilizer Function is activated this indication is displayed 5 Digital Zoom p 46 D ZOOM When the Digital Zoom function is activated this indication is displayed Digital Effects p 44 When a digital effect is activated the corresponding indication is displayed 6 Tape movement during recording 7 Tape Run Indications REC Recording p 22 PAUSE Recording Pause p 23 Playback p 30 Camera Search in forw...

Страница 71: ...indication is displayed Voice Zoom p 29 V ZOOM When the Voice Zoom function is activated this indication is displayed A 0 Lux Night View Mode p 56 When the 0 Lux Night View Mode is activated this indication is displayed B Title large indication p 50 This indication shows the selected pre programmed large title Changing the Indications By changing the setting for DISPLAY on the DISPLAY SETUP Sub Me...

Страница 72: ...pe battery is exhausted or is not inserted p 11 U11 The heads are dirty p 75 2END During recording the tape has reached its end D Sound Volume p 31 Use this indication to adjust the volume of the playback sound from the built in speaker With the VCR Lamp lit pressing the sVOLr Lever toward W or T the VOLUME Indication appears Then press the sVOLr Lever toward W or T to adjust the volume E Title sm...

Страница 73: ... Audio Track 1 track Normal Monaural Image Sensor 1 5 inch CCD Image Sensor Lens 22 1 Power Zoom Lens optical capability F1 6 Focal Length 2 9 63 8mm Digital Al Auto Focus Auto Iris Filter Diameter 43 mm Monitor 2 5 inch Colour LCD Monitor Viewfinder 0 24 inch Electronic Viewfinder Standard Illumination 1 400 lx Operating Temperature 0 C 40 C Operating Humidity 10 80 Dimensions Approx 88 W t 118 H...

Страница 74: ...ged S2 If the DC Input Lead is connected to the AC Adaptor charging is not possible Disconnect the DC Input Lead Normal Recording P1 Recording cannot be started even though the Movie Camera is supplied with power and the cassette is inserted correctly S1 1 The tab of the inserted cassette is broken out Insert a cassette with intact tab Or cover the hole where the tab was with two layers of adhesiv...

Страница 75: ...era is correctly connected to a TV but no playback picture is reproduced S3 Did you select Video Input on the TV Carefully read the operating instructions for your TV and select the channel that matches the input sockets used for connection P4 The playback picture is not in colour S4 The colour adjustment on the TV is not made properly Adjust the colour control on the TV Playback Sound P1 No sound...

Страница 76: ... Indication p 29 Date Time Setting p 16 DC Input Lead p 6 Digital Effects p 44 Digital Fade p 45 48 Digital Zoom p 44 46 Dubbing p 60 E Eyepiece Corrector Lever p 20 F Fade p 36 FF Fast Forward p 30 G H Grip Belt p 5 High Speed Rewinding p 30 I Index Signals p 22 L LCD Monitor p 20 66 70 Lens Cap p 21 35 52 Low Light Mode p 42 M Macro Close up Function p 29 Manual Focus p 26 Max Continuous Recordi...

Страница 77: ...k p 32 S Search Lock Function p 33 Sepia Mode p 45 Solarisation Mode p 45 Sound Volume p 31 SP LP Mode p 15 Sports Mode p 42 Spotlight Mode p 42 Standard Accessories p 3 Still Playback p 33 Stretch Mode p 44 Super Image Stabilizer p 44 46 Surf Snow Mode p 42 S VHS p 22 S VHS ET p 22 T Tape Counter p 69 71 Tape Length p 19 TBC Function p 31 Tracking Adjustment p 32 V Viewfinder p 20 66 70 Voice Zoo...

Страница 78: ...78 ...

Страница 79: ...79 ...

Страница 80: ...Matsushita Electric Industrial Co Ltd Central P O Box 288 Osaka 530 91 Japan C B VQT9093 F0201Kh0 500 A ...

Отзывы: