background image

11. REPLACEMENT PARTS LIST 

31

Содержание NV-HV61EE

Страница 1: ...ORDER NO MAV0404002C8 Video Cassette Recorder NV HV61GN NV HV61EE NV HV61GCU NV HV61GH NV HV61GHT NV HV61PX R4 MECHANISM SPECIFICATIONS 1 ...

Страница 2: ... which will allow service personnel to understand and service this model If the circuit is changed or modified this information will be followed by supplementary service manual to be filed with original service manual Note 1 Adjustment procedures Disassembly Procedures and Assembly 2 ...

Страница 3: ...the melting point is 50 70 F 30 40 C higher Please use a high temperature soldering iron In case of soldering iron with temperature control please set it to 700 20 F 370 10 C Pb free solder will tend to splash when heated too high about 1100 F 600 C When soldering or unsoldering please completely remove all of the solder on the pins or solder area and be sure to heat the soldering points with the ...

Страница 4: ... Controller in more than 5 seconds The NAVI data list is displayed on the Monitor Press the MENU button on the Remote Controller for cancellation Although stored NAVI data can be confirmed on the monitor there is no way to transfer the NAVI data to IC6001which is newly mounted 2 1 1 REPLACING PROCEDURE IC6001 1 PREPARATION Before replacing IC6001 1 Take note that stored TV broadcast channels Becau...

Страница 5: ...n 2 as well as pin 3 of IC6001 decides the model distinction data there is no need to set up the Model code which is necessary in the previous models STEP4 LINE IN SETTING ACTIVATE PLUG IN A T P 1 Press the Channel up and down keys simultaneously for more than 3 seconds under the condition of the no tape is in the unit 2 Confirm that A1 and A2 can be displayed on the FIP by pressing the CH UP and ...

Страница 6: ...g to the Factory shipping condition if necessary by referring to Option Setting on the Operating Instructions as shown in the following chart STEP5 TAPE INTERCHANGEABILITY ADJUSTMENT Refer to the Electrical Adjustment Procedures 2 2 CAUTION FOR AC MAINS LEAD NV HV61GH GHT 2 3 HOW TO REPLACE THE LITHIUM BATTERY 2 3 1 GENERAL DESCRIPTION There is a RAM in the IC6001 which is backing up the following...

Страница 7: ...ee Fig B1 Fig B1 NOTE The lithium battery is a critical component Manufactured by Panasonic It must never be subjected to excessive heat or discharge It must therefore only be fitted in equipment designed specifically for its use Replacement batteries must be of the same type and manufacture They must be fitted in the same manner and location as the original battery with the correct polarity conta...

Страница 8: ...ations from VHS minimum to UHF maximum and memorizes every tuned program position Other program positions are skipped Auto Tuning takes five or more minutes to complete its search Do not touch the VCR during Auto Tuning Auto Tuning will stop halfway if the VCR is operated or the aerial lead and or the mains lead are disconnected In case the VCR stopped during Auto Tuning the VCR has to be reset an...

Страница 9: ...ppears for moment then changes to 2 C Turn off the VCR and then turn it on Auto Tuning commences 3 If you turn the VCR off during Auto Tuning Auto Tuning will stop halfway The VCR should be reset and restarted by the item 2 in order to execute Auto Tuning 4 If the VCR starts playback during Auto Tuning Auto Tuning will stop halfway The VCR should be reset and restarted by the item 2 in order to ex...

Страница 10: ...ice Mode to 7 B Press STOP button in order to unload the mechanism Pay attention to tape slack Service Mode Indication 7 STOP 7 0L EJECT 2 Removal by manual operation by rotating the Loading Motor with the batteries A Disconnect the AC plug and remove the Top Panel and the Front Panel by referring to the Disassembly Procedures B Connect three batteries 1 5V spec to the Loading Motor in series for ...

Страница 11: ...t before unloading would be completed as shown in Fig S3 Fig S3 D Then the tape becomes slack as shown in Fig S4 Fig S4 E Rotate the S Reel by a small minus screwdriver Fig S5 to remove the slack tape as shown in Fig S6 11 ...

Страница 12: ... manual operations after uninstalling the mechanism refer to the DISASSEMBLY METHOD of item3 1 A Disconnect the AC plug and remove the Top Panel Front Panel and the Mechanism by referring to the Disassembly Procedures B Remove the Screw S1 and remove the Loading Motor both as shown in Fig S8 Fig S8 12 ...

Страница 13: ... as shown in Fig S3 D Rotate the Capstan Motor clockwise Fig S9 to remove the slack tape as shown in Fig S6 Fig S9 E Rotate the Main Cam Gear counter clockwise again Fig S9 to remove the cassette tape as shown in Fig S7 F Set the Position Switch to EJECT POSITION certainly as shown in Fig S10 Fig S10 13 ...

Страница 14: ... securing of RT gap is impossible out of factory please replace the cylinder by whole Cylinder Unit The Compatibility Adjustment should be performed after replacement ofthe DD Cylinder Unit 1 Remove the Mechanism Unit from Main C B A Chassis by referring to Disassembly Procedure 2 Remove a red Screw S2 and 2 gold Screws S3 to remove the Cylinder Unit shown in Fig S11 Fig S11 14 ...

Страница 15: ...tainly after CYLINDER UNIT REPLACEMENT 2 4 5 ATTENTION FOR REPLACING THE CYLINDER UNIT CAUTION Handle the Cylinder Flexble Card with care When it damaged you should replace it with a new Cylinder Unit 1 Put the gloves on your hands 2 Turn the Cylinder Unit over 3 Insert the FPC HOLDER to the Cylinder Unit Fig S12 15 ...

Страница 16: ...n removing the FPC HOLDER push stopper portion of the FPC HOLDER with a small minus screw driver and so on And then pay attention for not to scratch the Cylinder and not to break the Head Chip 2 FPC HOLDER is not reuseable If removed install a new one Fig S14 16 ...

Страница 17: ...echanism Chassis Order No VRD0202010C8 2 6 INTRODUCTION OF VIDEO HEAD CLEANING CASSETTE POLISHING TYPE 1 We are pleased to introduce Panasonic Video Head Cleaning Cassette VFK0923FT for service purposes and VFK0923FSE for end users for all VHS S VHS VCP and VCR 2 These cleaning cassettes are exclusive removing the hard and sticky clogging on video heads 3 These improve the efficiency of video head...

Страница 18: ...sette Full VHS Cassette Cleaning Time 10 Seconds Time Tape Length 20 m Usability in a Path 180 Times VFK0823FSE For end users Type of Cassette Full VHS Cassette Cleaning Time 10 Seconds Time Tape Length 3 34 m Usability in a Path 30 Times 18 ...

Страница 19: ... 3 ADJUSTMENT PROCEDURES 3 1 DISASSEMBLY METHOD 3 1 1 DISASSEMBLY FLOW CHART This flow chart indicates disassembly steps of the cabinet parts and the circuit boards in order to find the necessary items for servicing When reassembling perform the steps in the reverse order Fig D1 19 ...

Страница 20: ...3 1 2 DETAIL OF DISASSEMBLY METHOD 1 REMOVAL OF THE TOP PANEL Remove 2 Screws A Remove 2 Screws B Fig D2 20 ...

Страница 21: ...2 REMOVAL OF THE BACK PANEL Remove 2 Screws C Remove Screw D Unlock 4 Tabs E Fig D3 21 ...

Страница 22: ...3 REMOVAL OF THE FRONT PANEL UNIT Unlock 7 Tabs F Fig D4 4 REMOVAL OF THE FRONT C B A Remove 2 Screws G Fig D5 5 REMOVAL OF THE MECHANISM UNIT 22 ...

Страница 23: ...Remove Screw H Remove 2 Screws I Remove Screw J Disconnect Cylinder Connector Disconnect A C Head Connector Disconnect P1531 Fig D6 6 REMOVAL OF THE MAIN C B A Remove 4 Screws K Fig D7 23 ...

Страница 24: ... the insulation sheet is mounted on the frame as shown in Fig D8 Fig D8 7 SERVICING POSITION Install the Mechanism Unit on to the MAIN C B A Then fix a screw I and connect two frexible card Connectors Cylinder connector AC Head connector and P1531 as shown in Fig D6 Fig D9 24 ...

Страница 25: ... required 1 VHS Alignment Tape VFJ8125H3F 2 Monitor 3 3 2 SERVO SECTION PG SHIFTER ADJUSTMENT PROCEDURE F I P DISPLAY 1 Turn on the Service Mode 1 Press the FF key and the EJECT key simultaneously for more than 3 seconds 2 Activate the Service Mode 2 While keep pressing FF key press the EJECT key in twice 3 Activate the Entering Mode Press the EJECT key for more than 3 seconds 4 Set the Mode 2 Pre...

Страница 26: ...20 NG1 in the PG Shifter Automatic Adjustment The cylinder rotation is unstable during the automatic adjustment F21 NG2 in the PG Shifter Automatic Adjustment The vertical sync signal is lacked while over 5 seconds on the alignment tape F22 NG3 in the PG Shifter Automatic Adjustment The installing position of Heads to the cylinder is our of specification F23 NG4 in the PG Shifter Automatic Adjustm...

Страница 27: ...ANCE CHROMINANCE BLOCK DIAGRAM 7 4 AUDIO BLOCK DIAGRAM 8 SCHEMATIC DIAGRAMS 8 1 POWER TRANSFORMER SECTION IN MAIN SCHEMATIC DIAGRAM 8 2 POWER SUPPLY RF SECTION IN MAIN SCHEMATIC DIAGRAM 8 3 TIMER SECTION IN MAIN SCHEMATIC DIAGRAM 8 4 SYSTEM CONTROL SERVO SECTION IN MAIN SCHEMATIC DIAGRAM 8 5 LUMINANCE CHROMINANCE AUDIO SECTION IN MAIN SCHEMATIC DIAGRAM 8 6 Hi Fi AUDIO SECTION IN MAIN SCHEMATIC DIA...

Страница 28: ...8 7 DECODER SECTION IN MAIN SCHEMATIC DIAGRAM NV HV61GN GH GHT PX 8 8 FRONT SCHEMATIC DIAGRAM 9 CIRCUIT BOARD ASSEMBLIES 9 1 MAIN C B A 9 2 FRONT C B A 10 EXPLODED VIEWS 10 1 CHASSIS PARTS SECTION 28 ...

Страница 29: ...10 2 CASING PARTS SECTION 29 ...

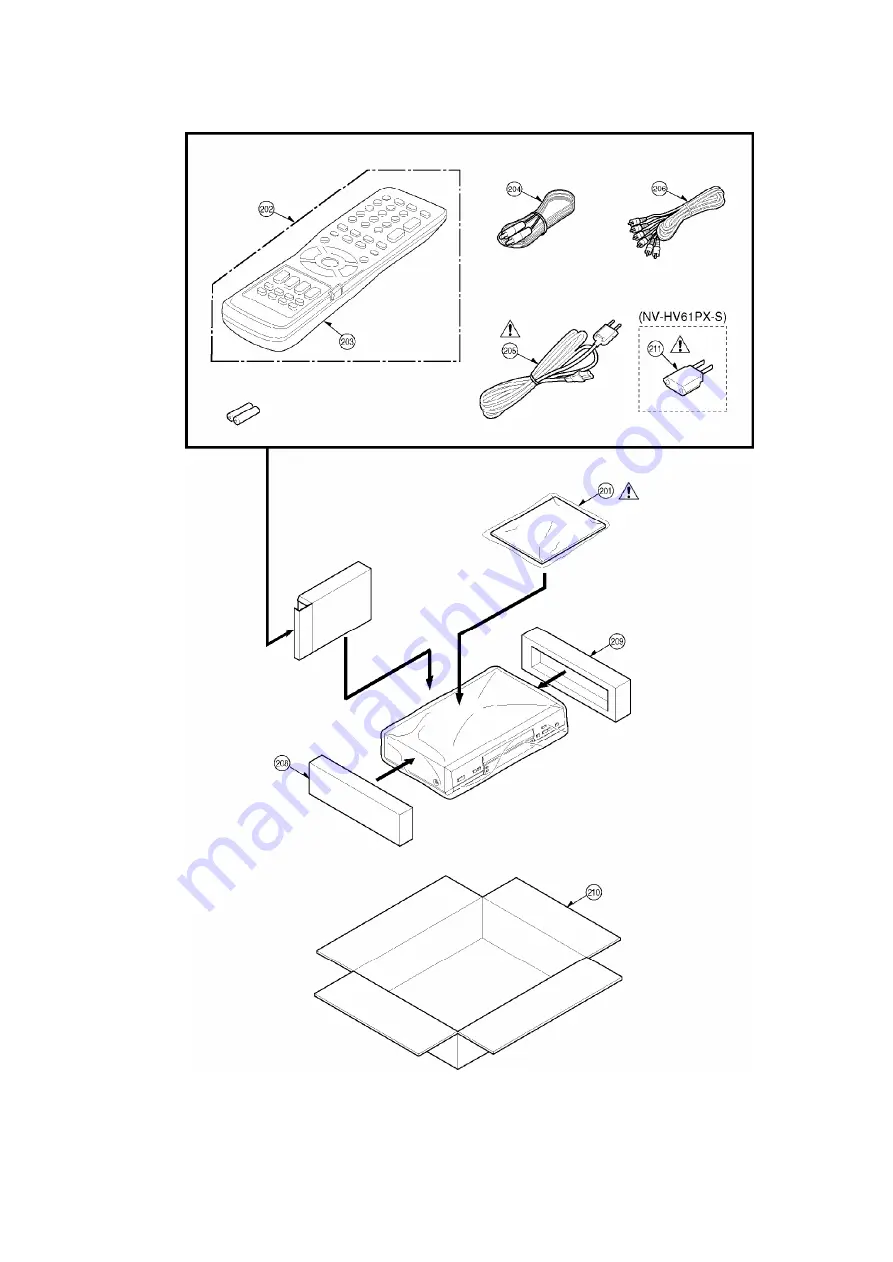
Страница 30: ...10 3 PACKING PARTS SECTION 30 ...

Страница 31: ...11 REPLACEMENT PARTS LIST 31 ...

Страница 32: ...91 CAPSTAN BELT 12 VMB3550 CHANGING GEAR SPRING 14 VMD4252 OPENER PIECE 15 VMD4253 LED PRISM 17 VML3624 MAIN LEVER 18 VML3626 PINCH CHARGE ARM 19 VML3632 IDLER ARM 20 VMX3092 P4 CAP 21 VDB1431 TENSION ARM BOSH 22 VEM0797 LOADING MOTOR UNIT 23 VXA7105 SUPPLY SHAFT HOLDER UNIT 24 VXA7106 TAKE SHAFT HOLDER UNIT 25 L1AE00000036 AC HEAD UNIT 26 VXA7311 SECTOR GEAR UNIT 27 VXL3107 SUPPLY LOADING ARM UNI...

Страница 33: ...W B4 XTN26 7JFJ SCREW B5 XTN26 7JFJ SCREW B6 XTV26 5FFJ SCREW B7 XTV26 5FFJ SCREW B8 XTV26 8FFJ SCREW B9 XTV26 8FFJ SCREW B10 VHD1066 SCREW B11 VHD1066 SCREW B12 VHD1185 SCREW B13 VHD1095 SCREW B14 VHD1117 SCREW B15 VHD1117 SCREW W1 VMX2208 WASHER W2 VMX2699 WASHER W3 VMX3196 WASHER W4 VMX3196 WASHER 11 2 CASING PARTS SECTION PARTS LIST Note All parts except parts mentioned PAVC SPC in the Remarks...

Страница 34: ...15 VKA0364 FOOT 116 VKA0364 FOOT 117 VMX3277 SPACER 118 VWJ050W120BB FLAT CARD CABLE 5P P3301 P4951 119 VWJ1652 FLAT CARD CABLE 6P P4002 AC HEAD 120 VWJ070W200MM FLAT CARD CABLE 7P P2501 CYLINDER B101 XTW3 10TFC TOP PANEL SCREW NV HV61GCU S EE S GH S GHT S GN S PX S B101 XTW3 10TFZ TOP PANEL SCREW NV HV61EE K B102 XTW3 10TFC TOP PANEL SCREW NV HV61GCU S EE S GH S GHT S GN S PX S B102 XTW3 10TFZ TO...

Страница 35: ...13 XTW3 6TR SCREW MAIN B117 VHD1452 1 SCREW L B114 VHD1453 1 SCREW S B116 VHD1453 1 SCREW S B118 XTV26 5FR SCREW 11 3 PACKING PARTS SECTION PARTS LIST Note All parts except parts mentioned PAVC SPC in the Remarks column are supplied from PAVCSG Parts mentioned PAVC SPC are supplied from PAVC SPC 35 ...

Страница 36: ... VPN5970 CUSHION L 209 VPN5971 CUSHION R 210 RPGV0029 PACKING CASE NV HV61GH GHT S 210 RPGV0030 PACKING CASE NV HV61PX S 210 RPGV0032 PACKING CASE NV HV61GN S 210 RPGV0027 PACKING CASE NV HV61EE S 210 RPGV0028 PACKING CASE NV HV61EE K Ref No Part No Part Name Description Remarks 210 RPGV0035 PACKING CASE NV HV61GCU S 211 K2DA42E00001 AC PLUG ADAPTOR NV HV61PX S SERVICE FIXTURES TOOLS VFJ8125H3F VH...

Страница 37: ...ks column shows the models as follows 1 NV HV61EE S EE K 2 NV HV61GCU S 3 NV HV61GH S 4 NV HV61GHT S 5 NV HV61GN S 6 NV HV61PX S Ref No Part No Part Name Description Remarks VEP06F53G MAIN C B A RTL 1 VEP06F53H MAIN C B A RTL 2 VEP06F53J MAIN C B A RTL 3 4 VEP06F53F MAIN C B A RTL 5 VEP06F53K MAIN C B A RTL 6 VEP04857A FRONT C B A RTL 1 2 VEP04857B FRONT C B A RTL 3 4 5 6 37 ...

Страница 38: ...0B ELECTROLYTIC CAPACITOR C1260 F2A1A1020056 E CAP C1261 ECA1AM101B ELECTROLYTIC CAPACITOR C1270 EEUFG1H560B E CAP C1280 EEUFG1A101B E CAP C1341 ECJ1VF1H103Z CHIP CAPACITOR C1351 ECJ1VF1H103Z CHIP CAPACITOR C1352 ECEA1AKA470B ELECTROLYTIC CAPACITOR C1353 ECJ1VF1C104Z CHIP CAPACITOR 1 2 C2001 ECJ1VC1H330J CHIP CAPACITOR C2003 ECJ1VF1A105Z CHIP CAPACITOR C2051 ECEA0JKN220B E CAP C2053 ECEA1CKA100B E...

Страница 39: ...TOR C3017 F1H1C104A065 CHIP CAPACITOR C3019 F1H1C104A065 CHIP CAPACITOR C3020 ECEA1EKA3R3B E CAP C3021 ECEA1CKA100B ELECTROLYTIC CAPACITOR C3022 ECJ1VB1H103K CHIP CAPACITOR C3025 ECJ1VC1H331J CHIP CAPACITOR C3027 ECJ1VB1H103K CHIP CAPACITOR C3029 ECJ1VF1H103Z CHIP CAPACITOR C3030 ECJ1VF1H103Z CHIP CAPACITOR C3031 ECJ1VB1A224K CHIP CAPACITOR C3032 ECEA0JKA470B ELECTROLYTIC CAPACITOR C3033 ECJ1VB0J1...

Страница 40: ...P CAPACITOR C4085 ECJ1VB1E223K CAPACITOR C4502 ECEA1CKA100B ELECTROLYTIC CAPACITOR C4503 ECEA1CKA100B ELECTROLYTIC CAPACITOR C4504 ECEA1CKA100B ELECTROLYTIC CAPACITOR C4505 ECEA0JKA330B E CAP C4506 ECEA1CKA100B ELECTROLYTIC CAPACITOR C4507 ECEA0JKA220B ELECTROLYTIC CAPACITOR C4508 ECJ1VB1C333K CHIP CAPACITOR C4509 ECJ1VF1H103Z CHIP CAPACITOR C4510 ECJ1VF1H103Z CHIP CAPACITOR C4511 F1H1C104A065 CHI...

Страница 41: ...C4537 ECJ2VC1H560G CHIP CAPACITOR 41 ...

Страница 42: ...PACITOR C6014 ECJ1VB1H102K CHIP CAPACITOR C6015 ECJ1VB1C333K CHIP CAPACITOR C6016 ECJ1VB1H102K CHIP CAPACITOR C6017 ECJ1VC1H471J CHIP CAPACITOR 1 2 5 C6017 ECJ1VC1H681J CHIP CAPACITOR 3 4 6 C6020 ECJ1VB1H102K CHIP CAPACITOR C6021 ECJ1VF1H103Z CHIP CAPACITOR C6022 ECJ1VF1H103Z CHIP CAPACITOR C6101 ECJ2VF1H104Z CHIP CAPACITOR C6102 ECJ1VF1H103Z CHIP CAPACITOR C6103 ECJ1VF1H103Z CHIP CAPACITOR C6109 ...

Страница 43: ... CAPACITOR C7603 ECJ1VF1H103Z CHIP CAPACITOR C7605 ECEA0JKA470B ELECTROLYTIC CAPACITOR C7608 ECJ1VF1H103Z CHIP CAPACITOR C7610 ECJ1VB1H102K CHIP CAPACITOR C7616 ECEA0JKA470B ELECTROLYTIC CAPACITOR C7617 ECJ1VF1H103Z CHIP CAPACITOR C7618 ECEA0JKA470B ELECTROLYTIC CAPACITOR C7619 ECJ1VF1H103Z CHIP CAPACITOR C7621 ECJ1VB1H471K CHIP CAPACITOR C7622 ECJ1VB1H471K CHIP CAPACITOR C7623 ECJ1VF1H103Z CHIP C...

Страница 44: ...D2002 B0AAED000003 DIODE 44 ...

Страница 45: ...P IC IC4501 AN3656NFBPBV HI FI IC IC6001 C2CBHF000297 U CON IC 3 4 6 IC6001 C2CBHF000298 U CON IC 1 2 IC6001 C2CBHF000301 U CON IC 5 IC6201 C0EBH0000172 RESET IC IC6301 C0DBCHD00002 REGULATOR IC IC7301 C1AB00001404 DECODER IC 3 4 5 6 IC7501 C0HBB0000023 FIP DRIVE IC IR7501 PNA4618M09VT IR RECEIVER J1 VEE0X50 EARTH WIRE JK3201 K2HA612B0045 I O JACK K3010 ERJ3GEY0R00V CHIP JUMPER K4591 ERJ3GEY0R00V ...

Страница 46: ...E LB1214 J0JKB0000028 BEED CORE LB4073 ERJ6GEY0R00V CHIP JUMPER 3 4 5 6 LB4073 J0JBC0000041 CHIP INDUCTOR 1 2 LB4074 ERJ6GEY0R00V CHIP JUMPER 3 4 5 6 LB4074 J0JBC0000041 CHIP INDUCTOR 1 2 LB4077 ERJ3GEY0R00V CHIP JUMPER 3 4 5 6 LB4077 J0JBC0000070 CHIP COIL 1 2 LB4078 ERJ3GEY0R00V CHIP JUMPER 3 4 5 6 LB4078 J0JBC0000070 CHIP COIL 1 2 LB4079 ERJ6GEY0R00V CHIP JUMPER LB7301 J0JCC0000124 CHIP COIL 3 ...

Страница 47: ...Q1152 2SC3311ASA TRANSISTOR 47 ...

Страница 48: ...NSISTOR QR4081 UNR211100L CHIP TRANSISTOR QR4082 UNR221300L DIGITAL TRANSISTOR QR4501 UNR221500L DIGITAL TRANSISTOR QR4504 UNR211500L CHIP TRANSISTOR QR4505 UNR221500L DIGITAL TRANSISTOR QR4506 UNR221500L DIGITAL TRANSISTOR QR4651 UNR221500L DIGITAL TRANSISTOR R1150 ERDS2TJ105T CARBON RESISTOR R1153 ERG2SJ331E METAL OXIDE RESISTOR R1154 ERDS2TJ105T CARBON RESISTOR R1155 ERDS2TJ104T CARBON RESISTOR...

Страница 49: ...R1502 ERJ3GEYJ273V CHIP RESISTOR 49 ...

Страница 50: ...GEYJ822V CHIP RESISTOR R3003 ERJ3GEYJ152V CHIP RESISTOR R3004 ERJ3GEYJ682V CHIP RESISTOR R3005 ERJ3GEYJ472V CHIP RESISTOR R3011 ERJ3GEYJ332V CHIP RESISTOR R3012 ERJ3GEYJ102V CHIP RESISTOR R3013 ERJ3GEYJ273V CHIP RESISTOR R3018 ERJ3GEYJ153V CHIP RESISTOR R3020 ERJ3GEYJ152V CHIP RESISTOR R3021 ERJ3GEYJ331V CHIP RESISTOR R3022 ERDS2TJ681T CARBON RESISTOR R3023 ERJ3GEYJ271V CHIP RESISTOR R3024 ERJ3GEY...

Страница 51: ...R4512 ERJ3GEYJ392V CHIP RESISTOR R4513 ERJ3GEYJ222V CHIP RESISTOR R4525 ERJ3GEYJ102V CHIP RESISTOR R4527 ERJ3GEYJ681V CHIP RESISTOR R4530 ERJ3GEYJ472V CHIP RESISTOR R4532 ERJ3GEYJ472V CHIP RESISTOR R4534 ERJ3GEYJ124V CHIP RESISTOR R4538 ERJ3GEYJ333V CHIP RESISTOR R4539 ERJ3GEYJ331V CHIP RESISTOR R4540 ERJ3GEYJ331V CHIP RESISTOR R4541 ERJ3GEYJ471V CHIP RESISTOR R4542 ERJ3GEYJ471V CHIP RESISTOR R458...

Страница 52: ...1V CHIP RESISTOR R6406 ERJ3GEYJ101V CHIP RESISTOR R7301 ERJ3GEY0R00V CHIP JUMPER 3 4 5 6 R7304 ERJ3GEYJ101V CHIP RESISTOR 3 4 5 6 R7307 ERJ3GEY0R00V CHIP JUMPER 3 4 5 6 R7309 ERJ3GEYJ103V CHIP RESISTOR 3 4 5 6 R7310 ERJ3GEYJ221V CHIP RESISTOR 3 4 5 6 R7312 ERJ3GEYG221V CHIP RESISTOR 3 4 5 6 R7313 ERJ3GEYG221V CHIP RESISTOR 3 4 5 6 R7314 ERJ3GEY0R00V CHIP JUMPER 3 4 5 6 R7315 ERJ3GEY0R00V CHIP JUMP...

Страница 53: ...WITCH S7510 EVQ11L09B TACK SWITCH S7511 EVQ11L09B TACK SWITCH S7512 EVQ21409K SWITCH S7513 EVQ21409K SWITCH S7515 EVQ21409K SWITCH S7518 EVQ21409K SWITCH S7519 EVQ21409K SWITCH T1150 G4D2A0000113 SW TRANS T4081 EQQ7QF024Q IF TRANSFORMER TU7601 ENG57818G1 TUNER 1 2 TU7601 ENG57820G1 TUNER 5 TU7601 ENG57912G1 TUNER 3 4 6 W502 ERJ6GEY0R00V CHIP JUMPER W503 ERJ3GEY0R00V CHIP JUMPER W504 ERJ6GEY0R00V C...

Страница 54: ...W519 ERJ3GEY0R00V CHIP JUMPER 54 ...

Страница 55: ...8 ERJ3GEY0R00V CHIP JUMPER W549 ERJ3GEY0R00V CHIP JUMPER W550 ERJ3GEY0R00V CHIP JUMPER W551 ERJ3GEY0R00V CHIP JUMPER W552 ERJ3GEY0R00V CHIP JUMPER W553 ERJ3GEY0R00V CHIP JUMPER W554 ERJ6GEY0R00V CHIP JUMPER W555 ERJ6GEY0R00V CHIP JUMPER W556 ERJ3GEY0R00V CHIP JUMPER W557 ERJ3GEY0R00V CHIP JUMPER W559 ERJ3GEY0R00V CHIP JUMPER W560 ERJ3GEY0R00V CHIP JUMPER W561 ERJ3GEY0R00V CHIP JUMPER W562 ERJ3GEY0...

Страница 56: ...1H471J CHIP CAPACITOR 1 2 C4902 ECJ1VC1H471J CHIP CAPACITOR 1 2 JK4951 K2HA307A0003 I O JACK LB4901 J0JBC0000041 CHIP INDUCTOR 1 2 LB4901 ERJ3GEY0R00V CHIP JUMPER 3 4 5 6 LB4902 J0JBC0000041 CHIP INDUCTOR 1 2 LB4902 ERJ3GEY0R00V CHIP JUMPER 3 4 5 6 P4951 K1MN05B00039 CONNECTOR R4901 ERJ3GEY0R00V CHIP JUMPER 3 4 5 6 R4901 ERJ3GEYJ471V CHIP RESISTOR 1 2 R4902 ERJ3GEY0R00V CHIP JUMPER 3 4 5 6 R4902 E...

Страница 57: ...ULATOR MODULATOR FM LPF BPF BPF PNR RCH DET REC AGC OUT ENV DET DC2 REC VCC SWITCH PREAMP GND AGC LCH PNR LPF DEMODULATOR MODULATOR FM SWITCH AGC L GND INPUT SWITCH LCH INPUT SWITCH RCH VREF LCH SWITCH SELECT OUTPUT SWITCH OUTPUT NORMAL DET RCH SWITCH SELECT OUTPUT LCH SWITCH RCH SWITCH 6V22 C4513 16V10 C4514 1K R4525 33K R4538 330 R4540 330 R4539 16V10 C4516 A4 A3 A2 A1 32 31 30 29 28 27 26 25 24...

Страница 58: ...TION P3301 C 22 TO LUMINANCE CHROMINANCE P4951 5 4 3 2 1 FRONT VIDEO GND FRONT AUDIO L GND FRONT AUDIO R P3301 1 P3301 2 P3301 3 P3301 4 P3301 5 AUDIO MAIN SIGNAL PATH IN REC MODE VIDEO MAIN SIGNAL PATH IN REC MODE ORDER A PART PLEASE REFER TO PARTS LIST SCHEMATIC DIAGRAM FOR ORDERING WHEN YOU NOTE DO NOT USE ANY PART NUMBER SHOWN ON THIS C B A 4 3 2 1 NV HV61GN EE GCU GH GHT PX FRONT SCHEMATIC DI...

Страница 59: ...KB0000028 LB1210 3300P C1210 100 R1163 1K R1162 CONTROL VOLTAGE 2SK2876 Q1153 270P C1155 DF80S 6622 D1140 2 3 1 4 4 3 1 2 ELF15N005A L1120 330P C1122 0 068 C1121 1 2 4 3 ELF15N005A L1121 ERZVA5Z471 D1110 VSF0243C16 F1101 GND R R UNREG 38V S UNREG 6V R S HEATER T 400V68 C1143 TO TIMER SECTION T TO SYSTEM CONTROL SERVO SECTION S HEATER T UNREG 16V R SECONDARY SIDE PRIMARY SIDE CIRCUIT SET THE GND TE...

Страница 60: ...7617 0 01 C7619 6V47 C7618 10µ L7610 0 01 C7623 2SC1959Y Q1351 5V REG MA4056NH D1351 10V47 C1352 0 01 C1351 470 R1351 2SC1959Y Q1354 5V REG 5V REG 2SC1959Y Q1352 A10 A9 A8 A7 A6 A5 A4 A3 A2 A1 RFC AUDIO OUT RFC VIDEO OUT IIC CLOCK IIC DATA SW2 SW1 TUNER AUDIO N SIF AFC S CURVE TUNER VIDEO A V S S S S A D S V V A S AUDIO 5V D TUNER 5V V VIDEO 5V V REG 5V S N SW 5V A S T BACK UP 5V S SYSTEM CTL 5V A...

Страница 61: ...13 B12 B26 B25 B28 B29 B28 B27 B25 A12 A18 A9 A8 A25 A6 A24 A5 A4 A23 A22 A21 A20 A19 A18 A16 A15 A AMP 2SB709A Q7701 100 R7706 1K R7707 B C D E 1M R6013 1 C6013 560 R6012 0 01 C6011 R6102 2200 C6020 1000P TW2001 B3EA00000072 D1501 SENSOR PNA2604M01 Q1501 T PHOTO S PHOTO PNA2604M01 Q1502 27K R1502 150 R1503 27K R1501 12K E 10K B D R6021 10K R6018 B C D E 10µ L7702 100P C7714 R3026 3300 R3025 3300 ...

Страница 62: ...C PFG PG OUT PG PG EC VM2 OUT1 L GND OUT2 F IN R IN VG GND CST CT1 CT2 PCI CNF C1AB00001479 IC2501 TO LOADING MOTOR P1531 TO CAPSTAN UNIT P2571 TO CYLINDER UNIT P2501 7 6 5 4 3 2 1 8 7 6 5 4 3 2 1 2 1 PG PG GND COM M3 M2 M1 GND MOTOR CAP R F CAP ET CURR LIMIT GND FG CAP FG1 UNREG 16V 5V LOAD MOTOR LOAD MOTOR UNREG 16V CYLINDER VG VIDEO 5V 25V220 C2571 A24 A25 27 25 24 23 22 21 20 19 18 17 16 15 14...

Страница 63: ... 12K EVQ11G09K S7519 PLAY PROG GND R SYSTEM CTL 5V R 5100 R7523 3600 R7503 EVQ11G09K S7501 CHECK TIMER 100 R7526 TO SYSTEM CONTROL SERVO SECTION S NOTE THE MEASUREMENT MODE OF THE DC VOLTAGE ON THIS DIAGRAM IS STOP MODE ORDERING WHEN YOU ORDER A PART PLEASE REFER TO PARTS LIST NOTE DO NOT USE ANY PART NUMBER SHOWN ON THIS SCHEMATIC DIAGRAM FOR TO POWER SUPPLY RF SECTION R TO POWER TRANSFORMER SECT...

Страница 64: ...4 2SD601A Q4083 2SD1149 Q4082 UN2111 QR4081 VIDEO 5V R TUNER 5V R PAL 9H ON UN2211 QR4061 2200P C4066 BIAS S A AUDIO HEAD COM AUDIO HEAD R AUDIO OUT N AUDIO IN N A A D D A REC S PAL 9H S B1 B7 B8 B9 5 2 1 4 3 6 7 8 TO CYLINDER UNIT P5001 LP EP COM LP EP R LP EP L AUDIO HEAD L 9 SP L SP COM SP R AUDIO HEAD COM AUDIO HEAD R B2 B4 B5 B6 B3 TUNER AUDIO N A AUDIO HEAD L A R GND P UNREG 6V 2 1 FULL ERAS...

Страница 65: ... VIDEO AGC PC ET LPF EMPH N L DEH HP NC TRAP NC Y LPF SSEQ DELAY SECAM EQ SQPB DE EMPH N L DET AGC PG YNR VIDEO ALC CLAMP FEED BACK R DET DO LPF SUB DEMO DLIM G EQ S DET DET AGC FM P EQ DELAY SQUELCH C PB AGC APL REC FBC ALC DE EMPHASIS MAIN FILTER REC FM MOD FO DEVADJ W C D C CARRIER OFFSET MAIN EMPHASIS PG SEP SYNC GCL GCL LPF GCL CCD SECTION C CCD Y CCD DRIVER CLOCK SW APC LPF L SECAM L SECAM H...

Страница 66: ...P4951 JK4951 1 5 6 7 5 4 1 2 3 NV HV61GN EE GCU GH GHT PX FRONT C B A VEP04857A NV HV61GN GH GHT PX VEP04857B NV HV61EE GCU 1 A B 2 3 P4951 B 2 FRONT C B A Connector ADDRESS INFORMATION B C ...

Страница 67: ...12 TL7501 TL7502 Q6307 TL7303 TL7302 TL7301 IC7301 TL4501 TL4552 TL4551 Q1351 P4001 IC4501 TU7601 TW4002 QR4651 QR4505 QR4506 TW4502 QR4504 TW2002 QR4501 TW4501 Q1354 Q1352 Q1502 P3301 TW3001 TW2001 2 7 18 10 NC P1 PT P2 NC V1 NC NC NC S5 S2 S1A S1B S3 S4 1 5 1 2 3 4 41 43 29 30 27 21 19 15 13 10 8 3 1 3 1 1 2 3 4 1 2 1 5 19 25 8 18 1 7 1 2 1 2 8 9 1 6 1 6 4 3 1 8 5 4 1 1 7 2 1 2 4 3 8 6 7 5 VEP06...

Страница 68: ...4084 C 2 Q6305 A 4 Q6306 A 3 Q6307 A 7 Q7701 C 5 QR1342 B 3 QR3001 C 6 QR4061 F 6 QR4081 E 6 QR4082 C 3 QR4501 D 8 QR4504 E 8 QR4505 E 8 QR4506 E 8 QR4651 E 8 IC1200 B 2 IC1511 B 4 IC1512 B 7 IC2501 E 3 IC2502 E 3 IC3001 E 6 IC4501 E 7 IC6001 C 4 IC6201 D 4 IC6301 D 3 IC7301 B 8 IC7501 A 6 TL1002 A 3 TL1003 C 3 TL1006 B 2 TL1008 B 1 TL1009 A 1 TL1015 A 1 TL1029 B 1 TL1038 B 2 TL2015 D 4 TL2502 D 4...

Страница 69: ...erting timing Hi Z M output Except above conditions Low 2 NAVI REC Hi Z 3 OSD REC Hi Z 4 Other than above conditions Low Low Low Low 14 REMOCON I Input terminal for the Remote Controller In In In 15 PICT1 O Control terminal for the Picture mode Low Low Low 16 NC O Low fix Low Low Low 17 PICT2 O Control terminal for the Picture mode Low Low Low 18 VIDEO H SW O Video head switching signal L R High R...

Страница 70: ...7 STAB L I SAFETY TAB DETECTION With SAFETY TAB Low Without SAFETY TAB High In In In 28 FM_MUTE O Audio mute control terminal High output AUDIO MUTE The voltage is shifted to Hi Z for reucing the current at 3 second after the power has been turned on Hi Z In In 29 SW1 O AUDIO SYSTEM TUNER PRESET BG I High output AUDIO SYSTEM TUNER PRESET DK M Low output Low Low Low 30 POS SW4 I In In In 31 POS SW3...

Страница 71: ...High is put in Different In In In 52 CVOUT O Output terminal for the composite video signal Out Out Out 53 5V OSD Power supply terminal for OSD 54 HLF I LPF connection terminal for slicer In In In 55 VHOLD I Capacitor connection terminal of the Reference voltage generator circuit for the slicer In In In 56 CVIN EDS I Composite video signal input terminal for the slicer In In In 57 GND Connect to t...

Страница 72: ...gh FWD Low Low Low Low 75 NC O Low fix Low Low Low 76 CAP ET O Power supply terminal for the capstan motor control Conpared with the driver reference voltage when it is low current will be cut Also when it is high the rotation speed will be accelerated High PWM 0V Low High PWM 0V 77 CYL ET O Power supply terminal of the cylinder motor control Conpared with the driver reference voltage when it is h...

Страница 73: ... 90 CYL PFG I Input terminal for the Cylinder PG FG In In In 91 OREF O 1 2 VDD reference voltage output terminal for the Analogue AMP Out Out Out 92 IREF I 1 2 VDD reference voltage input terminal for the Analogue AMP In In In 93 GND I GND In In In 94 CTL HEAD I O I O terminal for the Control head In Out In Out In Out 95 CTL HEAD I O I O terminal for the Control head In Out In Out In Out 96 CTL AM...

Страница 74: ... 4 6 4 6 0 0 1 7 2 2 0 0 1 7 0 0 1 7 5 1 2 1 1 8 2 0 0 0 0 0 0 0 0 0 PLAY 0 0 0 0 0 0 4 6 4 6 0 0 1 7 2 2 0 0 1 7 0 0 1 7 5 2 2 1 1 8 2 0 0 0 0 0 0 0 0 0 REC 4 9 0 0 0 0 4 6 4 6 0 0 1 7 2 2 0 0 1 7 0 0 1 7 5 1 2 1 1 8 2 0 0 0 0 0 0 0 0 0 F F 0 0 0 0 0 0 4 6 4 6 0 0 1 7 2 2 0 0 1 7 0 0 1 7 5 2 2 1 1 8 2 0 0 0 0 0 0 0 0 0 REW 0 0 0 0 0 0 4 6 4 6 0 0 1 7 2 2 0 0 1 7 0 0 1 7 5 2 2 1 1 8 2 0 0 0 0 0 0 ...

Страница 75: ...UDIO OUTPUT R AUDIO SELECT H AUDIO L AUDIO R AV CONTROL AV CONTROL AV CONTROL SERIAL CLOCK AV CONTROL MODE AV CONTROL LEVEL METER R AV SW LEVEL METER L B MODE H BURST GATE PULSE BACK UP 5V BAND U BAND VL BILINGUAL MIX L BIL BIL L BIL H BIL M1 L BS CLOCK BS DATA BS LCH IN BS MIX H BS MON H BS MONI H BS RCH IN BS VIDEO BS VIDEO BS1 BS H BS LEVEL BS M H BS VTR H BUS CLK BUS LSN BUS TLK BUZZER CAP EC ...

Страница 76: ...H FM AUDIO MUTE H FM OUTPUT L FM OUTPUT R FM PACK OUTPUT L FM PACK OUTPUT R FM BS SELECT L FM BS SELECT R FS CLOCK FULL ERASE HEAD ON H FULL ERASE HEAD ON H FULL E 12V GND A GND TU GND N SW 12V H SYNC H AMP SW H P R H P L H P GND H P OUT L H P OUT R H SW HEAD PHONE L HEAD PHONE R HEAD SW HEATER HEATER HSS HTR HTR I RFE ICL IF IN SELA1 IN SELA2 IN SELA3 INS L R L INS H INSEL A1 INSEL A2 INSERT INSE...

Страница 77: ...PE PLAY H NORMAL H NR BIAS NTSC L CONTROL AGC CIRCUIT OUTPUT P OFF H P OFF L P FAIL P OFF H P OFF L PAL H PAL L NTSC H PB ADJ OUT PB OUT PB H PFG PHOTSN B PICT CNT PLAY LED RVS LED PLAY PO PLAY R LED PLY DEW POWER OFF L PREROLL H PWRFAIL R CH H R CH L R ST R S F RCH H REC 12V REC CHROMA REC H REC IN REC OUT L REC START REC VR C REC VR L REC VR R REC Y REC H REC C REC Y REC EE CTL REEL T REEL S REG...

Страница 78: ... POSITION PAL STOP 2 POSITION STOP 2 POSITION SAFETY TAB SW STEREO H SUB BIAS SUB SW S VHS CASSETTE L SW 5V DETECT SYNC L SYSCON 5V SYSTEM T PHOTO T RL PLS T BUSCLK T BUSLSN T BUSTLK T END L T PHOTO TAPE END L TAPE END L CAM TEST TPZ TRIC L TRICK L TRK ENV TU AUDIO TU GND TU V IN TU VIDEO TUN NOR IN TUN R TUN AUDIO IN TUNER 12V TUNER L TUNER V IN TUNER L TUNER N TUNER R TUNER 12 TUOFF H TV AUDIO T...

Страница 79: ...CTRICAL SHOCK IF THE CUT OFF PLUG IS INSERTED INTO ANY 13 AMP SOCKET If a new plug is to be fitted please observe the wiring code as shown below If in any doubt please consult a qualified electrician IMPORTANT The wires in this mains lead are coloured in accordance with the following code Blue Neutral Brown Live As the colours of the wires in the mains lead of this appliance may not correspond wit...

Страница 80: ...153 0 022 C1154 1M R1154 1M R1150 J0JKB0000028 LB1210 3300P C1210 100 R1163 1K R1162 CONTROL VOLTAGE 2SK2876 Q1153 270P C1155 DF80S 6622 D1140 2 3 1 4 4 3 1 2 ELF15N005A L1120 330P C1122 0 068 C1121 1 2 4 3 ELF15N005A L1121 ERZVA5Z471 D1110 VSF0243C16 F1101 GND R R UNREG 38V S UNREG 6V R S HEATER T 400V68 C1143 TO TIMER SECTION T TO SYSTEM CONTROL SERVO SECTION S HEATER T UNREG 16V R SECONDARY SID...

Страница 81: ...153 0 022 C1154 1M R1154 1M R1150 J0JKB0000028 LB1210 3300P C1210 100 R1163 1K R1162 CONTROL VOLTAGE 2SK2876 Q1153 270P C1155 DF80S 6622 D1140 2 3 1 4 4 3 1 2 ELF15N005A L1120 330P C1122 0 068 C1121 1 2 4 3 ELF15N005A L1121 ERZVA5Z471 D1110 VSF0243C16 F1101 GND R R UNREG 38V S UNREG 6V R S HEATER T 400V68 C1143 TO TIMER SECTION T TO SYSTEM CONTROL SERVO SECTION S HEATER T UNREG 16V R SECONDARY SID...

Страница 82: ...47 C7616 10µ L7605 0 01 C7617 0 01 C7619 6V47 C7618 10µ L7610 0 01 C7623 2SC1959Y Q1351 5V REG MA4056NH D1351 10V47 C1352 0 01 C1351 470 R1351 2SC1959Y Q1354 5V REG 5V REG 2SC1959Y Q1352 A10 A9 A8 A7 A6 A5 A4 A3 A2 A1 RFC AUDIO OUT RFC VIDEO OUT IIC CLOCK IIC DATA SW2 SW1 TUNER AUDIO N SIF AFC S CURVE TUNER VIDEO A V S S S S A D S V V A S AUDIO 5V D TUNER 5V V VIDEO 5V V REG 5V S N SW 5V A S T BAC...

Страница 83: ...47 C7616 10µ L7605 0 01 C7617 0 01 C7619 6V47 C7618 10µ L7610 0 01 C7623 2SC1959Y Q1351 5V REG MA4056NH D1351 10V47 C1352 0 01 C1351 470 R1351 2SC1959Y Q1354 5V REG 5V REG 2SC1959Y Q1352 A10 A9 A8 A7 A6 A5 A4 A3 A2 A1 RFC AUDIO OUT RFC VIDEO OUT IIC CLOCK IIC DATA SW2 SW1 TUNER AUDIO N SIF AFC S CURVE TUNER VIDEO A V S S S S A D S V V A S AUDIO 5V D TUNER 5V V VIDEO 5V V REG 5V S N SW 5V A S T BAC...

Страница 84: ...R7520 R7505 12K R7506 12K EVQ11G09K S7519 PLAY PROG GND R SYSTEM CTL 5V R 5100 R7523 3600 R7503 EVQ11G09K S7501 CHECK TIMER 100 R7526 TO SYSTEM CONTROL SERVO SECTION S NOTE THE MEASUREMENT MODE OF THE DC VOLTAGE ON THIS DIAGRAM IS STOP MODE ORDERING WHEN YOU ORDER A PART PLEASE REFER TO PARTS LIST NOTE DO NOT USE ANY PART NUMBER SHOWN ON THIS SCHEMATIC DIAGRAM FOR TO POWER SUPPLY RF SECTION R TO P...

Страница 85: ...R7520 R7505 12K R7506 12K EVQ11G09K S7519 PLAY PROG GND R SYSTEM CTL 5V R 5100 R7523 3600 R7503 EVQ11G09K S7501 CHECK TIMER 100 R7526 TO SYSTEM CONTROL SERVO SECTION S NOTE THE MEASUREMENT MODE OF THE DC VOLTAGE ON THIS DIAGRAM IS STOP MODE ORDERING WHEN YOU ORDER A PART PLEASE REFER TO PARTS LIST NOTE DO NOT USE ANY PART NUMBER SHOWN ON THIS SCHEMATIC DIAGRAM FOR TO POWER SUPPLY RF SECTION R TO P...

Страница 86: ...B4 B22 B21 B19 B18 B17 B14 B13 B12 B26 B25 B28 B29 B28 B27 B25 A12 A18 A9 A8 A25 A6 A24 A5 A4 A23 A22 A21 A20 A19 A18 A16 A15 A AMP 2SB709A Q7701 100 R7706 1K R7707 B C D E 1M R6013 1 C6013 560 R6012 0 01 C6011 R6102 2200 C6020 1000P TW2001 B3EA00000072 D1501 SENSOR PNA2604M01 Q1501 T PHOTO S PHOTO PNA2604M01 Q1502 27K R1502 150 R1503 27K R1501 12K E 10K B D R6021 10K R6018 B C D E 10µ L7702 100P ...

Страница 87: ...B4 B22 B21 B19 B18 B17 B14 B13 B12 B26 B25 B28 B29 B28 B27 B25 A12 A18 A9 A8 A25 A6 A24 A5 A4 A23 A22 A21 A20 A19 A18 A16 A15 A AMP 2SB709A Q7701 100 R7706 1K R7707 B C D E 1M R6013 1 C6013 560 R6012 0 01 C6011 R6102 2200 C6020 1000P TW2001 B3EA00000072 D1501 SENSOR PNA2604M01 Q1501 T PHOTO S PHOTO PNA2604M01 Q1502 27K R1502 150 R1503 27K R1501 12K E 10K B D R6021 10K R6018 B C D E 10µ L7702 100P ...

Страница 88: ...PFG PG OUT PG PG EC VM2 OUT1 L GND OUT2 F IN R IN VG GND CST CT1 CT2 PCI CNF C1AB00001479 IC2501 TO LOADING MOTOR P1531 TO CAPSTAN UNIT P2571 TO CYLINDER UNIT P2501 7 6 5 4 3 2 1 8 7 6 5 4 3 2 1 2 1 PG PG GND COM M3 M2 M1 GND MOTOR CAP R F CAP ET CURR LIMIT GND FG CAP FG1 UNREG 16V 5V LOAD MOTOR LOAD MOTOR UNREG 16V CYLINDER VG VIDEO 5V 25V220 C2571 A24 A25 27 25 24 23 22 21 20 19 18 17 16 15 14 2...

Страница 89: ...PFG PG OUT PG PG EC VM2 OUT1 L GND OUT2 F IN R IN VG GND CST CT1 CT2 PCI CNF C1AB00001479 IC2501 TO LOADING MOTOR P1531 TO CAPSTAN UNIT P2571 TO CYLINDER UNIT P2501 7 6 5 4 3 2 1 8 7 6 5 4 3 2 1 2 1 PG PG GND COM M3 M2 M1 GND MOTOR CAP R F CAP ET CURR LIMIT GND FG CAP FG1 UNREG 16V 5V LOAD MOTOR LOAD MOTOR UNREG 16V CYLINDER VG VIDEO 5V 25V220 C2571 A24 A25 27 25 24 23 22 21 20 19 18 17 16 15 14 2...

Страница 90: ...ON D A REC OFF 1K R4085 1K R4084 2SD601A Q4083 2SD1149 Q4082 UN2111 QR4081 VIDEO 5V R TUNER 5V R PAL 9H ON UN2211 QR4061 2200P C4066 BIAS S A AUDIO HEAD COM AUDIO HEAD R AUDIO OUT N AUDIO IN N A A D D A REC S PAL 9H S B1 B7 B8 B9 5 2 1 4 3 6 7 8 TO CYLINDER UNIT P5001 LP EP COM LP EP R LP EP L AUDIO HEAD L 9 SP L SP COM SP R AUDIO HEAD COM AUDIO HEAD R B2 B4 B5 B6 B3 TUNER AUDIO N A AUDIO HEAD L A...

Страница 91: ...ON D A REC OFF 1K R4085 1K R4084 2SD601A Q4083 2SD1149 Q4082 UN2111 QR4081 VIDEO 5V R TUNER 5V R PAL 9H ON UN2211 QR4061 2200P C4066 BIAS S A AUDIO HEAD COM AUDIO HEAD R AUDIO OUT N AUDIO IN N A A D D A REC S PAL 9H S B1 B7 B8 B9 5 2 1 4 3 6 7 8 TO CYLINDER UNIT P5001 LP EP COM LP EP R LP EP L AUDIO HEAD L 9 SP L SP COM SP R AUDIO HEAD COM AUDIO HEAD R B2 B4 B5 B6 B3 TUNER AUDIO N A AUDIO HEAD L A...

Страница 92: ...IDEO AGC PC ET LPF EMPH N L DEH HP NC TRAP NC Y LPF SSEQ DELAY SECAM EQ SQPB DE EMPH N L DET AGC PG YNR VIDEO ALC CLAMP FEED BACK R DET DO LPF SUB DEMO DLIM G EQ S DET DET AGC FM P EQ DELAY SQUELCH C PB AGC APL REC FBC ALC DE EMPHASIS MAIN FILTER REC FM MOD FO DEVADJ W C D C CARRIER OFFSET MAIN EMPHASIS PG SEP SYNC GCL GCL LPF GCL CCD SECTION C CCD Y CCD DRIVER CLOCK SW APC LPF L SECAM L SECAM HPF...

Страница 93: ...IDEO AGC PC ET LPF EMPH N L DEH HP NC TRAP NC Y LPF SSEQ DELAY SECAM EQ SQPB DE EMPH N L DET AGC PG YNR VIDEO ALC CLAMP FEED BACK R DET DO LPF SUB DEMO DLIM G EQ S DET DET AGC FM P EQ DELAY SQUELCH C PB AGC APL REC FBC ALC DE EMPHASIS MAIN FILTER REC FM MOD FO DEVADJ W C D C CARRIER OFFSET MAIN EMPHASIS PG SEP SYNC GCL GCL LPF GCL CCD SECTION C CCD Y CCD DRIVER CLOCK SW APC LPF L SECAM L SECAM HPF...

Страница 94: ...OL MUTE SWITCH AGC DEMODULATOR MODULATOR FM LPF BPF BPF PNR RCH DET REC AGC OUT ENV DET DC2 REC VCC SWITCH PREAMP GND AGC LCH PNR LPF DEMODULATOR MODULATOR FM SWITCH AGC L GND INPUT SWITCH LCH INPUT SWITCH RCH VREF LCH SWITCH SELECT OUTPUT SWITCH OUTPUT NORMAL DET RCH SWITCH SELECT OUTPUT LCH SWITCH RCH SWITCH 6V22 C4513 16V10 C4514 1K R4525 33K R4538 330 R4540 330 R4539 16V10 C4516 A4 A3 A2 A1 32...

Страница 95: ...OL MUTE SWITCH AGC DEMODULATOR MODULATOR FM LPF BPF BPF PNR RCH DET REC AGC OUT ENV DET DC2 REC VCC SWITCH PREAMP GND AGC LCH PNR LPF DEMODULATOR MODULATOR FM SWITCH AGC L GND INPUT SWITCH LCH INPUT SWITCH RCH VREF LCH SWITCH SELECT OUTPUT SWITCH OUTPUT NORMAL DET RCH SWITCH SELECT OUTPUT LCH SWITCH RCH SWITCH 6V22 C4513 16V10 C4514 1K R4525 33K R4538 330 R4540 330 R4539 16V10 C4516 A4 A3 A2 A1 32...

Страница 96: ...SSA1 VSSD1 VDDD1 VSSD2 VDEC2 TP2 NICAM TP1 SCK WS SDO SDA SCL VDDA3 VSSA3 CRESET SIF1 VREF1 SIF2 VSSA4 OUT M P2 VREF2 EXTIL EXTIR MONO IN P1 VSSD3 VDDD3 SYS CLK BUFFERS OUTPUT CHANNEL MONO BUFFERS OUTPUT 2 CHANNEL SWITCH ANALOG CROSSBAR 3 DACS POST FILTER INTERFACE IIC BUS ADJUST LEVEL DECODER NICAM DEMODULATION NICAM INTERFACE IIC BUS SELECTOR DIGITAL DECODER SATELLITE ANALOG 2 CHANNEL DEMATRIX C...

Страница 97: ...SSA1 VSSD1 VDDD1 VSSD2 VDEC2 TP2 NICAM TP1 SCK WS SDO SDA SCL VDDA3 VSSA3 CRESET SIF1 VREF1 SIF2 VSSA4 OUT M P2 VREF2 EXTIL EXTIR MONO IN P1 VSSD3 VDDD3 SYS CLK BUFFERS OUTPUT CHANNEL MONO BUFFERS OUTPUT 2 CHANNEL SWITCH ANALOG CROSSBAR 3 DACS POST FILTER INTERFACE IIC BUS ADJUST LEVEL DECODER NICAM DEMODULATION NICAM INTERFACE IIC BUS SELECTOR DIGITAL DECODER SATELLITE ANALOG 2 CHANNEL DEMATRIX C...

Страница 98: ...TO LUMINANCE CHROMINANCE P4951 5 4 3 2 1 FRONT VIDEO GND FRONT AUDIO L GND FRONT AUDIO R P3301 1 P3301 2 P3301 3 P3301 4 P3301 5 AUDIO MAIN SIGNAL PATH IN REC MODE VIDEO MAIN SIGNAL PATH IN REC MODE ORDER A PART PLEASE REFER TO PARTS LIST SCHEMATIC DIAGRAM FOR ORDERING WHEN YOU NOTE DO NOT USE ANY PART NUMBER SHOWN ON THIS C B A 4 3 2 1 NV HV61GN EE GCU GH GHT PX FRONT SCHEMATIC DIAGRAM 8 8 FRONT ...

Страница 99: ...TO LUMINANCE CHROMINANCE P4951 5 4 3 2 1 FRONT VIDEO GND FRONT AUDIO L GND FRONT AUDIO R P3301 1 P3301 2 P3301 3 P3301 4 P3301 5 AUDIO MAIN SIGNAL PATH IN REC MODE VIDEO MAIN SIGNAL PATH IN REC MODE ORDER A PART PLEASE REFER TO PARTS LIST SCHEMATIC DIAGRAM FOR ORDERING WHEN YOU NOTE DO NOT USE ANY PART NUMBER SHOWN ON THIS C B A 4 3 2 1 NV HV61GN EE GCU GH GHT PX FRONT SCHEMATIC DIAGRAM 8 8 FRONT ...

Страница 100: ... 80 FF REW 5 0Vp p 1msec div IC6001 90 REC 5 0Vp p 10msec div IC6001 94 95 REC 6 8Vp p 10msec div IC6001 97 PLAY 0 8Vp p 10msec div IC4501 22 24 PLAY 1 4Vp p 20usec div IC4501 21 REC 1 4Vp p 20usec div IC4501 53 57 REC PLAY 1 8Vp p 0 5msec div IC3001 98 REC 1 6Vp p 0 5msec div IC3001 96 PLAY 5 0Vp p 5msec div IC3001 86 REC 1 8Vp p 5msec div IC3001 85 PLAY 1 8Vp p 20µsec div IC3001 87 PLAY 150mVp p...

Страница 101: ...REAMP AGC LPF SWITCH AGC DEMODULATOR FM MODULATOR SWITCH SELECT NORMAL PNR LCH PNR RCH LCH SWITCH SELECT OUTPUT RCH SWITCH SELECT OUTPUT LCH SWITCH SELECT INPUT RCH SWITCH SELECT INPUT TL4505 9 TL4506 HEAD AUDIO Hi Fi R L 9 8 7 P5001 P5001 P5001 22 21 24 CONTROL SYSTEM FROM D FM REC MAIN SIGNAL PATH IN PLAYBACK MODE MAIN SIGNAL PATH IN REC MODE IC3001 IC4501 CONTROL SYSTEM TO FROM IIC DATA IIC CLO...

Страница 102: ... UNREG 30V 38V SW QR1342 UNREG 38V TL1038 11 TO TIMER HEATER HEATER UNREG 29V CONTROL TO SYSTEM Hi Fi AUDIO SYSTEM CONTROL TO TIMER BACK UP 5V SYSTEM CTL 5V TW1004 TL1003 5V REG Q6306 UNREG 6V TL1006 12 TW1343 CAPSTAN IC2501 TO SERVO UNREG 16V Hi Fi AUDIO CHROMINANCE TO LUMINANCE IC2501 TO SERVO AV 12V REG 12V TL1002 SW REG 12V 3 2 1 IC2502 Q1341 12V REG UNREG 16V TLGND1 TL1015 13 UNREG 29V HEATER...

Страница 103: ... 5 4 3 2 1 30 POSITION SW4 POSITION SW3 31 32 POSITION SW2 POSITION SW1 33 PB CTL OUT EX FF REW TW2002 97 82 6 5 P4002 P4002 HEAD CONTROL 95 94 TL6001 125Hz 73 COMPOSER FG PG AMPLIFIRE DIFFERENTIAL 17 16 15 CYL PFG 90 18 CYL ET CTL AMP REF 96 O REF 91 UNLOADING LOADING CAP FG IN CAP FG OUT 77 14 AMPLIFIRE DIFFERENTIAL COM M3 M2 M1 20 AMPLIFIRE DIFFERENTIAL SELECTOR GENERATOR SIGNAL DRIVE MOTOR PRE...

Страница 104: ...SSEQ SECAM DELAY Y LPF R P GCL NOT USED IN THESE MODELS SIGNAL INPUT LINE EXTERNAL PB LUMINANCE TO C CCD SQPB SQPB EXT INT P R TRAP 629MHz AGC FM DET S VHS P EQ DL SQPB DRIVER C CLOCK 2FSC OSCILLATOR VCO X TAL G EQ DLIM DEMO LPF SUB W C D C CARRIER OFFSET MAIN EMPHASIS DE EMPHASIS MAIN ET LPF PB AGC APL REC FBC ALC ADJUSTMENT fo DEVIATION MODULATION FM FILTER REC ACC DET CHROMA ACC DET ACC SW REC ...

Страница 105: ... NICAM TP1 SCK WS SDO SDA SCL VDDA3 VSSA3 CRESET SIF1 VREF1 SIF2 VSSA4 OUT M P2 VREF2 EXTIL EXTIR MONO IN P1 VSSD3 VDDD3 SYS CLK BUFFERS OUTPUT CHANNEL MONO BUFFERS OUTPUT 2 CHANNEL SWITCH ANALOG CROSSBAR 3 DACS POST FILTER INTERFACE IIC BUS ADJUST LEVEL DECODER NICAM DEMODULATION NICAM INTERFACE IIC BUS SELECTOR DIGITAL DECODER SATELLITE ANALOG 2 CHANNEL DEMATRIX CATION IDENTIFI DEMODULATION FM A...

Страница 106: ...HASSIS SPECIFICATIONS INRTODUCTION The R4 Mechanism chassis are built in several Panasonic VHS Video Cassette Recorders from year 2002 2002 Matsushita Electric Industrial Co Ltd All rights reserved Unauthorized copying and distribution is a violation of law 1 1 ...

Страница 107: ...READJUSTMENT 25 5 2 TAPE INTERCHANGEABILITY ADJUSTMENT 25 Servicing Fixture and Tools 30 6 SERVICE INFORMATION DISPLAY 31 7 SELF DIAGNOSIS INDICATION DISPLAY 33 7 1 TABLE OF DETECTING CONDITION AND MOVEMENT OF MECHANISM IN DETECTION OF THE SELF DIAGNOSIS FUNCTION 35 7 2 MEMORY OF THE SELF DIAGNOSIS HISTORY AND THE SUPPLEMENTARY DATA 39 7 3 CHANGE OF MEMORY TIMINGFOR ERROR NO F03 AND F04 41 7 4 ANA...

Страница 108: ...nder Corresponding heads 2 6ch Weight 100 Corresponding heads 2 10ch Weight 76 FF REW speed 360 times 600 400 times Area size of mechanism 100 97 Capstan drive IC Cylinder drive IC Loading motor drive IC Standard All new ICs Capstan Unit Whole wave Half wave Drive PWM Drive Cylinder Unit New GLDD or UDD RDD Tape transport path Standard same as Z mechanism Phase adjustment place 7 places 5 places S...

Страница 109: ...4 1 3 PARTS NAME OF R4 MECHANISM Fig M2 ...

Страница 110: ...NIT 26 SECTOR GEAR UNIT 27 SUPPLY LOADING ARM UNIT 28 TAKE UP LOADING ARM UNIT 29 PINCH ARM UNIT 30 P5 ARM UNIT 31 TENSION ARM UNIT 32 TENSION SPRING 33 SUPPLY BRAKE ARM UNIT 34 TAKE UP BRAKE ARM UNIT 35 TAKE UP BRAKE SPRING 36 CHANGE LEVER UNIT 37 CLEANER ARM UNIT 39 CENTRE CLUTCH UNIT 40 TORQUE CLUTCH UNIT 41 FLAT CABLE HOLDER 50 TOP PLATE 51 SIDE PLATE L 52 SIDE PLATE UNIT 53 OPENER LEVER 54 CA...

Страница 111: ... replacement of the DD Cylinder FEATURE 1 The RDD corresponds to 2 10 Heads 2 Thickness of Upper Cylinder and Lower Cylinder becomes thin 3 Adoption of standard parts in the VTR world 4 Miniaturization of the Rotary Transformer Rotary Transformer of UDD Rotary Transformer of RDD Inner Diameter φ18 5 φ8 3 Outer Diameter φ47 6 φ32 3 Thinness t 2 70 t 1 85 Total Parts Pieces of the Motor 62 56 Rotary...

Страница 112: ... l ERROR The F20 F21 F22 or F23 is displayed Refer to next PG Shifter Adjustment Self Diagnosis Indication Table regarding the details of the indications Exit from Service Mode 6 Press FF and EJECT keys simultaneously in 6 times Then the FIP becomes normal indication Normal Indication PG SHIFTER AUTOMATIC ADJUSTMENT SELF DIAGNOSIS INDICATION F20 NG1 in the PG Shifter Automatic Adjustment The cylin...

Страница 113: ...W3001 Fig M4 3 Perform the LINEARITY ADJUSTMENT 1 Turn the Auto Tracking to off and set the tracking to center fixing position 2 Playback the alignment Tape and adjust the LINEARITY so that the envelope becomes flat by tracking and switches VFJ8125H3F PAL Alignment Tape VFM8080HQFP NTSC Test Point of Playback Envelope TW3001 Fig M5 l Main symptoms and Adjustment point Envelope Post Name Adjustment...

Страница 114: ...l operation by rotating the Loading Motor with the batteries a Disconnect the AC plug and remove the Top Panel and the Front Panel by referring the Disassembly Procedures b Connect three batteries 1 5V spec to the Loading Motor in series for supplying 4 5V to rotate the Loading Motor following Fig S2 Fig S2 c Stop unloading just before unloading would be completed as shown in Fig S3 Fig S3 d Then ...

Страница 115: ...8 c Rotate the Main Cam Gear counter clockwise Fig S9 until just before the unloading would be completed as shown in Fig S3 d Rotate the Capstan Motor clockwise Fig S9 to remove the tape slacks as shown in Fig S6 Fig S9 e Rotate the Main Cam Gear counter clockwise again Fig S7 to remove the cassette tape as shown in Fig S8 f Set the Position Switch to EJECT POSITION certainly as shown in Fig S10 F...

Страница 116: ...connect two Flexible Card Connectors Cylinder and A C Head and P1531 Fig R2 3 2 REMOVAL OF CASSETTE HOLDER UNIT 1 Remove 2 Red Screws and unlock 3 Locking tabs to remove the Cassette Holder Fig R3 Fig R4 P1531 Flexible Cad Connectors 3 Red Screws 3 Black Screws Front Panel Top Panel 3 Locking Tabs 2 Red Screws Side Plate L Side Plate R Cassette Holder Top Plate Wiper Arm unit Cassette Holder Unit ...

Страница 117: ...aterial handle with care when removing 3 Remove Idler Arm and Idler Gears Fig D3 Fig D4 4 Remove Tension Spring Fig D5 5 Unlock the Hooks of the boss on rear side of mechanism chassis to remove the Tension Arm Unit and remove the Supply Brake Arm Unit and Supply Reel Table Fig D6 Take up Brake Spring Take up Brake Arm Take up Reel Table Take up Brake Arm Unit Take up Reel Table LED Prism Idler Arm...

Страница 118: ...r Clutch Unit Change Lever Unit and Change Gear Spring keep paying attention to do not lose the Change Gear Spring and the Cut Washer Fig D11 Fig D12 Supply Reel Table Tension Arm Unit Supply Brake Arm unit Opener Piece Pinch Arm Unit Pinch Charge Arm P5 Arm Pinch Charge Arm Opener Piece P5 Arm Unit Pinch Arm Unit Cut Washer Main Cam Gear Sector Gear Unit Cut Washer Center Clutch Unit Center Clutc...

Страница 119: ...upply Shaft Holder Unit and Take up Shaft Holder Unit toward you to the limit and remove them Fig D17 12 Remove the Cut Washer for the Torque Clutch Unit and remove the Torque Clutch Unit Intermediate Gear and Change Gear Fig D18 Main Lever Take up Loading Arm Unit Supply Loading Arm Unit Supply Loading Arm Unit Take up Loading Arm Unit Torque Clutch Unit Intermediate Gear Change Gear Cut Washer C...

Страница 120: ...a Screw for A C Head Unit and remove the A C Head Unit Fig D22 15 Remove a Screw for the Loading Motor and remove the Loading Motor Unit Fig D23 Change Gear Intermediate Gear Torque Clutch 2 Screws for Stator Stator Capstan Unit 3 Screws for Capstan Unit A Screw for A C Head Unit A C Head Unit Loading Motor A Screw for Loading Motor ...

Страница 121: ...n the Screw for A C Head Unit Fig A3 3 Install the Capstan Motor Unit and tighten 3 Screws for the Capstan Motor Unit and 2 Screws for Stator Fig A4 NOTE When install the replacement parts apply the Silicon Grease VFK1301 on IC0201 portion Applying portion NOTE When install the replacement parts to Chassis apply the Floil Grease VFK1298A Loading Motor Unit A Screw for Loading Motor Worm Gear A C H...

Страница 122: ...Shaft Holder Unit Fig A11 3 Screws for Capstan Unit 2 Screws for Stator Stator Capstan Unit Supply Shaft Holder Unit NOTE When install the replacement parts apply the Floil Grease VFK1298A Spring of the Pinch Arm Unit Hole of the Pinch Charge Arm NOTE When install the replacement parts apply the Floil Grease VFK1298A Pinch Charge Arm Pinch Arm Unit NOTE When install the replacement parts apply the...

Страница 123: ...sting the phase between Take up Loading Gear and the Supply Loading Gear as shown in Fig A12 Fig A17 Supply Shaft Holder Unit Take up Shaft Holder Unit Torque Clutch Unit Intermediate Gear Change Gear Cut Washer Take up Loading Arm Unit Supply Loading Arm Unit Take up Loading Arm Unit NOTE When install the replacement parts apply the Floil Grease VFK1298A Intermediate Gear NOTE When install the re...

Страница 124: ...tted into the concave portion of Take up Loading Arm Gear Fig A19 and install the Cut Washer as shown in Fig A22 Fig A20 Fig A21 Fig A22 Phase Adjustment Take up Loading Arm Gear Supply Loading Arm Gear Concave portion of Take up Loading Arm Gear Cut Washer NOTE When install the replacement parts apply the Floil Grease VFK1298A a Inside b Outside Main Lever Convex portion on rear side of the Main ...

Страница 125: ...Install the Center Clutch Unit and the Cut Washer Note Keep paying attention to do not lose the Change Gear Spring and the Cut Washer Fig A27 16 Install the Sector Gear Unit so that the Phase Adjustment Hole of Sector Gear Unit is met with the Adjustment Hole of Chassis Fig A28 Phase Adjustment Hole Change Lever Unit Change Gear Change Gear Spring Center Clutch Unit Cut Washer Sector Gear Unit Pha...

Страница 126: ...Supply Brake Arm Unit Fig A32 20 Install the Supply Reel Table Fig A33 21 Install the Tension Arm Unit into the Tension Arm Boss Fig A34 Phase Adjustment Hole Main Cam Gear Cut Washer Capstan Belt Supply Brake Arm Unit Supply Reel Table Tension Arm Unit NOTE When install the replacement parts apply the Floil Grease VFK1298A Main Cam Gear NOTE When install the replacement parts apply the Floil Grea...

Страница 127: ...tall the Idler Arm to Chassis Fig A37 24 Install the LED Prism and turn it counter clockwise Fig A38 Caution The LED Prism is easy to break therefore treat it carefully 25 Install the Take up Reel Table Fig A39 Tension Arm Tension Arm Boss Bottom View Bottom View Tension spring Supply Brake Arm Unit Idler Arm Idler Gears LED Prism Take up Reel Table ...

Страница 128: ...end of the Slot in Unit 30 Insert the convex portions of the Slot in Unit into the grooves of Chassis Fig A44 31 Reconfirm Slot in Unit is correct phase as shown in Fig A35 Sharp edge of Wiper Arm R is in line with the Sector Gear Hole Fig A45 Take up Brake Arm Unit Take up Brake Spring Hook the Take up Brake Spring 1 3 2 Confirm that the Adjustment Holes of Sector Gear and Chassis are seen throug...

Страница 129: ...ten three Black Screws and three Red Screws with earth lead and connect two Flexible Card Connectors Cylinder and A C Head and P1531 Fig A50 PHASE ADJUSTMENT OF P4 CAP 36 Adjust the P4 Cap so that the Direction of P4 Cap is on y axis with tolerance 5 Fig A51 Sharp edge of Wiper Arm R Sector Gear Hole Grooves of Chassis Convex portions 2 Screws P1531 Flexible Cad Connectors 3 Red Screws 3 Black Scr...

Страница 130: ...UTIONS Turn the Auto Tracking to off and set the tracking control to center fixing position To make an Adjustment Mode for Tape Interchangeability press the FF REW and EJECT buttons simultaneously 3 times to set the Service Mode 2 Then the Auto Tracking becomes off In case of the VCR mounts JOG SHUTTLE turn the shuttle ring to FF and then press EJECT button NOTE Cleaning the Tape Transport path be...

Страница 131: ...e appears like D or E in Fig M5 then adjustment of the tape guide post P3 Exit is necessary 6 Adjust the tape guidepost P3 in the same manner as the P2 post so that the exit portion becomes flat as shown in Fig M8 F Fig M5 7 Keep pressing the tracking up down or buttons on the remote controller unit The output envelope should vary nearly parallel with other condition as shown in Fig M6 8 Set the t...

Страница 132: ...al is maximized NOTE 1 The relation between the rotation direction of screws A and B and the condition of wrinkle on the lower edge at P4 Post as shown in Fig M9 2 Make sure that there is not the inclined wrinkle between P4 Post and Pinch Roller Fig M9 P2 Post P2 Post P3 Post P3 Post P2 P3 Posts Envelope Post Name Adjustment Method Turn P2 Post counter clockwise Approx 1 2 revolutions Turn P2 Post...

Страница 133: ...t of specification P4 Post adjustment has to be performed as follows Turn the screw A counterclockwise until the wrinkle appears on the lower edge of tape at P4 Post Turn screw A clockwise until the wrinkle disappears on the lower edge of tape at P4 Post 4 Turn the screw C until the audio signal is maximized NOTE Make sure that the audio output does not increase when push the upper and lower edges...

Страница 134: ...igger 2 Playback the Alignment Tape and set the tracking control into center fix position 3 Adjust A C Head position by the Fine Adjustment Gear Driver VFK0330 until the video envelope level is maximized at the tracking center fix position NOTE During X Value Fine Adjustment in case the video envelope level becomes 0 Pre adjustment of X Value should be adjusted again due to it is possible to vary ...

Страница 135: ...ck Tension Meter Tentelometer Made in U S A VFK0335 Retaining Ring Remover 3mm 4mm VFK0326 Hex Wrench Set 0 7 0 9 1 2 1 5 1 6 2 0 2 4 3 0mm VFK0329 Post Adjustment Screwdriver VFK0330 Fine Adjustment Gear Driver VFK27 Head Cleaning Stick VFK1024 Morlytone Grease VFK1298A Floil Grease VFK1301 Silicone Grease ...

Страница 136: ...he consumer to help determine the source of an Error The service information display operates independently of the service modes and stores the fault indication in memory for as long as AC power is not supplied Service Number Contents Contents of Indication on minute Contents of Indication on second Remarks VCR mode Real time Process number Real time 0 Indication for the inner data of IC6001 VCR m...

Страница 137: ...it 3 Bit 2 Bit 1 UNLOADING H Bit 0 LOADING H 3 Self diagnosis history 1st Error number of history 1 Supplementary data 1 and 2 of history 1 In the Self Diagnosis Memory next 3 BYTE is memorized for an Error 1 BYTE Its Error number 2 BYTE Its supplementary data 4 Self diagnosis history 2nd Error number of history 2 Supplementary data 1 and 2 of history 2 5 Self diagnosis history 3rd Error number of...

Страница 138: ...3 This Error indication code will be stored in the microprocessor even after the AC plug being disconnected The two digit number portion of the stored Error indication code can be re displayed in second display portion the last 2 digits of the FIP by placing the unit is Service Mode Number 2 When turning on Service Data Display as for example 01 or 02 etc If a second error occurs the most recent e...

Страница 139: ...34 ...

Страница 140: ...the Mechanism Initial Operation Tape rewinding by the S Reel in LOAD position When the power is turned on or the AC is input to the VCR in condition that the mechanism is stopped at LOAD position with a mechanism lock if the CAP FG could not be detected over 255 pulses during first one second of 5 seconds tape rewinding previous to the re loading with S reel that is judged a Error of the capstan s...

Страница 141: ...able is not rotated The judgement depends on the input signal from the S reel sensor l If the Error is detected 05 is memorized on the self diagnosis history on the model corresponding to 3 self diagnosis history memory l If the Error is detected anything is not memorized on the self diagnosis history and the automatic indication is not indicated on the model not corresponding to 3 self diagnosis ...

Страница 142: ...is detected l The mechanism is shifted to OFF position and the Cylinder is stopped Please check the Cylinder motor Cylinder motor drive circuit and the CYL HSW signal circuit No H17 S reel lock detection in constant running of the S reel If the S reel pulses could not be detected over the regulated time while tape is running it is judged S reel lock l 17 is memorized on the self diagnosis history ...

Страница 143: ...on DOWN position It is judged that the tape could not be rewound l If the mechanism lock is occurred during the loading to LOAD position it is judged that the loading could not be performed l If the both ends are detected at LOAD position it is judged that the tape is cut off l EJECT is performed l 80 is memorized on the self diagnosis history l Reason of the ejection is memorized on the supplemen...

Страница 144: ...g the Cassette up VCR mode Stand by position 05 S reel pulse cannot be detected when a cassette tape is inserted Error of the S reel system or the Capstan system VCR mode Tape position 04 Mechanism lock during unloading VCR mode Stand by position 03 Mechanism lock during without the unloading and the cassette up VCR mode Stand by position 02 The CAP FG could not be detected VCR mode No Data 01 The...

Страница 145: ...is history 1 The self diagnosis result and the supplementary data are the condition memorized just as an Error is detected 2 There are the histories from number 1 to number 3 3 The latest Error is memorized on history number 1 and then the old histories are shifted to the history number 2 3 4 Put out data from the memory number 3 by the shift is deleted 5 If the latest Error is same with the histo...

Страница 146: ... the initial operation from the fixed position 1 A mechanism lock has been occurred In this condition the applicable Error number F03 or F04 and its supplementary data are memorized The mechanism initial operation is started 2 A mechanism lock has been occurred again during the mechanism initial operation The Error number F03 or F04 which is memorized on step 1 is indicated and then the power is t...

Страница 147: ...of the DOWN position during the unloading No Data No Data Process No No data 8 The recording circuit is operated in except for REC mode VCR mode No Data Process No No data 7 The recording circuit can not be operated in REC mode VCR mode No Data Process No No data 6 Mechanism lock during the Cassette up VCR mode Stand by position Process No LM data 5 S reel pulse cannot be detected when a cassette ...

Страница 148: ...min or less type Large Hub The Tape position is divided into 6 stages between the Starting edge A and the finishing edge 5 l A and E is hexadecimal A 10 Decimal E 14 Decimal l Hexadecimal indication from A to E are shown below Description of Reason of Ejection of the supplementary Data Supplementary Data 2 Reason 1 S reel pulse is less than 3 when the loading has been completed Miss catching the t...

Страница 149: ...g is off the following operation will be performed after AC power is applied Test Mode Information will be displayed on FIP 1 Power will be turned on automatically when AC power is applied 2 The direct operations of buttons can be performed Example PLAY REC REC EJECT 9 TIMING CHART OF MODE SW Relationship between the Mechanism Position and the Mechanism Condition POSITION EJECT DOWN R REW LOAD REV...

Страница 150: ...E key is pressed briefly for less than 1 sec at other than STILL mode Pressing and holding the PAUSE key the mode is changed to STILL once and after 1 sec changed to 1 10 SLOW 3 The mode is changed to EJECT if the STOP button is pressed for more than 3 sec when a cassette is in the mechanism 10 1 2 Basic mode action with EDIT function Operation Key Present mode P SW EJECT STOP REW FF PLAY PAUSE RE...

Страница 151: ...osition S reel is rotated for 5 sec To tighten ape After that tape is loaded again and mode changes to stand by mode at P OFF or PLAY position 5 At EJECT position Initializing finishes without any action If the key signal is received during mechanism being initialized mode display changes However actual mode change is performed after initializing has completed 10 2 3 Mechanism action in sand by co...

Страница 152: ...of the end edge Detection of both edges POWER OFF ON SHORT CUE 1 SHORT REW 2 STOP CASSETTE IN SHORT CUE 1 SHORT REW 2 EJECT LOADING SHORT CUE 1 SHORT REW 2 STOP PLAY REC CUE FF SLOW STILL ADUB I NSERT AUTO REW STOP RPLAY REV RSLOW SHORT CUE 1 STOP REC PAUSE SHORT REW STOP TIMER REC OTR AV2PB H REC SHIRT REW 2 POWER OFF STOP or P OFF PLAY OFF TIMER AUTO REW POWER OFF STOP or P OFF 1 SHORT CUE is to...

Страница 153: ...o used Switching CH and Audio are effective Dew sensor on During Dew formation is detected and 80 minutes after completion of Dew detection Dew sensor off 80 minutes after completion of Dew detection because the Dew Sensor dries faster than mechanism due to their heat capacity 10 6 SAFETY TIMER 10 6 1 Holding time of special playback and stand by mode Special playback and stand by modes are automa...

Страница 154: ...UE REV 27 0 2s PLAY 1 3 5s PLAY 1 5 1s 2 5 1 6s 2 5 2 66s 11 21 27 0 3s 11 15 17 19 0 5s 6H CUE REV 35 0 2s 9H CUE REV 35 0 34s PLAY 1 5 1s 2 5 2 66s 11 21 27 0 5s 10H CUE REV 35 0 34s 2 FF REW mode FF REW position If one of the following conditions exists reel lock is detected Rotation mode changes to Pinch roller mode FF changes to CUE and REW changes to REV and rotation continues 1 When more th...

Страница 155: ...tion 10 7 Automatic features VTR has several automatic features that always function without any settings Explanations of each feature are described below 1 Auto Power On If cassette is inserted in POWER OFF condition without cassette in the power automatically turns on and the cassette is successfully inserted 2 Auto Play When write protected tape is inserted VTR is automatically set to PLAY afte...

Страница 156: ... driving method Number of rotation HIGHER Driving Torque BIGGER Full wave driving method Number of rotation LOWER NOTE It is quit difficult to say which method is better but in generally since the full wave driving method uses two phases in a path relation between current voltage and generated torque are efficient compared with half wave driving method Half wave driving method uses only one phase ...

Страница 157: ...instead of Linear driving signal which is used in Z Mechanism Fig MD1 PWM CAPSTAN MOTOR DRIVE Z Mechanism Linear drive signal R4 Mechanism PWM drive signal CAPSTAN MOTOR DRIVING SIGNAL ADVANTAGE OF PWM DRIVE PWM drive turns on the Transistors for half time of duty In other than above time motor is driven with the reverse electromotive force A3 A2 A1 B2 B1 B3 ON OFF Always ON Half wave Full wave ...

Страница 158: ...ower The motor current in positive period of PWM drive is flows as follows VM1 Q2 L Q3 R PWM Input Waveform at Q2 b Motor Power The motor current in negative period of PWM drive is flows as follows by the reverse electromotive force D1 L Q3 R PWM Input Waveform at Q2 b L 2 L 2 ...

Страница 159: ...g 10 IN CT 1 Capacitor connection terminal for slope of the cylinder 11 IN CT 2 Capacitor connection terminal for slope of the cylinder 12 IN PC 1 Capacitor connection terminal for phase compensation of the cylinder 13 IN CNF Capacitor connection terminal for phase compensation of the cylinder 14 IN EC Torque order input terminal for the cylinder 15 IN PG PG input terminal for the cylinder 16 IN P...

Отзывы: