background image

20

With this feature you can defrost/reheat/cook food according to the weight. 

Select the category and set the weight of the food. The weight is programmed 

in grams. The oven determines MICROWAVE power level and cooking time 

automatically. For quick selection, the weight starts from the most commonly 

used weight for each category. Do not include the weight of any added water 

or the container weight.


„

Notes

1.  Always operate the oven with the roller ring and glass tray in place.

2. 

The AUTO PROGRAMMES must ONLY be used for foods described.

3.  Only defrost/cook foods within the weight ranges described.

4.  Always weigh the food rather than relying on the package information.

5. 

Most foods benefit from a STANDING TIME. After cooking with an AUTO 

PROGRAMME, allow heat to continue conducting to the centre.

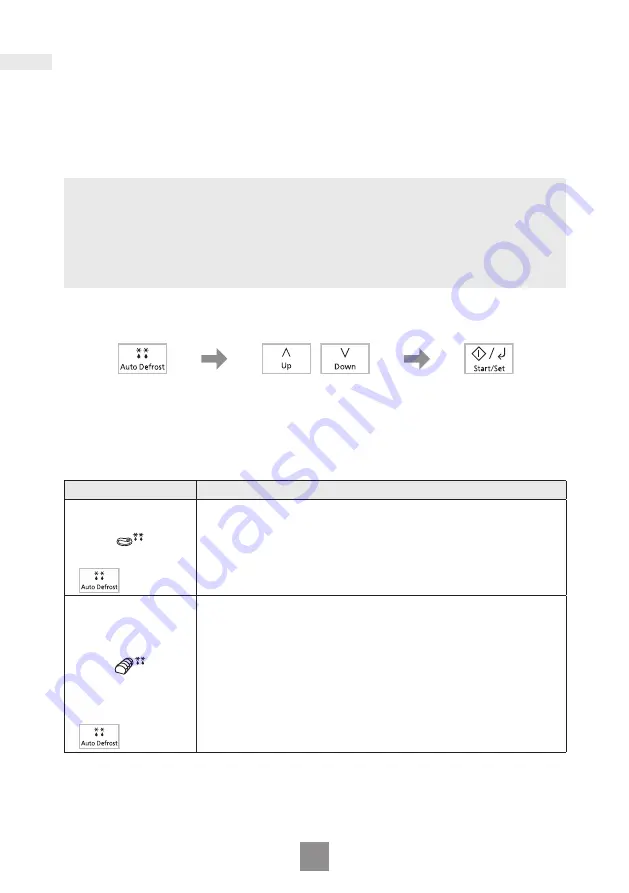
Auto defrost

Press Start/Set.

Remember to stir 

or turn the food 

during defrosting.

Set the weight of the 

frozen food.

The weight counts up/

down in 10 

g

 increments.

Select the desired Auto 

Defrost programme.

The AUTO PROGRAMME 

number appears in the 

display.

Programme

Instructions

1. Small Pieces

Weight:

 200


- 1000 

g

For defrosting small pieces of meat, escallop, sausages, 

minced meat, steak, chops, fish fillets (each 100 

g

 to 400 

g

). 

Press Auto Defrost once. Set the weight of the food and 

press Start/Set. Turn and shield at beeps. Allow to stand for 

15 to 30 minutes.


1 press

2. Big Piece

Weight:

 600


- 1600 

g

For defrosting big piece of meat, whole chicken, meat joint. 

Press Auto Defrost twice. Set the weight of the food and 

press Start/Set. Whole chicken and meat joint will require 

shielding during defrosting. Protect wings, breast and fat 

with smooth pieces of aluminium foil secured with cocktail 

sticks. Do not allow the foil to touch the walls of the oven. 

Standing time of 1 to 2 hours should be allowed before 

cooking, so that the centre of the food thaws out. Turn and 

shield at beeps.


2 presses

Auto programmes

Содержание NN-ST34NW

Страница 1: ...Operating Instructions Microwave Oven Household Use Only Model No NN ST34NW B NN ST34NB...

Страница 2: ...ue and thereby develop a firm understanding of your new oven Start experimenting now and enjoy the first class results you will achieve by using your new microwave oven Panasonic Australia Pty Ltd 1 I...

Страница 3: ...idelines 7 Containers to use 9 Parts of your oven 11 Control panel 12 Setting the clock 13 Child safety lock 13 Microwave cooking and defrosting 14 Multi stage cooking 16 Quick 30 feature 17 Add time...

Страница 4: ...nce if it has a damaged CORD OR PLUG if it is not working properly or if it has been damaged or dropped It is dangerous for anyone other than a service technician trained by the manufacturer to perfor...

Страница 5: ...stomer to have it replaced with a properly earthed wall socket Operation Voltage The voltage has to be the same as specified on the label on the oven If a higher voltage than specified is used it may...

Страница 6: ...s The oven comes equipped with a variety of accessories Always follow the directions given for use of the accessories Roller ring Q Q Do not remove the roller ring from the cavity floor Q Q The roller...

Страница 7: ...oking time and check the food frequently Foods low in moisture Take care when heating foods low in moisture e g bread items chocolate popcorn biscuits and pastries These can easily burn dry out or cat...

Страница 8: ...e g Kitchen roll unless they say they are specifically designed for use in a microwave oven These products contain impurities which may cause sparks and or fires when used Liquids Microwave heating o...

Страница 9: ...inutes jacket potatoes 5 minutes Other foods such as plated meals vegetables fish etc require 2 5 minutes standing If food is not cooked after standing time return to the oven and cook for additional...

Страница 10: ...boiled DO NOT OVERHEAT TURNING AND STIRRING Some foods require stirring during cooking Meat and poultry should be turned after half of the cooking time ARRANGING Individual foods e g chicken portions...

Страница 11: ...dish or craze the finish Do not use dishes with a metal rim or pattern Do not use jugs or mugs with glued handles since the glue can melt in a microwave POTTERY EARTHENWARE STONEWARE Only use if compl...

Страница 12: ...l is recommended for microwave use Do not use waxed or plastic coated cups as the finish may melt in the oven Greaseproof paper can be used to line the base of dishes and to cover fatty foods White pa...

Страница 13: ...here is no risk of microwave exposure Cooking resumes after the door is closed and Start Set is pressed 2 Oven window 3 Air vent 4 Microwave feed guide Do not remove 5 External air vents 6 Control pan...

Страница 14: ...Menu pad 5 Time pads 6 Timer Clock pad 7 Quick 30 pad 8 Up Down pads 9 Stop Reset pad Before Cooking One press clears your instructions During Cooking One press temporarily stops the cooking process A...

Страница 15: ...step above 2 The clock will keep the time of day as long as the oven is plugged in and electricity is supplied 3 This is a 12 hour clock Press Start Set 3 times within 10 seconds The clock will disapp...

Страница 16: ...owly Notes 1 The oven will automatically work on High microwave power if a cooking time is entered without the power level previously being selected 2 While cooking the glass tray may vibrate This wil...

Страница 17: ...ollowing keys according to your needs Press each Time pad repeatedly according to the time value you want to set Press Quick 30 to set cooking time in 30 seconds increments After you enter a time valu...

Страница 18: ...ce to select Medium power Set the cooking time Press 3 times Press Micro Power 4 times to select Low power Press Start Set The time for the first stage counts down in the display Set the cooking time...

Страница 19: ...ick 30 until the desired cooking time appears in the display Press Start Set The time counts down in the display Add time feature This feature allows you to add cooking time during cooking During cook...

Страница 20: ...ds Press 5 times Refer to Setting the cook time timer time on page 15 Standing time Example To stand for 5 minutes after cooking at Medium power for 3 minutes Press Micro Power 3 times to select Mediu...

Страница 21: ...Medium power Press 3 times Press Start Set Delayed time counts down then cooking will start Refer to Setting the cook time timer time on page 15 Notes 1 MULTI STAGE COOKING can be programmed includin...

Страница 22: ...turn the food during defrosting Set the weight of the frozen food The weight counts up down in 10 g increments Select the desired Auto Defrost programme The AUTO PROGRAMME number appears in the displa...

Страница 23: ...osting as foods vary in their defrosting speed 3 It is not necessary to cover the whole food see point 6 4 Always turn or stir the food especially when the oven beeps Protect ends and tips with alumin...

Страница 24: ...Set the weight of the food and press Start Set Stir at beeps Stir again at end of programme and allow a few minutes standing time Large pieces of meat fish in a thin sauce may require longer cooking T...

Страница 25: ...Fresh Fish Weight 200 700 g For cooking fresh fish filets and steaks Place in a suitable sized container Add 1 3 tbsp liquid Cover with cling film Pierce cling film once in the centre and 4 times arou...

Страница 26: ...Add recommended water listed above Allow at least 1 2 depth of volume for evaporation to prevent boiling over Cover with lid Place the casserole on glass tray Press Auto Menu 8 times and press Start S...

Страница 27: ...d extra alcohol BABIES BOTTLES CAUTION Milk or formula MUST be shaken thoroughly before heating and again at the end and tested carefully before feeding a baby For 200 240 ml of milk from fridge tempe...

Страница 28: ...with my TV Is this normal A Some radio and TV interference might occur when you cook with the oven This interference is similar to the interference caused by small appliances such as mixers vacuums b...

Страница 29: ...und the outside of the oven door wipe with a soft cloth This may occur when the oven is operated under high humidity conditions and in no way indicates a malfunction of the unit 7 It is occasionally n...

Страница 30: ...imensions 329 W 326 D 236 H mm Overall Cavity Volume 25 L Glass Tray Diameter 288 mm Operating Frequency 2450 MHz Net Weight 12 kg Weight and Dimensions shown are approximate Specifications subject to...

Страница 31: ...y infestation by insects or vermin tampering or repair by unauthorised persons including unauthorised alterations exposure to abnormally corrosive conditions or any foreign object or matter having ent...

Страница 32: ...the product fails to be of acceptable quality and the failure does not amount to a major failure If there is a major failure in regard to the product which cannot be remedied then you must notify us...

Страница 33: ...p Trim Professional use and does not cover damage malfunction or failure resulting from use of incorrect voltages incorrect installation accident misuse neglect build up of dirt or dust abuse maladjus...

Страница 34: ...rvice Centres are located in major metropolitan areas and most regional centres of New Zealand however coverage will vary dependant on product For advice on exact Authorised Service Centre locations f...

Страница 35: ......

Страница 36: ...Panasonic Corporation Website https www panasonic com Panasonic Corporation 2022 PN F0622 0 Printed in China...

Отзывы: