background image

26

27

Examine Su Horno

Desempaque el horno, quite todo el material de
empaque y examine que su horno no tenga ningún
daño, tales como abolladuras, seguros de la puer-
ta rotos o resquebrajaduras en la puerta. Notifique
inmediatamente a su distribuidor si el horno está
dañado.

Ubicación del Horno

1. El horno debe ser colocado en una superficie

plana y estable. Para su operación apropiada, el
horno debe tener suficiente corriente de aire.
Deje 10 cm de espacio de ambos lados del
horno y 10 cm de espacio en la parte superior
del horno.

a.NO bloquear la ventilación del aire.

Si es bloqueada la ventilación del aire
durante la operación, el horno puede sobre-
calentarse y quemarse.
Cuando use algún trapo, franela o funda
para cubrir el horno, las tomas y salidas del
aire no deberán ser bloqueadas. Tambien
debe tener un espacio apropiado para la
parte trasera y los costados.

b.NO coloque el horno cerca de una superficie

húmeda caliente, tal como un registro de gas
o eléctrico.

c.NO opere el horno cuando la humedad del

cuarto sea muy alta.

2. Este horno ha sido fabricado para uso en el

hogar solamente.

Interferencia de Radio

1. La operación de su horno de microondas puede

causar interferencia en su radio, TV o equipo
similar.

2. Cuando hay interferencia, se puede reducir o

eliminar tomando las siguientes medidas:

a.Limpie la puerta y las superficies selladoras

del horno.

b.Ponga el radio, TV, etc. lo más lejos posible

del horno de microondas.

c.Use una antena instalada adecuadamente

para obtener una recepción de señal más
fuerte.

Requerimientos

de cableado

1. El horno debe estar en un circuito separado.

Ningún otro aparato debe compartir el circuito
con el horno. Si lo hace el fusible del circuito
puede estallar, el bloqueador del circuito tra-
barse o la comida cocinarse más lento que en
los tiempos recomendados en este manual.

2. El voltaje usado debe ser el mismo al especifi-

cado en el horno de microondas (120 V.). Usar
un voltaje más alto es peligroso y puede resul-
tar en fuego u otro accidente causando daño al
horno. Usar un bajo voltaje dará como resultado
un cocinado más lento. Panasonic no se hace
responsable por daños resultantes del uso del
horno con otros voltajes que no sea el especifi-
cado.

3. El horno debe ser conectado en un enchufe a

tierra de al menos 20 amp 120 volt, 60 Hz.
Donde se encuentre un enchufe estándar de 2
entradas es responsabilidad y obligación del
consumidor reem-
plazarlo por un
enchufe a tierra de 3
entradas.

INSTRUCCIONES DE INSTALACIÓN

*Determonado de acuerdo a procedimientos contemplados en la nomal IEC 60705.
Las expecificaciónes estàn sujetas a cambios sin previo aviso.

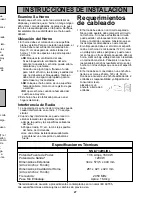
Especificaciones Técnicas

Potencia Fuente de Poder:
Potencia de Salida:*
Dimensiónes Exteriores
(Alto x Ancho x Fondo):
Dimensiónes Cavidad del Horno
(Alto x Ancho x Fondo):
Frecuencia:
Peso Sin Embalaje:

13,5 Amps, 1600 W

1200 W

344 x 573,5 x 440 mm

261 x 421 x 424 mm

2450 MHz

Aprox. 16,9 kg

NN-S732WL/BL

Uso General

1. NO altere o haga ningún ajuste o reparación a

la puerta, al alojamiento del panel de control,
interruptores entrecruzados de seguridad o a
cualquier otra parte del horno. NO quite el panel
exterior del horno. Las reparaciones deben ser
hechas solamente por personal de servicio cali-
ficado.

2. NO opere el horno vacío. La energía de

microondas se reflejará continuamente a través
del horno si los alimentos o agua no están pre-
sentes para absorber energía. Esto puede
dañar el horno y resultar en peligro de incendio. 

3. NO utilice este horno para calentar químicos o

cualquier otros productos no alimenticios. NO
limpie este horno con cualquier producto etique-
tado con contenido químico corrosivo. El calen-
tamiento de químicos corrosivos en este horno
puede causar fugas de radiación.

4. NO seque telas, periódicos u otros materiales

en el horno. Pueden incendiarse.

5. NO use productos de papel reciclado, ya que

pueden contener impurezas que pueden causar
chispas y/o incendios cuando se usen.

6. NO use periódicos o bolsas de papel para coci-

nar. Puede causar un incendio.

7. NO pegue, NO golpee el panel de control.

Pueden causarse daños a los controles. Puede
causar un incendio.

8. Las manoplas para tomar cosas calientes siem-

pre deben ser utilizados cuando se retiren
cosas de el horno. El calor se transfiere de los
alimentos calientes a los contenedores para
cocinar y de los contenedores a la Bandeja de
Cristal. La Bandeja de Cristal puede estar muy
caliente después de sacar los contenedores
para cocinar del horno.

9. NO almacene materiales flamables cerca, arri-

ba, o dentro del horno. Pueden ser riesgos de
incendio.

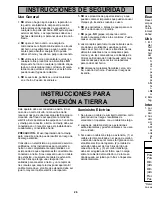
Este aparato debe ser conectado a tierra. En el
caso de un corto circuito, la conexión a tierra
reduce el riesgo de una descarga eléctrica propor-
cionando una línea de escape para la corriente
eléctrica. Este aparato está equipado con un cable
y clavija para conexión a tierra. La clavija debe ser
conectada en un receptor que esté instalado ade-
cuadamente y conectado a tierra.

PRECAUCION - El uso inapropiado de la clavija
para conexión a tierra puede resultar en riesgo de
descarga eléctrica.

Consulte a un electricista o a personal de servicio
calificados, si las instrucciones para conectar a
tierra no son completamente comprendidas o si
existe duda de que el aparato está correctamente
conectado a tierra. Si es necessario usar un cable
de extensión, use solamente cable de extensión
de tres hilos que tenga una clavija de tres
entradas para conectar a tierra, y un receptor de
tres ranuras que acepte la clavija del aparato. El
calibre marcado en el cable de extensión debe ser
igual o mayor al calibre eléctrico del aparato.

Suministro Eléctrico

1. Se provee un cable de suministro eléctrico corto

para reducir los riesgos resultantes de
enredarse o tropezarse con un cable más largo.

2. Juegos de cable más largos o extensiones

están disponibles y pueden utilizarse si se usan
con cuidado.

3. Si se usa un cable más largo o extensión, (1) el

calibre eléctrico marcado en el juego de cordón
o extensión debe ser al menos tan grande como
el calibre eléctrico del aparato, (2) el cable de
extensión debe ser de tres hilos del tipo de
conexión a tierra, y (3) el cordón más largo
debe ser arreglado de tal forma que no caiga
sobre la cubierta del mostrador o de la mesa
donde pueda ser jalado por niños o tropezarse
accidentalmente.

INSTRUCCIONES DE SEGURIDAD

INSTRUCCIONES PARA

CONEXIÓN A TIERRA

Содержание NN-S732

Страница 1: ...tes de operar este producto lea este instructivo en su totalidad El manual de instrucciones en español puede ser encontrada en la páginas 23 29 Spanish Operating Instructions can be found on pages 23 29 For assistance please call 1 800 211 PANA 7262 or send e mail to consumerproducts panasonic com or visit us at www panasonic com U S A For assistance please call 787 750 4300 or visit us at www pan...

Страница 2: ...repaired by anyone except properly qualified service personnel Copyrighted by Matsushita Electric Industrial Co Ltd 2002 The serial number of this product may be found on the back side of the oven You should note the model number and the serial number of this oven in the space provided and retain this book as a perma nent record of your purchase for future ref erence Model No _____________________...

Страница 3: ...eristics 15 Cooking Techniques 15 16 Using Your Microwave Oven 17 18 Heating or Reheating Guide 19 Fresh Vegetable Chart 20 Quick Guide to Operation Back Cover Maintenance Technical Specifications Inside Front Cover Care of Your Microwave Oven 21 Before Requesting Service 22 Limited Warranty Customer Services 23 24 Manual de instrucciones Spanish Operating Instructions Instrucciones de Seguridad 2...

Страница 4: ...litate cooking b Remove wire twist ties from paper or plastic bags before placing bag in oven c If materials inside the oven should ignite keep oven door closed turn oven off and disconnect the power cord or shut off power at the fuse or circuit breaker panel d Do not use the cavity for storage purpos es Do not leave paper products cooking utensils or food in the cavity when not in use General Use...

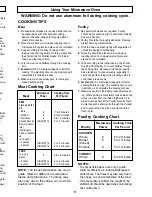
Страница 5: ...ord and 3 the longer cord should be arranged so that it will not drape over the counter top or tabletop where it can be pulled on by children or tripped over accidentally Wiring Requirements 1 The oven must be on a SEPARATE CIRCUIT No other appliance should share the circuit with the microwave oven If it does the branch cir cuit fuse may blow the circuit breaker may trip or the food may cook slowe...

Страница 6: ... arcing occurs spark ing remove metal material skewers etc and or transfer to a non metallic container Dishes with metallic trim should not be used as arcing may occur If an entree is heated in a foil tray maintain at least 1 inch 2 5 cm spacing from the oven walls 7 PAPER TOWELS CLOTHS DO NOT use paper towels or cloths which con tain a synthetic fiber woven into them The syn thetic fiber may caus...

Страница 7: ...ers directions Close bag with the nylon tie Oven Cooking Bag Yes provided a strip cut from the end of the bag or a piece of cotton string Do not close with a metal twist tie Make six 1 2 in 1 cm slits near the closure Paper Plates Cups Yes Use to warm cooked foods and to cook foods that require short cooking times such as hot dogs Paper Towels Napkins Yes Use to warm rolls and sandwiches by microw...

Страница 8: ... g j d 1 DISPLAY WINDOW 2 AUTO DEFROST PAD Page 12 3 POWER LEVEL PAD Page 9 4 AUTO REHEAT PAD Page 11 5 AUTO COOK PAD Page 14 6 NUMBER PAD 7 TIMER PAD Page 10 8 POPCORN PAD Page 11 9 QUCIK MIN PAD Page 9 10 CLOCK PAD Page 9 11 SERVING WEIGHT PAD Page 14 12 START PAD One tap allows oven to begin functioning If door is opened or STOP RESET pad must be pressed again to restart oven 13 STOP RESET PAD ...

Страница 9: ...reheating use P10 HIGH for liquids P7 MEDIUM HIGH for most foods and P6 MEDIUM for dense foods 6 For defrosting use P3 MEDIUM LOW You can use this safety feature to lock the control panel so that children cannot use the oven when you do not want them 1 2 3 Press once Colon flashes Enter time of day using the number pads Time appears on the Display Window Colon continues flashing Press Colon stops ...

Страница 10: ... seconds Press Time will count down without oven operating To Use as a Kitchen Timer Example To count 5 minutes When not th pads to coo Pre 1 3 2 Exam 1 2 3 4 Press once 5 times Enter desired amount of delayed time using number pads up to 99 minutes and 99 seconds Enter the desired cooking program see page 9 for directions To Set Delay Start Example To start cooking 5 minutes later 3 mins at MEDIU...

Страница 11: ... When using popcorn pad maybe the weight is not the same as offered By using the number pads or the programs can be adjusted to cook for a heavier or lighter weight 1 tap More 2 taps More Press 1 tap Less 2 taps Less 1 2 Press until the desired number of servings appears in the Display Window Example To reheat 2 cups of soup 1 3 2 Set the desired weight of prepackaged microwave popcorn Press Start...

Страница 12: ...meat and poultry from its original closed paper or plastic package wrapper Otherwise the wrap will hold steam and juice close to the foods which can cause the outer surface of the foods to cook Shape ground meat into the form of a doughnut before freezing When defrost ing remove thawed meat when the reminder tone sounds and continue defrosting Place foods in a shallow container or on a microwave r...

Страница 13: ...en partially thawed if possible Rearrange and break apart Turn over and rearrange Turn over and rearrange 10 20 min 10 20 min 10 20 min 5 min 5 min Rinse with cold water to separate 5 min 5 min 5 min At Reminder Tone Turn over Remove thawed portions and break apart Return remainder to oven Turn over Remove thawed portions with fork Turn over Turn over Cover warm areas with aluminum foil Same as ab...

Страница 14: ...ients for 2 eggs 1 tablespoon butter or margarine 2 tablespoons milk salt and ground black pepper Melt butter in a 9 inch pie plate turn the plate to coat the bottom with butter Combine the remaining ingredients and pour into the pie plate and cover with vented plastic wrap Let stand 2 minutes With a spatura loosen the edges of the omelet from the plate fold into thirds to serve Pour soup into a m...

Страница 15: ...ecrease and a fire could result Shape Uniform sizes heat more evenly The thin end of a drumstick will cook more quickly than the meaty end To compensate for irregular shapes place thin parts toward the center of the dish and thick pieces toward the edge Size Thin pieces cook more quickly than thick pieces Starting Temperature Foods that are room temperature take less time to cook than if they are ...

Страница 16: ...help insure even cooking these foods need to be turned Turn over large foods such as roasts or turkeys halfway through cooking Stand Time Most foods will continue to cook by conduction after the microwave oven is turned off In meat cookery the internal temperature will rise 5 F to 15 F 3 C to 8 C if allowed to stand tented with foil for 10 to 15 minutes Casseroles and vegetables need a shorter amo...

Страница 17: ...s the cooking process 7 Make sure poultry is thoroughly cooked before eat ing Whole poultry is completely cooked when the juices run clear from the inside thigh when it is pierced with a sharp knife Poultry pieces should be pierced with a sharp knife through the thickest part to ensure that the juices are clear and the flesh is firm WARNING Do not use aluminum foil during cooking cycle BEEF Standi...

Страница 18: ...ing to the instructions in the Fresh Fish Cooking Chart below Flakes of butter can be added to the fish if desired 5 Let stand as directed in the Cooking Chart before serving 6 After standing time check to see that the fish is thoroughly cooked The fish should be opaque and flake easily Fresh Fish Cooking Chart Fish Fish Fillets Whole Mackerel Cleaned and Prepared Whole Trout Cleaned and Prepared ...

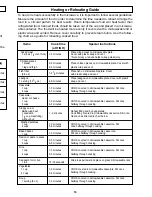
Страница 19: ...2 oz 4 6 minutes wrap and vent Casserole 1 cup 1 3 minutes COOK covered in microwavable casserole Stir once 4 cups 4 7 minutes halfway through cooking Casserole cream or cheese 1 cup 1 3 minutes COOK covered in microwavable casserole Stir once 4 cups 2 4 minutes halfway through cooking Sloppy Joe or Barbecued beef Reheat filling and bun separately 1 sandwich 1 2 minutes Cook filling covered in mic...

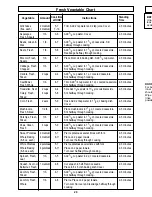
Страница 20: ...iced Corn Fresh 2 ears 5 9 Husk Add 2 tbsp water in 11 2 qt baking dish 2 3 minutes Cover Mushrooms 1 2 Ib 2 3 Place mushrooms in 11 2 qt covered casserole 2 3 minutes Fresh Sliced Stir halfway through cooking Parsnips Fresh 1Ib 4 7 Add 1 2 cup water in 11 2 qt covered casserole 2 3 minutes Sliced Stir halfway through cooking Peas Green 4 cups 5 9 Add 1 2 cup water in 11 2 qt covered casserole 2 3...

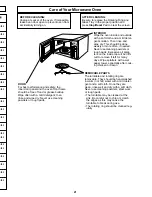
Страница 21: ...r towel especially after cook ing chicken or bacon DOOR For best performance and safety the inner door panel and the oven front frame should be free of food or grease buildup Wipe often with a mild detergent then rinse and wipe dry Never use cleaning powders or rough pads REMOVABLE PARTS The turntable and rotating ring are removable They should be hand washed in warm not hot water with a mild dete...

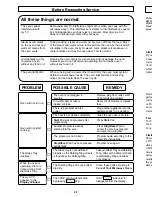
Страница 22: ...ower power levels The oven light will dim and clicking noises can be heard when the oven cycle PROBLEM POSSIBLE CAUSE REMEDY Oven will not turn on The oven is not plugged in Remove plug from outlet wait securely 10 seconds and reinsert Circuit breaker or fuse is Reset circuit breaker or replace tripped or blown fuse There is a problem with the Plug another appliance into the outlet outlet to check...

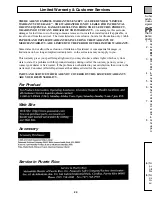
Страница 23: ...cts purchased and serviced in the United States or Puerto Rico This warranty is extended only to the original purchaser of a new product which was not sold as is A purchase receipt or other proof of the original purchase date is required for warranty service Carry In or Mail In Service For Carry In or Mail In Service in the United States call 1 800 211 PANA 7262 or visit Panasonic Web Site http ww...

Страница 24: ...LL EXPRESS AND IMPLIED WARRANTIES INCLUDING THE WARRANTY OF MERCHANTABILITY ARE LIMITED TO THE PERIOD OF THE LIMITED WARRANTY Some states do not allow the exclusion or limitation of incidental or consequential damages or limitations on how long an implied warranty lasts so the exclusions may not apply to you This warranty gives you specific legal rights and you may also have others rights which va...

Страница 25: ...o de personal calificado Contacte las instala ciones de servicio autorizadas más cercanas para revisión reparación o ajuste 15 Algunos productos tales como los huevos completos y contenedores sellados por ejem plo frascos de vidrio cerrados pueden explotar y no deben ser calentados en este horno 16 Para reducir el riesgo de incendio en la cavi dad del horno a No sobrecocine los alimentos Preste at...

Страница 26: ...después de sacar los contenedores para cocinar del horno 9 NO almacene materiales flamables cerca arri ba o dentro del horno Pueden ser riesgos de incendio Este aparato debe ser conectado a tierra En el caso de un corto circuito la conexión a tierra reduce el riesgo de una descarga eléctrica propor cionando una línea de escape para la corriente eléctrica Este aparato está equipado con un cable y c...

Страница 27: ...posible del horno de microondas c Use una antena instalada adecuadamente para obtener una recepción de señal más fuerte Requerimientos de cableado 1 El horno debe estar en un circuito separado Ningún otro aparato debe compartir el circuito con el horno Si lo hace el fusible del circuito puede estallar el bloqueador del circuito tra barse o la comida cocinarse más lento que en los tiempos recomenda...

Страница 28: ...portes para lo caliente cuando saque los utensillos del horno o cuando quite tapas o cubiertas de envoltura de plástico de los utensillos de cocina para evitar quemaduras La bandeja de cristal se calentará durante la cocción Debe permitirse que se enfrie antes de manejarla o antes de colocar productos de papel tales como platos de papel o bolsas de palomitas de maíz para microondas para cocinar Cu...

Страница 29: ...eparadas abra la bolsa cuidadosamente las palomitas de maíz y el vapor estarán extremadamente calientes 5 No vuelva a calentar los granos que no reventaron ni vuelva a usar la bolsa 6 Nunca deje el horno desatendido cuando prepare palomitas de maíz Pare el horno cuando la explosión de las palomi tas demore entre 2 y 3 segundos El exceso de cocción puede hacer que las palomitas se quemen 7 Devido a...

Страница 30: ...liquido cubierta o mesclado 3 Tocino 4 rebanadas Use un plato rigido Cubralo con toallas de 100 133 g papel Si el bacon no se cocina a su gusto 6 rebanadas continúe calentándolo añadiendo más tiempo 150 183 g 10 rebanadas 260 300 g 14 rebanadas 366 400 g Comida 4 Sopa 1 2 tazas Siga las instrucciones del fabricante para cantidades de liquido cubierta o mesclado 5 Pizza 110 225 g Siga las instrucci...

Страница 31: ...ione Presione Presione Seleccione potencia hasta a 10 Presione Mantenga Start presionado hasta que el siguiente mensaje aparezca en el indicador L y se escuchen dos beeps Presione y mantenga presionda la tecla Start hasta que la leyenda L desaparezca delindicador Presione Presione Presione Para Cocinar usando el Pulsador Auto Cocción Vea página 14 Establezca el tiempo de cocción GUIA RAPIDA DE OPE...

Страница 32: ...ick Min Pad see page 9 To Set Power Time see page 9 To Defrost using Auto Defrost Pad see page 12 To Use as a Kitchen Timer see page 10 To reheat using Auto Reheat Pad see page 11 Enter time of day Press Press up to 10 min Press Press To Cook using Auto Cook Pads see page 14 QUICK GUIDE TO OPERATION Part No 3828W5A2260 Select recipe Select serving weight eg To use Child Safety Lock see page 9 Hold...

Отзывы: