NN-CT867MBPQ NN-CT857WBPQ
23
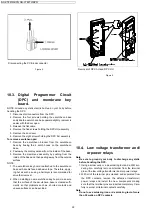
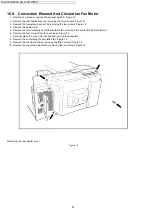
10.5. Fan Motor
1. Disconnect the two lead wires from the fan motor termi-
nals
2. Remove the power cord by removing the two wires from
the noise filter and the ground connection from the oven
chassis.
3. Remove the noise filter
4. Remove the two screws holding the orifice assembly
5. Remove the two screws holding the fan motor assembly
6. Detach the orifice assembly and the fan motor assembly
from the oven assembly.
7. Remove the fan blade from the fan motor by pulling out-
ward.
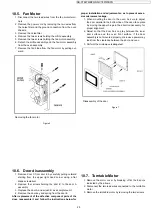
10.6. Door disassembly
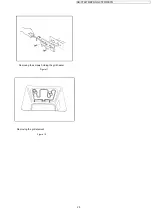
1. Remove door C from door E by carefully pulling outward
starting from the upper right hand corner using a flat
blade screwdriver.
2. Remove four screws holding the door E to the door A
assembly
3. Replace the door A and screen B as a complete unit.
4. Remove the door key and spring from the door E
After replacement of the defective component parts of the
door, reassemble it and follow the instructions below for
proper installation and adjustment so as to prevent exces-
sive microwave leakage.
1. When mounting the door to the oven, be sure to adjust
the door parallel to the bottom line of the oven face plate
by moving the upper hinge in the direction necessary for
proper alignment.
2. Adjust so that the door has no play between the inner
door surface and the oven front surface. if the door
assembly is not mounted properly, microwave power may
leak from the clearance between the door and oven.
3. Perform the microwave leakage test.
10.7. Turntable Motor
1. Remove the motor cover by breaking off at the 8 spots
indicated by the arrows.
2. Disconnect the two lead wires connected to the turntable
motor
3. Remove the turntable motor by removing the two screws
Removing the fan motor
Figure 6
Disassembly of the door
Figure 7
Содержание NN-CT857WBPQ
Страница 4: ...NN CT867MBPQ NN CT857WBPQ 4 4 Control Panel ...
Страница 5: ...NN CT867MBPQ NN CT857WBPQ 5 5 Operation And Digital Programmer Circuit Test Procedure ...
Страница 6: ...NN CT867MBPQ NN CT857WBPQ 6 ...
Страница 7: ...NN CT867MBPQ NN CT857WBPQ 7 ...
Страница 8: ...NN CT867MBPQ NN CT857WBPQ 8 6 Schematic Diagram ...
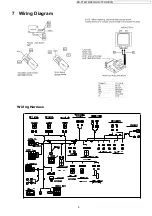
Страница 9: ...NN CT867MBPQ NN CT857WBPQ 9 7 Wiring Diagram Wiring Harness ...
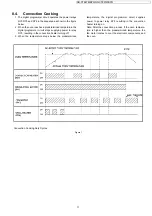
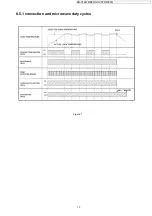
Страница 13: ...NN CT867MBPQ NN CT857WBPQ 13 8 5 1 convection and microwave duty cycles Figure 1 ...
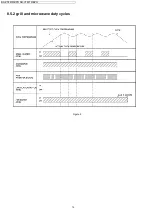
Страница 14: ...NN CT867MBPQ NN CT857WBPQ 14 8 5 2 grill and microwave duty cycles Figure 2 ...
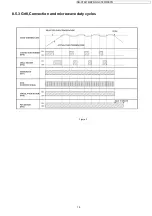
Страница 15: ...NN CT867MBPQ NN CT857WBPQ 15 Figure 3 8 5 3 Grill Convection and microwave duty cycles ...
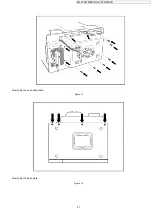
Страница 27: ...NN CT867MBPQ NN CT857WBPQ 27 Removing the oven back plate Figure 14 Removing the base plate Figure 15 ...
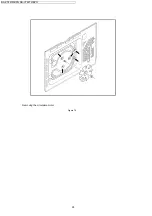
Страница 28: ...NN CT867MBPQ NN CT857WBPQ 28 Removing the circulation motor Figure 16 ...
Страница 32: ...NN CT867MBPQ NN CT857WBPQ 32 13 Troubleshooting Guide ...

