47
Editing Features
Editing Features
1
Insert a pre-recorded tape
into the source (playing) VCR and a
blank tape with recorded tab closed in
place into Palmcorder.
2
Press MENU
to display VCR MENU
screen.
3
Rotate JOG KEY
to select
REC
MODE
, then
press JOG KEY
to
display the VCR REC MODE menu
screen.
4
Rotate JOG KEY
to select
AV-JACK
,
then
press JOG KEY
to set to IN.
• “LINE-IN” is displayed on the EVF and
LCD monitor. (p. 109)
5
Press PLAY
on the VCR. When
the tape reaches the point from which
you want to start dubbing,
press
PAUSE
.
6
Hold down (REC) and (PLAY)
and then pause the Palmcorder.
7
Simultaneously, press (PAUSE)
on
both units to begin copying.
8
Press (STOP) on both units
when
copying is completed.
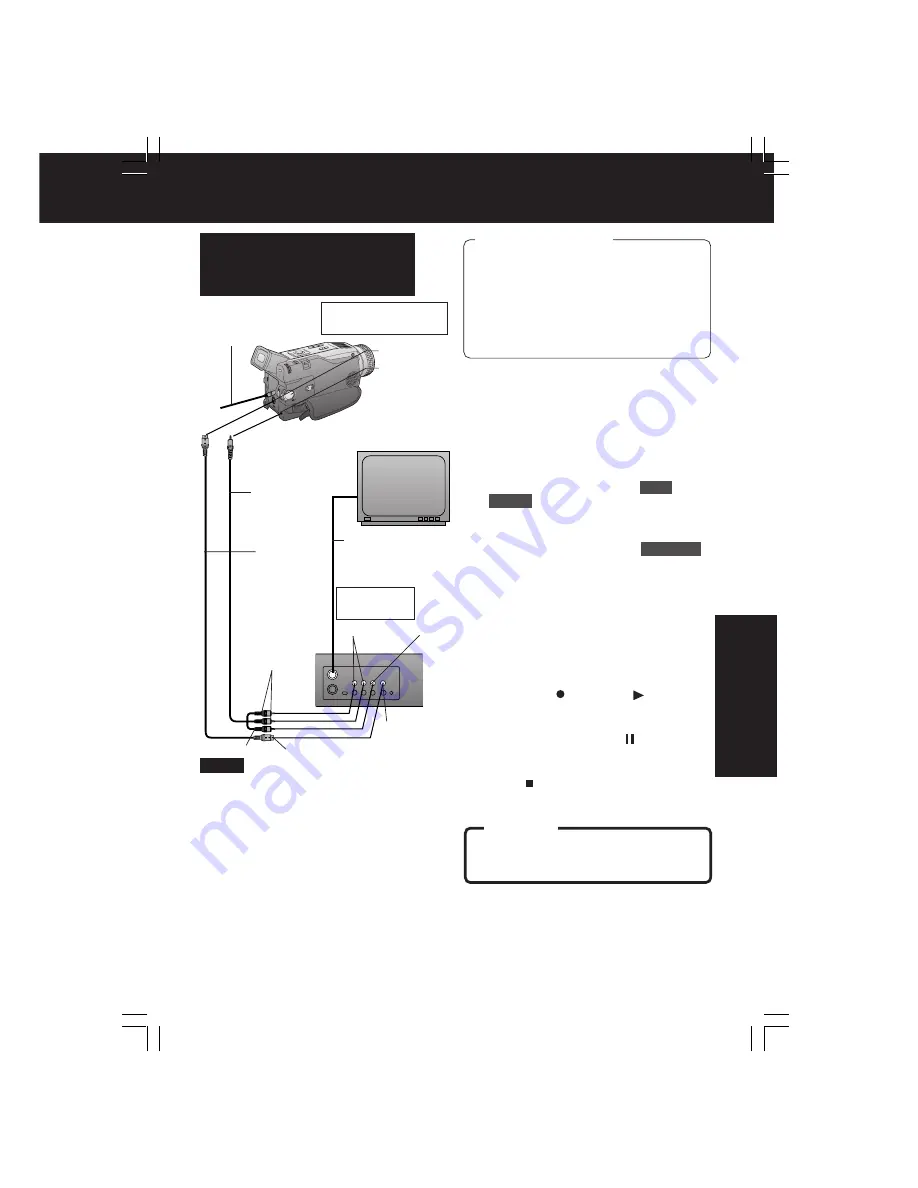
Before you begin
• Connect both Palmcorder and VCR to
their power sources.
• Connect the Palmcorder to a VCR as
illustrated left.
• Turn ON both units.
• Before using S-VIDEO Connector,
insert the DC Cable into the DC IN
Terminal. (p. 15)
CAUTION:
Unauthorized exchanging and/or
copying of copyrighted recordings may
be copyright infringement.
Video Out
S-Video Out
VHF Connecting
Cable (not
supplied)
TV
(To View)
A/V Cable
(Supplied)
To Audio Out
To Video Out
Source
VCR (Rear)
To S-Video Out
(If there is S-Video Out)
S-VIDEO IN
Source (Recording)
Palmcorder
S-Video
Cable (not
supplied)
Audio Out
Copying S-VHS or VHS
Cassette to your Tapes
(PV-DV402-K only)
• OSD functions are not displayed on the
TV monitor.
• Do not connect A/V with S-Video on a
different unit. The picture and sound may
be abnormal.
• If both S-Video Cable and A/V Cable are
used, the picture will come from the
S-Video Cable.
• Do not connect the A/V Cable and
S-Video Cable to other devices.
• If a recording is made by the VCR while
the counter is displayed, it cannot be
reset.
• Depending on the input signal, the closed
caption signal may not be able to be
recorded normally.
Note
A/V IN
DC Cable
(Supplied)
DV202_402-K.p 44-48.p65
2003/06/12, 10:15
47


