background image

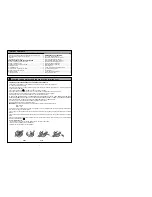
CAUTION:

Do not use attachments if they are wet. Attachments used in dirty areas, such as under a refrigerator,

should not be used on other surfaces until they are washed. They could leave marks.

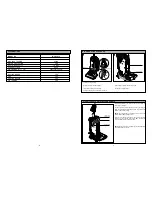
To return the handle to the storage position when the vacuum cleaner is not
in use, press handle release button and push the handle down for easy
storage.

NOTE: You should hear a noticeable “click” sound when handle reaches the
storage position.

MAINTENANCE AND SERVICING

A) VACUUM CLEANER STORAGE

Handle
Release
Button

Operating
Position

Storage
Position

Always follow all safety precautions when cleaning and servicing the vacuum cleaner.

WARNING: Electrical Shock And Personal Injury Hazard

Disconnect from electrical supply before servicing or cleaning the vacuum cleaner. Failure to do so could result in elec-
trical shock or personal injury from vacuum cleaner suddenly starting.

B) CLEANING EXTERIOR AND ACCESSORIES

Disconnect mains plug from wall outlet. 

Clean exterior using a clean, soft cloth that has been dipped in a solution of mild liquid detergent and water, then wrung dry. Wipe
dry after cleaning. DO NOT drip water on vacuum cleaner.

Wash attachments in warm soapy water, rinse and air dry.  Do not clean in dishwasher.

DO NOT use accessories if they are wet.

- 8 -

- 13 -

Motor

Shaft

Belt

Pulley

1

4

End

Cap

Base

Slot

Agitator

Nozzle

Base

1

5

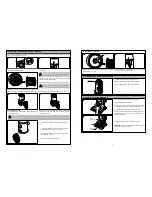
TO REPLACE BELT

Seat right end of agitator into nozzle base. To seat agitator
end, place rounded portion of agitator end cap down into slot
in nozzle base.

Loop the new belt on the belt pulley.

Loop the other end of belt onto the motor shaft on the left
end of agitator.

Pull left end of agitator forward and seat the end cap into
nozzle base.

Belt

Agitator

1

6

Press firmly, checking to see that each end is completely
inserted.

Check to see that the belt is centered on the belt pulley and
that the agitator turns freely.

Lower Plate

Nozzle Cover

Retainer

1

7

Make sure the nozzle cover retainers are in the UNLOCK
position.  Hook the front of the nozzle cover on to the nozzle
base and rotate downward.  Once in place, rotate the nozzle
cover retainers to the LOCK position.

Содержание MC-UL674

Страница 1: ...with the Australian Standards AS 3350 2 2 1995 and Australian EMC requirements for the C Tick Mark Matsushita Electric Industrial Co Ltd http www panasonic co jp global 2007 Matsushita Electric Industrial Co Ltd All rights Reserved CØ1ZDDEØØEØØ ACØ1ZDDEZØEØ Printed in P R C REMINDER FOR CUSTOMER The model and serial number of the product may be found on the nameplate located at the back of your va...

Страница 2: ...t it is refitted when the fuse is replaced If you lose the fuse cover the plug must not be used until a replacement cover is obtained A replacement fuse cover can be purchased from your local Panasonic Dealer IF THE FITTED MOULDED PLUG IS UNSUITABLE FOR THE SOCKET OUTLET IN YOUR HOME THEN THE FUSE SHOULD BE REMOVED AND THE PLUG CUT OFF AND DISPOSED OF SAFELY THERE IS A DANGER OF SEVERE ELECTRICAL ...

Страница 3: ...eave the vacuum cleaner plugged into mains socket Unplug from the socket when not in use and before cleaning the appliance or undertaking maintenance operations This appliance is not intended for use by persons including children with reduced physical sensory or mental capabilities or lack of experience and knowledge unless they have been given supervision or instruction concerning use of the appl...

Страница 4: ...lities are provid ed directly by Panasonic UK Ltd It couldn t be simpler Also available through our Internet is direct shopping for a wide range of finished products take a browse on our web site for further details 17 IDENTIFICATION OF MAIN PARTS HOW TO OPERATE YOUR VACUUM CLEANER A HOW TO ATTACH THE TELESCOPIC HANDLE 4 aaaaaaaaaaaaa aaaaaaaaaaaaa aaaaaaaaaaaaa aaaaaaaaaaaaa aaaaaaaaaaaaa aaaaaaa...

Страница 5: ...ays lift the vacuum cleaner by the carrying handle when transporting to storage Cord clip Handle height adjust button Carrying handle 16 MODEL NO MC UL674 POWER SOURCE 230 240V 50Hz MAX INPUT POWER 2200w MOTOR PROTECTION YES DUST BIN CAPACITY 1 8 litres EXHAUST FILTER HEPA DIMENSIONS W x L x H 368x406x1000 mm NET WEIGHT 11 7 kg DUSTING BRUSH YES PIPE YES CREVICE NOZZLE YES AIR TURBINE YES SPECIFIC...

Страница 6: ...ve dust accumulated or replace the filters filter see DUST BIN FILTER CHANGING AND CLEANING Exhaust filter If exhaust filter is full of dust replace it see EXHAUST FILTER MAINTENANCE Dust bin inlet is blocked If there is a blockage remove it see BLOCKAGES Agitator does not Clogged by a large object in If there is any obstruction remove it rotate the agitator housing Belts broken or loose If the be...

Страница 7: ...avoid accidental injury keep children away from the agitator while in operation Connect any of the accessories as indicated 1 1 1 2 1 5 1 3 1 4 14 H BLOCKAGES A B B A Hose Coupling Suction Inlet Hose Inlet Secondary Filter Screen The hose located on the vacuum cleaner carries the dirt from the nozzle up to the dust bin If the hose should become clogged Unplug the vacuum cleaner from mains outlet R...

Страница 8: ...lean exterior using a clean soft cloth that has been dipped in a solution of mild liquid detergent and water then wrung dry Wipe dry after cleaning DO NOT drip water on vacuum cleaner Wash attachments in warm soapy water rinse and air dry Do not clean in dishwasher DO NOT use accessories if they are wet 8 13 Motor Shaft Belt Pulley 1 4 End Cap Base Slot Agitator Nozzle Base 1 5 TO REPLACE BELT Sea...

Страница 9: ...to the UNLOCK position Grasp back of nozzle cover on each side and lift up to remove it from nozzle 1 1 Belt Agitator 1 2 WARNING Personal Injury Hazard Always unplug the vacuum cleaner before cleaning the brush area as agitator may suddenly restart Failure to do so can result in personal injury Carefully remove any residue that may exist in the belt area TO REMOVE BELT CLEAN AGITATOR Position han...

Страница 10: ...bbbb F EXHAUST FILTER MAINTENANCE 1 1 Exhaust Filter Cover Tab Latch HEPA Exhaust Filter 1 2 Rotate upper dust bin clockwise from the locked position to the unlocked position as shown Separate the upper dust bin from the lower dust bin by lifting it straight off 1 1 1 2 Locking Tabs TO ASSEMBLE THE DUST BIN Align the filter with the locking tabs in the dust bin and push down until you hear a click...

Отзывы: