background image

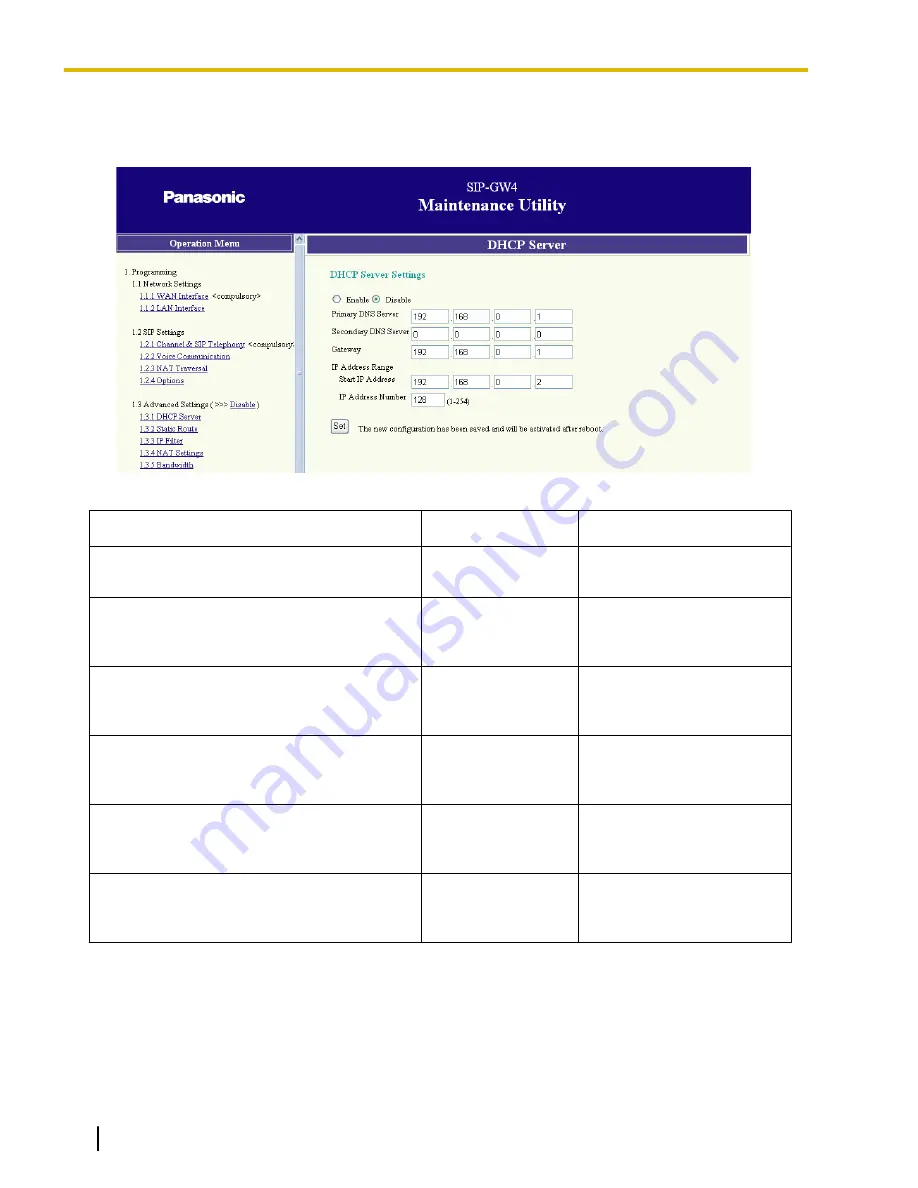
3.5.1  DHCP Server

1.

Click 

1.3.1 DHCP Server

 in the operation menu

2.

Assign each parameter referring to the descriptions below.

Parameter & Description

Default

Value Range

Enable/Disable

Specifies the use of a DHCP server.

Disable

Enable, Disable

Primary DNS Server

Specifies the IP address of the primary DNS
server.

192.168.0.1

Available IP addresses for the
primary DNS server

Secondary DNS Server

Specifies the IP address of the secondary DNS
server.

0.0.0.0

Available IP addresses for the
secondary DNS server

Gateway

Specifies the default gateway IP address of the
card.

192.168.0.1

Available default gateway IP
addresses for the card

Start IP Address

Specifies the first IP address that the DHCP
server can assign.

192.168.0.2

Available IP addresses

IP Address Number

Specifies the number of IP addresses that the
DHCP server can assign.

128

1–254

3.

Click 

Set

.

A confirmation screen is displayed.

4.

The new settings must be followed by a reboot to become effective.
Do one of the following:

Click 

Reboot Now

 to make the changes effective now.

Click 

Reboot Later

 to return to the previous screen.

52

Installation Manual

Document Version  2008-10  

3.5.1 DHCP Server

Содержание KX-TDA5450

Страница 1: ...ank you for purchasing a Panasonic 4 Channel SIP Trunk Card Please read this manual carefully before using this product and save this manual for future use In this manual the suffix of each model number e g KX TDA50G is omitted unless necessary 4 Channel SIP Trunk Card ...

Страница 2: ...1 Channel SIP Telephony 34 3 4 2 Voice Communication 41 3 4 3 NAT Traversal 45 3 4 4 Options 47 3 5 Programming Advanced Settings 49 3 5 1 DHCP Server 52 3 5 2 Static Route 53 3 5 3 IP Filter 54 3 5 4 NAT Settings 57 3 5 5 Bandwidth 62 3 6 Configuration Management 63 3 6 1 Backup Download from SIP GW4 63 3 6 2 Restore Upload to SIP GW4 64 3 6 3 Initialization 65 3 7 Maintenance 66 3 7 1 General In...

Страница 3: ...A 1 2 Bandwidth Requirements 79 B Initialization of the SIP GW4 Card 81 B 1 Initializing the SIP GW4 Card 82 Index 83 Document Version 2008 10 Installation Manual 3 Table of Contents ...

Страница 4: ...4 Installation Manual Document Version 2008 10 Table of Contents ...

Страница 5: ...Section 1 Overview Document Version 2008 10 Installation Manual 5 ...

Страница 6: ... telephone networks Mounting the 4 channel VoIP DSP SIP DSP4 card on a SIP GW4 card can enhance the channel capacity to a total of 8 channels SIP GW4 Connection Outline The following diagrams illustrate a simple VoIP networks connecting the SIP GW4 card to the Internet or LAN Diagram 1 PC Exclusively for maintenance of the SIP GW4 Card PC LAN Local Area Network WAN Wide Area Network Internet Local...

Страница 7: ...GW4 card may not function properly depending on the ITSP being used The performance of the SIP GW4 card may deteriorate depending on the network conditions If you access the Internet from the PC connected to the LAN port of the SIP GW4 card and send or receive large amounts of data there may be an adverse affect on voice communication In addition for security reasons it is recommended not to acces...

Страница 8: ... local IP address of the SIP GW4 card not the global IP address of the router Therefore if the SIP server receives a SIP message from the SIP GW4 card and sends a message back to the SIP GW4 card using the address stored in the SIP message the packet information will not reach the SIP GW4 card STUN Servers function to solve the global IP address problem under certain NAT conditions for example in ...

Страница 9: ... IP Address Fixed IP Address SIP SIP Server Server STUN STUN Server SIP Server Fixed IP Address SIP Server ISP ITSP ISP ITSP ISP ITSP ISP ITSP ISP ITSP ISP ITSP Router NAT enabled PC IP PT Switching Hub PC Exclusively for maintenance of the SIP GW4 Card Note If an ISP ITSP uses a device such as SBC Session Border Controller you may not have to enable the NAT Traversal feature A STUN Server is supp...

Страница 10: ...etric Response Routing rport RFC4028 Session Timer CODECs G 711 a law and µ law G 729AB Voice Options Echo Cancellation 64 ms Jitter Buffer 100 ms VAD Voice Activity Detection PLC Packet Loss Concealment DTMF Relay Inband Outband RFC2833 Outband INFO Protocol Function RTP RTCP PPPoE WAN Port DHCP Client WAN Port DHCP Server LAN Port DNS A SRV NAPT NAT Traversal STUN Port Forwarding QoS ToS field s...

Страница 11: ...e physical installation process of the KX TDA5450 SIP GW4 card covering the following topics 1 installing the card in the KX TDA50 PBX and 2 connecting the card to a network device using a Category 5 CAT 5 Ethernet cable Document Version 2008 10 Installation Manual 11 ...

Страница 12: ...RJ45 connector attach the included ferrite core Refer to Attaching a Ferrite Core to an RJ45 Connector Switch Settings Switch Usage and Status Definition SW1 Set the switch at ON position before installing the card in the PBX DIP SW Keep all DIP switches at default OFF positions Pin Assignments RJ45 Connector 10BASE T 100BASE TX 1 8 TX TX RX RX Signal Name Level V Function TX Transmit data TX Tran...

Страница 13: ...tablished Flashing PPPoE session establishment in process WAN LINK Green Indication of link status with connected devices e g modem ON Normal connection OFF Connection error 100 Green Indication of transmission speed with connected devices e g modem ON Operating at 100 Mbps OFF Operating at 10 Mbps Flashing Data transmitting only when operating at 100 Mbps LAN LINK Green Indication of link status ...

Страница 14: ...nd the ferrite core then close the case of the ferrite core Attach the ferrite core 5 cm 1 15 16 in away from the connector 5 cm 1 15 16 in SIP DSP4 Card KX TDA5451 4 channel VoIP DSP card To be mounted on the SIP GW4 card SIP DSP4 Card SIP GW4 Card Screws Included Accessories Screws 2 14 Installation Manual Document Version 2008 10 2 1 1 Names and Locations ...

Страница 15: ...r Plate CAUTION For safety reasons smooth the cut edges after removing the dummy cover plate 2 Position the card in the open slot making sure that the tabs on both sides of the card fit into place Then holding the card firmly in place lower the rear end so that the hole of the card fits over the extension bolt 1 2 Extension Bolt Document Version 2008 10 Installation Manual 15 2 1 2 Installing the ...

Страница 16: ...he new extension bolt included with the card into the hole on the card and tighten it to secure the card Extension Bolt 16 Installation Manual Document Version 2008 10 2 1 2 Installing the SIP GW4 Card in the PBX ...

Страница 17: ...ps below and then specify an IP address Note The IP address of the SIP GW4 card must be specified before connecting to the network For details about the IP address setting refer to 3 2 1 Preparing the PC Connecting to a PC When connecting the card to a PC use an Ethernet cross cable 1 Connect the Ethernet cable to the LAN port of the card 2 Connect the other end of the cable to the PC Ethernet Cro...

Страница 18: ...ubs use an Ethernet straight cable 1 Connect the Ethernet cable to the LAN port of the card 2 Connect the other end of the cable to the switching hub LAN Port PC Ethernet Straight Cable Switching Hub 18 Installation Manual Document Version 2008 10 2 2 1 LAN Port Connection ...

Страница 19: ...server so that the card can access the DHCP server directly not via a router Connecting to a Switching Hub When connecting the card to a switching hub use an Ethernet straight cable 1 Connect the Ethernet cable to the WAN port of the card 2 Connect the other end of the cable to the switching hub Internet Ethernet Straight Cable Switching Hub Router WAN Port Document Version 2008 10 Installation Ma...

Страница 20: ... be used depends on the type of DCE For details refer to documentation for the DCE 1 Connect the Ethernet cable to the WAN port of the card 2 Connect the other end of the cable to the LAN port of the DCE Internet WAN Port DCE e g ADSL Modem 20 Installation Manual Document Version 2008 10 2 2 2 WAN Port Connection ...

Страница 21: ...Section 3 Programming the SIP GW4 Card Document Version 2008 10 Installation Manual 21 ...

Страница 22: ...3 2 1 Preparing the PC 3 Connect cables to the card 2 2 1 LAN Port Connection 2 2 2 WAN Port Connection 4 Set up the Internet connection 3 3 1 WAN Interface 5 Set up the ITSP connection 3 4 1 Channel SIP Telephony 6 Specify other settings if necessary 7 Program the PBX 4 1 Programming the PBX 8 Back up the configuration file of the SIP GW4 card 3 6 1 Backup Download from SIP GW4 Note After you hav...

Страница 23: ...ata Security Inc MD5 Message Digest Algorithm in all material mentioning or referencing the derived work RSA Data Security Inc makes no representations concerning either the merchantability of this software or the suitability of this software for any particular purpose It is provided as is without express or implied warranty of any kind These notices must be retained in any copies of any part of t...

Страница 24: ... Protocol TCP IP and click Properties 4 a Select Use the following IP address b In the IP address box type 192 168 0 10 This is an example entry Type an IP address different from those assigned to the other LAN devices within the same network c In the Subnet mask box type 255 255 255 0 d Click OK Note To obtain an IP address automatically select Obtain an IP address automatically 5 a Start Interne...

Страница 25: ...k LAN Settings 7 When Not Using a Proxy Server Note If you use a proxy server see When Using a Proxy Server a Clear all check boxes b Click OK Your PC is now ready for programming through direct access to the card Document Version 2008 10 Installation Manual 25 3 2 1 Preparing the PC ...

Страница 26: ...steps below in substitution for step 7 above 7 a Check all boxes for Proxy server b Click Advanced 8 a Under Do not use proxy server for addresses beginning with type the IP address of the LAN port of the card b Click OK Your PC is now ready for programming the card through an IP network 26 Installation Manual Document Version 2008 10 3 2 1 Preparing the PC ...

Страница 27: ...d should be avoided during calls The contents and design of the software are subject to change without notice 1 Start Internet Explorer from the Start menu 2 Specify the URL of the SIP GW4 Maintenance Utility with the IP address http 192 168 0 1 8000 Exp 3 a The log in screen is displayed In the User name box type INSTALLER b In the Password box type 1234 c Click OK Now the menu screen of the SIP ...

Страница 28: ...PPoE Select when connecting to the network using PPPoE connection including using a fixed IP address for PPPoE connection DHCP Client Select when connecting to the network using DHCP server Fixed IP Address Select when connecting to the network using a fixed IP address assigned by an ISP 3 Click Set for the selected method for detailed configuration 28 Installation Manual Document Version 2008 10 ...

Страница 29: ...ic characters Password Specifies the password provided by the ISP compulsory No default Max 31 alphanumeric characters case sensitive Fixed IP Address 1 Specifies the IP address provided by the ISP required only when using a fixed IP address for PPPoE connection 0 0 0 0 2 Available IP addresses Subnet mask Specifies the subnet mask address for the fixed IP address required only when using a fixed ...

Страница 30: ...Specifies the maximum size of IP packet to be sent 1454 576 1492 DNS Server Address Specifies the method of IP address setting for a DNS server Auto Config Auto Config Manual Config 1 Authentication Type Specifies the authentication method AUTO AUTO Not Used CHAP PAP PPP Keep Alive Specifies whether the PPP Keep Alive feature is used or not Enable Enable Disable 1 When selecting Manual Config spec...

Страница 31: ... server No default Available IP addresses Secondary DNS Server Specifies the IP address of the secondary DNS server No default Available IP addresses Default Gateway Specifies the default gateway IP address No default Available IP addresses Note Do not assign an IP address and a subnet mask address from the same network as the LAN port for example LAN port IP address 192 168 0 1 Subnet mask 24 255...

Страница 32: ...Route to specify a static route Note Set Static Route is displayed only when 1 3 Advanced Settings is enabled Refer to 3 5 Programming Advanced Settings 32 Installation Manual Document Version 2008 10 3 3 1 WAN Interface ...

Страница 33: ...port for example LAN port IP address 192 168 0 1 Subnet mask 24 255 255 255 0 WAN port IP address 192 168 0 2 Subnet mask 24 255 255 255 0 If you do so disconnect the cables from the LAN and WAN ports and reboot the SIP GW4 card Then connect the cable only to the LAN port and reassign the IP address and subnet mask address for the LAN port If you change the IP address or subnet mask address of the...

Страница 34: ...assigned Reboot to enable new setting Reboot is required 1 Succeeded Registration to the SIP server is complete and calls can be made received Failed Registration to the SIP server is incomplete Channel Attribute Indicates the attribute of each channel It is necessary to program this item to activate each channel 1 When changing the attribute between Basic channel and Additional channel of ChN reb...

Страница 35: ...Settings is complete SIP Telephony Basic Settings If you change the Channel Attribute to Basic channel in Channel Settings and click the corresponding Set button the following screen is displayed 1 Assign parameters in Server Settings based on the information provided by the ITSP Parameter Description Default Value Range Proxy Server Specifies the domain name or IP address of a proxy server compul...

Страница 36: ...e specified port number after the domain name or IP address Example If you do not need to specify the port number of the server i e the port number is 5060 Domain name format example com IP address format 192 168 1 1 If you need to specify the port number of the server Domain name format example com 7777 IP address format 192 168 1 1 7777 The value range of the port number is 1024 65535 3 No need ...

Страница 37: ...igurations for caller ID to be sent when making calls Parameter Description Default Value Range Sending Caller ID Mode Specifies the header of the SIP message in which the caller ID is stored From header From header P Preferred Identity header P Asserted Identity header P Preferred Identity and P Asserted Identity header Username in From header 1 Specifies the value to be stored in the username pa...

Страница 38: ...ication ID PBX Caller ID 2 Complete SIP URI Address in P Preferred Identity header and P Asserted Identity header Specifies the complete SIP URI address of the P Preferred Identity header and P Asserted Identity header required only when this header is selected in Sending Caller ID Mode Note If you enter the complete SIP URI address here the configuration in Username in P Preferred Identity header...

Страница 39: ...with Country Code Area Code Number Receiving Caller ID for Incoming call Configurations for caller ID to be received from callers Parameter Description Default Value Range Minimum Caller ID Digits for International Call Specifies the minimum number of digits of the caller ID for international calls 12 1 31 Added Number for International Call Specifies the number to be added to the caller ID for in...

Страница 40: ... feature only when requested by the other device Enable Active Activates this feature only if the other device supports the feature Session Timer Specifies whether Session Timer is enabled or disabled Enable Passive Disable Enable Passive Activates this feature only when requested by the other device Enable Active Activates this feature only if the other device supports the feature Session Timer O...

Страница 41: ...rder of priority is as follows 1 High 3 Low 1 G 711 A 2 G 711 Mu 3 G 729 AB G 711 Mu G 711 A G 729 AB None for priority 2 and 3 only Packet Interval Specifies the interval time until the next RTP packet is sent 20 ms 20 30 40 50 60 ms VAD Specifies whether to use Voice Activity Detection VAD The VAD conserves bandwidth by detecting silent periods during a call and suppressing the packets of silenc...

Страница 42: ...st Reliability Throughput Delay DSCP Specifies the value in the ToS field of the header of IP packets by a DSCP for DiffServ 40 0 63 HEX Specifies the value in the ToS field of the header of IP packets by a hexadecimal number a0 0 FF RTP RTCP ToS Specifies the value in the ToS field of the header of IP packets by a generic term Priority 5 0 7 Normal Normal Monetary Cost Reliability Throughput Dela...

Страница 43: ...Later to return to the previous screen Fax Detection Detail Settings 1 If you enable the Fax Detection feature assign the parameters in Fax Detection Detail Settings referring to the descriptions below Parameter Description Default Value Range CNG Signal Detection Width ON Specifies the length of time that the PBX detects the CNG signal Min 425 ms Max 575 ms 15 5000 ms CNG Signal Detection Width O...

Страница 44: ...t be specified in the Codec Priority setting above Fax communication in the Super G3 mode is not guaranteed The Fax Detection feature may not function properly depending on the ITSP being used 44 Installation Manual Document Version 2008 10 3 4 2 Voice Communication ...

Страница 45: ...nel number ITSP Name Indicates the ITSP Internet Telephony Service Provider name specified in Server Settings in SIP Telephony Basic Settings in 1 2 1 Channel SIP Telephony No default ITSP name NAT Traversal Specifies the NAT traversal method Disable Disable NAT traversal is disabled Fixed IP Addr The global IP address of the router with NAT enabled is fixed STUN A STUN Server used alongside the S...

Страница 46: ...ed for only one ITSP specify STUN Server and Keep Alive for NAT Binding for only one channel The settings are automatically applied to the other channels 2 If the port number of the server is not 3478 enter and the specified port number after the domain name or IP address Example If you do not need to specify the port number of the server i e the port number is 3478 Domain name format example com ...

Страница 47: ...n be used as RTP RTCP ports 2 5004 1024 65434 even number only STUN Client Port Number 1 Specifies the port number of the SIP GW4 card used for communications with the STUN server 3478 1024 65535 1 Specify different values for each parameter 2 For example if the RTP RTCP Port Start Number is 5004 default ports 5004 to 5103 can be used as RTP RTCP ports DNS Settings 1 Assign each parameter referrin...

Страница 48: ... to be resent to another server This feature is disabled when the input value is 0 1 Assign each parameter referring to the descriptions below Parameter Description Default Value Range REGISTER Specifies the length of time before REGISTER requests are transmitted to another server 0 sec 0 32 sec Initial INVITE Specifies the length of time before Initial INVITE requests are transmitted to another s...

Страница 49: ...ling the Advanced Settings 1 Click Enable for 1 3 Advanced Settings in the operation menu 2 Read Agreement for the Advanced Settings carefully and click Agree Document Version 2008 10 Installation Manual 49 3 5 Programming Advanced Settings ...

Страница 50: ...he following screen is displayed and each programming item is enabled Disabling the Advanced Settings 1 Click Disable for 1 3 Advanced Settings in the operation menu 50 Installation Manual Document Version 2008 10 3 5 Programming Advanced Settings ...

Страница 51: ...lick OK 3 Click Reboot Now When the reboot finishes the following screen is displayed and each programming item is disabled Document Version 2008 10 Installation Manual 51 3 5 Programming Advanced Settings ...

Страница 52: ...es for the secondary DNS server Gateway Specifies the default gateway IP address of the card 192 168 0 1 Available default gateway IP addresses for the card Start IP Address Specifies the first IP address that the DHCP server can assign 192 168 0 2 Available IP addresses IP Address Number Specifies the number of IP addresses that the DHCP server can assign 128 1 254 3 Click Set A confirmation scre...

Страница 53: ...he descriptions below Parameter Description Default Value Range Destination IP Address Specifies the destination IP address No default Available IP addresses default route 0 0 0 0 Destination Subnet Mask Specifies the destination subnet mask address 24 255 255 255 0 0 8 32 Next Hop Specifies a gateway by selecting either an IP address or Interface No default Available IP addresses PPPoE 3 Click Ad...

Страница 54: ... packet does not match any rules the IP packet is allowed to pass Buttons in the table Button Description Delete Deletes the IP filter rule Edit Edits the IP filter rule Copy Copies the IP filter rule The copied rule can be edited to create a new rule Down Lowers the priority level of the IP filter rule Up Raises the priority level of the IP filter rule CAUTION For security reasons special care mu...

Страница 55: ... addresses 1 Mask Specifies the source subnet mask address 0 0 0 0 0 0 8 32 1 TCP UDP Port 2 Specifies the range of the source port number to apply the filter rule No default 1 65535 3 Destination IP Address Specifies the destination IP address No default Available destination IP addresses 1 Mask Specifies the destination subnet mask address 0 0 0 0 0 Available destination subnet mask addresses 1 ...

Страница 56: ...Fixed IP Address DHCP Client PPPoE LAN WAN Fixed IP Address DHCP Client PPPoE 4 1 Enter 0 0 0 0 0 to apply the IP filter rules to all the IP packets 2 This setting is activated when TCP UDP or TCP UDP is selected in Protocol 3 To specify the range enter the lowest port number hyphen and highest port number To apply the IP filter rules to all port numbers enter 0 65535 0 can only be entered in this...

Страница 57: ...enu 2 Assign the following items referring to the descriptions IP Masquerade NAPT Static NAT DMZ Demilitarized Zone Port Mapping Port Forwarding Private IP Packet Restriction to WAN VPN Pass through Document Version 2008 10 Installation Manual 57 3 5 4 NAT Settings ...

Страница 58: ...168 0 0 Available IP addresses Local Subnet Mask Specifies the subnet mask address for the local IP address assigned above 24 255 255 255 0 8 32 Note When the IP address is changed in 3 3 2 LAN Interface it may be necessary to change the IP masquerade settings as well Depending on the destination to which IP packets are sent the IP address of the WAN port may be automatically selected as the local...

Страница 59: ...s the target local IP address for address translation No default Available IP addresses Global IP Address Specifies the global IP address for address translation No default Available IP addresses 3 Click Add A maximum of 8 sets of addresses can be assigned to the table Port Mapping Port Forwarding Port Mapping enables external devices on a WAN network to communicate with internal devices on a LAN ...

Страница 60: ...get protocol for address translation TCP TCP UDP ESP GRE Port Number 1 Specifies the effective port numbers One Port One Port Enter a specific port number Port Range Enter a range of port numbers Local Host Specifies the local host by selecting either an IP address or a MAC address IP Address IP Address MAC Address 2 Remote Host 3 Specifies the target remote host for address translation IP Address...

Страница 61: ...te IP Packet Restriction to WAN Specifies whether to block IP packets that have private addresses as a source IP address to be sent to the WAN port without NAT 1 Check the box to block IP packets 2 Click Set A confirmation screen is displayed 3 Click Back to NAT Settings to return to the previous screen VPN Pass through Specifies the type of VPN pass through IPSec or PPTP 1 Check the desired box 2...

Страница 62: ...e Range WAN Fixed IP Address DHCP Client Specifies the bandwidth for the WAN port Applies to connection by a fixed IP address or DHCP Client 1 800 20 30000 PPPoE Specifies the bandwidth for PPPoE Applies to connection by PPPoE 2 800 20 30000 1 When Fixed IP Address or DHCP Client is selected as the connection method in WAN Interface 2 When PPPoE is selected as the connection method in WAN Interfac...

Страница 63: ...the speech quality Backup procedures should be avoided during calls 1 Click 2 1 Backup Download from SIP GW in the operation menu 2 Click Execute The download dialog box is displayed 3 Click Save The Save dialog box is displayed To cancel downloading click Cancel 4 Navigate to the folder in which you want to save the file 5 Enter a file name default config 6 Click Save Document Version 2008 10 Ins...

Страница 64: ...ation menu 2 Click Browse and select the file to be restored 3 Click Execute A confirmation screen is displayed To cancel uploading click Clear 4 The new settings must be followed by a reboot to become effective Do one of the following Click Reboot Now to make the new setting effective now Click Reboot Later to return to the previous screen Note After reboot the card will be disconnected from the ...

Страница 65: ...ncel the initialization click Cancel Note After initialization the card will automatically be rebooted After initialization the IP address of the LAN port is changed to 192 168 0 1 and the card and PCs may become unable to communicate In that case change the TCP IP settings of the PCs Document Version 2008 10 Installation Manual 65 3 6 3 Initialization ...

Страница 66: ...3 7 Maintenance 3 7 1 General Information Click 3 1 General Information 66 Installation Manual Document Version 2008 10 3 7 1 General Information ...

Страница 67: ...s a malfunction on the WAN For more information consult your network administrator SIP Registration Failed After WAN connection is complete registration to the SIP server failed Check the probable causes below and make the necessary corrections The settings for the channel are incorrect Refer to 3 4 1 Channel SIP Telephony The WAN port is not connected to the DCE e g ADSL Modem correctly Refer to ...

Страница 68: ...displayed system log information click Refresh System Logs To clear all system log information click Clear System Logs If the number of recorded system logs exceeds the limit the oldest system logs will be overwritten 68 Installation Manual Document Version 2008 10 3 7 3 System Log for engineers only ...

Страница 69: ... in the operation menu 2 Enter the IP address of the ping destination in the Destination IP Address box 3 Click Send After a few seconds the ping test result will be displayed Document Version 2008 10 Installation Manual 69 3 7 4 Ping Test ...

Страница 70: ...e same password in the Reenter new password box 4 Click Set A confirmation screen is displayed Note A maximum of 16 alphanumeric characters can be assigned for the password The password is case sensitive For security it is recommended to change the password periodically 70 Installation Manual Document Version 2008 10 3 7 5 Change Password ...

Страница 71: ...How to restore the configuration file 1 Click Browse and select the file to be restored 2 Click Execute A confirmation screen is displayed To clear the entry click Clear 3 The new setting must be followed by a reboot to become effective Do one of the following Click Reboot Now to make the new setting effective now Click Reboot Later to return to the previous screen How to backup the configuration ...

Страница 72: ...5 Click Save 72 Installation Manual Document Version 2008 10 3 7 6 Firmware Upgrade ...

Страница 73: ...nu 2 Click Reboot Now A confirmation screen is displayed 3 Click Execute After reboot the card will be disconnected from the network for a number of seconds Click Cancel to return to the previous screen Document Version 2008 10 Installation Manual 73 3 8 1 Reboot ...

Страница 74: ...74 Installation Manual Document Version 2008 10 3 8 1 Reboot ...

Страница 75: ...Section 4 Programming the PBX Document Version 2008 10 Installation Manual 75 ...

Страница 76: ...reprogrammed telephone number Programming Location of the Maintenance Console 3 Group 1 Trunk Group 1 TRG Settings Main Dialing Plan Table 3 Group 1 Trunk Group 4 Dialing Plan Caller ID Configuration To make the PBX send caller ID to the card when making calls when PBX Caller ID is selected for Username in From header or Username in P Preferred Identity header and P Asserted Identity header in 3 4...

Страница 77: ...Appendix A Guidance for VoIP Installation Document Version 2008 10 Installation Manual 77 ...

Страница 78: ...0 STUN Server Port UDP 3478 DNS Server Port UDP 53 Router Requirements Port Forwarding It may be necessary to set the NAT router so that it forwards the incoming packets to the IP address of the SIP GW4 card if all of the following conditions are met the PBX uses a STUN server a SIP GW4 card is located under a NAT router incoming packets are routed to a SIP Client port or RTP RTCP port indicated i...

Страница 79: ...ckets Specify the bandwidth of the ADSL network for outgoing IP packets in 3 5 5 Bandwidth Required Bandwidth for Each Channel The required bandwidth depends on what combination of CODECs and packet sending interval is used Keep in mind the following points about the type of CODEC and packet sending interval in terms of the speech quality The speech quality of the CODECs varies as follows G 711 Hi...

Страница 80: ...80 Installation Manual Document Version 2008 10 A 1 2 Bandwidth Requirements ...

Страница 81: ...Appendix B Initialization of the SIP GW4 Card Document Version 2008 10 Installation Manual 81 ...

Страница 82: ... the power to the PBX DIP SW OFF 1 2 3 INI 1 2 3 INI OFF 2 To start the SIP GW4 Maintenance Utility log in with the default IP address user ID and password from the PC connected to the card refer to 3 2 2 Starting the SIP GW4 Maintenance Utility 3 Open 2 3 Initialization from the menu and execute initialization refer to 3 6 3 Initialization 4 After initialization is complete return the Initialize ...

Страница 83: ...Index Document Version 2008 10 Installation Manual 83 ...

Страница 84: ...r 7 ITSP Internet Telephony Service Provider 6 K KX TDA5450 SIP GW4 Card 12 KX TDA5451 SIP DSP4 Card 14 L LAN Interface 33 LAN Port Connection 17 Local Port Settings 47 48 M Maintenance 66 N Names and Locations Installation 12 NAT Settings 57 NAT Traversal 8 45 O Options 47 P Ping Test 69 Port Mapping Port Forwarding NAT Settings 59 PPPoE Configuration WAN Interface 29 Preparations 23 Preparing th...

Страница 85: ...W WAN Interface 28 WAN Port Connection 19 Document Version 2008 10 Installation Manual 85 Index ...

Страница 86: ...ck and send it prepaid adequately insured and preferably in the original carton Attach a postage paid letter detailing the symptom to the outside of the carton DO NOT send the product to the Executive or Regional Sales offices They are NOT equipped to make repairs Product Service Panasonic Factory Service Centers for this product are listed in the service center directory Consult your certified Pa...

Отзывы: