background image

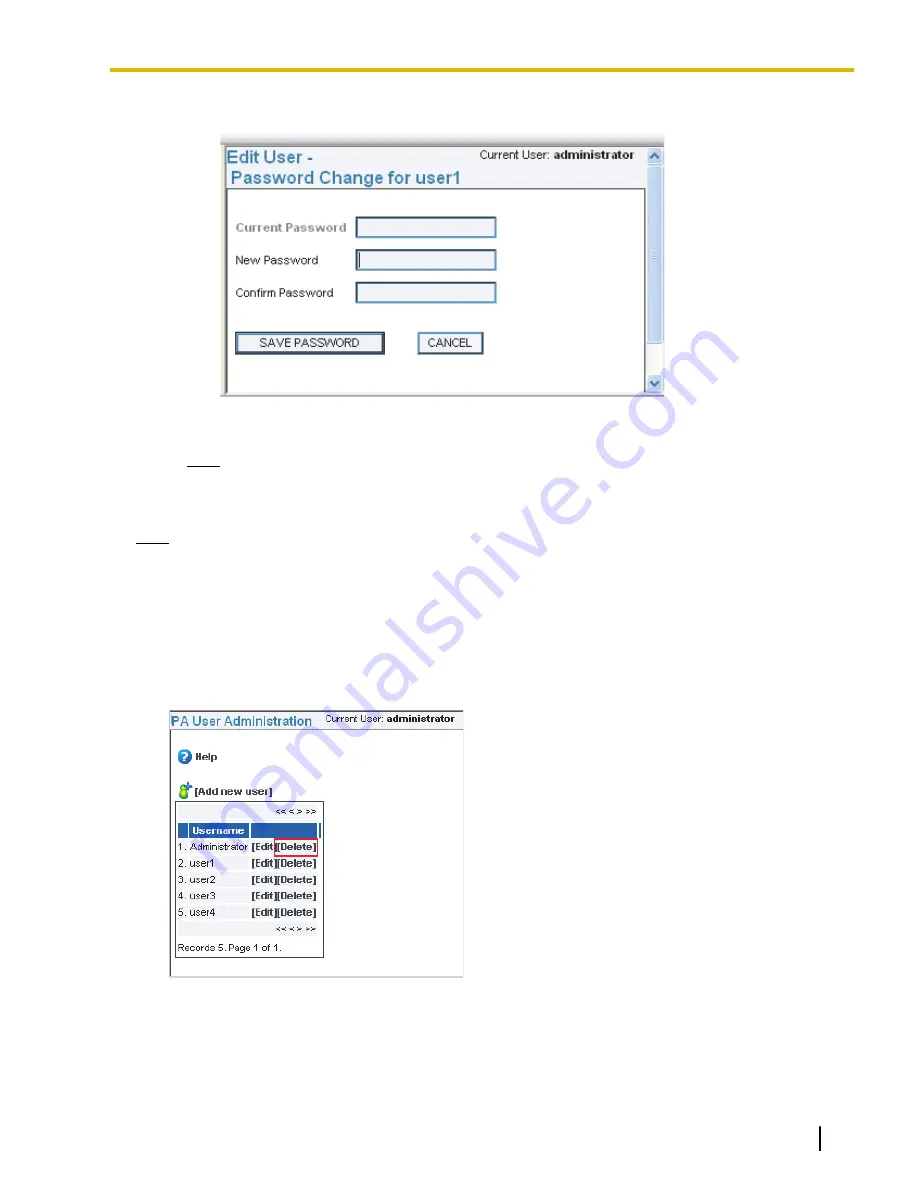
2.

Enter a 

New Password

, and reenter the new password in the 

Confirm Password

 field.

3.

Click 

SAVE PASSWORD

.

Note

Current Password

 only needs to be entered when the administrator is changing his/her password.

3.

Click 

SAVE

 when finished.

Note

If an email address is set, a notification message will be sent to inform the PA user of the modifications
when 

SAVE

 is clicked.

3.1.3  Deleting a PA User

The administrator and PA users with administrative privileges can delete PA users from the system.

1.

Click the 

[Delete]

 link in the 

PA User administration

 page.

Document Version  2007/2/19  

Operating Manual—Server

29

3.1.3 Deleting a PA User

Содержание KX-NCS1101

Страница 1: ...rver Phone Assistant Series Model No KX NCS1101 KX NCS1105 KX NCS1110 KX NCS1199 KX NCS1201 KX NCS9101 Thank you for purchasing this Panasonic product Please read this manual carefully before using this software and save this manual for future use ...

Страница 2: ...itoring call status 2 PA Status for supervisors or managers 3 PA Manager Web server performs configuration or setup for all PA users 4 PA Server CTI control the core engine for all PA software Condition The screen shots may be different from the actual software Trademarks All other trademarks identified herein are the property of their respective owners Screen shots reprinted with permission from ...

Страница 3: ... 34 3 2 4 1 Editing System Quick Dial 35 3 2 4 2 Deleting System Quick Dial 36 3 2 5 System Speed Dial 37 3 2 5 1 Adding System Speed Dial 39 3 2 5 2 Editing System Speed Dial 39 3 2 5 3 Deleting System Speed Dial 40 3 2 6 DISA AA Destination Setting 40 3 2 6 1 Editing DISA AA Destination Settings 41 3 2 6 2 Deleting OGM Number 41 3 2 7 Extension Names Number 42 3 2 7 1 Editing Extension Names 43 ...

Страница 4: ...4 1 3 1 Adding Personal Speed Dial 61 4 1 3 2 Editing Personal Speed Dial 61 4 1 3 3 Deleting Personal Speed Dial 62 4 1 4 Extension PIN 62 Index 65 4 Operating Manual Server Document Version 2007 2 19 ...

Страница 5: ...Section 1 Starting Phone Assistant Applications Document Version 2007 2 19 Operating Manual Server 5 ...

Страница 6: ...ger Web server starts automatically after PA Services Communication interface is successfully connected to PA Server CTI control The user can activate PA Services Communication interface manually by following the instructions below Double click the PA Services shortcut on the desktop or Start PA Services Communication interface from the Start menu Start All Programs Panasonic Phone Assistant Manag...

Страница 7: ... control will start After the server is successfully activated PA Services Communication interface automatically connects itself to PA Server CTI control After PA Services Communication interface successfully connects to PA Server CTI control PA Manager Web server automatically starts 4 Enter the following in the corresponding fields Username field administrator Document Version 2007 2 19 Operatin...

Страница 8: ...rol and PA Services Communication interface have finished starting up the status icons below will appear in the Notification area 1 2 A PA Services Communication interface ACTIVATED DEACTIVATED 8 Operating Manual Server Document Version 2007 2 19 1 1 Starting Phone Assistant Server for the first time ...

Страница 9: ...cks the status icon for PA Server CTI control the following commands will appear on the shortcut menu Settings changes the settings of PBX connection Clear Call Log deletes all the call logs About shows software version of PA Server CTI control 1 2 Exiting PA Applications To exit PA applications deactivate PA Manager Web server PA Services Communication interface and PA Server CTI control Document...

Страница 10: ...Right click the status icon for PA Services Communication interface in the Notification area and select Stop Service or Click the status icon for PA Services Communication interface to open the PA Services screen Then click Stop and close the screen 5 Right click the status icon for PA Services Communication interface in the Notification area and select Exit 10 Operating Manual Server Document Ver...

Страница 11: ...d select Stop 7 When the Stop PA Server dialogue box appears enter the user name and password 8 Click OK 9 Right click the status icon for PA Server CTI control in the Notification area and select Exit Document Version 2007 2 19 Operating Manual Server 11 1 2 Exiting PA Applications ...

Страница 12: ...12 Operating Manual Server Document Version 2007 2 19 1 2 Exiting PA Applications ...

Страница 13: ...Section 2 Interface Preview Document Version 2007 2 19 Operating Manual Server 13 ...

Страница 14: ...gn a password for the PA user Please refer to Administrator Functions and PA User Functions for details Administrator can view and change the general PBX settings and their own phone settings PA User can view and change some of the phone settings Note If the PA Manager Web server is idle for more than 5 minutes the user will be logged off automatically Only one administrator or PA user can log in ...

Страница 15: ...tor notifying him her about the forgotten password To use this feature the administrator must have set a valid email address in the PA User Admin function Specifying the email address of the administrator is described in 3 1 Registering a PA User 3 Click LOGIN 2 2 1 1 When Logged in as the Administrator After logging in as the administrator the following screen appears Document Version 2007 2 19 O...

Страница 16: ...l the configuration functions available in PA Manager Web server i e view and change the PA user s information and the PBX settings Note If either field was left empty or the user name or password were entered incorrectly the following error message appears and both fields are cleared To log in to PA Manager Web server reenter the correct user name and password 16 Operating Manual Server Document ...

Страница 17: ...rror message appears To continue using PA Manager Web server reenter your user name and password and click LOGIN Only one administrator or PA user can log in at a time If you try to log in to PA Manager Web server when another user has already logged in the following error message appears Document Version 2007 2 19 Operating Manual Server 17 2 2 1 To Log in to PA Manager Web server ...

Страница 18: ...A PA User Function Keys A PA user has limited access to configuration functions Therefore the function keys which appear in the Menu frame differ from those of the administrator Only the Not at My Desk Flexible Key Personal Speed Dial and the Extension PIN function keys are available when logged in as a PA user 18 Operating Manual Server Document Version 2007 2 19 2 2 1 To Log in to PA Manager Web...

Страница 19: ... address shown below appears in the address bar of the web browser A Hostname for PC Default Port Number connects the web browser to PA Services Client PC B Client PC C By entering the address shown below in the web browser of the client PC the user may log in to the PA Manager from their PC A http 10 75 28 189 8080 INDEX PHP IP Address of PC Default Port Number connects the web browser to PA Serv...

Страница 20: ...eb server 2 Click the Close button in the upper right corner of the window 2 3 Language PA Manager Web server allows you to select the desired language 1 Click the PAM Setup Configuration link in the PA Manager Version page 20 Operating Manual Server Document Version 2007 2 19 2 3 Language ...

Страница 21: ...e default language is determined during installation Refer to the Phone Assistant Series Installation Manual for more information This screen allows you to change the language even after default language has been selected Document Version 2007 2 19 Operating Manual Server 21 2 3 Language ...

Страница 22: ...22 Operating Manual Server Document Version 2007 2 19 2 3 Language ...

Страница 23: ...Section 3 Administrator Functions Document Version 2007 2 19 Operating Manual Server 23 ...

Страница 24: ...sername Shows registered PA user names C Edit Enables you to modify user account information D Delete Enables you to delete user accounts E Changes the PA User administration page Note Up to 25 records can be shown on a page Until other user accounts have been created only the administrator s information appears in the list 24 Operating Manual Server Document Version 2007 2 19 3 1 Registering a PA...

Страница 25: ...ew PA User 1 Click the Add new user link in the PA User administration page 2 Enter the account information 1 2 3 4 5 6 7 8 9 10 11 12 13 Document Version 2007 2 19 Operating Manual Server 25 3 1 1 Adding a New PA User ...

Страница 26: ...ost frequently Extensions List Opens the page that shows all the extension numbers connected to the PBX Note If more than one profile setting has been assigned click the Default Profile button next to the profile you wish to be the default profile Instead of manually entering the extension number it is possible to select the extension number from a list of all of the extension numbers by clicking ...

Страница 27: ...ears in the PA User administration page Note If an email address is set a welcome message will be sent to the newly registered PA user when SAVE is clicked The welcome message includes information such as the user name and password for the new account 3 1 2 Editing a PA User The administrator and PA users with administrative privileges can edit the information for all PA users Document Version 200...

Страница 28: ... link in the PA User administration page 2 Make the desired changes 1 A Change Password Changes the current password 1 Click Change Password 28 Operating Manual Server Document Version 2007 2 19 3 1 2 Editing a PA User ...

Страница 29: ... SAVE when finished Note If an email address is set a notification message will be sent to inform the PA user of the modifications when SAVE is clicked 3 1 3 Deleting a PA User The administrator and PA users with administrative privileges can delete PA users from the system 1 Click the Delete link in the PA User administration page Document Version 2007 2 19 Operating Manual Server 29 3 1 3 Deleti...

Страница 30: ...The following screen appears 2 Click OK 30 Operating Manual Server Document Version 2007 2 19 3 1 3 Deleting a PA User ...

Страница 31: ...ase refer to the Panasonic Hybrid IP PBX manuals regarding details on PBX features and settings 3 2 1 PBX Programming Settings Initialization 1 Click PBX settings or any function link in PBX settings The following information appears 2 Click Activate Document Version 2007 2 19 Operating Manual Server 31 3 2 1 PBX Programming Settings Initialization ...

Страница 32: ... appear on the telephone display 1 Click System Date Time in the Menu frame The following information appears 1 2 3 A System Date Specifies the date month and year B System Time Specifies the hour and minute C Refresh PBX Time Settings Enables to update the date and time settings according to that of the connected PBX 2 Set the System Date and the System Time using the drop down lists System Date ...

Страница 33: ...lows called users to assign messages to appear on a caller s extension 1 Click System Absent Message in the Menu frame 2 To change the message edit the existing message in the field To delete the message highlight the message in the field and delete it Note A maximum of 16 characters may be entered in each field 3 Click SET to update the Absent Message setting Document Version 2007 2 19 Operating ...

Страница 34: ...n abbreviated numbers in the Dial Number column which are used to call extensions or outside parties without having to dial their full numbers IMPORTANT To access the System Quick Dial function you need to import the System Quick Dial data from the PBX by following the procedure below 1 Click System Quick Dial The following information appears 2 Click Import 34 Operating Manual Server Document Ver...

Страница 35: ...er C Dial Number Specifies the quick dialing number D Contact Number Specifies the number to be dialed when the corresponding Dial Number is entered E Edit Allows you to change the corresponding Dial Number and Contact Number settings F Delete Deletes the corresponding Quick Dial Number setting G Changes the System Quick Dial page Note Up to 50 Quick Dial Number settings can be displayed on one pa...

Страница 36: ...rmation appears in the table as indicated below 3 2 4 2 Deleting System Quick Dial The administrator and PA users with administrative privileges may delete all the Quick Dial Number settings 1 Click the Delete link next to the desired Quick Dial Number A confirmation dialogue box will be displayed 2 Click OK to confirm the deletion 36 Operating Manual Server Document Version 2007 2 19 3 2 4 System...

Страница 37: ...ers available for all extension users IMPORTANT To access the System Speed Dial function you need to import the System Speed Dial data from the PBX by following the procedure below 1 Click System Speed Dial The following information appears 2 Click Import Document Version 2007 2 19 Operating Manual Server 37 3 2 5 System Speed Dial ...

Страница 38: ... can select Expanded Memory for Tenant 1 Expanded Memory for Tenant 8 from the drop down list and access an additional System Speed Dial table B Add new Speed Dial Allows you to add a new System Speed Dial setting C Speed Dial No Shows the location number D Contact Name Specifies the name of the System Speed Dial number E Contact Number Specifies the number to be dialed by the System Speed Dial nu...

Страница 39: ... the Contact Phone Number max 32 digits into each field 4 Click SAVE 3 2 5 2 Editing System Speed Dial The administrator and PA users with administrative privileges may change System Speed Dial numbers 1 Click the Edit link in the System Speed Dial page 2 Apply the desired changes to the corresponding fields 3 Click SAVE Note The updated information appears in the table When a System Speed Dial nu...

Страница 40: ...k OK to confirm the deletion 3 2 6 DISA AA Destination Setting The administrator and PA users with administrative privileges may assign the DISA AA number for the prerecorded outgoing messages OGMs Click DISA AA Destination Setting in the Menu frame The following information appears 1 3 4 5 5 2 A OGM Number Shows the prerecorded outgoing message number 40 Operating Manual Server Document Version 2...

Страница 41: ...eges may change destinations for each DISA AA number 1 Click the Edit link in the DISA AA Destination Setting page 2 Enter extension numbers to be assigned as destinations into the corresponding fields 3 Click SAVE to store Note The updated information appears in the table 3 2 6 2 Deleting OGM Number The administrator and PA users with administrative privileges may delete the DISA AA destinations ...

Страница 42: ... Number in the Menu frame The following information appears 2 1 3 4 5 6 7 7 A Extension Number Specifies the extension number of the extension Max 5 digits B Extension Name Specifies the name of the extension Max 20 characters C Edit Changes the Extension Name D Extension Setting Configures the extension settings for the extension E Flexible Key Assigns flexible CO buttons F Extension PIN Changes ...

Страница 43: ...nsion name change the administrator must reboot PA Server CTI control 3 2 7 2 Extension Setting The administrator and PA users may change extension settings For example a PA user who has left the office and forgotten to configure the phone forwarding option can log in to PA Manager Web server and configure this option remotely The administrator can change the settings for all extensions PA users c...

Страница 44: ...ned The following types of FWD settings are available Always On Busy On No Answer On Busy No Answer To set Call Forwarding select the desired FWD settings using the drop down lists and enter a specified destination number Do Not Disturb DND Incoming calls will not arrive at the extension To set Do Not Disturb select Don t Disturb using the drop down lists D Absent Message Specifies the Personal Ab...

Страница 45: ...0 or max 5 digits for KX TDA600 in the Ext No Floating Ext No field One touch One touch Dialing Used to access a preprogrammed party or feature with one touch Enter the desired one touch dialing number in the Dial Max 32 digits field Call Park Used to park or retrieve a call in the preset PBX parking zone Select Automatic or Specific from Param When Specific is assigned select the desired parking ...

Страница 46: ...cessing System VPS max 4 digits for KX TDA50 KX TDA100 KX TDA200 or max 5 digits for KX TDA600 into the Ext No Floating Ext No field Two way Transfer 1 Used to record a conversation into the mailbox of a specified extension Enter the floating extension number of the VPS max 4 digits for KX TDA50 KX TDA100 KX TDA200 or max 5 digits for KX TDA600 into the Ext No Floating Ext No field and then enter ...

Страница 47: ...1 Click Holiday Table Setting in the Menu frame The Holiday Table Setting page is displayed 2 Select a desired holiday mode Day Lunch Break Night 3 Select Enabled or Disabled in the Setting column 4 Specify the starting and ending dates using the drop down lists 5 Click SET to store the settings Document Version 2007 2 19 Operating Manual Server 47 3 2 8 Holiday Table Setting ...

Страница 48: ... Menu frame The following information appears 1 2 3 4 A Time Table No Specifies the desired time table to be displayed B Time Setting T Opens the Time Settings Selection Day Lunch Night page C Start time and End Time The start and end time for each time mode can be changed by dragging the edge of the corresponding color bar to the desired time D Time Service Switching Specifies whether time modes ...

Страница 49: ...tting T in the Time Service Mode page 2 Select the desired time Hour and Minute for each time mode 3 Click APPLY to store the time setting 4 Click OK to return to the Time Service Mode page 5 Click SET to store the time table 3 2 9 2 Editing Break Setting The administrator and PA users with administrative privileges may set and change the break time 1 Click Time Setting T in the Time Service Mode ...

Страница 50: ...d Minute for each time mode 70 273 4 Click APPLY to store the break settings 5 Click OK to return to the Time Service Mode page 6 Click SET to store the time table 50 Operating Manual Server Document Version 2007 2 19 3 2 9 Time Service Mode ...

Страница 51: ... dial box of PA or an external telephone number is dialed from another application through PA the dialed number will be modified automatically Example Copy a telephone number on another application software Paste to the dial box of PA client software using clipboard CTRL V The telephone number is modified automatically as programmed in PA Manager Web server Document Version 2007 2 19 Operating Man...

Страница 52: ... is 7 For example a number is treated as below by default 1234576 7 digits External telephone number 123456 6 digits Not an external telephone number B Remove 0 when dial is copied check box Deletes 0 from a copied external telephone number Example 81 0 1 2345 6789P12 81 1 2345 6789P12 C Telephone Number Modification A dialed number is modified according to the Telephone Number Modification table ...

Страница 53: ... 4567 No 3 011 01181921234567 201 123 4567 No 4 201 1234567 202 123 4567 No 5 202 202 2021234567 222 123 4567 Other Digits 1 12221234567 2 Configure Minimum digits of public telephone number Remove 0 when dial is copied and the Telephone Number Modification table as desired 3 Click OK Note PA client software must be restarted in order to update the settings that were changed by PA Manager Document...

Страница 54: ...Mail Address Specifies the email address to receive an error message Max 200 characters B Subject Max 80 characters C Body Information Max 255 characters 2 Enter the desired email address subject and message into the corresponding fields 3 Click Save Settings 3 3 3 E Mail Settings The administrator and PA users with administrative privileges may edit an email messages that PA Manager Web server au...

Страница 55: ... message configuration for Edit New User operation PA Manager Web server sends this message to a PA user when a user account is modified c E Mail message configuration for Forgot User Password request PA Manager Web server sends this message to a PA user when the Forgot Password button is clicked 2 Edit the desired message in the corresponding fields 3 Click Save Settings Document Version 2007 2 1...

Страница 56: ...56 Operating Manual Server Document Version 2007 2 19 3 3 3 E Mail Settings ...

Страница 57: ...Section 4 PA User Functions Document Version 2007 2 19 Operating Manual Server 57 ...

Страница 58: ... Initialization 4 1 1 Not at My Desk The administrator and PA users can change the personal settings for their own extensions 1 Click the Not at My Desk function in the Menu frame 2 Select the desired extension from the drop down list 3 Click OK Note For the detailed settings of Not at My Desk refer to 3 2 7 2 Extension Setting 4 1 2 Flexible Key The administrator and PA users can assign flexible ...

Страница 59: ...settings of Flexible Key refer to 3 2 7 3 Flexible Key 4 1 3 Personal Speed Dial The administrator and PA users may add edit and delete Personal Speed Dial numbers 1 Click Personal Speed Dial in the Menu frame Document Version 2007 2 19 Operating Manual Server 59 4 1 3 Personal Speed Dial ...

Страница 60: ...ofile Only available when more than one extension profile is set Select the desired extension profile from the drop down list B Add new Personal Speed Dial Allows you to add a new Personal Speed Dial setting C Speed Dial Number Shows the location number 60 Operating Manual Server Document Version 2007 2 19 4 1 3 Personal Speed Dial ...

Страница 61: ...an be assigned for each extension 4 1 3 1 Adding Personal Speed Dial The administrator and PA users may add new Personal Speed Dial numbers 1 Click the Add new Personal Speed Dial link in the Personal Speed Dial page 2 Select a desired Personal Speed Dial number from the Available Personal Speed Dialing Numbers drop down list 3 Enter the Contact Name max 20 characters and the Contact Dial Number m...

Страница 62: ...ed Dial numbers 1 Click the Delete link in the Personal Speed Dial page A confirmation dialogue box will be displayed 2 Click OK to confirm the deletion 4 1 4 Extension PIN The administrator and PA users may change the PIN code for their extensions 1 Click Extension PIN in the Menu frame 62 Operating Manual Server Document Version 2007 2 19 4 1 4 Extension PIN ...

Страница 63: ... the desired extension from the drop down list 3 Click OK Note For the detailed settings of Extension PIN refer to 3 2 7 4 Extension PIN Document Version 2007 2 19 Operating Manual Server 63 4 1 4 Extension PIN ...

Страница 64: ...64 Operating Manual Server Document Version 2007 2 19 4 1 4 Extension PIN ...

Страница 65: ...Index Document Version 2007 2 19 Operating Manual Server 65 ...

Страница 66: ...on 45 H Holiday Table Setting 47 Hurry up Button 46 L Language 20 Login 14 Administrator 15 PA User 18 Through a Web Browser 19 Log in Log out Button 45 Logout 20 Loop CO Button 45 M My Phone Settings 58 N Not at My Desk 58 O One touch Button 45 P Password Change Password Button 28 Forgot Password Button 15 PBX Programming Settings Initialization 31 Profile Name 26 Q Quick Dialing 34 R Registering...

Страница 67: ...Document Version 2007 2 19 Operating Manual Server 67 Notes ...

Страница 68: ...65 de Infanteria Km 9 5 Carolina Puerto Rico 00985 http www panasonic com csd Copyright This material is copyrighted by Panasonic Communications Co Ltd and may be reproduced for internal use only All other reproduction in whole or in part is prohibited without the written consent of Panasonic Communications Co Ltd 2007 Panasonic Communications Co Ltd All Rights Reserved PSQX4570ZA KK0207MS0 ...

Отзывы: