background image

Table of Contents

7

For Fax Advantage assistance, call 1-800-435-7329.

Fax

Sending Faxes 

Sending a fax manually........................................................................ 55
Documents you can send .................................................................... 57
Sending a fax using the navigator directory ......................................... 58
Broadcast transmission ....................................................................... 59

Receiving Faxes 

Receiving a fax manually ..................................................................... 62
Receiving a fax automatically .............................................................. 64

Distinctive Ring 

Using two or more phone numbers in a single telephone line ............. 66

Copy

Copying 

Making a copy ...................................................................................... 68

Answering Device

Greeting 

Recording your own greeting message ............................................... 71
Erasing your own recorded greeting message .................................... 72

Memo Message 

Leaving a message for others or yourself ............................................ 73

Incoming Messages 

Listening to recorded messages using the base unit ........................... 74
Listening to recorded messages using the handset............................. 76

Remote Operation 

Operating from a remote location ........................................................ 77

Voice Mailbox 

How callers can leave you private messages ...................................... 79
Recording your own mailbox greeting messages ................................ 80
Listening to recorded messages using the base unit ........................... 81
Listening to recorded messages using the handset............................. 82
Listening to recorded messages from a remote location ..................... 83

Option 

Transferring recorded messages to another telephone ....................... 84

Programmable Features

Features Summary 

Programming ....................................................................................... 86
Basic features  ..................................................................................... 88
Advanced features  .............................................................................. 89

Содержание KX-FPG372

Страница 1: ...ASSISTANCE VOICE CALL 1 800 HELP FAX 1 800 435 7329 E MAIL TO consumerproducts panasonic com for customers in the U S A or Puerto Rico REFER TO www panasonic com for customers in the U S A or Puerto Rico Please read these Operating Instructions before using the unit and save for future reference This model is designed to be used only in the U S A ...

Страница 2: ...nstructions on page 31 to page 34 L Note that the images of copied or received documents will remain on the used ink film Use discretion when disposing of the used ink film L Do not rub or use an eraser on the printed side of recording paper as the print may smear Energy Star L As an ENERGY STAR Partner Panasonic has determined that this product meets the ENERGY STAR guidelines for energy efficien...

Страница 3: ...tance and noise free operation the recommended base unit location is A A A A Away from electrical appliances such as a TV personal computer or another cordless phone B B B B In a HIGH and CENTRAL location with no obstructions such as walls C C C C Raise the antenna vertically Note L If you are using the handset near a microwave oven which is being used noise may be heard from the receiver on the h...

Страница 4: ...uthorized service center when service is required Opening or removing covers may expose you to dangerous voltage or other risks Incorrect reassembly can cause electric shock when the unit is subsequently used 13 Unplug this unit from the wall outlet and refer servicing to an authorized service center when the following conditions occur A When the power supply cord or plug is damaged or frayed B If...

Страница 5: ...ay overheat and cause burns L Charge the battery ies provided with or identified for use with this product only in accordance with the instructions and limitations specified in this manual NOTICE L Operating near 2 4GHz electrical appliances may cause interference Move away from the electrical appliances and or press the CH Channel button L Consult the manufacturer of any personal medical devices ...

Страница 6: ...sing the fax machine with an extension telephone 24 Case 3 Using the fax machine with a computer 26 Help Button Help function 28 Volume Adjusting handset volume 29 Adjusting base unit volume 30 Initial Programming Date and time your logo and fax number 31 Telephone Making and Answering Calls Phone calls making 35 Phone calls answering 37 Intercom 38 Transferring a call 40 Navigator Directory Stori...

Страница 7: ...orded greeting message 72 Memo Message Leaving a message for others or yourself 73 Incoming Messages Listening to recorded messages using the base unit 74 Listening to recorded messages using the handset 76 Remote Operation Operating from a remote location 77 Voice Mailbox How callers can leave you private messages 79 Recording your own mailbox greeting messages 80 Listening to recorded messages u...

Страница 8: ...ending 106 Battery Replacing the handset battery 107 Cleaning Document feeder 108 Thermal head 109 General Information Printed Reports Reference lists and reports 111 Caller IQ Feature openLCR service for the Caller IQ feature 112 Specifications Technical data about this product 119 FCC and Other Information FCC and Other Information 121 Warranty Limited Warranty 123 Customer Services Customer Ser...

Страница 9: ...king materials for future shipping and transportation of the unit L The part numbers are subject to change without notice Power cord 1 Part No PFJA1030Z Telephone line cord 1 Part No PQJA10075Z Cordless handset 1 Belt clip 1 Part No PQKE10341Z3 Paper tray for letter size recording paper 1 Part No PFKS1060Z1 Metal recording paper guide 1 Part No PFUS1385Z A4 paper guide 1 Part No PFZMFC175AL Ink fi...

Страница 10: ...etter size pages KX FA55 Replacement film 2 rolls 216 mm 50 m 81 2 164 about 300 letter size pages KX FA55D Replacement film 4 rolls 216 mm 50 m 81 2 164 about 600 letter size pages KX FA51 Legal paper tray To install legal size recording paper P P511 Rechargeable battery Nickel cadmium battery for the cordless handset KX TCA88 KX TCA90 Headset For a hands free telephone conversation Telephone Cal...

Страница 11: ...insert a pause during dialing or after pressing FLASH N MUTE L To mute your voice to the other party during a conversation Press this button again to resume the conversation O DIGITAL SP PHONE L For speakerphone operation page 36 37 P NAVIGATOR VOLUME L To adjust volume page 29 L To search for a stored name page 47 58 L To select the features or feature settings during programming page 86 87 L To ...

Страница 12: ...ecording paper entrance E E E E Recording paper exit F F F F Tension plate G G G G Antenna H H H H Front cover I I I I Document exit J J J J Microphone L To talk with the other party when using the speakerphone K K K K Document entrance L L L L Back cover open button M M M M Back cover Rear view A A A A Power inlet B B B B Telephone line jack C C C C Speaker B E F G H L D A M K J I C A C B ...

Страница 13: ... PLAYBACK L To access special telephone services such as Call Waiting page 49 or for transferring extension calls L To listen to recorded messages page 76 H H H H MUTE L To mute your voice to the other party during a conversation To release the mute press MUTE TALK or SP PHONE I I I I CALLER IQ L To use the Caller IQ feature page 112 J J J J OFF L To hang up page 35 37 L To stop viewing caller inf...

Страница 14: ... open lever green in the unit 3 Open the back cover 4 Insert the blue core of the front ink film roll into the right slot of the unit 1 Insert the T shaped gear blue into the left slot of the unit 2 Insert the rear ink film roll 3 L The ink film is safe to touch and will not rub off on your hands like carbon paper Center part Front cover Back cover open button green Back cover open lever green Bac...

Страница 15: ... cover securely by pushing down on the dotted area at both ends 1 Close the front cover securely 2 L When the power cord is connected the following message will be displayed while the unit is checking that there is no slack in the ink film PLEASE WAIT T shaped gear blue Ink film Slack Reverse Correct Incorrect Tight 1 turn Blue core The ink film is not wrapped around the blue core Dotted area Back...

Страница 16: ...may be obstructed i e by a wall etc To use legal size paper L Please purchase a legal paper tray Model No KX FA51 page 10 and install it To use A4 size paper You need to install the A4 paper guide to the right side of the paper tray L Change the recording paper size feature 16 page 88 1 Insert the bottom tab on the A4 paper guide into the lower slot 2 Press the guide into the upper slot Slot Tab P...

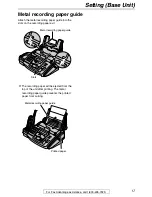
Страница 17: ...ch the metal recording paper guide into the slots on the recording paper exit L The recording paper will be ejected from the top of the unit after printing The metal recording paper guide prevents the printed paper from curling Slots Metal recording paper guide Metal recording paper guide Printed paper ...

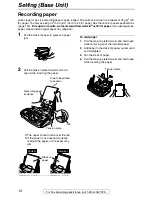
Страница 18: ... 16 1 Fan the stack of paper to prevent a paper jam 2 Pull the tension plate forward and hold open while inserting the paper L The paper should not be over the tab L If the paper is not inserted correctly readjust the paper or the paper may jam To add paper 1 Pull the tension plate forward and hold open while removing all of the installed paper 2 Add paper to the stack of paper you removed and str...

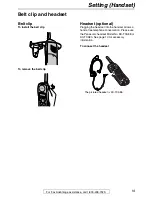
Страница 19: ...t clip To install the belt clip To remove the belt clip Headset optional Plugging the headset into the handset allows a hands free telephone conversation Please use the Panasonic headset Model No KX TCA88 or KX TCA90 See page 10 for accessory information To connect the headset The pictured headset is KX TCA88 ...

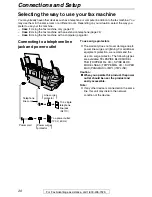
Страница 20: ...ting to a telephone line jack and power outlet To use surge protectors L The warranty does not cover damage due to power line surges or lightning For additional equipment protection we recommend the use of a surge protector The following types are available TELESPIKE BLOK MODEL TSB TRIPPE MFG CO SPIKE BLOK MODEL SK6 0 TRIPPE MFG CO SUPER MAX PANAMAX or MP1 ITW LINX Caution L L L L When you operate...

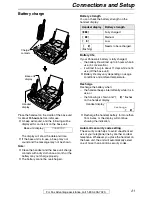
Страница 21: ...life will last up to 5 hours while in use in conversation it will last for up to about 11 days while not in use off the base unit L Battery life may vary depending on usage conditions and ambient temperature Recharge Recharge the battery when the handset beeps intermittently while it is in use or the following is shown and 1 23 flashes on the handset display Handset display Recharge 01 234 L Recha...

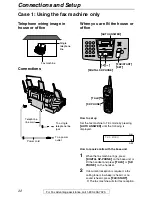
Страница 22: ...o receive calls with the base unit 1 When the fax machine rings press DIGITAL SP PHONE on the base unit or lift the handset and press TALK or SP PHONE on the handset 2 If document reception is required a fax calling tone slow beep is heard or no sound is heard press FAX START L The fax machine will start fax reception Single telephone line Fax machine To a single telephone line jack To a power out...

Страница 23: ...se or office How to set up 1 Set feature 77 to TAD FAX mode page 92 beforehand 2 Press AUTO ANSWER until the following is displayed L The display will show the number of rings before the unit answers a call in TAD FAX mode L If necessary press or to select the desired ring setting and press SET How to receive calls If the call is a phone call the fax machine will record a voice message automatical...

Страница 24: ...ce Connections When you are IN the house or office How to set up Set the fax machine to TEL mode by pressing AUTO ANSWER until the following is displayed Room Extension telephone Fax machine Room Single telephone line To a single telephone line jack To a power outlet Power cord Telephone line cord AUTO ANSWER FAX START SET DIGITAL SP PHONE SP PHONE TALK ON OFF TEL MODE ...

Страница 25: ...n document reception is required a fax calling tone slow beep is heard or no sound is heard press 9 pre selected fax activation code firmly 3 Replace the handset L The fax machine will start fax reception Note L To receive fax documents using the extension telephone you must set the remote fax activation to on feature 41 page 90 beforehand L You can change the fax activation code in feature 41 pag...

Страница 26: ...you may hear interference noise during telephone conversation A filter to prevent this is provided from your service company Please attach the filter to the telephone line cord of the fax machine When you are IN the house or office Computer Fax machine Single telephone line To a single telephone line jack To a power outlet Power cord Telephone line cord Telephone line cord To a single telephone li...

Страница 27: ... receive fax documents using the handset you must set the remote fax activation to on feature 41 page 90 beforehand L You can change the fax activation code in feature 41 page 90 When you are OUT of the house or office How to set up 1 Set feature 77 to TAD FAX mode page 92 beforehand 2 Press AUTO ANSWER until the following is displayed L The display will show the number of rings before the unit an...

Страница 28: ...atures FEATURE LIST PRESS SET 4 How to store names and telephone numbers in the directory and how to dial them DIRECTORY PRESS SET 5 Help with problems operating the answering device TAD OPERATION PRESS SET 6 Help with problems sending receiving faxes FAX SND RCV PRESS SET 7 How to use the copier function COPIER PRESS SET 8 Frequently asked questions and answers Q and A PRESS SET 9 Explanation of ...

Страница 29: ...following is displayed and press Ringer off V Save To turn the ringer back on press e or v 5 Press While the ringer volume is set to off When a call is received the handset will not ring Ringer pattern L You can select one of six ringer patterns 1 Press FUNCTION 2 Press v or e repeatedly until the arrow points to Ringer pattern Ringer volume Ringer pattern Program 3 Press 4 Press v or e to select ...

Страница 30: ... turn the ringer back on press While the ringer volume is set to off When a call is received the unit will not ring and will display the following INCOMING CALL Ringer pattern L You can select one of three ringer patterns Change the setting feature 17 page 88 The ringer pattern you selected will sound when the unit receives a call Speaker volume 8 levels high to low are available While using the s...

Страница 31: ...st 10 2002 Press 0 8 1 0 0 2 M 08 D 10 Y 02 TIME 12 00AM 5 Enter the correct hour minute by selecting 2 digits for each using the dial keypad Press to select AM or PM Example 10 15PM 12 hour clock entry 1 Press 1 0 1 5 M 08 D 10 Y 02 TIME 10 15AM 2 Press until PM is displayed M 08 D 10 Y 02 TIME 10 15PM 6 Press SET L The next feature will be displayed 7 Press MENU Note L You can enter the number b...

Страница 32: ...be displayed 6 Press MENU Note L You can enter your logo by pressing or in step 4 In this case press to move the cursor see page 33 for details To change capital or lower case letters Pressing the key will change to capital or lower case alternately 1 Press 2 2 times LOGO B 2 Press 4 3 times LOGO B I 3 Press LOGO B i 4 Press 5 3 times LOGO Bi l To correct a mistake Press or to move the cursor to t...

Страница 33: ...o step 1 to enter the next character Display order of characters Keys Characters 1 1 _ 2 A B C a b c 2 3 D E F d e f 3 4 G H I g h i 4 5 J K L j k l 5 6 M N O m n o 6 7 P Q R S p q r s 7 8 T U V t u v 8 9 W X Y Z w x y z 9 0 0 To change capital or lower case letter FLASH CALL WAIT Hyphen button To insert a hyphen MUTE Insert button To insert one character or one space STOP Delete button To delete ...

Страница 34: ...isplayed 6 Press MENU Note L You can enter your fax number by pressing or in step 4 In this case press to move the cursor L The button replaces the digit with a and the button replaces it with a space Example 234 5678 Press 2 3 4 5 6 7 8 L To enter a hyphen in a telephone number press FLASH CALL WAIT To correct a mistake Press or to move the cursor to the incorrect number and make the correction T...

Страница 35: ...swers talk into the microphone 4 When finished talking press OFF or place the handset on the base unit To put a call on hold Press HOLD To release the hold press TALK or SP PHONE on the handset or DIGITAL SP PHONE on the base unit L If you do not press a button for more than 6 minutes a beep will sound L If you do not press a button for more than 10 minutes the line will be disconnected To redial ...

Страница 36: ...ast will be displayed 8 Press OFF to exit the program With the base unit 1 Press DIGITAL SP PHONE TEL PRESS NAVI 2 Dial the telephone number L When the other party answers talk into the microphone 3 When finished talking press DIGITAL SP PHONE Note L To switch to the handset while using the base unit speakerphone If the handset is off the base unit press TALK or SP PHONE If on the base unit just l...

Страница 37: ... to Program Ringer pattern Program 3 Press Talk switching LCD contrast 4 Press Auto talk Off V Save 5 Press e or v to select On Auto talk On V Save 6 Press 7 Press OFF to exit the program Note L If you subscribe to Caller ID service and want to view the caller s information on the handset display before answering a call turn off this feature Answering phone calls hands free 1 When the unit rings l...

Страница 38: ...le 00 01 12 12223 2 Base unit Answer through the microphone Base unit display PAGING u INTERCOM 3 Handset When finished talking press OFF or lay the handset on the base unit Base unit When finished talking press LOCATOR INTERCOM Note L If the handset user has difficulty hearing the base unit user ask the base unit user to decrease the speaker volume by pressing Microphone LOCATOR INTERCOM OFF INTE...

Страница 39: ...again 2 Handset Press INTERCOM to answer Handset display Intercom Example 00 01 12 12223 3 Base unit Speak into the microphone Base unit display INTERCOM 4 Base unit When finished talking press LOCATOR INTERCOM Handset When finished talking press OFF or place the handset on the base unit Handset locator Using this feature you can locate the handset if it has been misplaced Microphone LOCATOR INTER...

Страница 40: ... unit Talk with the handset user through the microphone 3 Base unit To answer the outside call press DIGITAL SP PHONE From the base unit to the handset 1 Base unit During an outside call press LOCATOR INTERCOM to page the handset L The base unit will start paging the handset for 1 minute L The outside call will be put on hold Base unit display PAGING Handset display Paging Press INTERCOM L If ther...

Страница 41: ...ll change to capital or lower case alternatively 4 Press v Enter phone no 5 Enter the telephone number up to 30 digits using the dial keypad Example 3334444 V Next 6 Press v Example Tom Jones 3334444 Edit Save 7 Press L To program other entries repeat steps 2 to 7 8 Press OFF to exit the program Helpful hint L For your convenience HELP FAX 1 800 435 7329 has been pre programmed If you cannot solve...

Страница 42: ...S SET L To program other entries repeat steps 3 to 6 7 Press MENU to exit the program Helpful hint L You can confirm the stored entries in the telephone number list page 111 Note L When the following is displayed in step 6 you can store only 5 more entries REGISTERED SPACE 5 DIRS L If there is no space to store new entries the following is displayed in step 6 Erase unnecessary entries page 45 REGI...

Страница 43: ...age 41 for instructions 5 Press v Example 1234567 V Next L If you do not need to edit the telephone number skip to step 7 6 Edit the telephone number For further details see page 41 7 Press v Example Jane 6789453 Edit Save 8 Press 9 Press OFF to exit the program Using the base unit 1 Press L Confirm that there are no documents in the document entrance DIRECTORY MAILBOX 2 Press or until the desired...

Страница 44: ... Edit the name see page 33 42 for instructions 6 Press SET Example NO 0123456 L If you do not need to edit the telephone number skip to step 8 7 Edit the telephone number For further details see page 42 8 Press SET REGISTERED ...

Страница 45: ...ng press 4 Press or CLEAR Clear L The stored name and number are erased 5 Press OFF to exit the program Using the base unit 1 Press L Confirm that there are no documents in the document entrance DIRECTORY MAILBOX 2 Press or until the desired entry is displayed Example PETER 9876543 b PETER EDIT PRESS MENU 3 Press MENU Example NAME PETER EDIT DELETE 4 Press DELETE OK YES SET NO STOP L To cancel era...

Страница 46: ...vigator Directory 46 Another method to erase a stored entry 1 Press L Confirm that there are no documents in the document entrance 2 Press or until the desired entry is displayed 3 Press ERASE 4 Press SET ...

Страница 47: ... and dial the number manually 3 Press TALK or SP PHONE L The unit will start dialing automatically Using the base unit 1 Press L Confirm that there are no documents in the document entrance DIRECTORY MAILBOX 2 Press or until the desired entry is displayed Example LISA 2233445 b LISA EDIT PRESS MENU L If the desired name has not been stored press STOP and dial the number manually 3 Press DIGITAL SP...

Страница 48: ...ls not letters or numbers press 4 Press e until LISA is displayed L To stop the search press OFF L To make a call press TALK or SP PHONE Using the base unit 1 Press L Confirm that there are no documents in the document entrance 2 Press or to enter the directory 3 Press 5 repeatedly until any name with the initial L is displayed see the character table page 33 L To search for symbols not letters or...

Страница 49: ...rea which does not provide Caller ID service Base unit display OUT OF AREA Handset display Out of area The caller requested not to send caller information Base unit display PRIVATE CALLER Handset display Private caller The caller made a long distance call Base unit display LONG DISTANCE Handset display Long distance To confirm caller information using the Caller ID list The unit will store informa...

Страница 50: ...ler information Example KEVIN PARKER 333 4444 11 50A JUN10 L Check mark on the display means this call has already been viewed or answered 3 Press TALK or SP PHONE to call back the displayed party L The unit will start dialing automatically Display while viewing When no calls have been received No caller data To edit the telephone number for calling back Press repeatedly after step 2 Each time you...

Страница 51: ... 2 Example SAM LEE 11 20AM Jul 20 b 1345678901 11 20AM Jul 20 L Check mark on the display means the call has already been viewed or answered Display while viewing When the unit could not receive a name NO NAME RCVD When no calls have been received NO CALLER DATA To edit the telephone number for calling back Press repeatedly after step 2 Each time you press the telephone number will be changed as f...

Страница 52: ... e or v repeatedly until the arrow points to All clear Exit All clear V Yes L To cancel erasing press OFF 4 Press or CLEAR All clear Erasing specific caller information using the handset 1 Lift the handset and press e or v Example 2 new calls V Directory 2 Press e or v repeatedly until the desired entry is displayed Example CINDY TURNER 1 234 456 7890 11 20A JAN12 3 Press CLEAR Clear u Example KEV...

Страница 53: ...OP L To cancel erasing press STOP then MENU 4 Press SET ERASE COMPLETED 5 Press STOP to exit the program Erasing specific caller information using the base unit 1 Press CALLER ID Example 2 NEW CALLS PRESS NAVI 2 Press or until the desired entry is displayed Example SAM LEE 12 10AM Jul 20 3 Press ERASE DELETED L To erase other entries repeat steps 2 to 3 4 Press STOP to exit the program SET MENU ST...

Страница 54: ...ess Edit Save directory V Yes 4 Press e or v repeatedly until the arrow points to Save directory Edit Save directory V Yes 5 Press Example CINDY TURNER 12344567890 6 Press OFF to exit the program Into the base unit 1 Press CALLER ID Example 2 NEW CALLS PRESS NAVI 2 Press or until the desired entry is displayed Example SAM LEE 11 50AM Apr 14 3 Press MENU Example NAME SAM LEE STORE PRESS SET 4 Press...

Страница 55: ...n Select the desired resolution according to the type of document STANDARD For printed or typewritten originals with normal sized characters FINE For originals with small printing SUPER FINE For originals with very small printing This setting only works with other compatible fax machines PHOTO For originals containing photographs shaded drawings etc L Using the FINE SUPER FINE or PHOTO setting wil...

Страница 56: ...s the memory capacity sending will be canceled and this feature will be turned off automatically Transmit the entire document manually L This feature cannot be used if DIGITAL SP PHONE TALK or SP PHONE is pressed To stop transmission Press STOP Sending a fax with the voice guide You can send documents by following the voice guide 1 Press HELP 2 times 2 Press SET 3 Follow steps 1 to 6 page 55 L Aft...

Страница 57: ...hat can be seen through the other side i e newspaper L Check that ink paste or correction fluid has dried completely L To transmit the document with a width of less than standard letter size 216 mm we recommend using a copy machine to copy the original document onto letter sized paper then transmitting the copied document Minimum size Maximum size Effective scanning area Document weight L Single s...

Страница 58: ...TART L If the desired name has not been stored in the navigator directory press STOP and dial the number manually Fax auto redial If the line is busy or if there is no answer the unit will automatically redial the number up to 2 times L This feature is also available for delayed transmission feature 25 page 89 L During redial the following will be displayed WAITING REDIAL L To cancel redialing pre...

Страница 59: ...T NAVI BROAD 2 Press DIR 00 NAVI SET L The number in brackets indicates the number of registered entries 3 Press or until the desired entry is displayed Example MIKE 1 987 654 3210 4 Press SET Example DIR MIKE 01 STORE PRESS SET L To program other entries repeat steps 3 and 4 up to 20 entries 5 Press SET to exit the program REGISTERED Note L If you program the wrong entry press STOP after step 4 t...

Страница 60: ... repeat steps 5 and 6 up to 20 entries 7 Press STOP to exit the program Erasing a stored entry in the broadcast memory 1 Press L Confirm that there are no documents in the document entrance DIRECTORY MAILBOX 2 Press or until the following is displayed BROADCAST EDIT PRESS MENU 3 Press MENU BROADCAST ADD DELETE 4 Press 5 Press or until the desired entry you want to erase is displayed Example DICK 1...

Страница 61: ...will be canceled L If one of the entries is busy or does not answer it will be skipped All skipped entries will be redialed up to 2 times after all of the other entries have been called To send the same document to more than one party only once You can also select the parties for each transmission 1 Insert the document 2 Press 3 Press or until the following is displayed ONE TIME BROAD PRESS SET 4 ...

Страница 62: ...machine rings lift the handset and press TALK or SP PHONE 2 When document reception is required a fax calling tone slow beep is heard or no sound is heard press 9 pre selected fax activation code firmly L A single beep will be heard L The unit will start fax reception Note L To receive fax documents using the handset you must set the remote fax activation to on feature 41 page 90 beforehand L You ...

Страница 63: ...ation code firmly 1 When the extension telephone rings lift the handset of the extension telephone 2 When document reception is required a fax calling tone slow beep is heard or no sound is heard press 9 pre selected fax activation code firmly 3 Replace the handset L The fax machine will start reception Note L To receive fax documents using the extension telephone you must set the remote fax activ...

Страница 64: ...D FAX mode 1 Set feature 77 to TAD FAX page 92 2 Press AUTO ANSWER until the following is displayed L The unit will play the pre recorded greeting message L The display will show the number of rings before the unit answers a call in TAD FAX mode L If you wish to change the ring setting press or until the desired setting is displayed and press SET L You can adjust the speaker volume after changing ...

Страница 65: ...cted the fax machine will receive a fax automatically Ring setting in TAD FAX mode You can choose from 1 2 3 4 TOLL SAVER and RINGER OFF This setting can be changed by feature 06 page 88 TOLL SAVER When you call the unit from a remote location the number of rings will tell you if there are any new voice messages If the unit answers on the 2nd ring there is at least one new recorded message If the ...

Страница 66: ...l automatically start fax reception This service is convenient if you wish to have a different number for fax in a single telephone line To use this service you must subscribe to the Distinctive Ring service offered by your local telephone company Activating the Distinctive Ring feature 1 Press MENU SYSTEM SET UP PRESS NAVI 2 Press then 3 1 DISTINCTIVE RING MODE OFF 3 Press or to select ON DISTINC...

Страница 67: ...ess MENU SYSTEM SET UP PRESS NAVI 2 Press then 3 2 FAX RING PATTERN RING B D 3 Press or to select the ring pattern assigned for fax A Standard ring one long ring B Double ring two short rings C Triple ring short long short rings D Other triple ring short short long rings B D default setting For the ring pattern of B C and D 4 Press SET 5 Press MENU Telephone number Ring pattern Use 012 1234 Standa...

Страница 68: ...nsmittable document can be copied page 57 To select the resolution Select the desired resolution according to the type of document FINE For printed or typewritten originals with small printing SUPER FINE For originals with very small printing PHOTO For originals containing photographs shaded drawings etc L If you select STANDARD copying will be done using FINE mode Quick scan feature This feature ...

Страница 69: ... 14 A4 210 mm 297 mm 81 4 1111 16 Note L If the appropriate reduction rate is not selected the document may be divided and the top of the second sheet will be deleted L If the image at the bottom of the document is not copied when you copy a document that is the same length as the recording paper try 92 or 86 Original document Enlarged copy B C F G A B C D E F G H Area to be enlarged Example 150 e...

Страница 70: ...til the following is displayed COLLATE ON RESOLUTION 3 Press START Example Making 2 copies of a 4 page original document Note L The unit will store the documents into memory while collating the copies If memory becomes full while storing the unit will only print out the stored pages L After copying the collating feature will turn off automatically Collated pages 4 3 2 1 4 3 2 1 Uncollated pages 1 ...

Страница 71: ...about 20 cm 8 inches away from the microphone L The display will show the remaining recording time TAD REC 16s 5 When finished recording press STOP L The unit will repeat your message Adjust the volume using or Note L You can choose 60 seconds for your own TAD FAX greeting message feature 54 page 91 If you change to 60 seconds we recommend that you tell the caller in your own TAD FAX greeting mess...

Страница 72: ...ess ERASE until the following is displayed TAD GREETING PRESS SET 3 Press SET ERASE GREETING YES SET NO STOP L To cancel erasing press STOP 4 Press SET GREETING ERASED Note L If you erase your own TAD FAX greeting message the pre recorded greeting message will be played when receiving a call SET ERASE STOP ...

Страница 73: ...meone else you can record a voice memo This memo can be played back later either directly or remotely 1 Press RECORD MEMO MESSAGE PRESS SET 2 Press SET L A long beep will sound MEMO RECORDING 3 Speak clearly about 20 cm 8 inches away from the microphone 4 When finished recording press STOP SET RECORD STOP Microphone ...

Страница 74: ... message Press while listening to the message L If you press within 5 seconds of the beginning of the message the previous message will be played L To play back a specific message press or and search for the message you want to listen to To skip a message Press to play the next message To stop playback Press STOP L If you press PLAY MESSAGES within 1 minute the unit will resume playing the rest of...

Страница 75: ...SE while listening to the message you want to erase To erase all the messages Check that you have listened to all of the recorded messages 1 Press ERASE ALL MESSAGES PRESS SET 2 Press SET ERASE MESSAGES YES SET NO STOP 3 Press SET L Messages recorded in voice mailbox will not be erased ...

Страница 76: ...ges The voice guide will be heard after playing back the messages Erase unnecessary messages To repeat a message Press 1 while listening to the message L If you press this key within 5 seconds of the beginning of a message the previous message will be played To skip a message Press 2 to play the next message To erase a specific message Press 4 while listening to the message you want to erase Voice...

Страница 77: ...remote operation ID during the TAD FAX greeting message 3 Start remote operations When there are new recorded messages The voice guide will tell you the number of new messages and they will be played automatically Voice guide example 3 new messages When there are no new messages Voice guide No new messages Wait for 4 seconds or press 5 to listen to all the messages When voice memory is full Voice ...

Страница 78: ...sage will be played Skipping the greeting message Press 0 during the greeting message playback L The unit will skip the rest of the greeting message Turning the message transfer on or off You must program a transfer telephone number beforehand feature 60 page 91 Press 8 1 to turn on the message transfer Voice guide example Message transfer is set Transfer phone number is 123 Press 8 2 to turn off ...

Страница 79: ...and the desired mailbox number 1 or 2 Thank you 2 Record your own mailbox greeting message if necessary page 80 Suggested message This is personal name Please leave your name and message after the beep 3 Change the mailbox password if necessary For mailbox 1 password see feature 51 page 91 For mailbox 2 password see feature 52 page 91 4 Set the unit to TAD FAX mode page 64 How incoming messages ar...

Страница 80: ...peak clearly about 20 cm 8 inches away from the microphone L The display will show the remaining recording time Example BOX1 REC 16s 6 When finished recording press STOP L The unit will repeat your message Adjust the volume using or 7 Press MENU To check the mailbox greeting message 1 For mailbox 1 press MENU 5 5 For mailbox 2 press MENU 5 6 2 Press or to select CHECK 3 Press SET L The unit will p...

Страница 81: ... page 74 75 for details To repeat a message To skip a message To stop playback To change the playback speed To erase a specific message To record a memo message into a mailbox 1 Press 2 times MAILBOX 2 Press or until the desired mailbox number is displayed Example MAILBOX1 00 b PRESS REC ERASE PLAY 3 Press RECORD L A long beep will sound Example BOX1 RECORDING 4 Speak clearly about 20 cm 8 inches ...

Страница 82: ...ges and they will be played automatically Voice guide example 3 new messages To repeat only the new messages Press 4 To listen to all the messages Press 5 4 Press OFF to end the operation Note L The following features can be used during playback See page 76 for details To repeat a message To skip a message To erase a specific message To erase all the messages L For the following see page 76 When t...

Страница 83: ...g message it will be played 3 Enter the mailbox password default setting 555 L If you have programmed your own mailbox password enter it instead of 555 Note L For details on remote operation see page 77 to page 78 8 1 8 2 8 3 and 8 4 cannot be used To listen to messages in another memory after playback Press and 0 for the common memory then enter the remote operation ID or Press and the desired ma...

Страница 84: ...r greeting message L You can record your own transfer greeting message 5 Enter the remote operation ID and retrieve the message using the remote operation page 77 to page 78 Recording your own transfer greeting message The recording time is limited to 16 seconds Suggested message This is a transferred message from your name business and or telephone number Please enter your remote ID for remote op...

Страница 85: ...eives an incoming voice message 1 Press MENU 2 Press then 7 0 PAGER CALL MODE OFF 3 Press or to select ON L If this feature is not required select OFF 4 Press SET 5 Enter your pager number up to 30 digits 6 Press SET 7 Enter your pager access code up to 10 digits if required 8 Press SET MSG 07734 L The default code 07734 will show Hello on your pager L If you want to change this message enter your...

Страница 86: ...displayed L This step may be slightly different depending on the feature 4 Press SET L The setting you selected is set and the next feature will be displayed 5 To exit programming press MENU Programming by entering the program code number directly You can select a feature by directly entering the program code and 2 digit number instead of using or 1 Press MENU 2 Press and the 2 digit code number p...

Страница 87: ...ayed L This step may be slightly different depending on the feature 6 Press SET L The setting you selected is set and the next feature will be displayed 7 To exit programming press MENU Programming by entering the program code number directly You can select a feature by directly entering the program code and 2 digit number instead of using or 1 Press MENU 2 Press and the 2 digit code number page 8...

Страница 88: ...ode 06 Changing the ring setting in FAX ONLY mode FAX RING COUNT RINGS 3 To change the number of rings before the unit answers a call in FAX ONLY mode You can select from 1 2 3 default and 4 Code 10 Changing the incoming message recording time RECORDING TIME MODE VOX VOX default Unlimited 1 MIN Up to 1 minute Code 11 Setting the remote operation ID REMOTE TAD ID ID 111 1 Press MENU 2 Press or and ...

Страница 89: ...me To send a document 1 Insert the document 2 Press MENU 3 Press then 2 5 4 Press or to select ON 5 Press SET 6 Enter the fax number 7 Press SET 8 Enter the transmission start time L Press to select AM or PM 9 Press SET 10 Press MENU L To cancel after programming press STOP then SET L Turn on the auto answer setting Code 26 Setting the Caller ID list to print automatically AUTO CALL LIST MODE ON O...

Страница 90: ...t Deactivates this feature Code 43 Setting the recording time alert REC TIME ALERT MODE OFF To alert you with beeps when there is less than 60 seconds of remaining recording time If you hear slow beeps erase the recorded messages page 75 80 The beeps will stop ON You will hear a beeping sound OFF default Deactivates this feature Code 44 Setting the memory reception alert RECEIVE ALERT MODE ON To a...

Страница 91: ...me for your own TAD FAX greeting message GREETING TIME MODE 16s 16s default Up to 16 seconds 60s Up to 60 seconds See page 71 for details Code 55 Greeting message for mailbox 1 BOX1 GREETING CHECK See page 80 for details Code 56 Greeting message for mailbox 2 BOX2 GREETING CHECK See page 80 for details Code 60 Setting the message transfer MESSAGE TRANSFER MODE OFF To transfer a recorded incoming m...

Страница 92: ...ck with the other party L The connecting tone volume cannot be adjusted ON default You will hear connecting tones OFF Deactivates this feature Code 77 Changing the receiving mode in the auto answer setting AUTO ANSWER MODE TAD FAX TAD FAX default Telephone Answering Device Facsimile mode page 64 FAX ONLY Facsimile only mode page 64 Code 80 Resetting advanced features to their default settings SET ...

Страница 93: ...he document is jammed Remove the jammed document page 106 ERROR NOT YOUR UNIT Code 54 59 70 A transmission or reception error occurred because of a problem with the other party s fax machine Check with the other party MEMORY FULL L The document was not received as a result of the memory being full NO DOCUMENT L The document was not fed into the unit properly Reinsert the document and try again OTH...

Страница 94: ...s SET to clear the message L The recording paper has jammed near the recording paper entrance Clear the jammed paper page 103 and press SET to clear the message Do not install folded or heavily curled paper COVER OPEN b CHECK FILM L The covers are open Close them L The ink film is empty Replace the ink film with a new one page 101 L The ink film is not installed Install it page 14 L The ink film i...

Страница 95: ...he document is jammed Remove the jammed document page 106 TRANSMIT ERROR L A transmission error occurred Try again UNIT OVERHEATED L The unit is too hot Let the unit cool down Handset Directory full L There is no space to store new entries in the navigator directory Erase unnecessary entries page 45 No link to base Place on cradle and try again L The handset has lost communication with the base un...

Страница 96: ...ode or TAD FAX mode by pressing AUTO ANSWER L If you use a Distinctive Ring service turn AUTO ANSWER off so that the fax machine is in TEL mode L If you use a Distinctive Ring service make sure you have set the same ring pattern assigned by the telephone company page 66 The receiving mode does not function properly L Distinctive Ring feature 31 is set page 89 The REDIAL PAUSE button does not funct...

Страница 97: ... and disconnect the power cord to reset the unit Connect the power cord and try again I cannot store a name and telephone number in the navigator directory L You cannot store a name and number while the unit is in the talk or intercom mode L Do not pause for over 60 seconds while storing While storing a name and telephone number in the navigator directory the handset starts to ring L To answer a c...

Страница 98: ... you have a single telephone line and subscribe to a Voice Mail service you must also subscribe to a Distinctive Ring service page 66 I cannot receive documents automatically L The receiving mode is set to TEL mode Set to TAD FAX mode or FAX ONLY mode by pressing AUTO ANSWER L The time taken to answer the call is too long Decrease the number of rings of feature 06 page 88 L The greeting message is...

Страница 99: ...tedly until the desired mode is displayed L If you want to set TEL mode press AUTO ANSWER repeatedly until TEL mode is displayed The other party complains that they cannot send a document L The unit is not in TAD FAX or FAX ONLY mode Select the desired mode using feature 77 and press AUTO ANSWER repeatedly until TAD FAX or FAX ONLY mode is displayed Copying The unit does not make a copy L You cann...

Страница 100: ...lling you from outside Press TALK or SP PHONE to answer the outside call I cannot operate the answering device with the handset L Someone is operating the answering device L You are too far from the base unit Move closer to the base unit If a power failure occurs L The unit will not function L The unit is not designed for making emergency telephone calls when the power fails Alternative arrangemen...

Страница 101: ...n lever green in the unit 3 Open the back cover 4 Pull out the blue gear and remove the used ink film Remove the used core 5 Remove the stoppers and tags from the new ink film Find the T shaped gear blue 6 Insert the blue core of the front ink film roll into the right slot of the unit 1 Insert the T shaped gear blue into the left slot of the unit 2 Insert the rear ink film roll 3 Center part Front...

Страница 102: ...the dotted area at both ends 1 Close the front cover securely 2 L The following message will be displayed while the unit is checking that there is no slack in the ink film PLEASE WAIT Note L The ink film is safe to touch and will not rub off on your hands like carbon paper T shaped gear blue Ink film Slack Reverse Correct Incorrect Tight 1 turn Blue core The ink film is not wrapped around the blue...

Страница 103: ...ront cover by pulling up the center part 2 Release the back cover by pushing the back cover open button green on the right side of the unit OR Release the back cover by pushing the back cover open lever green in the unit 3 Open the back cover 4 Remove the jammed recording paper Center part Front cover Back cover open button green Back cover open lever green Back cover Jammed recording paper ...

Страница 104: ...e back cover securely by pushing down on the dotted area at both ends 1 Close the front cover securely 2 7 Remove the recording paper and straighten Pull the tension plate forward and hold open while inserting the paper T shaped gear blue Ink film Slack Reverse Correct Incorrect Tight 1 turn Blue core The ink film is not wrapped around the blue core Back cover 1 2 Front cover 2 Dotted area Tension...

Страница 105: ...n the recording paper was not fed into the unit properly The display will show the following CHECK PAPER Remove the recording paper and straighten Pull the tension plate forward and hold open while inserting paper Press SET to clear the message Tension plate SET ...

Страница 106: ... jams sending 1 Open the front cover by pulling up the center part Remove the jammed document carefully 2 Close the front cover securely Note L Do not pull out the jammed paper forcibly before opening the front cover Center part Front cover Jammed document Front cover ...

Страница 107: ...he handset as shown matching the correct polarity 1 Press the battery down until it places into the compartment 2 3 Close the cover Make sure you charge the new battery for about 15 hours in order to display the battery strength prompt correctly page 21 Attention A recyclable nickel cadmium battery powers the product you have purchased At the end of its useful life under various state and local la...

Страница 108: ...the center part 3 Clean the document feeder rollers and rubber flap with a cloth moistened with isopropyl rubbing alcohol and let all parts dry thoroughly Caution L L L L Do not use paper products such as paper towels or tissues 4 Clean the glass with a soft and dry cloth Caution L L L L Do not use paper products such as paper towels or tissues 5 Close the front cover securely 6 Connect the power ...

Страница 109: ...y pushing the back cover open button green on the right side of the unit OR Release the back cover by pushing the back cover open lever green in the unit 4 Open the back cover Remove the ink film 5 Clean the thermal head with a cloth moistened with isopropyl rubbing alcohol and let it dry thoroughly Caution L L L L To prevent a malfunction due to static electricity do not use a dry cloth and do no...

Страница 110: ... blue core at least once 7 Close the back cover securely by pushing down on the dotted area at both ends 1 Close the front cover securely 2 8 Connect the power cord and the telephone line cord T shaped gear blue Ink film Slack Reverse Correct Incorrect Tight 1 turn Blue core The ink film is not wrapped around the blue core Dotted area Back cover 1 2 Front cover 2 Power cord Telephone line cord ...

Страница 111: ...he test print has a smudge or blurred points or lines clean the thermal head page 109 Broadcast programming list provides you with entries which are stored in the broadcast feature page 59 Caller ID list keeps records of the last 30 callers after subscribing to a Caller ID service This report will be printed automatically after every 30 callers feature 26 page 89 1 Press MENU repeatedly until the ...

Страница 112: ...OTHER OBLIGATION OF ANY KIND ON BEHALF OF OPENLCR L If you subscribe to openLCR service the unit will start the first download of the rate table to your fax machine and the Caller IQ feature will be automatically turned on The CALLER IQ indicator will stay on No special dialing or button pressing is necessary to place a long distance call with the Caller IQ feature If you do not wish to use the Ca...

Страница 113: ...feature from OFF to ON using the handset 1 Press CALLER IQ To enable Caller IQ press 0 1 2 Press 0 To enable Caller IQ press 1 3 Press 1 To enable Caller IQ press 4 Press Caller IQ on L A beep sounds and Caller IQ function is set to ON L If 3 beeps sound Caller IQ is not set to ON Start again from step 1 L In steps 1 through 3 if you do not press any buttons for 60 seconds or you press OFF the han...

Страница 114: ...Press TALK or SP PHONE and then press CALLER IQ 2 Press L The unit will dial to openLCR automatically and start downloading information 3 When downloading is complete a beep sounds L After downloading starts the handset must be off hook DO NOT PLACE the handset on the base unit placing the handset on the base unit will terminate the download process DO NOT PRESS OFF pressing OFF will terminate the...

Страница 115: ...y in the directory because the directory memory is full Download incomplete Directory full Erase unnecessary entries page 45 Using the base unit 1 Press CALLER IQ CALLER IQ PRESS NAVI 2 Press or until the following is displayed or press GET NEW INFO PRESS SET 3 Press SET LISTEN FOLLOW PHONE GUIDANCE 4 Follow the voice prompt to start downloading SET CALLER IQ STOP FLASH LIGHT For assistance please...

Страница 116: ...ate table in the fax machine reaches expiry date usually between 60 90 days after last update the fax machine is being polled by openLCR service center To stop downloading 1 Press STOP CANCEL DOWNLOAD YES SET NO STOP 2 Press SET Information Download This enables you to view information such as weather lottery results and stock quotes from the LCD display on your openLCR ready unit Each time you do...

Страница 117: ...nnot be stored in the directory Download incomplete Directory full Erase entries which do not exist on the web from the directory of the unit page 45 Then start again from step 1 L You cannot access the openLCR server if a telephone or fax machine on the same phone line is in use L While the unit is downloading the data from openLCR the Call Waiting Service cannot be used Downloading information u...

Страница 118: ...Fort Collins CO 78 F PartlyCldy 4 Find more information by pressing v v v v or e e e e Example H 90 L 70 F UV 2 Dew 64 F Humidity 42 5 When finished press OFF or place the handset on the base unit Caller IQ on 12223 Printing information using the base unit 1 Press CALLER IQ CALLER IQ PRESS NAVI 2 Press or until the following is displayed or press 1 PRINT INFO PRESS SET 3 Press SET to start printin...

Страница 119: ...solution 64 level Scanner type Contact Image Sensor Printer type Thermal Transfer on plain paper Data compression system Modified Huffman MH Modified READ MR Modem speed 14 400 12 000 9 600 7 200 4 800 2 400 bps Automatic Fallback Operating environment 5 C 35 C 41 F 95 F 20 80 RH Relative Humidity Dimensions Approx height 199 mm width 384 mm depth 282 mm 727 32 151 8 113 32 Mass Weight Approx 3 3 ...

Страница 120: ...paper if you are not happy with the print quality or if misfeeding occurs L For proper feeding and best print quality we recommend using long grained paper L Do not use paper of different types or thickness at the same time This may cause a paper jam L Avoid double sided printing L Do not use paper printed from this unit for double sided printing with other copiers or printers This may cause a pap...

Страница 121: ...lease contact a Factory Servicenter or other Authorized Servicer If the equipment is causing harm to the telephone network the telephone company may request that you disconnect the equipment until the problem is resolved Connection to party line service is subject to state tariffs Contact the state public utility commission public service commission or corporation commission for information This e...

Страница 122: ...ce to radio or television reception which can be determined by turning the equipment off and on the user is encouraged to try to correct the interference by one or more of the following measures Reorient or relocate the receiving antenna Increase the separation between the equipment and receiver Connect the equipment into an outlet on a circuit different from that to which the receiver is connecte...

Страница 123: ...In or Mail In Service For Carry In or Mail In Service in the United States call 1 800 HELP FAX 1 800 435 7329 For assistance in Puerto Rico call Panasonic Sales Company 787 750 4300 or fax 787 768 2910 Limited Warranty Limits And Exclusions This warranty ONLY COVERS failures due to defects in materials or workmanship and DOES NOT COVER normal wear and tear or cosmetic damage The warranty ALSO DOES...

Страница 124: ...TS AND SERVICE WHICH ARE NOT COVERED BY THIS LIMITED WARRANTY ARE YOUR RESPONSIBILITY For product service Call toll free 1 800 HELP FAX 1 800 435 7329 for the location of an authorized servicenter For out of warranty technical support After the warranty has expired please contact our Continued Services Technical Support Line at 1 900 555 PANA 1 900 555 7262 for support on a fee basis When you ship...

Страница 125: ...NA 1 900 555 7262 for support on a fee basis For hearing or speech impaired TTY users TTY 1 866 741 6422 Web Site www panasonic com for customers in the USA or Puerto Rico ONLY You can purchase parts accessories or locate your nearest servicenter by visiting our Web Site Service in Puerto Rico Matsushita Electric of Puerto Rico Inc Panasonic Sales Company Factory Servicenter Ave 65 de Infantería K...

Страница 126: ...26 Caller ID list 89 31 Distinctive Ring 66 32 Ring pattern 89 34 Quick scan 56 68 89 36 Receiving reduction 90 39 Display contrast 90 41 Fax activation code 25 90 42 Message alert 90 43 Recording time alert 90 44 Memory reception alert 90 46 Friendly reception 90 47 Fax voice guidance 91 51 Mailbox 1 password 91 52 Mailbox 2 password 91 54 Greeting time 91 55 Mailbox 1 greeting 91 56 Mailbox 2 gr...

Страница 127: ...me Feature 10 88 Character table 33 Cleaning 108 Communication messages 93 Connecting tone Feature 76 92 Copy 68 Collation 70 Enlarge 69 Reduce 69 D Date and time Feature 01 31 88 Delayed transmission Feature 25 89 Dialing mode Feature 13 88 Display Contrast Feature 39 90 Error messages 94 Distinctive Ring service Feature 31 66 89 Document size 57 E Erasing recorded messages 75 Error messages 93 9...

Страница 128: ...ote operation ID Feature 11 88 Reports Broadcast programming 111 Broadcast sending 61 Caller ID list 49 89 111 Journal 56 111 Power down 100 Printer test 111 Sending 56 88 Setup 111 Telephone number 111 Reset Feature 80 92 Resolution 55 68 Ringer pattern for base unit Feature 17 30 88 Ringer pattern for handset 29 Ring pattern for Distinctive Ring Feature 32 89 Ring setting FAX ONLY Feature 06 88 ...

Страница 129: ...the mailbox no 1 or 2 enter the mailbox password then press the remote command key 4 New message playback 5 All message playback 6 Room monitor 7 Re records a greeting message 9 Stops re recording of a greeting message 4 Erases a specific message 5 Erases all messages 8 0 Changes to TEL mode 8 1 Turns on message transfer Key Remote command 8 2 Turns off message transfer 0 Skips the greeting messag...

Страница 130: ...130 ...

Страница 131: ...131 ...

Страница 132: ...y is to mail in or carry in your fax to one of our Regional Service centers where the unit will be repaired and returned to you Instructions If you choose to receive a replacement unit under the Fax Advantage Program Panasonic will provide a replacement unit which will be completely refurbished quality tested by Panasonic technicians and individually hand inspected before it is shipped to you You ...

Отзывы: