background image

4. Fax

20

4 Fax

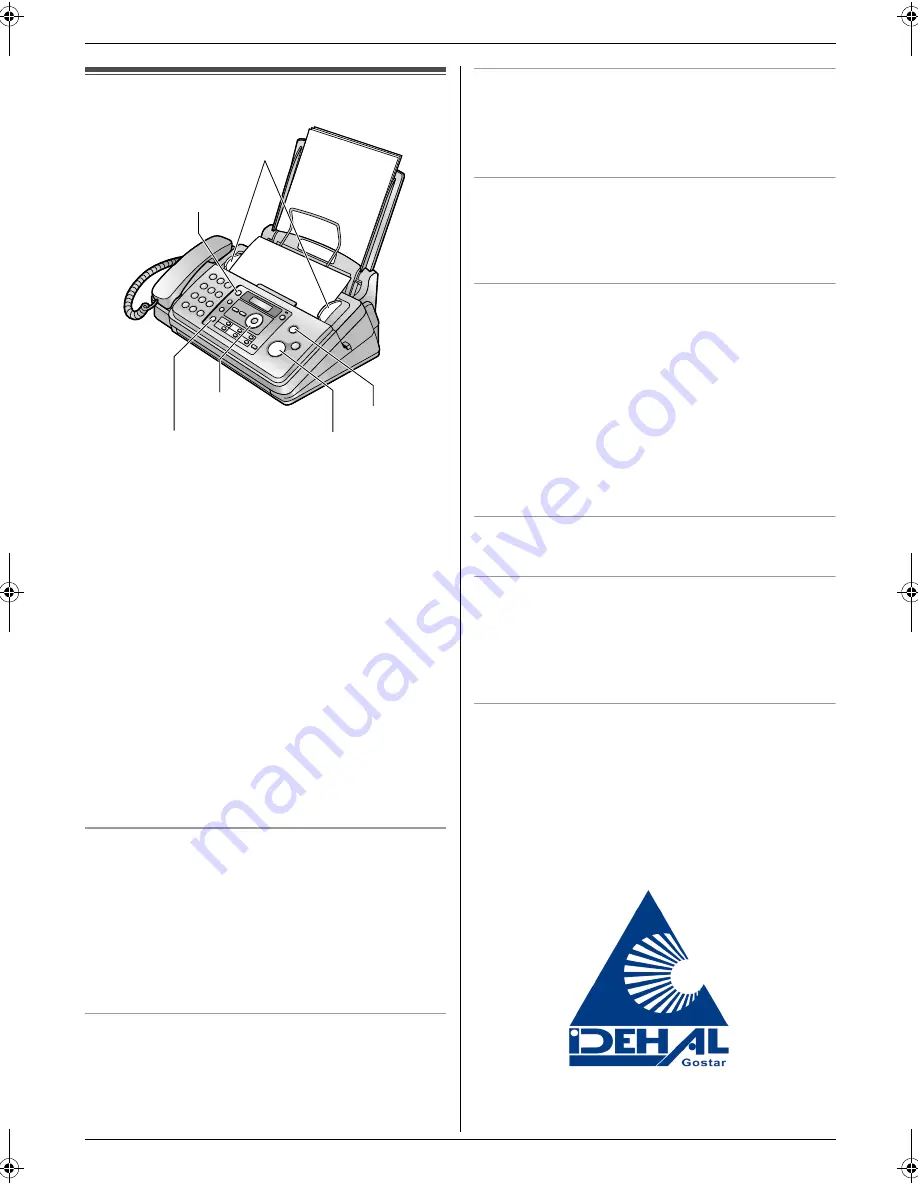
Sending Faxes

4.1 Sending a fax manually

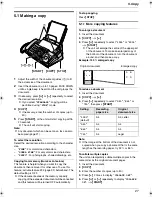
1

Adjust the width of the document guides (

1

) to fit 

the actual size of the document.

2

Insert the document (up to 10 pages) FACE DOWN 
until a single beep is heard and the unit grasps the 
document.

3

If necessary, press 

{A}

 or 

{B}

 repeatedly to select 

the desired resolution.

4

Press 

{

MONITOR

}

 or lift the handset.

5

Dial the fax number.

6

When a fax tone is heard:

Press 

{

FAX START

}

.

When the other party answers your call:

Ask them to press their start button. When the fax 
tone is heard, press 

{

FAX START

}

.

L

If you pressed 

{

MONITOR

}

 in step 4, lift the 

handset before speaking.

To select the resolution

Select the desired resolution according to the character 
size.

STANDARD

: For normal-sized characters.

FINE

: For small-sized characters.

SUPER FINE

: For very small-sized characters.

PHOTO

: For photographs, shaded drawings, etc.

L

Using the 

FINE

SUPER FINE

 and 

PHOTO

settings will increase transmission time.

To redial the last number

{

REDIAL

}


i


{

FAX START

}

L

If the line is busy, the unit will automatically redial the 
number 2 or more times.

L

To cancel redialling, press 

{

STOP

}

.

To send more than 10 pages at a time

Insert the first 10 pages of the document. Add the other 
pages (up to 10 at a time) on top of the previously 
inserted pages while the last page is being fed into the 
unit.

Pre-dialling a fax number

1.

Enter the fax number.

2.

Insert the document.

3.

{

FAX START

}

Sending from memory (Quick scan feature)

To use this feature, activate feature #34 (page 32) 
beforehand.

1.

Insert the document.

2.

Enter the fax number. 

i


{

FAX START

}

L

If the document exceeds the memory capacity,
transmission will be cancelled and this feature will be 
turned OFF automatically. You must send the entire 
document manually.

L

This feature cannot be used if the handset is in use or 

{

MONITOR

}

 is pressed.

To stop sending

Press 

{

STOP

}

.

Printing a sending report

A sending report provides you with a printed record of 
transmission results (errors, etc.). To print sending 
reports, make sure feature #04 is activated (page 30). 
The default setting is 

ERROR

. For an explanation of 

error messages, see page 38.

Printing a journal report

A journal report provides you with a printed record of the 
30 most recent fax transmissions and receptions. To 
print it manually, see page 49. To print it automatically 
after every 30 new fax transmissions and receptions, 
make sure feature #22 is activated (page 31). For an 
explanation of error messages, see page 38.

{

STOP

}

{

FAX START

}

{A}{B}

{

REDIAL

}

1

{

MONITOR

}

FP701FX-PFQX2792ZA-en.book  Page 20  Friday, July 13, 2007  3:34 PM

Содержание KX-FP711CX

Страница 1: ...unit is compatible with Caller ID To use this feature you must subscribe to the appropriate service of your service provider Operating Instructions Plain Paper Fax with Copier Model No KX FP701FX ا ﯾ ن ﺗ ﻧ ظ ﯾ ﻣ ﺎ ت ﺑ ر ا ی د ﺳ ﺗ ﮕ ﺎ ه ﻓ ﮑ س ﭘ ﺎ ﻧ ﺎ ﺳ و ﻧ ﯾ ﮏ ﻣ د ل KX FP711CX ا ﺳ ﺗ ﻔ ﺎ د ه ﻣ ﯾ ﺷ و د ...

Страница 2: ...or received documents will remain on the used ink film Use discretion when disposing of the used ink film Declaration of Conformity L Panasonic Communications Co Ltd declares that this equipment is in compliance with the essential requirements and other relevant provisions of Radio Telecommunications Terminal Equipment R TTE Directive 1999 5 EC Declarations of Conformity for the relevant Panasonic...

Страница 3: ...ompany For safety purposes this unit is equipped with a grounded plug If you do not have this type of outlet please have one installed Do not defeat this safety feature by tampering with the plug Do not place objects on the power cord Install the unit where no one can step or trip on the cord Do not overload power outlets and extension cords This can result in the risk of fire or electric shock Co...

Страница 4: ...e telephone line cord plug or allow it to become wet at all This may cause a fire If the telephone line cord plug becomes wet immediately pull it from the telephone wall jack and do not use Unplug this unit from power outlets and refer servicing to an authorised service centre when the following conditions occur L If the power cord is damaged or frayed L If liquid has been spilled into the unit L ...

Страница 5: ... arise from inappropriate waste handling Please contact your local authority for further details of your nearest designated collection point Penalties may be applicable for incorrect disposal of this waste in accordance with national legislation For business users in the European Union If you wish to discard electrical and electronic equipment please contact your dealer or supplier for further inf...

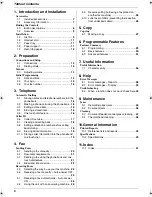
Страница 6: ...ending Faxes 4 1 Sending a fax manually 20 4 2 Document requirements 21 4 3 Sending a fax using the phonebook and one touch dial feature 21 4 4 Broadcast transmission 22 Receiving Faxes 4 5 Selecting the way to use your fax machine 23 4 6 Receiving a fax manually Auto answer OFF 24 4 7 Receiving a fax automatically Auto answer ON 25 4 8 Using the unit with an answering machine 25 4 9 Receive polli...

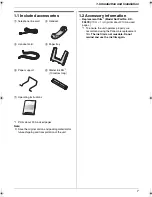
Страница 7: ...ion of the unit 1 2 Accessory information Replacement film 1 Model No Part No KX FA57E 70 m 1 roll prints about 210 A4 sized pages 1 To ensure the unit operates properly we recommend using the Panasonic replacement film The ink film is not reusable Do not rewind and use the ink film again 1 Telephone line cord 2 Handset 3 Handset cord 4 Paper tray 5 Paper support 6 Starter ink film 1 10 metres lon...

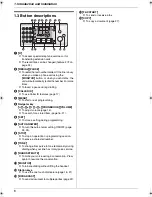
Страница 8: ...ONEBOOK VOLUME L To adjust volume page 14 L To search for a stored item page 16 21 F SET L To store a setting during programming G AUTO ANSWER L To turn the auto answer setting ON OFF page 24 25 H STOP L To stop an operation or programming session L To erase a character number I TONE L To change from pulse to tone temporarily during dialling when your line has rotary pulse service J HANDSET MUTE L...

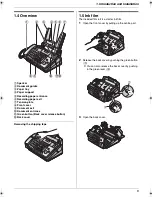
Страница 9: ...2 Release the back cover by pushing the green button 1 L You can also release the back cover by pushing in the green lever 2 3 Open the back cover 1 Speaker 2 Document guides 3 Paper tray 4 Paper support 5 Recording paper entrance 6 Recording paper exit 7 Tension plate 8 Front cover 9 Document exit j Document entrance k Green button Back cover release button l Back cover 3 1 4 56 7 2 k j l 9 8 1 2...

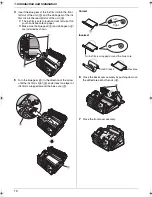
Страница 10: ...s like carbon paper L Make sure the blue gear 3 and white gear 4 are installed as shown 5 Turn the blue gear 5 in the direction of the arrow until the ink film is tight 6 and at least one layer of ink film is wrapped around the blue core 7 6 Close the back cover securely by pushing down on the dotted area at both ends 8 7 Close the front cover securely 3 4 5 6 Correct Incorrect 7 Tight 1 turn No i...

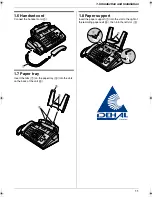
Страница 11: ...ect the handset cord 1 1 7 Paper tray Insert the tabs 1 on the paper tray 2 into the slots on the back of the unit 3 1 8 Paper support Insert the paper support 1 into the slot to the right of the recording paper exit 2 then into the left slot 3 1 2 3 1 3 2 1 ...

Страница 12: ...aper 1 Fan the paper to prevent paper jams 2 Pull the tension plate forward 1 and insert the paper gently print side down 2 L The paper should not be over the tab 3 L If the paper is not inserted correctly remove all of the installed paper and re install it gently Otherwise the paper may jam Note L Remove all of the installed paper before adding paper Correct Incorrect 3 2 1 ...

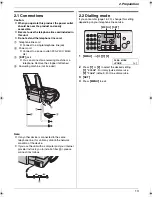
Страница 13: ...d your internet provider instructs you to install a filter 5 please connect it as follows 2 2 Dialling mode If you cannot dial page 16 20 change this setting depending on your telephone line service 1 MENU i 1 3 DIAL MODE TONE 2 Press 1 or 2 to select the desired setting 1 PULSE For rotary pulse dial service 2 TONE default For tone dial service 3 SET 4 Press MENU to exit 1 Telephone line cord L Co...

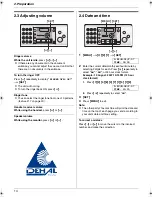
Страница 14: ...ess A or B Speaker volume While using the monitor press A or B Initial Programming 2 4 Date and time 1 MENU i 0 1 i SET D 01 M 01 Y 07 TIME 00 00 2 Enter the current date month year hour minute by selecting 2 digits for each Press repeatedly to select AM PM or 24 hour clock format Example 10 August 2007 10 15PM 12 hour clock format 1 Press 1 0 0 8 0 7 1 0 1 5 D 10 M 08 Y 07 TIME 10 15 2 Press repe...

Страница 15: ...4 Press MENU to exit 2 6 Your fax number You can program your fax number so that it appears on the top of each page sent 1 MENU i 0 3 i SET NO 2 Enter your fax number up to 20 digits L To enter a press L To enter a space press L To enter a hyphen press R L To erase a number press STOP 3 SET 4 Press MENU to exit To correct a mistake Press or to move the cursor to the incorrect number and make the c...

Страница 16: ...r press MONITOR or lift the handset 3 3 Editing a stored item 1 PHONEBOOK 2 Press A or B repeatedly to display the desired item i MENU 3 L If you do not need to edit the name skip to step 5 4 Edit the name For further details see the storing procedure on page 16 5 SET L If you do not need to edit the telephone number skip to step 7 6 Edit the telephone number For further details see the storing pr...

Страница 17: ...pending on the service of the local telephone company the date time of the call or the caller s name may not be displayed Make sure the following ring count is set to 2 or more rings beforehand FAX ring count feature 06 on page 30 and TEL FAX ring count feature 78 on page 34 L The name display service may not be available in some areas For further information please contact your telephone company ...

Страница 18: ...r of times the same caller called 2 to 9 will be displayed Only the date and time of the most recent call will be stored Example The same person called 3 times SAM LEE 10 30 20 Jul 3 To stop viewing Press STOP 3 8 Editing a telephone number before calling back storing 1 CALLER ID 2 Press A or B repeatedly to display the desired item 3 Press CALLER ID to display the telephone number 4 Press then ed...

Страница 19: ... A or B repeatedly to display the desired item 3 MENU 4 Select the phonebook or station key Using phonebook Press PHONEBOOK Using one touch dial Press the desired station key 5 If a name is required enter up to 16 characters for the name page 36 6 SET L If the number requires editing see page 18 7 SET ...

Страница 20: ... at a time Insert the first 10 pages of the document Add the other pages up to 10 at a time on top of the previously inserted pages while the last page is being fed into the unit Pre dialling a fax number 1 Enter the fax number 2 Insert the document 3 FAX START Sending from memory Quick scan feature To use this feature activate feature 34 page 32 beforehand 1 Insert the document 2 Enter the fax nu...

Страница 21: ...n 210 mm we recommend using a copy machine to copy the original document onto A4 or letter sized paper then sending the copied document 4 3 Sending a fax using the phonebook and one touch dial feature Before using this feature store the desired names and telephone numbers into the phonebook page 16 and one touch dial feature page 16 1 Adjust the width of the document guides to fit the actual size ...

Страница 22: ...repeatedly to display BROADCAST i MENU i 3 Press A or B repeatedly to display the desired item you want to erase L To cancel erasing press STOP 4 SET i SET i STOP 4 4 4 Sending the same document to pre programmed parties 1 Insert the document FACE DOWN 2 If necessary press A or B repeatedly to select the desired resolution page 20 3 BROADCAST L After transmission the unit will automatically print ...

Страница 23: ... and faxes You have to answer all calls manually To receive a fax press FAX START 4 5 3 Use as a telephone and or fax TEL FAX mode Your situation You want to answer phone calls yourself and receive faxes automatically without rings Setup Set the fax machine to TEL FAX mode page 24 by pressing AUTO ANSWER repeatedly L The AUTO ANSWER indicator turns OFF Note L Make sure feature 73 is set to TEL FAX...

Страница 24: ...ess AUTO ANSWER repeatedly to display TEL FAX MODE L The AUTO ANSWER indicator turns OFF 3 The ringer volume setting should be ON page 14 How phone calls and faxes are received 1 INCOMING CALL will be displayed but the unit will not ring 2 The unit will wait for the duration of 2 rings before answering the call L The number of rings is determined by the TEL FAX delayed ring setting feature 78 on p...

Страница 25: ...nswering machine 1 L Answering machine is not included L Remove the stopper 2 if attached 2 Set the number of rings on the answering machine to less than 4 L This will allow the answering machine to answer the call first 3 Record a greeting message on the answering machine L We recommend you record a message up to 10 seconds long and not to pause for more than 4 seconds during the message Otherwis...

Страница 26: ...ers If you subscribe to Caller ID service page 17 this feature prevents fax reception from calls that do not show caller information Additionally the fax machine will not accept faxes originated from numbers that match the one on a programmable junk fax prohibitor list Important L This feature does not work when manual reception is performed 4 10 1 Activating the junk fax prohibitor 1 Press MENU r...

Страница 27: ...f the document exceeds the memory capacity copying of the exceeded document will be cancelled and this feature will be turned OFF automatically To stop copying Press STOP 5 1 1 More copying features To enlarge a document 1 Insert the document 2 COPY i 3 Press A repeatedly to select 150 or 200 i START L The unit will enlarge the centre of the upper part of the document To make an enlarged copy of t...

Страница 28: ...e original document Note L The unit will store the documents into memory while collating the copies If memory becomes full while storing the unit will only print out the stored pages Collated pages Uncollated pages 4 3 2 1 4 3 2 1 1 1 2 2 3 3 4 4 ...

Страница 29: ...atures Features Summary 6 1 Programming 1 MENU 2 Press and the 2 digit code 3 Press the desired command to display the desired setting L This step may be slightly different depending on the feature 4 SET 5 To exit programming press MENU SET MENU ...

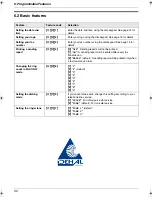
Страница 30: ...nting a sending report 0 4 0 OFF Sending reports will not be printed 1 ON A sending report will be printed after every fax transmission 2 ERROR default A sending report will be printed only when a fax transmission fails Changing the ring count in FAX ONLY mode 0 6 1 1 2 2 default 3 3 4 4 5 5 6 6 7 7 8 8 9 9 Setting the dialling mode 1 3 If you cannot make calls change this setting according to you...

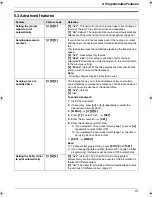
Страница 31: ...al Sending a fax at a specified time 2 5 This feature allows you to take advantage of low cost calling hours offered by your telephone company This feature can be set up to 24 hours in advance of the desired time 0 OFF default 1 ON To send a document 1 Insert the document 2 If necessary press A or B repeatedly to select the desired resolution page 20 3 MENU i 2 5 4 Press 1 to select ON i SET 5 Ent...

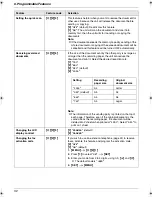
Страница 32: ...ing paper the unit can reduce the document and print it Select the desired reduction rate 1 72 2 86 3 92 default 4 100 Setting Recording paper size Original document size 100 A4 Letter 92 default A4 A4 86 A4 A4 72 A4 Legal Note L The information of the sending party is printed on the top of each page Therefore even if the original document is the same size as the recording paper the document will ...

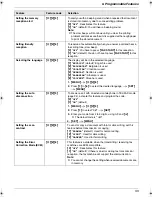
Страница 33: ... 5 ALBANIAN Albanian is used 6 SLOVENE Slovene is used 1 MENU i 4 8 2 Press 1 to 6 to select the desired language i SET i MENU Setting the auto disconnection 4 9 To answer a call with an extension telephone in TEL FAX mode page 24 activate this feature and program the code 0 OFF 1 ON default 1 MENU i 4 9 2 Press 1 to select ON i SET 3 Enter your code from 2 to 4 digits using 0 9 and L The default ...

Страница 34: ...nnecting tone 7 6 If you often have trouble when sending faxes this feature allows you to hear connecting tones fax tone ring back tone and busy tone You can use those tones to confirm the status of the other party s machine 0 OFF Deactivates this feature 1 ON default You will hear connecting tones Note L If the ring back tone continues the other party s machine may not be a fax machine or may hav...

Страница 35: ... default settings 8 0 0 NO default 1 YES To reset the advanced features 1 MENU i 8 0 2 Press 1 to select YES i SET i SET i MENU Note L The language setting feature 48 on page 33 and ECM setting feature 68 on page 33 will not be reset Feature Feature code Selection ...

Страница 36: ...hlighted by the cursor Press and hold STOP to erase all characters or numbers Press to switch between uppercase and lowercase To enter another character located on the same dial key press to move the cursor to the next space then press the appropriate dial key 7 1 1 Character entry modes Several character entry modes can be used when entering text The characters that can be entered depend on the e...

Страница 37: ...7 Useful Information 37 Extended 2 character table O L The following are used for both uppercase and lowercase Cyrillic character table P ...

Страница 38: ...arty s fax machine Check with the other party JUNK FAX PROH REJECT L The junk fax prohibitor feature of this unit rejected fax reception MEMORY FULL L The memory is full of received documents due to a lack of recording paper a lack of ink film or a recording paper jam Install paper page 12 install ink film page 9 or remove the jammed paper page 45 NO DOCUMENT L The document was not fed into the un...

Страница 39: ...er connected FAX MEMORY FULL L The memory is full of received documents due to a lack of recording paper a lack of ink film or a recording paper jam Install paper page 12 install ink film page 9 or remove the jammed paper page 45 You will lose all faxes in memory if the power is removed Check with power connected L When performing memory transmission the document being stored exceeded the memory c...

Страница 40: ... too hot Stop using the unit for a while and let the unit cool down Problem Cause Solution I cannot hear a dial tone L The telephone line cord is connected to the EXT jack on the unit Connect to the LINE jack page 13 L If you used a splitter coupler to connect the unit remove the splitter coupler and connect the unit to the wall jack directly If the unit operates properly check the splitter couple...

Страница 41: ...s a document in memory Press STOP to stop the beeps then see the displayed message instructions to solve the problem The unit does not display the caller s name and or telephone number L You need to subscribe to a Caller ID service L Other telephone equipment may be interfering with your phone Disconnect it and try again L Other electrical appliances connected to the same outlet may be interfering...

Страница 42: ...the number of rings in feature 06 page 30 and 78 page 34 The display shows CONNECTING but faxes are not received L The receiving mode is set to FAX ONLY mode and the incoming call is not a fax Change the receiving mode to TEL mode page 24 or TEL FAX mode page 24 A blank sheet is ejected L If a blank sheet is ejected after the received document is printed out the size of the document sent by the ot...

Страница 43: ...is displayed If you want to set TEL or TEL FAX mode set the desired mode using feature 73 page 34 and press AUTO ANSWER repeatedly to select the desired mode Problem Cause Solution The unit will not make a copy L The ink film is empty Replace the ink film with a new one page 9 L You cannot make a copy during programming L You cannot make a copy during a telephone conversation A black line white li...

Страница 44: ...lution I cannot receive documents automatically L Your greeting message on the answering machine is too long Shorten the message Record a message up to 10 seconds long L The answering machine rings too many times Set to 1 or 2 rings I cannot receive voice messages L Check if the answering machine is turned ON and connected to the unit properly page 25 L Set the number of rings on the answering mac...

Страница 45: ...cover by pulling up the centre part 2 Release the back cover by pushing the green button 1 L You can also release the back cover by pushing in the green lever 2 3 Open the back cover 4 Remove the jammed recording paper 3 5 Turn the blue gear 4 in the direction of the arrow until the ink film is tight 5 and at least one layer of ink film is wrapped around the blue core 6 1 2 3 4 5 ...

Страница 46: ...cording paper and straighten Pull the tension plate 1 forward and hold open while inserting paper then press SET to clear the message 9 2 Document jams 1 Open the front cover by pulling up the centre part Remove the jammed document carefully 1 2 Close the front cover securely Note L Do not pull out the jammed paper forcibly before opening the front cover Correct Incorrect 6 Tight 1 turn No ink fil...

Страница 47: ...elephone line cord 2 Open the front cover by pulling up the centre part 3 Clean the document feeder rollers 1 and rubber flap 2 with a cloth moistened with isopropyl rubbing alcohol and let all parts dry thoroughly Clean the scanner glass 3 with a soft dry cloth Caution L Do not use paper products such as paper towels or tissues 4 Close the front cover securely 5 Insert the recording paper gently ...

Страница 48: ...g the green button 1 L You can also release the back cover by pushing in the green lever 2 4 Open the back cover Remove the ink film 3 5 Clean the thermal head 4 with a cloth moistened with isopropyl rubbing alcohol and let it dry thoroughly Caution L To prevent a malfunction due to static electricity do not use a dry cloth and do not touch the thermal head directly 6 Re install the ink film and c...

Страница 49: ...l 8 pels mm Vertical 3 85 lines mm standard resolution 7 7 lines mm fine photo resolution 15 4 lines mm super fine resolution Photo resolution 64 levels Scanner type Contact Image Sensor Printer type Thermal Transfer on plain paper Data compression system Modified Huffman MH Modified READ MR Modified Modified READ MMR Modem speed 9 600 7 200 4 800 2 400 bps Automatic Fallback Operating environment...

Страница 50: ...pes of paper Paper with cotton and or fibre content that is over 20 such as letterhead paper or paper used for resumes Extremely smooth or shiny paper or paper that is highly textured Coated damaged or wrinkled paper Paper with foreign objects attached such as tabs or staples Paper which has dust lint or oil stains Paper that will melt vaporize discolour scorch or emit dangerous fumes near 200 C s...

Страница 51: ...Delayed transmission Feature 25 31 Dialling mode Feature 13 30 Display Contrast Feature 39 32 Error messages 39 Document size 21 E ECM selection Feature 68 33 Error messages 38 Extension telephone 24 F Fax activation code Feature 41 32 Fax number Feature 03 15 FAX ONLY mode 23 25 Friendly reception Feature 46 33 I Ink film 9 J Jams Document 46 Recording paper 45 Journal report Feature 22 20 49 Jun...

Страница 52: ...11 Index 52 One touch 21 Phonebook 21 Sending report Feature 04 20 Setup list 49 Storing Broadcast 22 One touch 16 Phonebook 16 T Telephone number list 49 TEL FAX mode 23 24 TEL mode 23 24 V Volume 14 ...

Страница 53: ...53 Notes ...

Страница 54: ...54 Notes ...

Страница 55: ...55 Notes ...

Страница 56: ...PFQX2792ZA CM0707PN0 Panasonic Communications Co Ltd 1 62 4 chome Minoshima Hakata ku Fukuoka 812 8531 Japan 0682 Global web site http panasonic net ...

Отзывы: