background image

Getting started

Confirming the included items

If any items are missing, please contact your technical support representative.

Main unit


´

 1

Battery (Model number FZ-VZSUN100U)


´

 1

Operating Instructions - Read Me First


´

 1

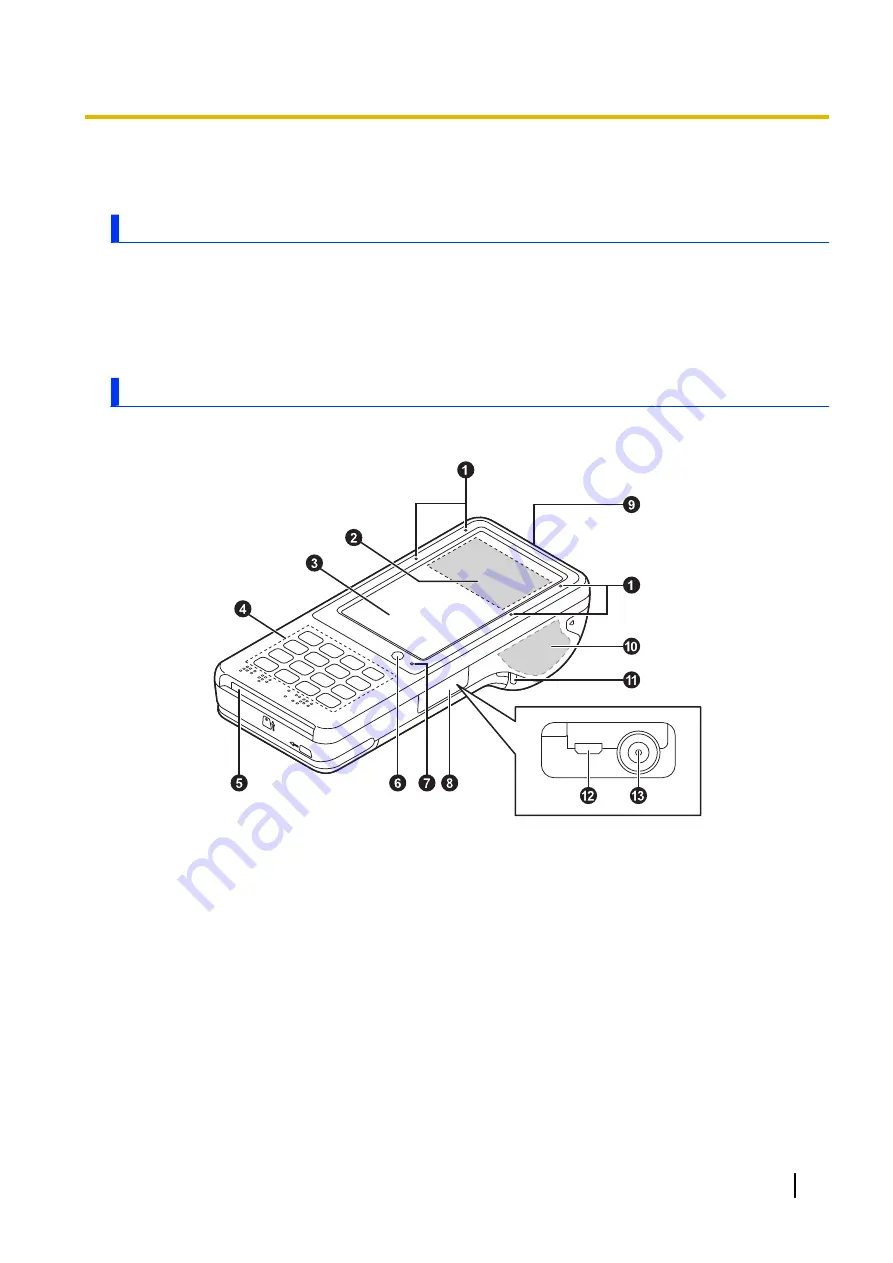
Description of parts

Front view

A

Status indicator (JT-C522GD series only)

Lights up or blinks during contactless IC card transactions.

B

Contactless IC Card Reader (JT-C522GD series only)

C

Display (touch panel)

D

Buttons

 (page 9)

E

Smart card reader

F

Ambient light sensor

*1

Automatically adjusts the screen brightness.

G

Charging indicator

Orange, lit: Battery is charging
Green, lit: Battery charging is complete
Red, lit: Battery level is 19 % or less of a full charge

*2

Operating Instructions - Reference Manual

7

Getting started

Содержание JT-C52 Series

Страница 1: ...Operating Instructions Reference Manual Mobile Payment Terminal Model No JT C52 series ...

Страница 2: ...etic stripe card 17 Reading the smart card 18 Reading the contactless IC card JT C522GD series only 19 Input 20 Typing and voice input 20 Using the keyboard 20 Connectivity 22 WLAN 22 Bluetooth 23 Airplane mode 23 Settings 24 Accessibility settings 24 Troubleshooting 25 General information 25 Starting up 25 Shutting down 25 Indicator 25 Appendix 27 Regulatory information 27 Specifications 28 WARRA...

Страница 3: ...the rights of third parties including but not limited to restriction under applicable copyright laws You are entirely responsible for additional content that you download to or forward from this product Panasonic is not responsible for such content or its use Before using such content it is your responsibility to verify that your intended use is properly licensed or is otherwise authorized Panason...

Страница 4: ...product away from magnets Failure to do so may cause malfunction When using the product in a vehicle it may affect electronic devices in the vehicle depending on the vehicle type Confirm the effects from radio waves with the vehicle manufacturer or sales dealer before use Follow these instructions and this manual to avoid any damage to the devices Carefully read the instruction manuals of the peri...

Страница 5: ...or the amount of time it can be used after a full charge becomes dramatically shorter the battery should be replaced with a new one Contact your technical support representative Do not touch the terminals of the battery Failure to observe this may cause poor contact When the battery is left installed in the product it discharges electricity gradually in small amounts even if the product s power is...

Страница 6: ...use of such marks by Panasonic Corporation is under license The N Mark is a trademark or registered trademark of NFC Forum Inc in the United States and in other countries All other trademarks identified herein are the property of their respective owners 6 Operating Instructions Reference Manual Introduction ...

Страница 7: ...JT C522GD series only Lights up or blinks during contactless IC card transactions B Contactless IC Card Reader JT C522GD series only C Display touch panel D Buttons page 9 E Smart card reader F Ambient light sensor 1 Automatically adjusts the screen brightness G Charging indicator Orange lit Battery is charging Green lit Battery charging is complete Red lit Battery level is 19 or less of a full ch...

Страница 8: ... product Otherwise transactions may not work 3 The antenna is built into the unit Covering the area around the antenna with your hands or objects may cause the product not to operate correctly Rear view A Speaker B Battery cover C Magnetic card reader D Camera E Photo light F Printer cover G Mobile Wireless LAN Bluetooth antenna 1 H Strap attachment hole I Volume button 8 Operating Instructions Re...

Страница 9: ...buttons Press to input a password ENTER button Press to confirm the input data CANCEL button Press if you made an operation or input mistake The input value will be cleared and you will return to the previous screen If you press the button while nothing is input you will return to the previous message Function buttons F1 to F3 Press to select the function Power button Press to turn the power on or...

Страница 10: ... lift it up B 3 Remove the battery Pull the battery pack remover sheet A A slightly lift the battery pack insert your fingertips into the grooves on both sides B and lift up C A 4 Insert the battery Insert the battery s terminal side into the unit A and then lower the battery into place B Take care so that the battery pack remover sheet does not get caught 10 Operating Instructions Reference Manua...

Страница 11: ... that the battery pack remover sheet does not get caught A B IMPORTANT The unit cannot operate with the AC adapter alone Make sure you insert a charged battery pack If you remove the battery pack the date and time settings return to default or return to the automatically or manually set previous date and time If the unit is not connected to a wireless LAN or mobile network configure the settings a...

Страница 12: ... its full capacity 1 Connect the AC adaptor and the AC cord as shown below 2 Connect the AC adaptor to the unit and then connect the AC plug to the AC outlet Confirming the battery level The battery level is displayed in the status bar Fully charged Charging Battery level is 19 or less of a full charge Turning the unit on and off Turning the unit on Press and hold the power button for more than 3 ...

Страница 13: ...the roll paper is set in the opposite direction B A 4 Pull out the roll paper so that about 1 to 5 cm of the end is out from the printer cover Pull out the roll paper straight Pulling at an angle will cause paper jams 5 Gently lift and close the printer cover so that the roll paper does not fall out from the compartment A and press the sides in the direction of the arrow until you hear a click B T...

Страница 14: ...yvinyl chloride supplies and adhesive tape Paper dust building up in the printer can cause defective printing Carefully remove it so that you do not damage the parts by using a dry cotton swab etc The speed of the printer varies depending on the operating environment and print content The speed may be reduced especially in extreme temperature environments or when the battery level is low When ther...

Страница 15: ... not touch the printer head printer drive and paper cutter A Paper cutter B Printer head C Printer drive D Bearing E Printer cover F Shaft 1 Insert the printer cover into the unit s printer as shown in the figure Insert the attachment part B of the printer cover into the A position in the figure A B Operating Instructions Reference Manual 15 Getting started ...

Страница 16: ...ise A and close B the printer cover to insert the printer cover shafts into the bearings 4 Press the printer cover in the direction of the arrow until you hear a click IMPORTANT Do not forcefully press on the bearings because the shafts may break If the roll paper jams 1 Open the printer cover page 13 2 Remove the roll paper and cut off the wrinkled or dirty part 3 Set the roll paper page 13 If th...

Страница 17: ...ic strip side facing down and slide from right to left Slide the card at a steady speed IMPORTANT Do not use objects other than the magnetic card and cleaning card Do not use a wet card Slide the card straight If you slide it in an arc the card may not be read correctly When cleaning use a cleaning card and repeat step 1 several times Operating Instructions Reference Manual 17 Getting started ...

Страница 18: ...ll out the card Keep the card inserted until reading is complete IMPORTANT Do not insert objects other than the smart card and cleaning card Do not use a wet card Wipe dirt off the contact part of the card before use When cleaning use a cleaning card and repeat steps 1 and 2 several times 18 Operating Instructions Reference Manual Getting started ...

Страница 19: ...ayed guide varies depending on the card IMPORTANT Perform contactless IC card transactions in areas with good signal strength If the card cannot be read move the card around and try again Keep at least 10 cm away from other contactless IC card readers writers during use Otherwise the card may not be read correctly Operating Instructions Reference Manual 19 Getting started ...
Страница 20: ...rd language 1 Swipe up the home screen and then in the app list tap Settings System Languages input 2 Tap Virtual keyboard select the desired keyboard and then configure the desired settings according to your needs If the desired keyboard is not shown tap Virtual keyboard Manage keyboards and then select the desired keyboard Using the SwiftKey keyboard A Tool bar Text replacement Some commonly dis...

Страница 21: ...leys D Input switching key Switches to alphabet number and symbol mode E Google voice typing key Tap and hold to switch to Google voice typing mode F Delete key Deletes the character to the left of the cursor G Line feed key Inserts line feeds in text H Keyboard conversion key Changes the virtual keyboard page 20 I Close the keyboard Operating Instructions Reference Manual 21 Input ...

Страница 22: ...ttings Network Internet WLAN Make sure that WLAN is turned on 2 Tap Add network 3 Enter the network name SSID then select the network s security type and enter the password if required Select the security type from None WEP WPA WPA2 PSK or 802 1x EAP 4 Tap SAVE Selecting the frequency band used for WLAN 1 Swipe up the home screen and then in the app list tap Settings Network Internet WLAN Make sur...

Страница 23: ...ion manuals included with the other device for details 1 Swipe up the home screen and then in the app list tap Settings Connected devices Bluetooth Pair new device The unit searches for nearby Bluetooth devices and the names of Bluetooth devices available for pairing are displayed 2 Tap the name of the device that you want to pair with the unit 3 Follow the on screen instructions Note When the uni...

Страница 24: ...o press and hold both volume buttons to start the selected accessibility feature Select to Speak Allows you to tap specific items on your screen to hear them read aloud TalkBack models with GMS only Reads items on the screen aloud Text to speech output Allows you to configure the unit s text to speech features Font size Allows you to make the text on the screen smaller or larger Display size Allow...

Страница 25: ...er button Charge the battery Install the battery correctly Replace the battery with a fully charged one Other startup problems Disconnect and remove all peripheral devices Shutting down The unit does not turn off It may take one or two minutes for the unit to turn off This is not a malfunction Press and hold the power button for at least 10 seconds to force the unit to restart and then try again D...

Страница 26: ...ry cannot be charged at all The charger is not connected properly Confirm all connections There may be debris lodged in the battery charge terminals Remove the battery and remove any debris found Replace the battery with a new one 26 Operating Instructions Reference Manual Troubleshooting ...

Страница 27: ...osure information The highest SAR value for this product as reported to the ISED is listed below Highest value W kg 0 71 Information sur l exposition aux radiofréquences RF La valeur de DAS la plus élevée obtenue pour ce produit telle que rapportée à l ISDE lors des essais pour une utilisation près de l oreille est telle que décrite ci dessous Valeur la plus élevée W kg 0 71 Operating Instructions...

Страница 28: ...8 149 151 153 157 159 161 165 ch IEEE 802 11b IEEE 802 11g IEEE 802 11n 2 4 GHz 1 ch 11 ch RF frequency band 2 4 GHz Band 2 412 GHz 2 462 GHz 5 GHz Band 5 18 GHz 5 32 GHz 5 5 GHz 5 7 GHz 5 745 GHz 5 825 GHz Data transfer rate IEEE 802 11a 54 Mbps IEEE 802 11b 11 Mbps IEEE 802 11g 54 Mbps IEEE 802 11n HT20 72 2 Mbps HT40 150 Mbps Bluetooth Bluetooth v4 2 Class 1 Transmission method FHSS system Wire...

Страница 29: ...epending on usage conditions 5 Actual size may vary by unit configuration 6 Average weight Actual weight may vary by unit configuration 7 Product or application booting can dependent upon the battery charge level Do not expose the skin to this product when using the product in a hot or cold environment When using the product in hot or cold environments some peripherals may not perform properly Con...

Страница 30: ... Plus warranty has been purchased will receive additional coverage for any failure that occurs due to accidental damage All other terms and conditions of the standard warranty apply and this additional coverage will exist for the duration of the standard warranty period of the Product If an extended Protection Plus warranty program is purchased coverage is extended to the end of the last year of e...

Страница 31: ...ition all modems must be approved by Panasonic as compatible with the device hardware before installation or use Panasonic s sole responsibility for the warranty or technical support of the software required to install or operate the modem is defined in Section 2 Limited Software Warranty Any attempted software installation by anyone other than a Panasonic Authorized Wireless Integrator is not cov...

Страница 32: ...y Panasonic Failures which result from alteration accident misuse introduction of liquid or other foreign matter into the unit abuse neglect installation maladjustment of consumer controls improper maintenance or modification use not in accordance with product use instructions Failures due to service by anyone other than a Panasonic Authorized Service Provider Failures caused by improper installat...

Страница 33: ...E LIMITED TO THE APPLICABLE WARRANTY PERIOD SET FORTH ABOVE Some states do not allow the exclusion or limitation of incidental or consequential damages or limitations on how long an implied warranty lasts so the above limitations or exclusions may not apply to you This limited warranty gives you specific legal rights and you may also have other rights which vary from state to state For technical s...

Страница 34: ...mer Purchase Defective Materials or Workmanship All consumable items including protection film cleaning cloth carry case tether and harness No Coverage Remedy In the event of a warranty claim contact PCI s representatives within the applicable warranty period identifying the nature of the defect claimed at 1 800 668 8386 between 9 00 A M and 5 00 P M Eastern Time Zone Mon Fri excluding holidays fo...

Страница 35: ... copy of your purchase receipt and an explanation of the suspected defect PCI will replace in Canada the defective disk s or other media Remedy PCI s entire liability and your only remedy for any breach of this software media warranty is limited to replacement of the media only It does not cover any other damages including but not limited to loss of use or profit loss or special indirect or conseq...

Страница 36: ...mmables incluant les pellicules protectrices chiffons de nettoyage étuis de transport longes et sangles Aucune couverture Recours Pour obtenir des informations sur la marche à suivre dans le cas où une réclamation en vertu de la garantie deviendrait nécessaire communiquez par téléphone avec un représentant de PCI au 1 800 668 8386 entre 9h00 et 17h00 heure de l Est du lundi au vendredi sauf les jo...

Страница 37: ... votre achat et une description du problème Recours La responsabilité de PCI et votre seul recours dans le cas de toute défaillance couverte par la garantie sur ce support de logiciel est limitée au seul remplacement du support Elle ne couvre aucun autre dommage y compris mais non exclusivement la perte d usage ou de profits ni aucun dommage spécial indirect ou consécutif ni aucune autre réclamati...

Страница 38: ...Panasonic Mobile Communications Co Ltd 600 Saedo cho Tsuzuki ku Yokohama city Kanagawa 224 8539 Japan DHQP1052ZA J1 CXXXX 0 ...

Отзывы: