background image

13

(ENG) VQT2U80

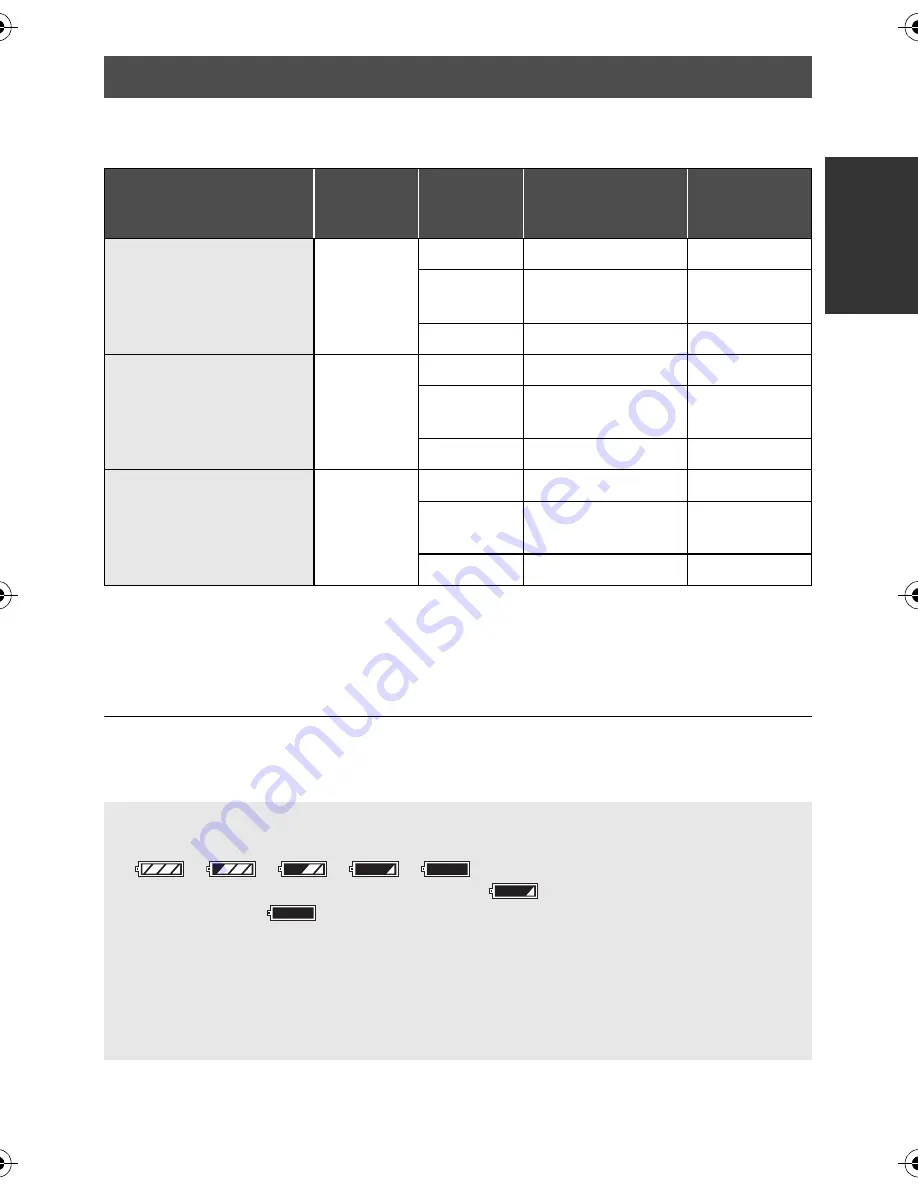
Charging/Recording time

Temperature: 25

o

C/humidity: 60%

* The battery pack holder kit VW-VH04 (optional) is necessary.

These times are approximations.

The indicated charging time is for when the battery has been discharged completely. 
Charging time and recordable time vary depending on the usage conditions such as 
high/low temperature.

The actual recordable time refers to the recordable time when repeatedly starting/stopping 
recording, turning the unit on/off, moving the zoom lever etc.

The batteries heat up after use or charging. This is not a malfunction.

Charging and recording time

Battery model number

[Voltage/Capacity 

(minimum)]

Charging 

time

Recording 

mode

Maximum 

continuously 

recordable time

Actual 

recordable 

time

Supplied battery/

VW-VBG130 (optional)

[7.2 V/1250 mAh]

2 h 35 min

1080/50p

1 h 40 min

1 h

HA, HG, 

HX

1 h 45 min

1 h 5 min

HE

1 h 50 min

1 h 5 min

VW-VBG260 (optional)

[7.2 V/2500 mAh]

4 h 40 min

1080/50p

3 h 15 min

2 h

HA, HG, 

HX

3 h 25 min

2 h 5 min

HE

3 h 25 min

2 h 10 min

VW-VBG6 (optional)

*

[7.2 V/5400 mAh]

9 h 25 min

1080/50p

8 h 10 min

5 h

HA, HG, 

HX

8 h 30 min

5 h 15 min

HE

8 h 35 min

5 h 20 min

Battery capacity indication

The display changes as the battery capacity reduces. 

#

#

#

#


If there is less than 3 minutes remaining, then 

 will become red. If the battery 

discharges, then 

 will flash.

The remaining battery capacity is displayed when using the Panasonic battery that you 
can use for this unit. The actual time can vary depending on your actual use.

If the actual remaining time exceeds 9 hours 59 minutes, the indication will stay green 
and will not change until the remaining time falls below 9 hours 59 minutes.

When using the AC adaptor or batteries made by other companies, the remaining 
battery capacity will not be shown.

HDC-SD600EP-VQT2U80_mst.book  13 ページ  2010年4月12日 月曜日 午後2時32分

Содержание HDCSD600K

Страница 1: ...600 Before use please read these instructions completely Please also refer to Operating Instructions PDF format recorded on the CD ROM containing the Operating Instructions supplied You can learn abou...

Страница 2: ...TILATION OPENINGS WITH NEWSPAPERS TABLECLOTHS CURTAINS AND SIMILAR ITEMS DO NOT PLACE SOURCES OF NAKED FLAMES SUCH AS LIGHTED CANDLES ON THE UNIT DISPOSE OF BATTERIES IN AN ENVIRONMENTALLY FRIENDLY MA...

Страница 3: ...pality your waste disposal service or the point of sale where you purchased the items Penalties may be applicable for incorrect disposal of this waste in accordance with national legislation For busin...

Страница 4: ...t result in loss of recording or edited content and does not guarantee any content if recording or editing does not work properly Likewise the above also applies in a case where any type of repair is...

Страница 5: ...t on and off with the LCD monitor 17 4 Selecting a mode 18 5 Adjusting LCD monitor 19 How to use the touch screen 19 6 Setting date and time 20 Basic Recording Playback 1 Recording motion pictures 21...

Страница 6: ...oduct numbers correct as of Apr 2010 These may be subject to change Battery pack VW VBG130 AC adaptor VSK0698 AC cable K2CQ29A00002 DC cable K2GJYDC00004 Remote control Battery built in N2QAEC000024 A...

Страница 7: ...end conversion lens VW WE08H 3 Filter kit VW LF46NE 4 Video DC light VW LDC103E 5 Light bulb for video DC light VZ LL10E Shoe adaptor VW SK12E DVD burner VW BN2 1 The supplied DC cables cannot be use...

Страница 8: ...IN l 14 Always use the supplied AC adaptor or a genuine Panasonic AC adaptor VW AD21E K optional 10 HDMI mini connector HDMI l 32 11 USB terminal 12 AV multi connector l 32 Use the AV multi cable onl...

Страница 9: ...t stop button This button functions in the same manner as the recording start stop button 24 Adjust zoom buttons l 27 25 Menu button MENU l 26 26 Delete button l 30 27 Tripod receptacle 21 22 23 24 25...

Страница 10: ...ording mode l 27 Thumbnail display switch Volume lever sVOLr In playback mode 31 Internal microphones 32 Mode switch l 18 33 Recording start stop button l 21 34 Shoulder strap fixture 35 Grip belt Adj...

Страница 11: ...tor then the battery will not charge Remove the DC cable from the AC adaptor 1 Connect the AC cable to the AC adaptor and the AC outlet 2 Insert the battery into the AC adaptor by aligning the arrows...

Страница 12: ...Inserting removing the battery Removing the battery Be sure to hold down the power button until the status indicator goes off Then remove the battery while supporting the unit to prevent it dropping M...

Страница 13: ...1250 mAh 2 h 35 min 1080 50p 1 h 40 min 1 h HA HG HX 1 h 45 min 1 h 5 min HE 1 h 50 min 1 h 5 min VW VBG260 optional 7 2 V 2500 mAh 4 h 40 min 1080 50p 3 h 15 min 2 h HA HG HX 3 h 25 min 2 h 5 min HE...

Страница 14: ...it is designed only for this unit Also do not use the AC cable from other equipment with this unit 1 Connect the AC cable to the AC adaptor and the AC outlet 2 Connect the DC cable to the AC adaptor...

Страница 15: ...rite protect switch A on SD card is locked no recording deletion or editing will be possible on the card Keep the Memory Card out of reach of children to prevent swallowing This unit an SDXC compatibl...

Страница 16: ...e the unit to vibrations or shock Performing the above while the lamp is on may result in damage to data SD card or this unit Do not expose the terminals of the SD card to water garbage or dust Do not...

Страница 17: ...o turn the unit on off To turn on the unit A The status indicator lights To turn off the unit B The status indicator goes off The unit will not turn off while recording motion pictures even if the LCD...

Страница 18: ...Preparation Setup 4 Selecting a mode Change the mode to recording or playback Operate the mode switch to change the mode to or Motion picture recording mode l 21 Still picture recording mode l 22 Play...

Страница 19: ...h the centre of the icon Touching the touch screen will not operate while you are touching another part of the touch screen About the operation icons These icons are used to switch the menu and thumbn...

Страница 20: ...The clock function starts at 00 seconds A message prompting for World time setting may be displayed Perform the World time setting by touching the screen Touch EXIT or press the MENU button to comple...

Страница 21: ...Press the recording start stop button again to pause recording Screen indications in the motion picture recording mode 0h00m00s 0h00m00s 0h00m00s R 1h20m R 1h20m R 1h20m HG A Recording mode B Remaini...

Страница 22: ...ton fully About the screen indications in still picture recording Still picture operation indicator Flash j Flash level Red eye reduction MEGA optical image stabilizer Optical image stabilizer l 29 Qu...

Страница 23: ...to OFF in the intelligent auto mode Intelligent auto Manual button Press this button to switch intelligent auto mode manual mode MANUAL Mode Scene Effect Portrait When the object is a person Faces ar...

Страница 24: ...till picture playback 1 Change the mode to 2 Touch the play mode select icon A 3 Touch VIDEO SD CARD or PICTURE SD CARD 4 Touch the scene or the still picture to be played back Next previous page can...

Страница 25: ...picture playback 1 Playback Pause 6 Rewind playback 5 Fast forward playback Stops the playback and shows the thumbnails 1 Displays the direct playback bar 1 Slide show playback of the still pictures...

Страница 26: ...XIT or press the MENU button to exit the menu setting About guide display After touching touching the submenus and items will cause function descriptions and settings confirmation messages to appear A...

Страница 27: ...d in still picture recording mode Zoom mode RECORD SETUP ZOOM MODE desired setting Opt Zoom 12k Optical zoom only Up to 12k i Zoom 18k This zoom function allows you to maintain high definition picture...

Страница 28: ...the picture size to the maximum area is cropped to the centre area allowing a picture with a higher zoom effect If you take your finger off the zoom lever during zoom operation the operation sound may...

Страница 29: ...e recording mode When in MODE1 appears When in MODE2 appears Stabilization may not be possible under strong shaking conditions RECORD SETUP O I S MODE1 or MODE2 Optical image stabilizer button Pressin...

Страница 30: ...re is selected and the indication appears on the thumbnails Touch the scene still picture again to cancel the operation Up to 99 scenes can be selected to be deleted 4 Only when SELECT is selected in...

Страница 31: ...is complete touch EXIT to exit the message screen Perform a physical formatting of the SD card when the SD card is to be disposed transferred Refer to the Operation Instructions PDF format Do not tur...

Страница 32: ...mages you can enjoy them in high resolution with high quality sound 1 Connect this unit to a TV Confirm the terminals on your TV and use a cable compatible with the terminals Image quality may vary wi...

Страница 33: ...hen the component terminal plug is connected simultaneously 2 Select the video input on the TV Example Select the HDMI channel with a HDMI mini cable Select the Component or Video 2 channel with an AV...

Страница 34: ...ixels Motion picture 2530 Kk3 16 9 Still picture 2320 Kk3 4 3 2630 Kk3 3 2 2530 Kk3 16 9 Lens Auto Iris F1 5 to F2 8 Focal length 3 45 mm to 41 4 mm Macro Full range AF 35 mm equivalent Motion picture...

Страница 35: ...onnector video output level HDMI x v Colour 1080p 1080i 576p AV multi connector audio output level Line 316 mV 600 h 2 ch HDMI mini connector audio output level Dolby Digital Linear PCM USB Card reade...

Страница 36: ...VBR HE Approx 5 Mbps VBR Picture size 1080 50p 1920k1080 50p HA HG HX HE 1920k1080 50i Audio compression Dolby Digital Recording media SD Memory Card FAT12 and FAT16 system compliant SDHC Memory Card...

Страница 37: ...safety Specifications may change without prior notice Power source Power consumption DC output AC 110 V to 240 V 50 60 Hz 19 W DC 9 3 V 1 2 A Unit operation DC 8 4 V 0 65 A Battery charging Dimension...

Страница 38: ...s and or other countries Microsoft product screen shot s reprinted with permission from Microsoft Corporation IBM and PC AT are registered trademarks of International Business Machines Corporation of...

Страница 39: ...r later or Adobe Reader 6 0 or later to browse or print the Operating Instructions PDF format Download and install a version of Adobe Reader that you can use with your OS from the following Web Site h...

Страница 40: ...oration Web site http panasonic net Pursuant to at the directive 2004 108 EC article 9 2 Panasonic Testing Centre Panasonic Marketing Europe GmbH Winsbergring 15 22525 Hamburg Germany Panasonic Corpor...

Отзывы: