background image

35

VQT2M75

Basic

Recording/
Playback

3

Recording motion 
pictures

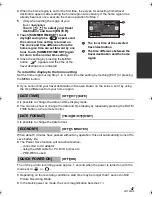
1

Change the mode to 

.

2

Open the LCD monitor or 
extend the viewfinder.

3

Press the recording start/stop 
button to start recording.

B

When you begin recording, 

;


changes to 

¥

.

4

Press the recording start/stop 
button again to pause 
recording.

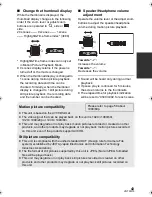
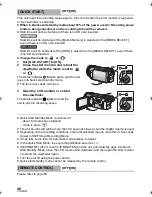
Still pictures can be recorded while recording the motion picture. (

l

38)

The images recorded between pressing the recording start/stop button to start recording 
and pressing it again to pause recording become one scene.

Maximum number of recordable scenes: 3900
Maximum number of different dates: 200 (

l

90)

When either of them reaches to the maximum limit, additional scenes cannot be recorded.
(In the case of SD cards it is the maximum number of recordable scenes per card.)

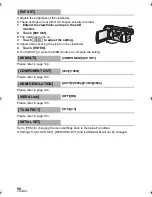
While recording is in progress, the recording will not stop even if the LCD monitor is closed 
and the viewfinder is retracted.

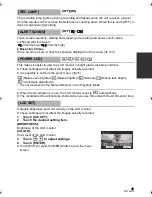
Put the unit in Pause mode when connecting or disconnecting an external microphone with 
the MIC terminal.

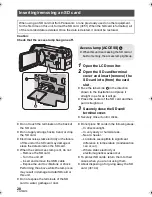
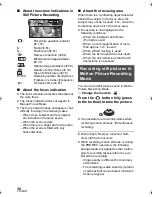
Align with the status indicator 

A

.

HDC-TM700&HS700P&PC-VQT2M75_mst.book  35 ページ  2010年2月23日 火曜日 午前10時34分

Содержание HDC-TM700K

Страница 1: ...ssistance please call 1 800 561 5505 or visit us at www panasonic ca Operating Instructions High Definition Video Camera Model No HDC TM700P PC HDC HS700P PC Before connecting operating or adjusting t...

Страница 2: ...O QUALIFIED SERVICE PERSONNEL CAUTION DO NOT INSTALL OR PLACE THIS UNIT IN A BOOKCASE BUILT IN CABINET OR IN ANOTHER CONFINED SPACE ENSURE THE UNIT IS WELL VENTILATED TO PREVENT RISK OF ELECTRIC SHOCK...

Страница 3: ...n the equipment and receiver Connect the equipment into an outlet on a circuit different from that to which the receiver is connected Consult the dealer or an experienced radio TV technician for help...

Страница 4: ...n consult a doctor Warning Risk of fire explosion and burns Do not disassemble Do not heat the batteries above the following temperatures or incinerate Button type battery 60 oC 140 oF Battery pack 60...

Страница 5: ...tains Perchlorate Material special handling may apply See www dtsc ca gov hazardouswaste perchlorate A lithium ion polymer battery that is recyclable powers the product you have purchased Please call...

Страница 6: ...grounding prong The wide blade or the third prong are provided for your safety If the provided plug does not fit into your outlet consult an electrician for replacement of the obsolete outlet 10 Prote...

Страница 7: ...e internal parts of your camera AVOID SUDDEN CHANGES IN TEMPERATURE If the unit is suddenly moved from a cold place to a warm place moisture may form on the SD card and inside the unit DO NOT LEAVE YO...

Страница 8: ...ention to the following points Do not expose the HDD to vibrations and shocks Due to the environment and handling conditions the HDD may be subject to partial damages or may not be able to read record...

Страница 9: ...Card Specifications Refer to page 27 for more details on SD cards For the purposes of these operating instructions SD Memory Card SDHC Memory Card and SDXC Memory Card are referred to as the SD card...

Страница 10: ...ording still pictures in Motion Picture Recording Mode 38 5 Intelligent Auto Mode 39 6 Motion picture Still picture playback 41 Setup 1 Using the menu screen 44 Using the quick menu 45 2 Using the Set...

Страница 11: ...burner to copy to play back a disc 109 Preparing for copying playing back 109 Copying to discs 111 Playing back the copied disc 114 Managing the copied disc 115 3 Dubbing images onto other video devi...

Страница 12: ...bject to change Battery pack VW VBG130 AC adaptor VSK0697 AC cable K2CA2CA00025 DC cable K2GJYDC00004 Remote control Built in battery N2QAEC000024 AV multi cable K1HY12YY0004 USB cable K1HY04YY0032 St...

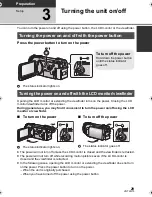
Страница 13: ...l go Press the center of the SD card and then pull it straight out 3 Securely close the SD card terminal cover Securely close it until it clicks Turning the unit on off Turning the power on and off wi...

Страница 14: ...the mode to or 2 Select the menu 3 Touch the media to record motion pictures or still pictures Touch VIDEO SD CARD or PICTURE SD CARD to record to the SD card Touch VIDEO Built inMemory or PICTURE Bu...

Страница 15: ...EO HDD or PICTURE HDD to play back the HDD 4 Touch the scene or the still picture to be played back Next previous page can be displayed by touching 5 Select the playback operation by touching the oper...

Страница 16: ...AD21PP K optional 11 HDMI mini connector HDMI l 101 105 12 USB terminal l 110 125 13 AV multi connector l 101 116 Use the AV multi cable only the supplied cable 14 Card slot l 28 15 Access lamp ACCES...

Страница 17: ...on 28 Adjust zoom buttons l 55 29 Menu button MENU l 44 30 Delete button l 95 31 Tripod receptacle 24 25 27 26 28 29 30 Due to limitations in LCD production technology there may be some tiny bright or...

Страница 18: ...dial l 30 41 Shoulder strap fixture 42 Grip belt Adjust the length of the grip belt so that it fits your hand 1 Flip the belt 2 Adjust the length 3 Replace the belt 43 Microphone terminal MIC A compat...

Страница 19: ...MI l 101 105 12 USB terminal l 110 125 13 AV multi connector l 101 116 Use the AV multi cable only the supplied cable 14 Card slot l 28 15 Access lamp ACCESS l 28 16 Lens cover The lens cover opens in...

Страница 20: ...on 29 Adjust zoom buttons l 55 30 Menu button MENU l 44 31 Delete button l 95 32 Tripod receptacle 25 26 28 27 29 30 31 Due to limitations in LCD production technology there may be some tiny bright or...

Страница 21: ...Grip belt Adjust the length of the grip belt so that it fits your hand 1 Flip the belt 2 Adjust the length 3 Replace the belt 42 Microphone terminal MIC A compatible plug in powered microphone can be...

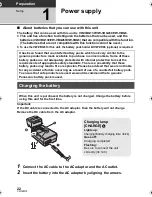
Страница 22: ...daptor by aligning the arrows It has been found that counterfeit battery packs which look very similar to the genuine product are made available to purchase in some markets Some of these battery packs...

Страница 23: ...nserting removing the battery Removing the battery Be sure to hold down the power button until the status indicator goes off Then remove the battery while supporting the unit to prevent it from droppi...

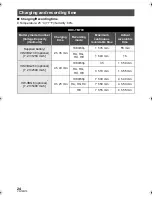
Страница 24: ...tinuous recordable time Actual recordable time Supplied battery VW VBG130 optional 7 2 V 1250 mAh 2 h 35 min 1080 60p 1 h 35 min 55 min HA HG HX HE 1 h 40 min 1 h VW VBG260 optional 7 2 V 2500 mAh 4 h...

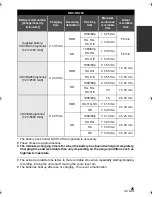
Страница 25: ...ry model number Voltage Capacity minimum Charging time Recording destination Recording mode Maximum continuous recordable time Actual recordable time Supplied battery VW VBG130 optional 7 2 V 1250 mAh...

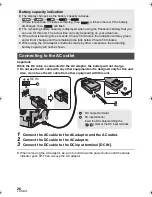
Страница 26: ...ity indication The display changes as the battery capacity reduces If there is less than 3 minutes remaining then will become red If the battery discharges then will flash The remaining battery capaci...

Страница 27: ...letion or editing will be possible on the card Keep the Memory Card out of reach of children to prevent swallowing This unit an SDXC compatible device is compatible with SD Memory Cards SDHC Memory Ca...

Страница 28: ...jExpose the unit to vibrations or shock Performing the above while the lamp is on may result in damage to data SD card or this unit Do not expose the terminals of the SD card to water garbage or dust...

Страница 29: ...turn off the power B The status indicator goes off The power will not turn off unless the LCD monitor is closed and the viewfinder is retracted The power will not turn off while recording motion pict...

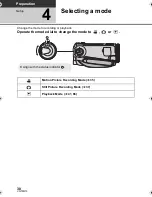
Страница 30: ...Selecting a mode Change the mode to recording or playback Operate the mode dial to change the mode to or Motion Picture Recording Mode l 35 Still Picture Recording Mode l 37 Playback Mode l 41 86 Ali...

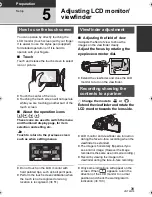
Страница 31: ...when the touch is not recognized or wrong location is recognized l 51 Adjusting the field of view It adjusts the field of view to show the images on the viewfinder clearly Adjust the focus by rotating...

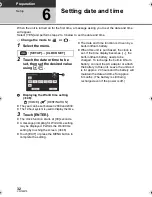
Страница 32: ...e clock function starts at 00 seconds A message prompting for World time setting may be displayed Perform the World time setting by touching the screen l 46 Touch EXIT or press the MENU button to comp...

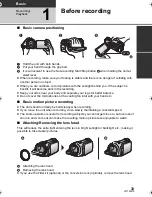
Страница 33: ...ur legs for better balance Do not cover the microphones or the cooling fan inlet with your hand etc Basic motion picture recording The unit should normally be held steady when recording If you move th...

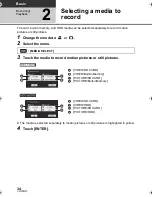
Страница 34: ...res 1 Change the mode to or 2 Select the menu 3 Touch the media to record motion pictures or still pictures The media is selected separately to motion pictures or still pictures is highlighted in yell...

Страница 35: ...ding start stop button to start recording and pressing it again to pause recording become one scene Maximum number of recordable scenes 3900 Maximum number of different dates 200 l 90 When either of t...

Страница 36: ...equipment supports AVCHD by referring to the operating instructions There are some cases where the recorded motion pictures cannot be played back even if the device supports AVCHD In such cases play...

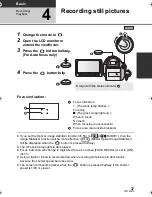
Страница 37: ...hen the button is pressed halfway The AF assist lamp lights in dark places Focus indication will change to registered focus icon when FACE RECOG is set to ON l 70 Using a flash or tripod is recommende...

Страница 38: ...ct may not be focused If so move the contrasting object out of the focus area Focus area is not displayed in the following conditions jWhen the Intelligent Auto Mode Portrait is used jWhen a zoom magn...

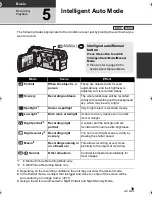
Страница 39: ...de Mode Scene Effect Portrait When the object is a person Faces are detected and focused automatically and the brightness is adjusted so it is recorded clearly Scenery Recording outdoors The whole lan...

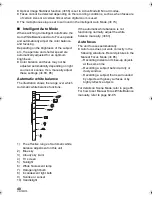
Страница 40: ...ce The illustration shows the range over which Automatic white balance functions 1 The effective range of Automatic white balance adjustment on this unit 2 Blue sky 3 Cloudy sky rain 4 TV screen 5 Sun...

Страница 41: ...esired media to be played back motion pictures or still pictures 4 Touch the scene or the still picture to be played back Next previous page can be displayed by touching A VIDEO SD CARD B VIDEO Built...

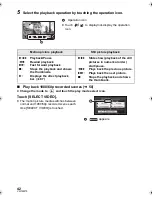
Страница 42: ...s touched A Operation icon Touch to display not display the operation icon Motion picture playback Still picture playback 1 Playback Pause 6 Rewind playback 5 Fast forward playback Stops the playback...

Страница 43: ...rd only during normal playback If pause play is continued for 5 minutes the screen returns to the thumbnails The elapsed time for playback indication will be reset to 0h00m00s for each scene Motion pi...

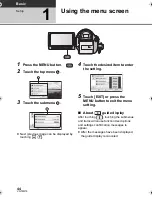
Страница 44: ...isplayed by touching 4 Touch the desired item to enter the setting 5 Touch EXIT or press the MENU button to exit the menu setting About guide display After touching touching the submenus and items wil...

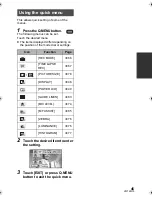
Страница 45: ...e position of the mode dial or settings 2 Touch the desired item to enter the setting 3 Touch EXIT or press Q MENU button to exit the quick menu Using the quick menu Icon Function Page REC MODE l 66 T...

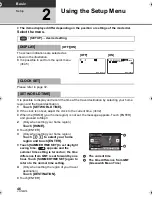
Страница 46: ...our home region is not set the message appears Touch ENTER and proceed to Step 3 2 Only when setting your home region Touch HOME Touch ENTER 3 Only when setting your home region Touch to select your h...

Страница 47: ...nd your travel destination in the area shown on the screen set it by using the time difference from your home region It is possible to change the date and time display mode You can also show or change...

Страница 48: ...art standby mode The lens cover does not close 3 Open the LCD monitor or extend the viewfinder The status indicator A lights red and the unit is put into recording pause Quick Start Standby Mode is ca...

Страница 49: ...ecorded It is possible to set from the quick menu l 45 Makes even brighter Makes brighter Normal Makes less bright Automatic adjustment It is not displayed in the Manual Mode or in the Playback Mode W...

Страница 50: ...4 Touch ENTER Touch EXIT or press the MENU button to complete the setting Please refer to page 104 Please refer to page 104 Please refer to page 104 Please refer to page 105 Please refer to page 103 S...

Страница 51: ...ry HDD Touch EXIT or press the MENU button to close the indication The SD card built in memory or built in HDD requires some space to store information and manage system files so the actual usable spa...

Страница 52: ...However if no operations take place for approx 10 minutes the demonstration automatically starts again To stop the demonstration set DEMO MODE to OFF or insert an SD card This item is used to start th...

Страница 53: ...Zoom volume thumbnail display switch buttons T W VOL 8 Recording start stop button START STOP 9 Date time button DATE TIME l 47 10 Menu button MENU 11 OK button OK means that these buttons function in...

Страница 54: ...All touch operations on the unit can also be operated by the remote control some exceptions CAUTION Danger of explosion if battery is incorrectly replaced Replace only with the same or equivalent type...

Страница 55: ...picture size to the maximum area is cropped to the center area allowing a picture with a higher zoom effect If you take your finger off the zoom lever during zoom operation the operation sound may be...

Страница 56: ...Recording Mode When in MODE1 appears When in MODE2 appears Stabilization may not be possible under strong shaking conditions RECORD SETUP O I S MODE1 or MODE2 O I S Optical image stabilizer button Pre...

Страница 57: ...tion will be canceled About target frame When target lock fails the target frame blinks in red and then disappears Touch a characteristic part color etc on the object to lock onto it again When the bu...

Страница 58: ...this unit Change the mode to Please refer to page 147 for details about approximate recordable time 1080 60p The scenes recorded in 1080 60p can be saved or played back by this unit or the HD Writer...

Страница 59: ...isplayed in Motion Picture Recording Mode 4 It is displayed only when a headphone is connected to the headphone output terminal If you turn off the power or change the mode to PRE REC Color night rec...

Страница 60: ...onds before the recording start stop button is pressed appears on the screen Aim the unit at the subject beforehand There is no beep sound PRE REC is canceled in the following cases jIf you change the...

Страница 61: ...le is detected on the locked subject When the Smile Shot function is set to Face Recognition it will record only if the face of a subject registered with FACE RECOG is locked as a target When the butt...

Страница 62: ...after 2 seconds setting canceled When the button is pressed a still picture is recorded after the 10 or 2 display and the recording lamp flashes for the time which has been set After recording the Sel...

Страница 63: ...e background The unit can focus on the subject at a distance of approx 70 cm 28q If the magnification is 12k or less then it is automatically set to 12k Tele Macro function is canceled when the zoom m...

Страница 64: ...come washed out for a while Bright dots that are usually invisible may be seen but this is not a malfunction Using a tripod is recommended In darker areas Auto Focus may focus a bit slower This is nor...

Страница 65: ...ent the Sports Mode does not function The 5 display flashes Portrait jColor and screen brightness may change under indoor lighting SCENE MODE RECORD SETUP SCENE MODE desired setting OFF Cancel the set...

Страница 66: ...to A Favors image quality B Favors recording time Recordable time using the battery l 24 This function s default setting is HG mode Please refer to page 147 about approximate recordable time When the...

Страница 67: ...not be adjusted automatically depending on light sources or scenes If so manually adjust these settings l 83 85 Use this function to record an image with vivid color like an image on a movie film Cha...

Страница 68: ...You will be able to perform Relay Recording by touching YES but you will not be able to perform the RELAY SCENE COMBINE after that Still pictures are recorded to the SD card after Relay recording is...

Страница 69: ...ions In this case try recording the face again 3 Entering the person s name Touch the text entry icon in the center of the screen and enter the name After entering the name touch Enter Entering text A...

Страница 70: ...ing still picture recording Only displayed when Face Recognition is in use Touch the icon you wish to have displayed 3 Touch ENTER Canceling a registered person 1 Select the menu Touching DELETE ALL c...

Страница 71: ...brightness will be performed against the prioritized face framing Prioritized face framing is only displayed in Intelligent Auto Mode Focus will be set to prioritized face framing when the button is...

Страница 72: ...To play back images recorded in Digital cinema color with vivid colors of wider color ranges a device compatible with x v Color is required When these images are played back with devices other than on...

Страница 73: ...cord higher quality sound and maintain realism even when zooming in for instance when recording a music recital we recommend setting MIC SETUP to SURROUND WIND NOISE CANCELER RECORD SETUP WIND NOISE C...

Страница 74: ...sound is distorted Select a lower setting for microphone input level 3 Touch ENTER to determine the microphone input level and then touch EXIT Microphone input level meter appears on the screen When s...

Страница 75: ...ng the quality of the image Change the mode to or Switch to Manual Mode l 82 1 Select the menu 2 Touch the desired setting items 3 Touch to adjust settings 4 Touch ENTER Touch EXIT or press the MENU b...

Страница 76: ...e object easier by checking the luminance level of the object when recording same object in different surroundings Adjust the brightness using IRIS l 84 Change the mode to or Switch to Manual Mode l 8...

Страница 77: ...raph Adjust the brightness using IRIS l 84 Change the mode to or Switch to Manual Mode l 82 Histogram is displayed while adjusting IRIS even if DISPLAY is set to OFF HISTOGRAM RECORD SETUP HISTOGRAM d...

Страница 78: ...ecording Mode Please refer to page 148 for details about the number of recordable pictures The recording will become longer depending on the recording pixels PICTURE SIZE PICTURE PICTURE SIZE desired...

Страница 79: ...res recorded on this unit with a 16 9 aspect ratio may be cut at printing Check the printer or photo studio before printing QUALITY PICTURE QUALITY desired setting Still pictures with a high picture q...

Страница 80: ...e range of pictures that will be stored Previous Next page is displayed by touching Only select the picture for start point if only 1 picture is to be stored A confirmation message is displayed when E...

Страница 81: ...p is approx 1 5 m 5 feet A conversion lens optional can block the AF assist lamp and it will become harder to adjust the focus When switching to Intelligent Auto Mode the setting is fixed to AUTO and...

Страница 82: ...uch 1 to change the page and the manual icon appears or disappears each time is touched When using the viewfinder 1 Press the CAMERA FUNCTION button to select the desired item Selected item changes wh...

Страница 83: ...ps flashing and then lights constantly the setting is complete If the display continues flashing the white balance cannot be set In this case use other White balance modes When the display flashes the...

Страница 84: ...button again When setting both the shutter speed and the iris gain value set the shutter speed and then set the iris gain value Manual shutter speed adjustment When the shutter speed is set lower tha...

Страница 85: ...is used Select the menu 2 Touch FOCUS 3 Touch MF to change to Manual Focus MF appears on the screen 4 Adjust the focus by rotating the ring The in focus area is displayed in blue The normal screen re...

Страница 86: ...otion playback During Pause When the operation icon disappears touch the screen to display the icon again With the playback paused continue touching is for slow rewind playback Playback is slow while...

Страница 87: ...rded will be registered as date of the still picture Quality will be different from the normal still picture Playback operation Playback display Operating steps Direct playback During Playback 1 Touch...

Страница 88: ...ces were recognized will be displayed A portion judged to be clearly recorded will be detected and displayed in thumbnail if you select HIGHLIGHT 3 Only when MINUTES is selected Touch to set the time...

Страница 89: ...zoomed in on centering on the part you touched With each touch you zoom in further k1 k2 k4 2 Move your position on the zoomed still picture by touching 3 4 2 1 The location of the zoom displays for...

Страница 90: ...es are recorded on the same day they are grouped separately in the following cases 1 2 is added after the recording date displayed on the screen jWhen the number of scenes exceeds 99 jWhen the media i...

Страница 91: ...ty to the parts with detected faces the part that was recognized as clearly recorded is extracted from a long recording and it can be played back in a short time with music added HIGHLIGHT Part that w...

Страница 92: ...is displayed Touch the scene again to cancel the operation When SELECT DATE is selected Touch the date to be played back A maximum of 7 days can be selected When touched the date is selected and surro...

Страница 93: ...short Date setting Touch the playback date Music setting 1 Touch your favorite music When NO MUSIC is selected the audio recorded at the time of shooting is played back To adjust the volume of music...

Страница 94: ...RT and start the audio testing Touch the other music option to change the music to be tested When you touch STOP the music playback stops 4 Touch START 5 Select the playback operation l 41 When the pl...

Страница 95: ...e is selected and the indication appears on the thumbnail Touch the scene still picture again to cancel the operation Up to 99 scenes can be selected to be deleted 4 Only when SELECT is selected in st...

Страница 96: ...the unnecessary portion Change the mode to and touch the Play mode select icon to select desired media to divide a scene l 41 1 Select the menu 2 Touch the scene to be divided 3 Touch to set the divi...

Страница 97: ...n is canceled cannot be restored During Face Highlight Playback Highlight Playback Intelligent Scene Selection or disc playback when connected to a DVD burner optional scenes still pictures cannot be...

Страница 98: ...opies they wish to print Please note Not all commercial printing services support this feature at this time 1 Select the menu 2 Touch the still picture to be set 3 Touch to set the number of prints Up...

Страница 99: ...menu 3 When the confirmation message appears touch YES Scene in the built in memory will be deleted Protected scenes in the built in memory are not deleted 4 Touch EXIT when the relay scene combining...

Страница 100: ...cel relay information The personal information of the relayed scene in the built in memory or SD card is deleted the personal information of the combined relay scene is not recorded EDIT SCENE RELAY I...

Страница 101: ...images you can enjoy them in high resolution with high quality sound 1 Connect this unit to a TV Confirm the terminals on your TV and use a cable compatible with the terminals Image quality may vary w...

Страница 102: ...Select the video input on the TV Example Select the HDMI channel with a HDMI mini cable Select the Component or Video 2 channel with an AV multi cable The name of the channel may differ depending on t...

Страница 103: ...en operation icon and time code etc can be displayed not displayed on the TV It will not display when the power is turned off If the HDMI mini cable and AV multi cable are connected at the same time o...

Страница 104: ...d the AV amplifier and TV operating instructions for how to connect this unit to the AV amplifier and TV If you connect this unit to a Panasonic AV amplifier that are compatible with VIERA Link linked...

Страница 105: ...ERA Link is a new name for EZ Sync This function allows you to use your remote control for the Panasonic TV for easy operations when this unit has been connected to a VIERA Link compatible device usin...

Страница 106: ...f the power the power on this unit also turns off Automatic input switching If you connect with a HDMI mini cable and then turn on the power on this unit the input channel on the TV automatically swit...

Страница 107: ...ia or only the necessary parts If there is not much remaining capacity in the SD card a confirmation message asking to copy after deleting all data on the SD card is displayed Be aware that deleted da...

Страница 108: ...nger jThe number of recorded scenes is large jThe temperature of the unit is high If some motion pictures or still pictures have already been recorded to the copy destination then the same date may be...

Страница 109: ...ed to allow playback on other devices and additional copying will not be possible 2 Only DVD RAM copied with the DVD burner or HD Writer AE 2 1 can additionally copy 3 Connect this unit and a DVD burn...

Страница 110: ...urner A Mini AB USB Connection Cable supplied with DVD burner B DVD burner optional Insert the plugs as far as they will go 4 Insert the disc in the DVD burner Insert the DVD disc with the recording s...

Страница 111: ...It will return to the previous step by touching When SELECT SCENES is selected When touched the scene still picture is selected and the indication appears on the thumbnail Touch the scene still pictur...

Страница 112: ...eed more discs for copying than SP Before you delete the data on the media after copying is complete be sure to play back the discs to check that they have been copied to correctly l 114 Important Not...

Страница 113: ...uality to a disc the recordable time of Standard XP is approx 60 minutes and that of Standard SP is approx 120 minutes To copy approx 600 MB still pictures picture size Disc type Copy time DVD RAM DVD...

Страница 114: ...or FACE of Highlight Time Frame Index The remaining copy time displayed while copying is the time for disc 1 Only discs that have been copied by connecting this unit to the DVD burner or created with...

Страница 115: ...when copying motion pictures or still pictures in high definition picture quality to the disc 1 Select the menu If a disc that you copied to is inserted in another device without protecting it a mess...

Страница 116: ...the date and time display and function indication are not wanted cancel them before dubbing l 47 103 If the dubbed images are played back on a wide screen TV the images may be stretched vertically In...

Страница 117: ...inition picture quality or conventional standard picture quality MPEG2 format Select the function you wish to use and follow the on screen instructions for easy copying Available function Data type So...

Страница 118: ...to the PC with the USB cable When the Conversion Assist Function is used it is possible to write to media faster than when operating only on PC Please refer to page 125 for details about the connecti...

Страница 119: ...se Engineering Decompiling or Disassembly Licensee may not reverse engineer decompile or disassemble the Software except to the extent either of them is permitted under law or regulation of the countr...

Страница 120: ...ervice Pack 2 Service Pack 3 Microsoft Windows XP Professional Service Pack 2 Service Pack 3 Microsoft Windows Vista Home Basic Service Pack 1 Service Pack 2 Microsoft Windows Vista Home Premium Servi...

Страница 121: ...y back or properly operate depending on the environment of the PC used Refer to the operating environment and notes Operation during the playback may become slow if the CPU or memory is not fulfilling...

Страница 122: ...Windows Vista Ultimate Service Pack 1 Service Pack 2 Microsoft Windows Vista Enterprise Service Pack 1 Service Pack 2 Microsoft Windows 7 Starter Microsoft Windows 7 Home Basic Microsoft Windows 7 Ho...

Страница 123: ...etup exe Continue If the following screen is not displayed automatically select Start Computer or double click on Computer on the desktop and then double click PANASONIC 2 Click Next 3 Read the End Us...

Страница 124: ...g HD Writer AE 2 1 Follow the steps below to uninstall any software applications that you no longer require 1 Select Start Control Panel Uninstall a Program 2 Select HD Writer AE 2 1 then click Uninst...

Страница 125: ...n on the unit This function is available in all modes 3 Connect this unit to a PC Do not use any other USB cables except the supplied one Operation is not guaranteed with any other USB cables The Smar...

Страница 126: ...s lamp is on or HDD access icon appears on the unit screen When performing reading writing between a PC and an SD card be aware that some SD card slots built into PCs and some SD card readers are not...

Страница 127: ...rded with this unit can be copied to the PC with Explorer or other programs 1 Double click the folder that contains the still pictures DCIM 100CDPFQ etc 2 Drag and drop the still pictures onto the des...

Страница 128: ...me equally authorized or with the user name for a standard user account If you log on with a user name for a guest user account the software cannot be used On the PC Select Start All Programs Panasoni...

Страница 129: ...ouch PC 3 Double click CAM_SD displayed on the desktop For users who have CAM_SD and CAM_MEM are displayed on the desktop and for users who have CAM_SD and CAM_HDD are displayed on the desktop Files a...

Страница 130: ...9 99 99 1 100 OPEN 0dB MF 6dB R 1h20m 1h30m A HG1920 NOV 15 2010 12 34PM F 1 100 OPEN 0dB MNL MEGA MF R 3000 1h30m A 99 99 99 F 14 2M White Green Card recording possible status Recognizing the card Re...

Страница 131: ...ize is not displayed for still pictures recorded with other products that have different picture sizes from the sizes shown above R3000 Remaining number of still pictures l 38 White Red Still picture...

Страница 132: ...DVD burner is connected Accessing the card l 126 Accessing the built in memory l 126 1 Accessing the HDD l 126 2 Time display The built in battery is low l 32 Warning for face to face recording l 31 D...

Страница 133: ...LOW TEMPERATURE The internal temperature of this unit is extremely low so it cannot be operated If Please Wait appears after this message wait a while without turning the unit off It may take time un...

Страница 134: ...another device is recovered it may not be possible to play back the data on this unit or the other device If recovery fails turn the power of the unit off and on again after waiting a while If recover...

Страница 135: ...turns off automatically if the Mini AB USB Connection Cable is removed A clicking sound is heard when the unit is shaken This is the sound of the lens moving and is not a defect This sound will no lo...

Страница 136: ...ilt in memory or HDD l 51 If AGS is ON record in the normal horizontal position or set AGS to OFF l 71 If the unit is exposed to strong vibrations or shocks while recording on HDD recording may stop t...

Страница 137: ...Back up important data on a PC disc etc If the SD card is inserted in this unit it is not recognized If the SD card is formatted on a PC it may not be recognized by this unit Use this unit to format S...

Страница 138: ...is displayed The unit has automatically detected an error Restart the unit by turning the power off and on The power will be turned off in about 1 minute if the power is not turned off and on Repair i...

Страница 139: ...click the icon in the task tray and follow the instructions on the screen The power of the DVD burner cannot be turned on When the unit is connected to the DVD burner use the respective AC adaptors f...

Страница 140: ...tarily stop at every 4 GB of data when played back with another device It may not play back smoothly when the editing of scenes was done with the HD Writer AE 2 1 but it will play back smoothly if you...

Страница 141: ...es the recorded pictures and sound may be adversely affected Make sure to use the supplied cords and cables If you use optional accessories use the cords and the cables supplied with them Do not exten...

Страница 142: ...select YES and then follow the on screen instructions To physically format the HDD connect the unit via the AC adaptor select FORMAT MEDIA HDD from the menu and then press and hold the delete button o...

Страница 143: ...may result in an explosion If the operating time is very short even after the battery has been recharged the battery has worn out Please purchase a new battery If the temperature of the battery is ext...

Страница 144: ...come hard to see or hard to recognize the touch when the LCD protection sheet is affixed In a place with drastic temperature changes condensation may form on the LCD monitor Wipe it with a soft cloth...

Страница 145: ...fort to ensure that condensation does not form If it does form take the actions described below Causes of condensation Condensation takes place when the ambient temperature or humidity is changed as f...

Страница 146: ...orporation in the United States and or other countries Microsoft product screen shot s reprinted with permission from Microsoft Corporation IBM and PC AT are registered trademarks of International Bus...

Страница 147: ...reduced if recording of short scene is repeated Use time in the row of 4 GB in above table as a guideline for the time that can be copied onto one DVD disc 4 7 GB Recording mode 1080 60p HA HG HX HE P...

Страница 148: ...00 11000 11000 18000 18000 28000 364000 613000 64 GB 10000 15800 15800 25000 25000 39000 492000 829000 Built in memory 32 GB 5000 7900 7900 12500 12500 19500 246000 414000 HDD 240 GB 37000 58000 58000...

Страница 149: ...B 270 400 400 700 700 1100 4 GB 550 850 850 1420 1420 2200 8 GB 1100 1700 1700 2800 2800 4500 16 GB 2200 3400 3400 5600 5600 9000 24 GB 3300 5100 5100 8400 8400 13000 32 GB 4500 7000 7000 11500 11500...

Страница 150: ...ffective pixels Motion picture 2530 Kk3 16 9 Still picture 2320 Kk3 4 3 2630 Kk3 3 2 2530 Kk3 16 9 Lens Auto Iris F1 5 to F2 8 Focal length 3 45 mm to 41 4 mm Macro Full range AF 35 mm equivalent Moti...

Страница 151: ...ideo out put level Y 1 0 Vp p 75 h Pb 0 7 Vp p 75 h Pr 0 7 Vp p 75 h AV video output level 1 0 Vp p 75 h NTSC system HDMI mini connector video output level HDMI x v Color 1080p 1080i 480p AV multi con...

Страница 152: ...4 F Operating humidity 10 to 80 Battery operation time See page 24 Recording media SD card SD Memory Card FAT12 and FAT16 system compliant SDHC Memory Card FAT32 system compliant SDXC Memory Card exFA...

Страница 153: ...ails on SD cards usable in this unit Built in memory 32 GB HDD 240 GB Compression JPEG Design rule for Camera File system based on Exif 2 2 standard DPOF corresponding Picture size Picture aspect 4 3...

Страница 154: ...change without prior notice Power source Power consumption DC output AC 110 V to 240 V 50 60 Hz 19 W DC 9 3 V 1 2 A Unit operation DC 8 4 V 0 65 A Battery charging Dimensions 92 mm W k33 mm H k61 mm...

Страница 155: ...VBG260 2 Rechargeable Lithium Ion Battery Pack VW VBG6 2 Rechargeable Lithium Ion Battery Pack The battery pack holder kit VW VH04 optional is necessary VW VH04 Battery pack holder kit RP CDHM15 RP C...

Страница 156: ...sult your local dealer Product numbers correct as of Feb 2010 These may be subject to change Accessory No Figure Description VW SK12PP Shoe adaptor RP SDP16GU1K RP SDP12GU1K RP SDP08GU1K RP SDP04GU1K...

Страница 157: ...attery in the battery holder Do not let the DC cable get caught in between the LCD monitor when closed Attaching the optional accessories on the shoe adaptor accessory shoe The video DC light VW LDC10...

Страница 158: ...in front of the lens It is not possible to attach it to the front of the lens hood l 33 You will not be able to use the flash Set the flash setting to OFF l 61 SHOE ADAPTOR RELEASE Be careful about t...

Страница 159: ...FICE 20421 84th Avenue South Kent WA 98032 Ship To Mr Mrs Ms First Last Street Address City State Zip Phone Day Night 4 Shipping information UPS delivery requires complete street address Please photoc...

Страница 160: ...call 1 800 211 PANA 7262 When shipping the unit carefully pack include all accessories and send it prepaid adequately insured and preferably in the original carton If Lithium Ion batteries are shippe...

Страница 161: ...rantor s Consumer Affairs Department at the addresses listed for the warrantor PARTS AND SERVICE WHICH ARE NOT COVERED BY THIS LIMITED WARRANTY ARE YOUR RESPONSIBILITY Customer Services Directory Unit...

Страница 162: ...nt of consumer controls improper maintenance improper batteries power line surge lightning damage modification introduction of sand humidity or liquids commercial use such as hotel office restaurant o...

Страница 163: ...display 47 Date and time setting 32 Delete 95 Deleting personal imformation 97 Demo mode 52 Digital cinema 67 Digital cinema color 72 Digital zoom 66 Direct playback 87 Disc status 115 Display 46 Divi...

Страница 164: ...ye reduction 62 Relay information canceling 100 Relay recording 68 Relay scene combining 99 Remaining number of still pictures 38 Remaining time left for recording 36 Remote control 48 53 Repeat playb...

Страница 165: ...od zcalo hasta el fondo Presione el centro de la tarjeta SD luego s quela recta 3 Cierre de forma segura la tapa de la tarjeta SD terminal Ci rrelo firmemente hasta que haga clic Encender apagar el di...

Страница 166: ...Espa ol Seleccionar un medio para grabar 1 Cambie el modo a o a 2 Seleccione el men 3 Toque el medio para grabar las pel culas o fotograf as Toque V DEO TARJETA SD o IMAGEN TARJETA SD para grabar en l...

Страница 167: ...que desea reproducir Puede visualizarse la p gina siguiente anterior tocando 5 Seleccione la operaci n de reproducci n tocando el icono de operaci n A Icono de funcionamiento Reproducci n de pel culas...

Страница 168: ...c Consumer Electronics Company Division of Panasonic Corporation of North America One Panasonic Way Secaucus NJ 07094 Panasonic Canada Inc 5770 Ambler Drive Mississauga Ontario L4W 2T3 P Panasonic Cor...

Отзывы: