background image

22

VQT3B52

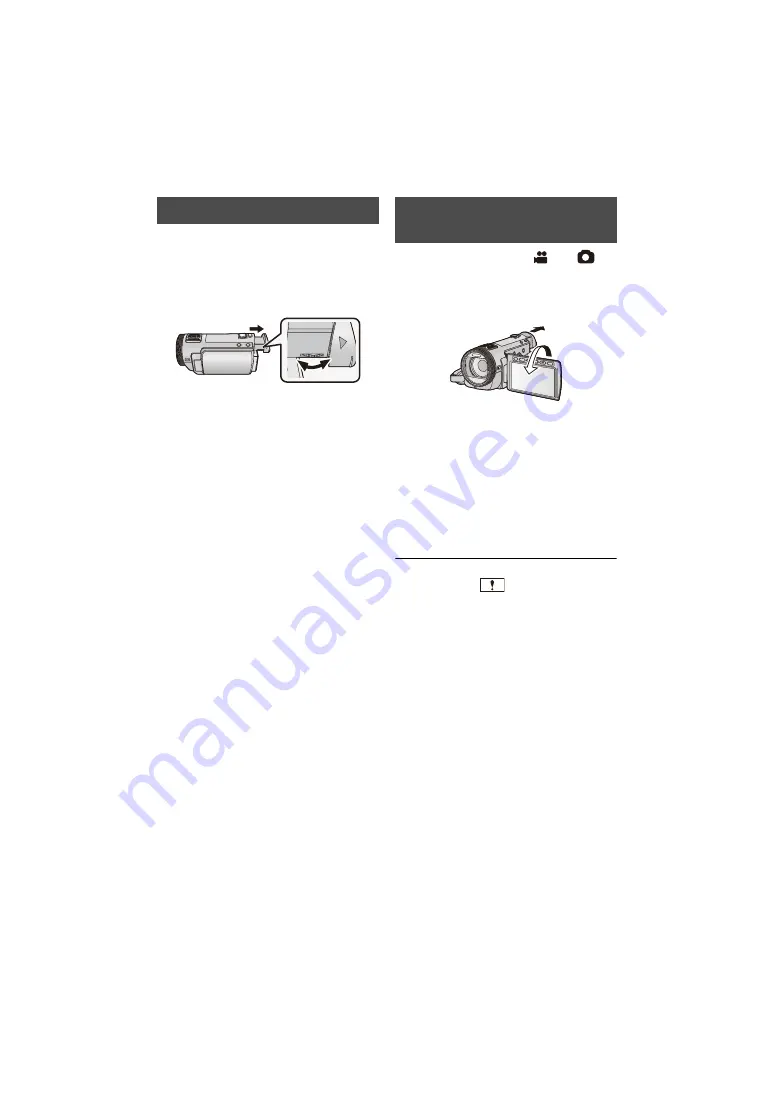
Adjusting the field of view

It adjusts the field of view to show the 
images on the viewfinder clearly.

Adjust the focus by rotating the 
eyepiece corrector dial.

Extend the viewfinder and close the LCD 
monitor to turn on the viewfinder.

¬

Change the mode to 

 or 

.

Extend the viewfinder and rotate 
the LCD monitor towards the lens 
side.

LCD monitor and viewfinder are turned on 
during the face-to-face recording when the 
viewfinder is extended.

The image is horizontally flipped as if you 
see a mirror image. (However the image 
recorded is the same as a normal 
recording.)

Record by viewing the image in the 
viewfinder during the face-to-face 
recording.

Only some indications will appear on the 
screen. When 


appears, return the 

direction of the LCD monitor to normal 
position and check the warning/alarm 
indication. (

l

143)

Viewfinder adjustment

Recording showing the 
contents to a partner

Содержание HDC-SDT750

Страница 1: ...Operating Instructions High Definition Video Camera Model No HDC SDT750 HDC TMT750 Before use please read these instructions completely VQT3B52 until 2010 9 16...

Страница 2: ...ENTILATED TO PREVENT RISK OF ELECTRIC SHOCK OR FIRE HAZARD DUE TO OVERHEATING ENSURE THAT CURTAINS AND ANY OTHER MATERIALS DO NOT OBSTRUCT THE VENTILATION VENTS DO NOT OBSTRUCT THE UNIT S VENTILATION...

Страница 3: ...ons below Illustrations may differ from actual AC mains plug 1 Open the fuse cover with a screwdriver 2 Replace the fuse and close or attach the fuse cover Information on Disposal in other Countries o...

Страница 4: ...vibrations or shock About disposing of or giving away this unit l 152 Cards that you can use with this unit SD Memory Card SDHC Memory Card and SDXC Memory Card 4 GB or more Memory Cards that do not h...

Страница 5: ...es 28 Recording still pictures in motion picture recording mode 29 5 Intelligent auto mode 30 6 Motion picture Still picture playback 32 Setup 1 Using the menu screen 35 Using the quick menu 36 2 Usin...

Страница 6: ...een SD card and Built in Memory HDC TMT750 112 Copying 112 2 Connecting a DVD burner to copy to play back a disc 114 Preparing for copying playing back 114 Copying to discs 116 Playing back the copied...

Страница 7: ...d Saudi Arabia B Australia and New Zealand C Areas Other than Hong Kong Special Administrative Region of China Saudi Arabia Australia and New Zealand DC cable K2GJYDC00004 Remote control Battery built...

Страница 8: ...DMI mini connector HDMI l 104 110 12 USB terminal l 115 122 135 13 AV multi connector l 104 124 Use the AV multi cable only the supplied cable 14 Card slot l 18 15 Access lamp ACCESS l 18 16 Lens cove...

Страница 9: ...n 29 Adjust zoom buttons l 47 30 Menu button MENU l 35 31 Delete button l 96 32 Tripod receptacle 25 26 28 27 29 30 31 Due to limitations in LCD production technology there may be some tiny bright or...

Страница 10: ...the grip belt so that it fits your hand 1 Flip the belt 2 Adjust the length 3 Replace the belt 44 Microphone terminal MIC A compatible plug in powered microphone can be used as an external microphone...

Страница 11: ...cal alignment adjustment dial 7 Horizontal image position adjustment dial 8 Protective glass rear 9 Camera body attachment part convex Lens front cap 10 Horizontal line for adjustment Use to adjust th...

Страница 12: ...hen the battery will not charge Remove the DC cable from the AC adaptor 1 Connect the AC cable to the AC adaptor and the AC outlet 2 Insert the battery into the AC adaptor by aligning the arrows It ha...

Страница 13: ...Inserting removing the battery Removing the battery Be sure to hold down the power button until the status indicator goes off Then remove the battery while supporting the unit to prevent it dropping...

Страница 14: ...ntinuously recordable time Actual recordable time Supplied battery VW VBG130 optional 7 2 V 1250 mAh 2 h 35 min 1080 50p HA HG HX 1 h 40 min 1 h HE 1 h 5 min VW VBG260 optional 7 2 V 2500 mAh 4 h 40 m...

Страница 15: ...Supplied battery VW VBG130 optional 7 2 V 1250 mAh 2 h 35 min 1080 50p HA HG HX 1 h 40 min 1 h HE 1 h 5 min VW VBG260 optional 7 2 V 2500 mAh 4 h 40 min 1080 50p 3 h 10 min 1 h 55 min HA HG HX 3 h 15...

Страница 16: ...t is designed only for this unit Also do not use the AC cable from other equipment with this unit 1 Connect the AC cable to the AC adaptor and the AC outlet 2 Connect the DC cable to the AC adaptor 3...

Страница 17: ...GB or more Memory Cards that do not have the SDXC logo are not based on SD Memory Card Specifications When the write protect switch A on SD card is locked no recording deletion or editing will be poss...

Страница 18: ...jExpose the unit to vibrations or shock Performing the above while the lamp is on may result in damage to data SD card or this unit Do not expose the terminals of the SD card to water garbage or dust...

Страница 19: ...s To turn off the unit B The status indicator goes off The unit will not turn off unless the LCD monitor is closed and the viewfinder is retracted The unit will not turn off while recording motion pic...

Страница 20: ...Selecting a mode Change the mode to recording or playback Operate the mode dial to change the mode to or Motion picture recording mode l 26 Still picture recording mode l 28 Playback mode l 32 87 Ali...

Страница 21: ...l not operate while you are touching another part of the touch screen Drag Move your finger while pressing on the touch screen Can be used during direct playback and playback zoom About the operation...

Страница 22: ...D monitor and viewfinder are turned on during the face to face recording when the viewfinder is extended The image is horizontally flipped as if you see a mirror image However the image recorded is th...

Страница 23: ...time setting by touching the screen l 37 Touch EXIT or press the MENU button to complete the setting The date and time function is driven by a built in lithium battery When this unit is purchased the...

Страница 24: ...r balance Do not cover the microphones or the cooling fan inlet with your hand etc Basic motion picture recording The unit should normally be held steady when recording If you move the unit when recor...

Страница 25: ...motion pictures or still pictures 1 Change the mode to or 2 Select the menu 3 Touch the media to record motion pictures or still pictures The media is selected separately to motion pictures or still...

Страница 26: ...start stop button to start recording and pressing it again to pause recording become one scene Maximum number of recordable scenes Approx 3900 Maximum number of different dates Approx 200 l 91 When e...

Страница 27: ...erring to the operating instructions There are some cases where the recorded motion pictures cannot be played back even if the device supports AVCHD In such cases play the recorded motion picture with...

Страница 28: ...lamp lights in dark places Focus indication will change to registered focus icon when FACE RECOG is set to ON l 69 It is recommended using a flash or tripod when recording still pictures in dark plac...

Страница 29: ...ect out of the focus area Focus area is not displayed in the following conditions jWhen the intelligent auto mode portrait is used jWhen AF AE tracking is used jWhen the Extra optical zoom is used jWh...

Страница 30: ...de MANUAL Mode Scene Effect Portrait When the object is a person Faces are detected and focused automatically and the brightness is adjusted so it is recorded clearly Scenery Recording outdoors The wh...

Страница 31: ...6 Automatic white balance The illustration shows the range over which automatic white balance functions 1 The effective range of automatic white balance adjustment on this unit 2 Blue sky 3 Cloudy sky...

Страница 32: ...EO PICTURE you wish to play back Touch ENTER Select the MEDIA and VIDEO PICTURE you wish to play back Touch ENTER 4 Touch the scene or the still picture to be played back C is displayed when 1080 50p...

Страница 33: ...ture playback 1 Playback Pause 6 Rewind playback 5 Fast forward playback Stops the playback and shows the thumbnails 1 Displays the direct playback bar l 88 1 Slide show playback of the still pictures...

Страница 34: ...ard only during normal playback If pause play is continued for 5 minutes the screen returns to the thumbnails The elapsed time for playback indication will be reset to 0h00m00s each scene Motion pictu...

Страница 35: ...splayed by touching 4 Touch the desired item to enter the setting 5 Touch EXIT or press the MENU button to exit the menu setting About guide display After touching touching the submenus and items will...

Страница 36: ...e position of the mode dial or settings 2 Touch the desired item to enter the setting 3 Touch EXIT or press Q MENU button to exit the quick menu Using the quick menu Icon Function Page REC MODE l 65 T...

Страница 37: ...to step 3 2 Only when setting your home region Touch HOME Touch ENTER 3 Only when setting your home region Touch to select your home region and touch ENTER Touch SUMMER TIME SET to set daylight savin...

Страница 38: ...pressing the MENU button If you cannot find your travel destination in the area shown on the screen set it by using the time difference from your home region It is possible to change the date and tim...

Страница 39: ...nitor or extend the viewfinder The status indicator A lights red and the unit is put into recording pause When in quick start standby mode about 80 of the power used in recording pause mode is being c...

Страница 40: ...ed It is possible to set from the quick menu l 36 Makes even brighter Makes brighter Normal Makes less bright Automatic adjustment It is not displayed in the manual mode or in the playback mode When t...

Страница 41: ...ng Adjust while checking the picture in the viewfinder 4 Touch ENTER Touch EXIT or press the MENU button to complete the setting Please refer to page 107 Please refer to page 107 Please refer to page...

Страница 42: ...ta recorded on the medium will be erased and cannot be restored Back up important data on a PC DVD disc etc l 114 126 1 Touch FORMAT MEDIA 2 Touch SD CARD or Built inMemory When formatting is complete...

Страница 43: ...ay for the SD card and the display for the built in memory Touch EXIT or press the MENU button to close the indication The SD card or built in memory requires some space to store information and manag...

Страница 44: ...f no operations take place for approx 10 minutes the demonstration automatically starts again To stop the demonstration set DEMO MODE to OFF or insert an SD card This item is used to start the optical...

Страница 45: ...button 6 Direction buttons 3 4 2 1 7 Zoom volume thumbnail display switch buttons T W VOL 8 Recording start stop button START STOP 9 Date time button DATE TIME l 38 10 Menu button MENU 11 OK button OK...

Страница 46: ...operation icons thumbnail display etc can be operated Wherever you can touch with your finger can be operated by the remote control Excluding some functions CAUTION Danger of explosion if battery is...

Страница 47: ...set the picture size to the maximum area is cropped to the centre area allowing a picture with a higher zoom effect If you take your finger off the zoom lever during zoom operation the operation sound...

Страница 48: ...tion s default setting is ON Still picture recording mode MODE1 The function works all the time MODE2 The function works when the button is pressed We recommend you are recording yourself or recording...

Страница 49: ...layed while you are touching the icon Optical image stabilizer lock is released when you remove your finger from the icon Operation icon will disappear when no function is performed for a specific per...

Страница 50: ...ame blinks in red and then disappears Touch a characteristic part colour etc on the object to lock onto it again When the button is pressed halfway in still picture recording mode the focus is set to...

Страница 51: ...as which Panasonic TVs can play back the scenes recorded in 1080 50p recorded with this unit can be found on the following support site As of Aug 2010 http panasonic jp support global cs e_cam index h...

Страница 52: ...t the recorded 3D video is not of high definition picture quality Attaching the 3D Conversion Lens 1 Rotate the lens rear cap in the direction indicated by the arrow Rotate the lens rear cap while pus...

Страница 53: ...automatically after performing the initial setting If the 3D Conversion Lens adjustment mode screen does not appear automatically set from the menu SETUP 3D CONV LENS SETUP If the unit is turned on wi...

Страница 54: ...rs off the adjustment dials 6 After checking the operation description touch NEXT To adjust the horizontal position rotate the horizontal image position adjustment dial so that the black vertical line...

Страница 55: ...3D Conversion Lens or after an impact etc it is recommended that you perform the adjustment again 11 Press the recording start stop button to start recording When the 3D Conversion Lens is attached t...

Страница 56: ...opposite direction until the adjustment screen starts moving ECONOMY will not work while you adjust the 3D Conversion Lens attachment position When the 3D Conversion Lens is attached the auto slow sh...

Страница 57: ...nly white balance can be used Touch to display the manual icon Functions not available during 3D recording Button lever operations Recording functions jZoom in out function 1 jHYBRID O I S 2 jIntellig...

Страница 58: ...ligent auto mode 3 It is not displayed in motion picture recording mode 4 It is displayed only when a headphone is connected to the headphone output terminal If you turn off the unit or change the mod...

Страница 59: ...conds before the recording start stop button is pressed appears on the screen Aim the unit at the subject beforehand There is no beep sound PRE REC is cancelled in the following cases jIf you change t...

Страница 60: ...MEDIA SELECT and there is no SD card inserted jWhen it is set to manual focus jWhen the interval recording is used jWhen FACE RECOG is set to OFF or no one is registered In Face recognition only Depe...

Страница 61: ...hter Set the flash to where using a flash is prohibited The light from the flash may be blocked by the lens hood when the lens hood is attached Do not use the flash with the ND filter optional or the...

Страница 62: ...orded clearly If there are extremely dark parts or the brightness is insufficient the effect may not be clear This makes the image brighter to prevent darkening of a backlit subject This makes skin co...

Страница 63: ...Built inMemory AVCHD l 32 VIDEO SETUP GUIDE LINES desired setting To cancel the Guideline function during playback set to OFF It cannot be set while in still picture playback mode This function allow...

Страница 64: ...es not function The display flashes Portrait jColour and screen brightness may change under indoor lighting SCENE MODE RECORD SETUP SCENE MODE desired setting OFF Cancel the setting 5Sports To make fa...

Страница 65: ...be recorded Change the mode to A Image quality prioritised B Recording time prioritised Recordable time using the battery l 14 This function s default setting is HG mode Please refer to page 158 about...

Страница 66: ...n the 1080 50p recording mode Recording mode cannot be changed when the interval recording is set If you turn off the unit or change the mode to this function is cancelled The shortest motion picture...

Страница 67: ...disappear when space in the built in memory is gone and the recording to the SD card starts Relay recording can only be performed once Combine the scenes that were relay recorded using the RELAY SCEN...

Страница 68: ...e a picture of the persons face from the front ensuring that their hair does not hide the outline of their face their eyes or their eyebrows 2 Touch REC or press the button fully Touch ENTER It may no...

Страница 69: ...priority according to the registration order setting from the first person Target will be locked according to the registration order setting from the first person when AF AE tracking is active To chan...

Страница 70: ...touch again Touch ENTER Since face recognition searches for faces that resemble the registered faces there is no guarantee of positive recognition It may not be possible to correctly recognise a pers...

Страница 71: ...e frames Focus and adjustment of brightness will be performed against the prioritised face framing Prioritised face framing is only displayed in intelligent auto mode The white frame is for face detec...

Страница 72: ...ction is only used with the 3D Conversion Lens For details refer to AUTO SLOW SHTR 2D This function s default setting is ON When a 3D Conversion Lens is used the recording scene will become darker We...

Страница 73: ...When these images are played back with devices other than ones compatible with x v Colour it is recommended to record the images after this function is turned OFF x v Colour is a name for devices tha...

Страница 74: ...l 83 If you wish to record higher quality sound and maintain realism even when zooming in for instance recording a music recital we recommend setting MIC SETUP to SURROUND WIND NOISE CANCELLER RECORD...

Страница 75: ...therwise the sound is distorted Select a lower setting for microphone input level 3 Touch ENTER to determine the microphone input level and then touch EXIT Microphone input level meter appears on the...

Страница 76: ...ting is retained when you change between motion picture recording mode and still picture recording mode Switch to manual mode l 83 1 Select the menu 2 Touch the desired setting items 3 Touch to adjust...

Страница 77: ...e object easier by checking the luminance level of the object when recording same object in different surroundings Adjust the brightness using IRIS l 85 Change the mode to or Switch to manual mode l 8...

Страница 78: ...aph Adjust the brightness using IRIS l 85 Change the mode to or Switch to manual mode l 83 Histogram is displayed while adjusting IRIS even if DISPLAY is set to OFF HISTOGRAM RECORD SETUP HISTOGRAM de...

Страница 79: ...ture recording mode Please refer to page 159 about the number of recordable pictures The recording will become longer depending on the recording pixels PICTURE SIZE PICTURE PICTURE SIZE desired settin...

Страница 80: ...res recorded on this unit with a 16 9 aspect ratio may be cut at printing Check the printer or photo studio before printing QUALITY PICTURE QUALITY desired setting Still pictures with a high picture q...

Страница 81: ...nge of pictures that will be stored Previous Next page is displayed by touching Only select the picture for start point if only 1 picture is to be stored A confirmation message is displayed when Enter...

Страница 82: ...nal or 3D Conversion Lens supplied can block the AF assist lamp and it will become harder to adjust the focus When switching to intelligent auto mode the setting is fixed to AUTO and cannot be changed...

Страница 83: ...selection Press the iA MANUAL button to cancel manual setting Touch 1 to change the page and the manual icon appears or disappears each time is touched When using the viewfinder 1 Press the CAMERA FUN...

Страница 84: ...ing and then lights constantly the setting is complete If the display continues flashing the white balance cannot be set In this case use other white balance modes When the display flashes the manual...

Страница 85: ...the shutter speed and then set the iris gain value Manual shutter speed adjustment When the shutter speed is set lower than 1 12 in the still picture recording mode it is recommended using a tripod Al...

Страница 86: ...o change to manual focus MF appears on the screen 4 Adjust the focus by rotating the multi manual ring A Part displayed in blue The in focus area is displayed in blue The normal screen returns approxi...

Страница 87: ...otion playback During Pause When the operation icon disappears touch the screen to display the icon again With the playback paused continue touching is for slow rewind playback Playback is slow while...

Страница 88: ...be registered as date of the still picture Quality will be different from the normal still picture Playback operation Playback display Operating steps Direct playback During Playback 1 Touch 1 to disp...

Страница 89: ...judged to be clearly recorded This will then be displayed as a thumbnail A portion judged to be clearly recorded will be detected and displayed in thumbnail if you select HIGHLIGHT 3 When MINUTES is s...

Страница 90: ...e is zoomed in on centring on the part you touched With each touch you zoom in further k1 k2 k4 2 Touch or drag the screen l 21 to move the zoomed position The location of the zoom displays for about...

Страница 91: ...s are recorded on the same day they are grouped separately in the following cases 1 2 is added after the recording date displayed on the screen jWhen the number of scenes exceeds 99 jWhen the media is...

Страница 92: ...ity to the parts with detected faces the part that was recognised as clearly recorded is extracted from a long recording and it can be played back in a short time with music added HIGHLIGHT Part that...

Страница 93: ...uch the scene again to cancel the operation When SELECT DATE is selected Touch the date to be played back A maximum of 7 days can be selected When touched the date is selected and surrounded by red To...

Страница 94: ...rt Date setting Touch the playback date Music setting 1 Touch your favourite music When NO MUSIC is selected the audio recorded at the time of shooting is played back To adjust the volume of music dur...

Страница 95: ...RT and start the audio testing Touch the other music option to change the music to be tested When you touch STOP the music playback stops 4 Touch START 5 Select the playback operation l 32 When the pl...

Страница 96: ...is selected and the indication appears on the thumbnails Touch the scene still picture again to cancel the operation Up to 99 scenes can be selected to be deleted 4 When SELECT is selected in step 2...

Страница 97: ...tional scenes still pictures cannot be deleted Scenes which cannot be played back the thumbnails are displayed as cannot be deleted In case of ALL SCENES the deletion may take time if there are many s...

Страница 98: ...scene To continue dividing other scenes touch NO and repeat steps 2 3 4 Press the MENU button to complete dividing 5 Delete the unnecessary scene l 96 To delete all the divided points The scenes that...

Страница 99: ...one of the scenes at which appears will change to red when touched Touch the red again to cancel the operation Up to 99 scenes can be selected in succession 3 Touch Delete or press the button To conti...

Страница 100: ...cene still picture to be protected When touched the scene still picture is selected and the indication appears on the thumbnail Touch the scene still picture again to cancel the operation Press the ME...

Страница 101: ...es they wish to print Please note Not all commercial printing services support this feature at this time 1 Select the menu 2 Touch the still picture to be set 3 Touch to set the number of prints Up to...

Страница 102: ...for relay recording 2 Select the menu 3 When the confirmation message appears touch YES Scene in the built in memory will be deleted Protected scenes in the built in memory are not deleted 4 Touch EX...

Страница 103: ...cel relay information The personal information of the relayed scene in the built in memory or SD card is deleted the personal information of the combined relay scene is not recorded EDIT SCENE RELAY I...

Страница 104: ...joy them in high resolution with high quality sound 1 Connect this unit to a TV Confirm the terminals on your TV and use a cable compatible with the terminals Image quality may vary with the connected...

Страница 105: ...component terminal plug is connected simultaneously 2 Select the video input on the TV Example Select the HDMI channel with a HDMI mini cable Select the Component or Video 2 channel with an AV multi c...

Страница 106: ...multi cable is connected to this unit the setup screen of the AV multi destination is displayed on the screen of this unit Touch either COMPONENT or AV OUT in accordance with the terminal connecting...

Страница 107: ...plifier and TV operating instructions for how to connect this unit to the AV amplifier and TV If you connect this unit to a Panasonic AV amplifier and Panasonic TV that are compatible with VIERA Link...

Страница 108: ...atically If your television does not switch to a 3D video make the necessary settings on the TV For further details please read the operating instructions for the TV Playing back scenes recorded in 3D...

Страница 109: ...med The unit automatically performs scene repair if faulty management information is detected When you select a 3D video thumbnail it may take a few seconds for playback to start After playback the th...

Страница 110: ...at is the VIERA Link This function allows you to use your remote control for the Panasonic TV for easy operations when this unit has been connected to a VIERA Link compatible device using a HDMI mini...

Страница 111: ...TV to turn off the power this unit also turns off Automatic input switching If you connect with a HDMI mini cable and then turn on this unit the input channel on the TV automatically switches to this...

Страница 112: ...the media or only the necessary parts If there is not much remaining capacity in the SD card a confirmation message asking to copy after deleting all data on the SD card is displayed Be aware that del...

Страница 113: ...nger jThe number of recorded scenes is large jThe temperature of the unit is high If some motion pictures or still pictures have already been recorded to the copy destination then the same date may be...

Страница 114: ...is automatically finalised to allow playback on other devices and additional copying will not be possible 2 Only DVD RAM copied with the DVD burner or HD Writer AE 2 6T can additionally copy 3 Connect...

Страница 115: ...urner A Mini AB USB Connection Cable supplied with DVD burner B DVD burner optional Insert the plugs as far as they will go 4 Insert the disc in the DVD burner Insert the DVD disc with the recording s...

Страница 116: ...he screen It will return to the previous step by touching When SELECT SCENES is selected When touched the scene still picture is selected and the indication appears on the thumbnail Touch the scene st...

Страница 117: ...capacity becomes large so that you may need more discs for copying than SP Copying scenes recorded in 3D Scenes recorded in 3D are converted to 2D video before being copied and stored In this case 3D...

Страница 118: ...the recordable time of Standard XP is approx 1 hour and that of Standard SP is approx 2 hours To copy approx 600 MB still pictures Picture size Disc type Copy time DVD RAM DVD RW DVD R RW R Approx 10...

Страница 119: ...GHT or FACE of highlight time frame index The remaining copy time displayed while copying is the approximate time for a single disc Only discs that have been copied by connecting this unit to the DVD...

Страница 120: ...when copying motion pictures or still pictures in high definition picture quality to the disc 1 Select the menu If a disc that you copied to is inserted in another device without protecting it a mess...

Страница 121: ...efinition AVCHD compatible DVD recorder Depending on the recorders or the media to be copied to you may not be able to copy in high definition AVCHD picture quality For further details see the operati...

Страница 122: ...r turns off after about 5 seconds Touch the screen to turn the LCD monitor on 3 Touch the media you wish to dub 4 Dubbing through operations on the Blu ray disc recorder or high definition AVCHD compa...

Страница 123: ...e Blu ray disc recorder or DVD recorder When you connect the unit to a Blu ray disc recorder a dubbing operations screen may appear on the television connected to the Blu ray disc recorder In this cas...

Страница 124: ...rding on the connected device To stop recording dubbing stop playback on this unit after stopping recording on the recorder Dubbing in standard picture quality Change the video input on the video devi...

Страница 125: ...for the TV Copying after conversion to 2D video Set 3D PLAYBACK to 2D If the date and time display and function indication are not wanted cancel them before dubbing l 38 106 SETUP 3D PLAYBACK 3D SETU...

Страница 126: ...ng instructions of HD Writer AE 2 6T PDF file for details on how to use it Smart wizard The Smart wizard screen is automatically displayed when you connect this unit to a PC with HD Writer AE 2 6T ins...

Страница 127: ...ed to 2D video when copied Motion picture Editing Editing motion picture data copied on an HDD of a PC Title Transition Delete partially Divide Scene The only types of editing possible on scenes recor...

Страница 128: ...to the PC with the USB cable When the Conversion assist function is used it is possible to write to media faster than when operating only on PC Please refer to page 135 about the connection of this un...

Страница 129: ...se Engineering Decompiling or Disassembly Licensee may not reverse engineer decompile or disassemble the Software except to the extent either of them is permitted under law or regulation of the countr...

Страница 130: ...al Service Pack 2 Service Pack 3 Microsoft Windows Vista 32 bit Home Basic Service Pack 1 Service Pack 2 Microsoft Windows Vista 32 bit Home Premium Service Pack 1 Service Pack 2 Microsoft Windows Vis...

Страница 131: ...the environment of the PC used Refer to the operating environment and notes Operation during the playback may become slow if the CPU or memory is not fulfilling the requirements of the operating envir...

Страница 132: ...ista 32 bit Ultimate Service Pack 1 Service Pack 2 Microsoft Windows Vista 32 bit Enterprise Service Pack 1 Service Pack 2 Microsoft Windows 7 32 bit Starter Microsoft Windows 7 32 bit 64 bit Home Bas...

Страница 133: ...ontinue When using Windows 7 or the following screen is not displayed automatically select Start Computer or double click on Computer on the desktop and then double click Panasonic 2 Click Next 3 Read...

Страница 134: ...HD Writer AE 2 6T Follow the steps below to uninstall any software applications that you no longer require 1 Select Start Control Panel Uninstall a Program 2 Select HD Writer AE 2 6T then click Unins...

Страница 135: ...ttery running down Connect with the AC adaptor when using the Conversion assist function 2 Turn on the unit This function is available in all modes 3 Connect this unit to a PC The USB function selecti...

Страница 136: ...creen When performing reading writing between a PC and an SD card be aware that some SD card slots built into PCs and some SD card readers are not compatible with the SDHC memory card or SDXC memory c...

Страница 137: ...he PC with Explorer or other programmes 1 Double click the folder that contains the still pictures DCIM 100CDPFQ etc 2 Drag and drop the still pictures onto the destination folder on the PC s HDD Do n...

Страница 138: ...ame equally authorized or with the user name for a standard user account If you log on with a user name for a guest user account the software cannot be used On the PC Select Start All Programs Panason...

Страница 139: ...cable The USB function selection screen will appear 2 Touch PC on the screen of this unit This unit is automatically recognised as an external drive of Mac When you select an option other than PC reco...

Страница 140: ...h30m A HG1920 15 11 2010 12 34 F 1h30m OPEN 0dB 1 100 MNL MEGA MF R 3000 A F 99 99 99 14 2M 1080 50p recording l 51 Built in memory recording possible status White Card recording possible status Green...

Страница 141: ...l 62 99 Luminance level l 77 White Green Focus indication l 28 10 2 Self Timer recording l 62 A Flash l 61 i j Flash level l 61 Red eye reduction l 61 Picture quality l 80 Number of recording pixels...

Страница 142: ...POF already set to more than 1 l 101 Protected motion pictures still pictures l 100 1080 50p recorded scene l 32 AVCHD recorded scene l 32 Relay recorded scene l 67 Interval recorded scene l 66 Still...

Страница 143: ...then turn the unit off and then on again THIS BATTERY CANNOT BE USED Use a battery that is compatible with this unit l 12 If using a Panasonic battery compatible with this unit remove the battery and...

Страница 144: ...f the data it may not be possible to completely repair the data If recovery fails it will not be possible to play back scenes recorded before the unit turned off When data recorded on another device i...

Страница 145: ...the TV remote control the VIERA Link is at work If you are not using the VIERA Link set VIERA Link to OFF l 110 When this unit is connected to a DVD burner to copy or play back images a disc is being...

Страница 146: ...ROL of the SETUP is OFF l 45 The button type battery of the remote control may be run out Replace it with a new button type battery l 45 The remaining time indication or the elapsed time indication is...

Страница 147: ...06 Change the setting of the unit depending on the cable connecting to the TV l 107 Scenes cannot be deleted Release the protect setting l 100 Any scenes still pictures where the thumbnails are displa...

Страница 148: ...is because the unit is using MOS for the image sensor This is not a malfunction White round spots like soap bubbles appear on the recorded picture If you take a picture with the flash in a dark place...

Страница 149: ...139 Connect the supplied USB cable again after restarting the PC and turning on this unit again When the USB cable is disconnected an error message will appear on the PC To disconnect the USB cable sa...

Страница 150: ...mentarily stop at every 4 GB of data when played back with another device It may not play back smoothly when the editing of scenes was done with the HD Writer AE 2 6T but it will play back smoothly if...

Страница 151: ...lines the recorded pictures and or sound may be adversely affected Make sure to use the supplied cords and cables If you use optional accessories use the cords and the cables supplied with them Do not...

Страница 152: ...not be held responsible in the unlikely case that private data is divulged The battery used in this unit is a rechargeable lithium ion battery It is susceptible to humidity and temperature and the ef...

Страница 153: ...When using the AC adaptor it may generate whirring sounds However this is normal After use be sure to disconnect the AC adaptor If it is left connected a minute amount of current is consumed Always ke...

Страница 154: ...p viewing at once Continuing to view may cause illness Please rest appropriately after stopping the viewing When viewing 3D video we recommend taking a break every 30 to 60 minutes Viewing for extende...

Страница 155: ...rty wipe it with a soft cloth such as eye glass cleaner Do not touch the LCD monitor with your finger nails or rub or press with strong force It may become hard to see or hard to recognise the touch w...

Страница 156: ...sure that condensation does not form If it does form take the actions described below Causes of condensation Condensation takes place when the ambient temperature or humidity is changed as follows Whe...

Страница 157: ...es and or other countries Microsoft product screen shot s reprinted with permission from Microsoft Corporation IBM and PC AT are registered trademarks of International Business Machines Corporation of...

Страница 158: ...s 12 hours and the recording will automatically resume after a few seconds If a recording with a lot movements is recorded the recording time is reduced The recordable time may be reduced if recording...

Страница 159: ...0 6200 9700 122000 205000 32 GB 5000 7900 7900 12500 12500 19500 246000 414000 48 GB 7200 11000 11000 18000 18000 28000 364000 613000 64 GB 10000 15800 15800 25000 25000 39000 492000 829000 Built in m...

Страница 160: ...12 MB 65 100 100 160 160 270 1 GB 130 200 200 320 320 540 2 GB 270 400 400 700 700 1100 4 GB 550 850 850 1420 1420 2200 8 GB 1100 1700 1700 2800 2800 4500 16 GB 2200 3400 3400 5600 5600 9000 32 GB 450...

Страница 161: ...VW W4607H Wide end conversion lens VW WE08H 3 Filter kit VW LF46NE 4 Video DC light VW LDC103E Light bulb for video DC light VZ LL10E Stereo microphone VW VMS2E 5 Shoe adaptor VW SK12E DVD burner VW...

Страница 162: ...rsion lens VW WE08H optional ND filter or MC protector of the Filter kit VW LF46NE optional in front of the lens It is not possible to attach it to the front of the lens hood l 24 You will not be able...

Страница 163: ...Panasonic Corporation Web site http panasonic net Panasonic Corporation 2010...

Отзывы: