22
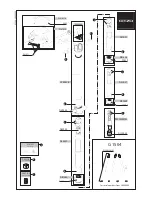
Using with the remote control
Select the menu.
●
This function’s default setting is [ON].
●
[REMOTE CONTROL] can be set to [OFF] so
the remote control will not be mistakenly used
when not in use.
1
Power on/off button [
]
Power can be turned on/off when the mode is set
to anything but OFF.
●
Power cannot be turned on by the power on/off
button when 36 hours have passed after the
power is turned off.
●
Power cannot be turned off when it is
connected to the PC or the DVD burner.
2
Photoshot button [
]
*
3
On-screen display button [EXT DISPLAY]
4
Playback operation buttons
These buttons function in the same manner as
the corresponding playback operation icon being
displayed on screen.
[Excluding skip playback ].
5
Delete button [
]
*
6
Direction buttons [
,
,
,
]
7
Zoom/volume/thumbnail display switch
buttons [T, W,
/VOL]*
8
Recording start/stop button [START/
STOP]
*
9
Date/time button [DATE/TIME]
10 Menu button [MENU]
*
11 OK button [OK]
* means that these buttons function in the same
manner as the corresponding buttons on the
unit.
[SETUP]
[REMOTE CONTROL]
[ON]
SEARCH
STILL ADV
STILL ADV
SEARCH
/VOL
DATE/TIME
START/
STOP
EXT DISPLAY
PLAY
STOP
OK
SKIP
SKIP
MENU
PAUSE
2
3
4
6
5
8
7
9
10
11
1
CAUTION
Danger of explosion if battery is incorrectly
replaced. Replace only with the same or
equivalent type recommended by the
manufacturer. Dispose of used batteries
according to the manufacturer’s instructions.
Remove the insulation sheet
before using.
Replace a button-type battery
1
While pressing
the stopper
,
pull out the
battery holder.
2
Set the button-
type battery
with its (
K
) mark
facing upward
and then put the
battery holder
back in place.
●
When the button-type battery runs down,
replace it with a new battery (part number:
CR2025). The battery should normally last
about 1 year, however this depends on how
frequently the unit is used.
●
Keep the button-type battery out of reach of
children to prevent swallowing.
Remote control usable range
Remote control sensor
Distance: Within approx. 5 m (16 feet)
Angle: Approx. 10
Q
up and 15
Q
down, left, and
right
●
The remote control is intended for indoor
operation. Outdoors or under strong light, the
unit may not operate properly even within the
usable ranges.
Replace battery with Panasonic PART NO.
CR2025 only. Use of another battery may
present a risk of fire or explosion.
Caution: Battery may explode if mistreated.
Dispose of used battery promptly. Keep away
from children.
Do not recharge, disassemble or dispose of in
fire.
Содержание HDC-HS300P
Страница 11: ...11 3 5 2 Precautions for installing HDD...
Страница 14: ...14 4 Specifications...
Страница 15: ...15...
Страница 16: ...16...
Страница 29: ...29 7 Disassembly and Assembly Instructions 7 1 Disassembly Flow Chart 7 2 PCB Location...
Страница 32: ...32 7 3 2 Removal of the Side Case R Unit Fig D2 Fig D3 7 3 3 Removal of the Side Case L Unit Fig D4...
Страница 33: ...33 7 3 4 Removal of the HDD Unit Fig D5 7 3 5 Removal of the Top Case Unit Fig D6...
Страница 35: ...35 Fig D11 7 3 8 Removal of the Lens Unit Fig D12 Fig D13 7 3 9 Removal of the Main P C B Fig D14...
Страница 36: ...36 7 3 10 Removal of the Sub P C B Fig D15 7 3 11 Removal of the Side R P C B and Cooling Fan Motor Fig D16...
Страница 38: ...38 Fig D20 7 3 15 Removal of the Monitor P C B Fig D21 Fig D22...
Страница 39: ...39 7 3 16 Removal of the LCD Fig D23 7 3 17 Removal of the Front P C B Fig D24...
Страница 40: ...40 7 3 18 Removal of the Camera Operation Unit Fig D25 7 3 19 Removal of the Barrier Motor Unit Fig D26...
Страница 41: ...41 Fig D27 7 3 20 Removal of the Barrier Unit and MF Ring Ornament Fig D28...
Страница 42: ...42 7 3 21 Removal of the Flash Unit Fig D29 7 3 22 Removal of the ECM Fig D30 Fig D31...
Страница 44: ...44 7 3 26 Removal of the Speaker Fig D35 7 3 27 Removal of the Shoe Angle and Grip Ornament Fig D36...
Страница 45: ...45 Fig D37 7 3 28 Removal of the MOS Unit and Optical Filter Fig D38 7 3 29 Removal of the Zoom Motor Fig D39...
Страница 84: ...S 33 S4 12 EVF FPC P C B 6 0 0 5 6 Foil Side HDC HS300 Series EVF FPC P C B 10 9 8 7 6 5 4 3 2 1 G F E D C B A...
Страница 88: ...S 37 S4 15 Front FPC P C B 6 6 HDC HS300 Series Front FPC P C B 10 9 8 7 6 5 4 3 2 1 G F E D C B A Foil Side...
Страница 89: ...S 38...
Страница 102: ...S6 3 EVF Section S 51 B45 55 B44 52 56 57 58 59 53 54 43 44 47 46 48 49 50 51 45 60 62 61 B46...
Страница 103: ...S6 4 LCD Section S 52 161 162 163 157 158 B151 B152 151 159 156 155 145 160 164 153 B153 B154 152 154...