background image

9

VQT4C40

Charging the battery

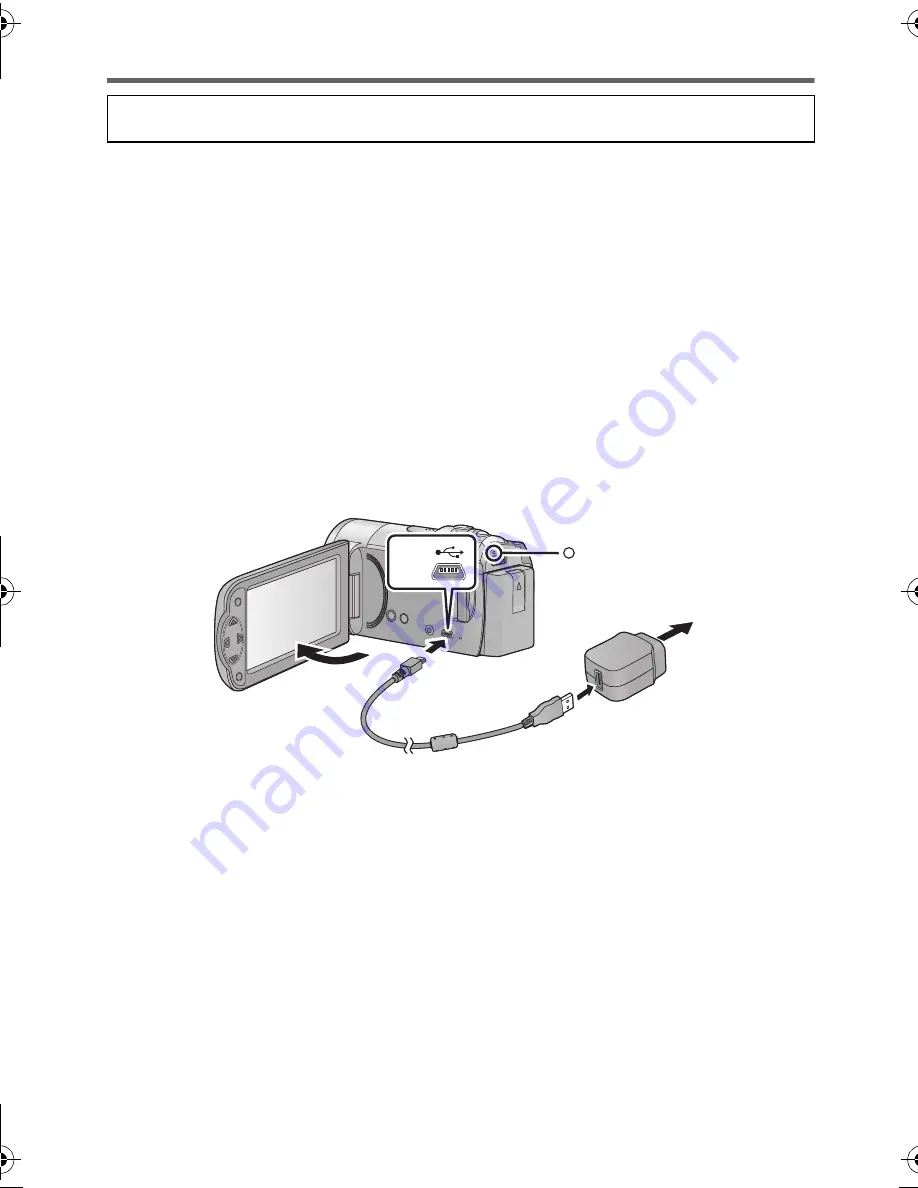
Charging with an AC adaptor.

The unit is in the standby condition when the AC adaptor is connected. The primary circuit is 

always “live” as long as the AC adaptor is connected to an electrical outlet.

Important:

Be sure to use the supplied AC adaptor and USB cable. Do not use parts supplied 

with other equipment.

The AC adaptor and USB cable are for use with this unit only. Do not use them with 

other equipment. Similarly, do not use AC adaptors and USB cables from other 

equipment with this unit.

(GC)

The battery can also be charged using a battery charger (VW-BC10EB: optional).

(GA/GW)

The battery can also be charged using a battery charger (VW-BC10E: optional).

(GN)

The battery can also be charged using a battery charger (VW-BC10GN: optional).

The battery cannot be charged when the power is on. Press the power button to turn 

off the power. (

l

14)

It is recommended to charge the battery in a temperature between 10 

o

C and 30 

o

C. 

(The battery temperature should also be the same.)

A

USB terminal

B

To the AC outlet

Insert the plugs as far as they will go.

1

Open the LCD monitor.

2

Connect the USB cable to the AC adaptor.

Check that the plug portion of the AC adaptor is not loose or misaligned.

Do not use any other AC adaptors except the supplied one.

Do not use any other USB cables except the supplied one. (Operation is not guaranteed 

with any other USB cables.)

3

Plug the AC adaptor into the AC outlet.

4

Connect the USB cable to the unit.

The status indicator 

C

 will flash red with approx. 2 seconds period (off for approx. 1 second, on 

for approx. 1 second), indicating that charging has begun.

It will turn off when the charging is completed.

When this unit is purchased, the battery is not charged. Charge the battery fully 
before using this unit for the first time.

HC-V10GA_GC_GW_GN_VQT4C40_mst.book  9 ページ  2012年1月25日 水曜日 午後1時5分

Содержание HC-V10

Страница 1: ...ra Model No HC V10 Before use please read these instructions completely More detailed instructions on the operation of this unit are contained in Operating Instructions PDF format in the supplied CD R...

Страница 2: ...not install or place this unit in a bookcase built in cabinet or in another confined space Ensure this unit is well ventilated Do not obstruct this unit s ventilation openings with newspapers tableclo...

Страница 3: ...reated by speakers or large motors Electromagnetic wave radiation generated by microprocessors may adversely affect this unit disturbing the pictures and or sound If this unit is adversely affected by...

Страница 4: ...ccurs when the ambient temperature or humidity changes Be careful of condensation since it causes lens or LCD monitor stains fungus and camera malfunction Cards that you can use with this unit SD Memo...

Страница 5: ...ng an SD card 13 Turning the unit on off 14 Selecting a mode 14 Setting date and time 15 Basic Intelligent Auto mode 16 Recording motion pictures 16 Recording still pictures 17 Motion picture Still pi...

Страница 6: ...es out of reach of children to prevent swallowing Product numbers correct as of Jan 2012 These may be subject to change Accessories Battery pack VW VBL090 AC adaptor VSK0784 AV cable K2KYYYY00203 USB...

Страница 7: ...VW ACK180E GN Accessory kit VW ACK180GN GC To use the VW LDC103E the shoe adaptor VW SK12E and the battery pack VW VBG130 VW VBG260 are required To charge the battery pack VW VBG130 VW VBG260 the AC a...

Страница 8: ...nternal protection to meet the requirements of appropriate safety standards There is a possibility that these battery packs may lead to fire or explosion Please be advised that we are not liable for a...

Страница 9: ...rged when the power is on Press the power button to turn off the power l 14 It is recommended to charge the battery in a temperature between 10 oC and 30 oC The battery temperature should also be the...

Страница 10: ...and turn the power off l 14 1 Turn the power of the PC on 2 Connect the USB cable The status indicator B will flash red with approx 2 seconds period off for approx 1 second on for approx 1 second indi...

Страница 11: ...Charging and recording time Charging Recording time Temperature 25 oC humidity 60 RH Time in the parenthesis is charging time when this unit is connected to a PC Panasonic Blu ray disc recorder or DVD...

Страница 12: ...rding 4 GB or more Memory Cards that do not have the SDHC logo or 48 GB or more Memory Cards that do not have the SDXC logo are not based on SD Memory Card Specifications The operation of Memory cards...

Страница 13: ...he USB cable jExpose the unit to vibrations or shock Performing the above while the lamp is on may result in damage to data SD card or this unit Do not expose the terminals of the SD card to water dir...

Страница 14: ...t is turned on when the LCD monitor is opened and unit is turned off when it is closed Change the mode to recording or playback Operate the mode switch to change the mode to or Preparation Turning the...

Страница 15: ...g the ENTER button Press the MENU button to complete the setting The date and time function is driven by a built in lithium battery If the time display becomes the built in lithium battery needs to be...

Страница 16: ...ange the mode to and open the LCD monitor 2 Press the recording start stop button to start recording A When you begin recording changes to 3 Press the recording start stop button again to pause record...

Страница 17: ...17 VQT4C40 Open the lens cover before turning on the unit 1 Change the mode to and open the LCD monitor 2 Press the button Basic Recording still pictures...

Страница 18: ...press the ENTER button Press the MENU button When a video item is selected an icon will appear on the thumbnail display 4 Select the scene or the still picture to be played back using 3 4 2 1 then pre...

Страница 19: ...use any other AV cables except the supplied one 2 Select the video input on the TV 3 Change the mode to to play back Motion picture playback Still picture playback 1 Playback Pause 6 Rewind playback 5...

Страница 20: ...reen Press the MENU button About the information display Descriptions of the selected submenus and items displayed in Steps 3 and 4 and messages to confirm settings are displayed About the operation i...

Страница 21: ...ed Back up important data on a PC disc etc Select the menu Basic Using the Zoom Basic Formatting SETUP FORMAT CARD A Zoom bar The zoom bar is displayed during the zoom operation Zoom lever T side Clos...

Страница 22: ...leted scenes still pictures cannot be restored so perform appropriate confirmation of the contents before proceeding with deletion To delete the scene or still picture being played back Press the butt...

Страница 23: ...0p Average 6 Mbps VBR Refer to the operating instructions PDF format for the picture size and recordable time of a motion picture Still picture recording format JPEG Design rule for Camera File system...

Страница 24: ...ustment Auto tracking white balance system Standard illumination 1 400 lx Minimum required illumination Approx 4 lx 1 25 with Low Light mode in the Scene Mode Approx 1 lx with the Colour Night View fu...

Страница 25: ...onal Operating temperature 0 oC to 40 oC Operating humidity 10 RH to 80 RH Battery operation time See page 11 Power source Power consumption DC output AC 110 V to 240 V 50 60 Hz 7 W DC 5 0 V 1 0 A GC...

Страница 26: ...d or other countries iMovie Mac and Mac OS are trademarks of Apple Inc registered in the U S and other countries Other names of systems and products mentioned in these instructions are usually the reg...

Страница 27: ...version of Adobe Reader that you can use with your OS from the following Web Site http get adobe com reader otherversions If using the following OS jWindows XP SP3 jWindows Vista SP2 jWindows 7 Inser...

Страница 28: ...Panasonic Corporation Web site http panasonic net Panasonic Corporation 2012 VQT4C40 F0112AS0...

Отзывы: