background image

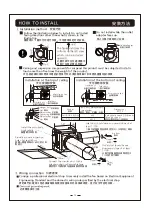
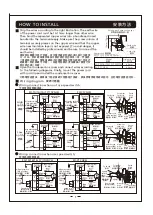
Strip the wires according to the right illustration. The earth wire 
of the power cord must be 10-15mm longer than other wire . 
Then bind the separated copper wires into a bundle and insert 
bundle into the terminal deeply. Make sure the screw column of 
terminal securely presses on the copper wire and that the copper 
wire near insulation layer is not exposed. (To avoid danger, it 
should be installed by professionals and be sure to connect the 
earth wire.) 

Wiring connection when not use speed switch:

 High
notch

All poles switch
  (No provide)

All poles switch
  (No provide)

All poles switch
  (No provide)

All poles switch
  (No provide)

All poles switch
  (No provide)

All poles switch
  (No provide)

Green/Yellow

Green/Yellow

Green/Yellow

Green/Yellow

Green/Yellow

Green/Yellow

 Low
notch

Wiring diagram

Open the condenser box cover and connect wires according 
to  the following diagrams. Finally, mount the power cord 
with cord clip and install the condenser box cover.

Wiring connection when use speed switch:

打開電容盒蓋後

請根據下面的接線示意圖進行接線

最後將 電 源線用 線 夾固定

並把電 容 盒蓋固 定 好

不使 用調 速開關接 線

使用調速開關接線

請按照右圖圖示進行剝線

其中電源線的地線必須比其它引線長

10-15mm

剝好線後請將每股分散的銅芯各自擰成一束

然後 插

入接線端子深處

確保接線端子的接線螺絲柱壓在銅線上且挨近

絕緣層一側的銅線不外露

(為避免危險必須由專業人員進行安

裝並務必接上地線

接線示意圖

FV-10/14/16/17/19CG2H

FV-10/14/16/17/19CG2H

FV-21CG2H

FV-21CG2H

Speed switch
(No provide)

調速開關(另購)

220V
50Hz

Speed switch
(No provide)

調速 開 關(另購)

220V
50Hz

Speed 
switch
(No 
provide)

調速開關

(另購)

 Power cord
(No provide)

Neutral
wire

Cord clip

Screw for
cord clip

Earth
wire

Live
wire

Terminal

Blue

FV-10/14/16/17/19CG2H

FV-21CG2H

 Power cord
(No provide)

 Power cord
(No provide)

220V
50Hz

220V
50Hz

Neutral
wire

Neutral
wire

Cord clip

Cord clip

Screw for
cord clip

Screw for
cord clip

Earth
wire

Earth
wire

Live
wire

Live
wire

Terminal

Terminal

Blue

220V
50Hz


藍色

Blue

220V
50Hz


藍色


藍色

Wiring each wire to sheaves

Earth wire

7

m

m

7

m

m

>

5

m

m

>5mm

>5mm

>5mm

M

1

0

m

m - 1

5

m

m

Cord clip

Power cord

Dimension M

2

60227 IEC 53 (RVV 0.75mm )

將每股絞線擰成一束

地線

電源線

線夾

尺寸

 M

Model

45mm

40mm

型號

熱熔斷器

熱熔斷器

熱熔斷器

熱熔斷器

熱熔斷器

熱熔斷器

全極開關(另購)

全極開關(另購)

全極開關(另購)

全極開關(另購)

全極開關(另購)

全極開關(另購)

接線端子

接線端子

接線端子

接線端子

接線端子

接線端子

接線端子

接線端子

接線端子

黃/綠色

黃/綠色

黃/綠色

黃/綠色

黃/綠色

黃/綠色

紅色

紅色

紅色

紅色

紅色

紅色

黑色

黑色

黑色

黑色

黑色

黑色

黑色

黑色

黑色

黑色

黑色

黑色

白色

白色

白色

白色

白色

白色

黃色

黃色

黃色

相線

相線

相線

線夾

線夾

線夾

固定線夾螺釘

固定線夾螺釘

固定線夾螺釘

地線

地線

地線

電源線(另購)

電源線(另購)

電源線(另購)

中性線

中性線

中性線

高 檔

低 檔

安裝方法

Содержание FV-10CG2H

Страница 1: ...CE TROUBLE SHOOTING SPECIFICATIONS BACK COVER BACK COVER INSTALLATION CAUTIONS INSTALLATION REQUIREMENTS READ AND SAVE THESE INSTRUCTIONS Thank you for purchasing this Panasonic product Panasonic product 型號 目錄 安裝方法 安全指引 安裝注意事項 安裝要求事項 部件名稱和尺寸 末頁 末頁 日常使用及維護 常見故障識別與處理 規格 閱讀並保管此說明書 感謝您選用Panasonic產品 安裝 使用和維護Panasonic產品前 請仔細閱讀本安裝使用說明書 不遵照此說明書進行操作有可能導致人員受傷或財產損失 安裝完成後 請向顧客說明如何使用和維護Panasonic產品 並將此說明書交給顧客保管...

Страница 2: ...項 安裝注意事項 Do not modify the internal wiring or disassemble the fan There should be an all poles switch with minimum 3mm contact gap in the fixed wiring In regards to electrical piping and set up consideration you should consign qualified professionals to perform installation according to these instructions If the fan is hung from the ceiling you should install and tighten the specified number of bo...

Страница 3: ... air duct cannot be supported by the fan after installation 本產品必須接地 當出現異常或漏電時 可能會觸電 If any abnormality or current leakage occurs it may cause electric shock The power cord should have an angle of 5 30 in the horizontal direction Improper installation may cause accident because of the falling of the product May drop and cause injury due to carrying an extra load 安裝本產品的建築結構必須牢固 當不能 確 保 安 裝 強 度 時 務 必...

Страница 4: ...222 FV 10CG2H 226 269 145 163 63 83 60 60 71 71 71 209 270 196 330 330 330 332 332 330 400 400 400 FV 14CG2H FV 16CG2H FV 17CG2H FV 19CG2H 電容盒蓋 Condenser box cover Do not install the fan in a place with high temperature or excessive smoke 不可安裝在高溫或油煙過多的場所 The bottom surface of the fan should keep a distance of over 2 3m from the ground after installation The fan should not make contact with any oth...

Страница 5: ...n upward slope of at least 1 100 出風口的導風管必須保持至少 1 100的向下傾斜 入風口的導風管必須保持至少1 100的向上傾斜 請使用不可燃的膠布連接導風管和接頭 設置一個邊長為45cm以上的方形 點檢口 天花板頂部安裝 天花板底部安裝 請使用以下圖示方向進行安裝 不可使用其他方向安裝 禁止出風口接頭向上安裝 此圖示表示在左邊視圖中 可朝上安裝的產品側面 天花板結構和用於懸掛本產品的懸掛元件必須能夠承載大於本產品重量5倍的強度 迷你送風機 迷你送風機 Mini sirocco fan Bolt nuts plain washers No provide Mini sirocco fan Inlet duct Inlet duct Outlet duct Outlet duct 斜度 斜度 水平線 FV 10 14 16CG2H FV 17 19 21CG...

Страница 6: ...蓋固定好 不使用調速開關接線 使用調速開關接線 請按照右圖圖示進行剝線 其中電源線的地線必須比其它引線長 10 15mm 剝好線後請將每股分散的銅芯各自擰成一束 然後插 入接線端子深處 確保接線端子的接線螺絲柱壓在銅線上且挨近 絕緣層一側的銅線不外露 為避免危險必須由專業人員進行安 裝並務必接上地線 接線示意圖 FV 10 14 16 17 19CG2H FV 10 14 16 17 19CG2H FV 21CG2H FV 21CG2H Speed switch No provide 調速開關 另購 220V 50Hz Speed switch No provide 調速開關 另購 220V 50Hz Speed switch No provide 調速開關 另購 Power cord No provide Neutral wire Cord clip Screw for cord cli...

Страница 7: ...ay cause injury May cause injury if being caught into the rotating section May cause injury 產品運行時禁止接觸扇葉及馬達等部件 A statement to the effect that when the product is no longer to be used it must not be left in the place but removed to prevent it from possible falling 如以後不打算再使用本產品 為了防止 在萬一的情況下掉落 不得放置不管 而應予以拆除 可能會產生不能預測的事故 可能會產生不能預測的事故 檢查前必須切斷電源 在產品的服務 維修及清潔過程中不要拉動 電氣引線 CAUTION 注意 檢查時即使關掉電源 送風機還會有短時間的運轉 ...

Страница 8: ...just Inspect and clean Change wiring Action 異常 問題 風量不足 噪音過大 振動過大 馬達過熱 運轉異常 對策 安裝基礎弱 安裝不良 電壓下降 動體與靜體相接觸 混入異物 帶有灰塵 導風管不良 接線錯誤 修補基礎 調整安裝 確認電源 檢查 調整 檢查 調整 檢查 清潔 變更接線 1 風量 電氣特性 噪音值等資料是在靜壓為0Pa狀態下的數值 2 噪音值是A計權平均聲壓級 是本公司測試結果的中心值 有 3 7的公差範圍 3 噪音值是在距機體側面1 5m處測得的值 在機體入風口 出風口兩側分別連接導風管 此測試方法是在假設機體的噪音傳到室內的情況下設定的 4 風量是本公司測試結果的中心值 有 10 的公差範圍 Web site http www panasonic com FV 10CG2H FV 14CG2H FV 16CG2H FV 17CG2H ...

Отзывы: