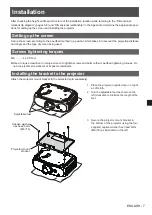
8 - ENGLISH
Attaching the projector drop-prevention kit
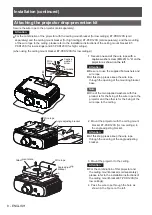
Secure the wire rope to the projector (sold separately).
Attention
z
For the combination of the projector with the ceiling mount bracket (for low ceilings) ET-PKD120S (sold
separately) and the ceiling mount bracket (for high ceilings) ET-PKD120H (sold separately), and the mounting
of the wire rope to the ceiling, please refer to the installation instructions of the ceiling mount bracket ET-
PKD120S (for low ceilings) and ET-PKD120H (for high ceilings).
(when using the ceiling mount bracket ET-PKD120S (for low ceilings))
Wire
rope
Flat washer
Captive
washer
screw
A
A
1 Secure one end of the
wire rope
with a
captive washer screw (M6×20) to “A” on the
projector as shown on the left.
Attention
z
Be sure to use the supplied flat washers and
wire rope.
z
At this step, please keep the wire rope
through the opening of the mounting bracket
base.
Note
z
One of the two supplied washers with this
product is for the fixing of the wire rope to the
projector and the other is for the fixing of the
wire rope to the ceiling.
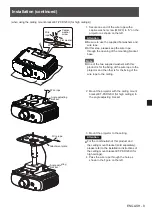
2 Mount the projector with the ceiling mount
bracket ET-PKD120S (for low ceilings) to
the angle adjusting bracket.
Attention
z
At this step, please keep the wire rope
through the opening of the angle adjusting
bracket.
A
A
Angle adjusting bracket
Wire rope
A
Attachment plate
Angle adjusting
bracket
Wire rope
3 Mount the projector to the ceiling.
Attention
z
For the combinatioin of this projector and
the ceiling mount bracket (sold separately),
please refer to the installation instructions of
the ceiling mount bracket ET-PKD120S (for
low ceilings).
4 Pass the wire rope through the hole as
shown in the figure on the left.
Installation (continued)


