background image

Advanced Operations

VQT8626

20

A

B

REPEAT
MODE

REPEAT MODE

T

A

T

A

A

 OFF

PRG

PRG

PRG

T

A

T

A

A

 OFF

b

c

d

e

f

g

h

i

j

k

l

C

T

 OFF

a

REPEAT MODE

TOP MENU

MENU

DISPLAY

PLAY MODE SUBTITLE AUDIO ANGLE

ENTER

RETURN

1

2

3

A-B REPEAT

4

5

6

7

8

9

SETUP CANCEL

0

S

10

REPEAT MODE

V.S.S.

Advanced operations

»

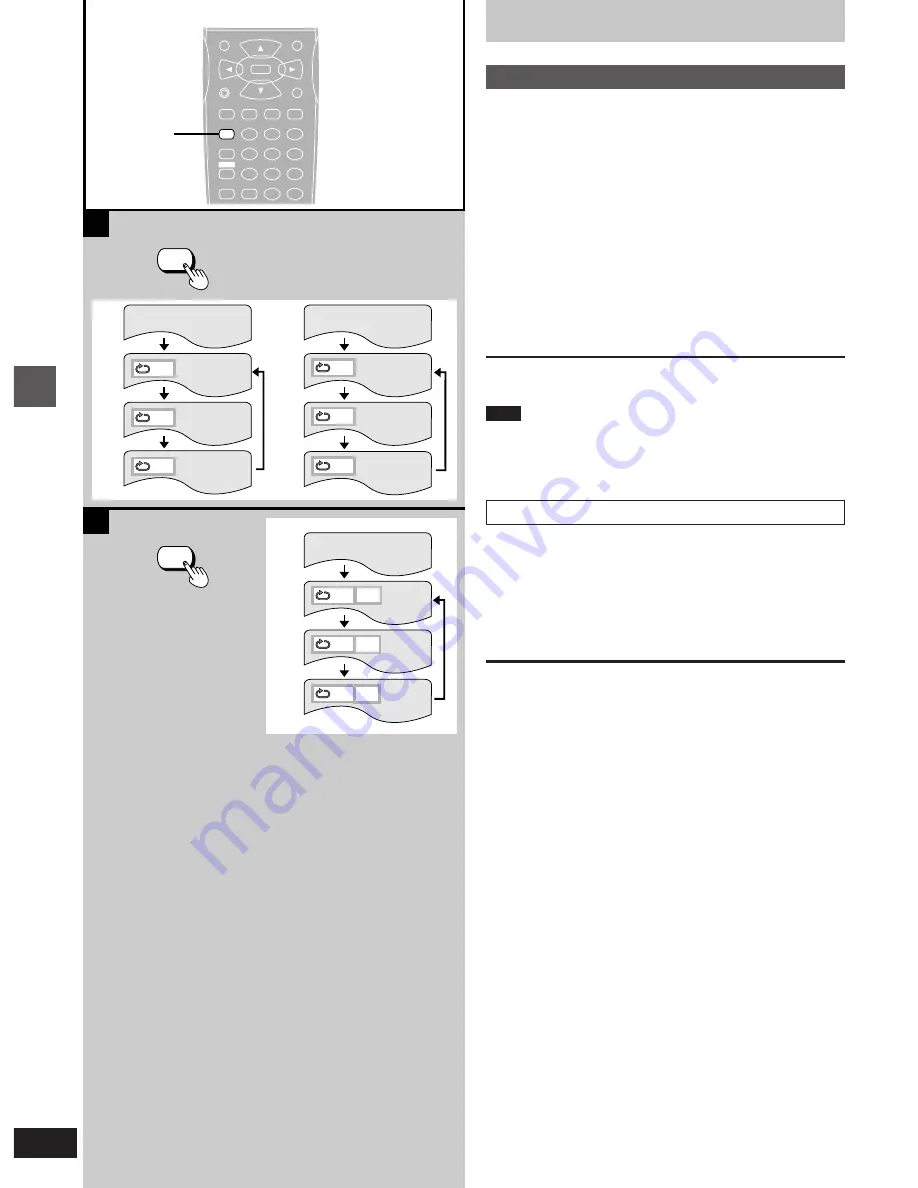
A

Repeat play

Press [REPEAT MODE] during play.

Each time this button is pressed, the TV monitor changes as illustrat-
ed and the disc will repeat a chapter or title (DVD) or a track (Video
CD/CD).
Repeat play starts when the display changes.

³

DVD

a

Normal play

b

Repeat of chapter being played

c

Repeat of title being played

d

Cancel repeat mode (Normal play)

³

Video CD/CD

e

Normal play

f

Repeat of track being played

g

Repeat of entire disc contents

h

Cancel repeat mode (Normal play)

To return to normal play
Press [REPEAT MODE] until “

1

 OFF” is displayed.

Note

³

Repeat play may not work correctly with some DVDs.

³

Repeat play does not work with an interactive DVD or during menu
play of a Video CD with playback control.

³

There is no mode for repeating the whole DVD.

»

B

To enjoy program repeat play

[VCD]

[CD]

If [REPEAT MODE] is pressed during program play (

á

 page 22), the

display changes as illustrated.

i

Program play

j

Repeat of track being played

k

Repeat of all programmed tracks

l

Cancel repeat mode (Program play)

To return to program play
Press [REPEAT MODE] until “

1

 OFF” is displayed.

Содержание DVDRV60 -

Страница 1: ...etely Please keep this manual for future reference VQT8626 DVD VIDEO CD CD PLAYER Operating Instructions Model No DVD RV60 º Region number supported by this player Region numbers are allocated to DVD players and software according to where they are sold The region number of this player is 2 The player will play DVDs marked with labels containing 2 or ALL Example 2 ALL 2 4 1 etc ...

Страница 2: ...apid advance Rapid reverse 15 Canceling playback control 16 Using menus to play 16 Advanced Operations Advanced operations 17 Changing soundtrack language 17 Changing subtitle language 18 Viewing from another angle 18 Changing picture quality for movie viewing 19 Raising dialogue volume 19 Repeat play 20 Repeating sections between two specific points A B repeat 21 Connecting headphones 21 Random p...

Страница 3: ...irect sunlight high temperatures high humidity and excessive vibration These condi tions can damage the cabinet and other components thereby short ening the unit s service life Place it at least 15 cm away from wall surfaces to avoid distortion and unwanted acoustical effects Do not place heavy items on the unit Voltage Do not use high voltage power sources This can overload the unit and cause a f...

Страница 4: ...GER OF SEVERE ELECTRICAL SHOCK IF THE CUT OFF PLUG IS INSERTED INTO ANY 13 AMP SOCKET If a new plug is to be fitted please observe the wiring code as shown below If in any doubt please consult a qualified electrician IMPORTANT The wires in this mains lead are coloured in accordance with the following code Blue Neutral Brown Live As the colours of the wires in the mains lead of this appliance may n...

Страница 5: ...age 9 No Connection No Connection Green GND 10 Through AV1 to AV2 Through AV1 to AV2 Through AV1 to AV2 11 No Connection No Connection Green 12 No Connection No Connection No Connection 13 No Connection S video C Output GND Red GND 14 Blanking GND Blanking GND Blanking GND 15 No Connection S video C Output Red 16 Blanking Blanking Blanking 17 Video Output GND S video Y Output GND Video Output GND ...

Страница 6: ...e menu Video CD with playback control º Copy Protection Some DVD discs contain a Copy Protection signal which can affect the video signal if the output of the player is fed through a VCR to the TV The picture may become unstable or the picture contrast may change drastically It is therefore very important to connect this DVD VIDEO CD CD player according to the diagram in these Operating Instructio...

Страница 7: ...e it necessary to use the remote con trol a shorter distance from the system To prevent damage Never place heavy items on top of the unit Do not disassemble or reconstruct the unit Do not spill water or other liquids into the unit 30 30 º Terms used in these operating instructions Title Chapter DVD DVDs are divided up into large sections titles and smaller sections chapters The numbers allocated t...

Страница 8: ...yed back e g 2ch or 5 1ch E A DVD is loaded F It is possible to change the angle DVD G Illuminates during program play VCD CD H Title chapter number DVD Track number VCD CD I Linear PCM of 96 kHz sampling is being played J Linear PCM of 24 bit is being played Control reference guide Buttons such as 1 function in exactly the same way as the buttons on the player Remote control Page K Top menu butto...

Страница 9: ... with ê I To save power when the unit is not to be used for a long time unplug it from the mains socket Connect Your Player Directly To Your Television If the player is connected to the television through a video cas sette recorder the picture may not be played back correctly due to the copy guard So we strongly recommend you do not con nect the player to your video cassette recorder when setting ...

Страница 10: ...able To 21 pin SCART terminal of television Connection to a television Connecting to a television and a video cassette recorder with 21 pin SCART terminal Note Additional equipment and cables are not supplied To view pictures from the video casette recorder set the player to the standby mode Direction of signal flow RGB where available á 6 AV1 Output in 9 Other Settings page 31 FOR AUDIO VIDEO USE...

Страница 11: ...er 1 Press ê to switch on the power 2 Press SETUP in the stop mode The initial settings screen is displayed 3 Press the cursor buttons 3 4 to se lect 6 TV Aspect and press ENTER 4 Press the cursor buttons 3 4 to select the TV aspect and press ENTER 1 4 3 Factory preset Select when a conventional television is connected 2 16 9 Select when a wide screen television is connected Setting TV type After ...

Страница 12: ... the previous menu RETURN Shows the menu screen TOP MENU Shows the first menu screen DVD MENU Shows the menu screen DVD Note NO PLAY is displayed on the FL display if you load the following kinds of discs and they cannot be played DVD for which playback is prohibited by the initial settings 2 Ratings á page 29 DVD with a region number other than 2 or ALL á page 6 If the disc is put in upside down ...

Страница 13: ... switched to the standby mode and then turned back ON C Chapter review function DVD This function plays the first few seconds of each chapter from the beginning of the title up to the point where operation was stopped This makes it possible to review previous chapters 1 Press 1 while is flashing on the FL display The message illustrated is briefly displayed 2 Press 1 again while the message is dis...

Страница 14: ...nu play of Video CDs with playback control a menu screen may sometimes be recalled C Frame advance Frame reverse DVD VCD Press the cursor buttons 2 1 while paused The disc is advanced reversed by one frame each time the cursor buttons 2 1 are pressed When the cursor buttons 2 1 are kept pressed consecutive frame advance reverse works To return to normal play Press 1 PLAY For your reference Pressin...

Страница 15: ... For your reference When 6 5 SLOW SEARCH or the shuttle dial 6 5 on the player is used during menu play of Video CDs with playback control a menu screen may sometimes be recalled B Rapid advance Rapid reverse Press 6 5 SLOW SEARCH during play Each press increases the speed of the search On the Player Turn the shuttle dial 6 5 during play The speed of the search increases the more you turn the shut...

Страница 16: ...cerned for the track numbers Press 1 to start play from the beginning of the disc To return to menu play Press º STOP to stop play press MENU and press the numeric buttons to select an item PBC lights on the player s FL display B Using menus to play DVD By calling up menus during play you can start play from a specific title or chapter or change the soundtrack and subtitle languages 1 Press TOP ME...

Страница 17: ...e disc you are playing If the RESUME function á page 13 is canceled or if you stop play of an interactive DVD the soundtrack languages revert to the initial settings á page 28 Some discs allow changes to soundtrack languages only by using the disc s menus Switching vocals ON or OFF for Karaoke B discs DVD VCD 1 Press AUDIO during play 2 Press the cursor buttons 3 4 2 1 or press AUDIO to change the...

Страница 18: ...me cases the subtitle language is not changed to the selected one immediately For your reference You can only select languages if they have been recorded on the disc you are playing If the RESUME function á page 13 is canceled or if you stop play of an interactive DVD the subtitle languages revert to the initial settings á page 28 Some discs allow changes to subtitle languages only by using the di...

Страница 19: ... noise To restore the standard picture mode Press CINEMA For your reference You can also use the GUI screen to adjust picture quality á e Digital picture mode page 26 B Raising dialogue volume DVD This mode makes the dialogue in movies easier to hear á c Dialogue Enhancer page 26 This function is effective with Dolby Digital or DTS Digital Surround three channels or over where the dialogue is reco...

Страница 20: ...ed c Repeat of title being played d Cancel repeat mode Normal play Video CD CD e Normal play f Repeat of track being played g Repeat of entire disc contents h Cancel repeat mode Normal play To return to normal play Press REPEAT MODE until 1 OFF is displayed Note Repeat play may not work correctly with some DVDs Repeat play does not work with an interactive DVD or during menu play of a Video CD wit...

Страница 21: ...EAT until 1 is displayed Note A B repeat play does not work with an interactive DVD Some subtitles recorded around point A or B may fail to appear DVD A B repeat play works only within a title DVD or a track Video CD CD For your reference The end of a track or title is automatically determined as point B B Connecting headphones 1 1 Set PHONES to MIN 2 Connect the headphones not supplied 2 Adjust t...

Страница 22: ... the disc will be selected Repeat step 2 to select another track If you enter over 32 tracks the last programmed track is replaced with the new one 3 Press 1 PLAY Play now begins in the programmed sequence To exit the screen Press PLAY MODE twice To add tracks 1 Press º STOP twice during program play to show the program play screen 2 Select the available item with the cursor buttons 3 4 then repea...

Страница 23: ...s FL display chang es d Headphone V S S 1 Natural effect e Headphone V S S 2 Emphasized effect f Headphone V S S is canceled Restore speaker mode when you are not using headphones or else the sound from the speakers will sound strange Note V S S effect does not work with Karaoke DVDs V S S will not work or will have less effect with some discs Turn off the TV surround sound and other surround soun...

Страница 24: ...r player information l v l Shuttle screen l v GUI screen cleared Some functions cannot be accessed from the stop mode 2 Press the cursor buttons 2 1 1 1 1 1 to se lect the item The item is highlighted in yellow 3 Press the cursor buttons 3 4 to se lect the setting For some functions the setting will be registered immediate ly for others ENTER or 1 PLAY must be pressed When numbers are displayed e ...

Страница 25: ... b Number of bits bit ch Number of channels Vocal Vocals indication You can switch vocals ON or OFF with the cursor buttons 3 4 DVD Karaoke Solo OFF or ON DVD Karaoke Duet OFF V1iV2 V1 or V2 g Subtitle language No Change the No with the cursor buttons 3 4 or the numeric buttons h Subtitle on off Select ON or OFF with the cursor buttons 3 4 OFF Subtitle is cleared ON Subtitle is displayed i Subtitl...

Страница 26: ...ff or the disc tray is opened Note A B repeat play does not work with an interactive DVD Repeat play and marker functions do not work with an interactive DVD or during menu play of a Video CD with playback control Dialogue Enhancer is effective with Dolby Digital or DTS Digital Surround three channels or over where the dialogue is recorded in the center channel e Digital picture mode DVD VCD You c...

Страница 27: ...rd This is also called a parental lock 3 Menu Language page 30 Change the language used for the on screen displays and initial settings menus 4 On Screen Messages page 30 Choose whether Play Still and other displays will be displayed or not and the colour and position of these dis plays as well as GUI screens 5 FL Display page 30 Change the brightness for the FL display 6 TV Aspect page 11 Change ...

Страница 28: ... 6588 Aymara 6590 Azerbaijani 6665 Bashkir 6669 Byelorussian 6671 Bulgarian 6672 Bihari 6678 Bengali Bangla 6679 Tibetan 6682 Breton 6765 Catalan 6779 Corsican 6783 Czech 6789 Welsh 6865 Danish 6869 German 6890 Bhutani 6976 Greek 6978 English 6979 Esperanto 6983 Spanish 6984 Estonian 6985 Basque 7065 Persian 7073 Finnish 7074 Fiji 7079 Faroese 7082 French 7089 Frisian 7165 Irish 7168 Scots Gaelic ...

Страница 29: ...adults which are not encoded with rating information Note The rating method differs from disc to disc There are discs designed for adults that do not have these ratings recorded on them These discs can be played as normal To prevent play of these discs set the rating limit to 0 Lock All 2 Ratings DVD See page 27 for operation 1 Select the level with the cursor buttons 3 3 3 3 3 4 4 4 4 4 and press...

Страница 30: ...uto The FL display will be dimmed during playback of DVDs and Video CDs The display resumes brightness when a button for special play such as 6 5 SLOW SEARCH or PAUSE is pressed FL Display Press RETURN to exit 1 Bright 2 Dim 3 Dim During DVD VCD Play Auto 1 English Factory preset 2 Français 3 Deutsch 4 Italiano 5 Español Changing initial settings Press RETURN to exit Select the language for these ...

Страница 31: ...eset Select when the player is connected to a PAL TV which is capable of receiving PAL 525 60 system 2 NTSC Select when the player is connected to a Multi system television Changing initial settings 9 Other Settings See page 27 for operation Example P picture 1 Still Mode Select either Field still or Frame still in the still picture mode 2 Audio during Search To select whether audio is heard or no...

Страница 32: ... pictures appear on the screen Refer to your television s operating instructions for details Wide screen pan and scan Wide screen non pan and scan Regular 4 3 Regular 4 3 letterbox 16 9 zoom mode Top and bottom cut off Top and bottom cut off Full screen 16 9 full mode Full screen Screen stretched horizontally Letterbox with screen stretched horizontally 4 3 Edges cut off Letterbox Full screen Lett...

Страница 33: ...ns See Connection to a television pages 9 and 10 for details on connection Note The equipment connections described are examples Additional equipment and cables are not supplied Setup chart Types of connection Equipment and settings Manufactured under license from Digital Theater Systems Inc DTS and DTS Digital Surround are trademarks of Digital Theater Systems Inc C 1996 Digital Theater Sys tems ...

Страница 34: ...ed by different types of speaker or distance Go to 7 Digital Audio Output and set 1 PCM Down Conversion to No page 37 Note Turn off V S S page 23 if you have connected a subwoofer center speaker or surround speakers as well as the front speakers Sound will not come from the other speakers if V S S is on When playing DVDs recorded in MPEG 2 audio multi channel audio will be output as well as Dolby ...

Страница 35: ... bend the optical digital audio cable when connecting it When you have finished connection Make changes to 7 Digital Audio Output to suit your decoder page 37 If this is set to No no audio will be output when DVDs recorded in 96 kHz linear PCM are played Audio will be output as it is if the DVD does not have copyright protection recorded on it These changes to digital audio output must be made oth...

Страница 36: ...udio equipment with digital audio input terminals When you have finished connection Make changes to 7 Digital Audio Output as shown page 37 Back of the player Dust protection cap Align the plug with the terminal Optical digital audio cable Do not bend the optical digital audio cable when connecting it Coaxial audio cable System component or amplifier with digital audio input termi nals and speaker...

Страница 37: ...l digital or coaxial audio output terminal during playback of DVDs recorded in DTS Digital Surround 4 MPEG To select the signal format PCM or Bitstream to be output from the optical digital or coaxial audio output terminal during playback of the DVD recorded in MPEG audio 4 Press the cursor buttons 3 4 to se lect the setting and press ENTER When 1 PCM Down Conversion is selected 1 No Factory prese...

Страница 38: ... analogue output Do the following if you wish to take advantage of high quality 96 kHz sound Select No and connect this player s audio output terminal to an amplifier s audio input terminal with the audio video cable supplied or an audio cable not supplied 2 When connecting an amplifier with an optical or coaxial digital input terminal which does not contain a Dolby Digital DTS Digital Surround or...

Страница 39: ...l Factory preset If you have connected 2 speakers You will return to the menu shown in step 1 Settings are not necessary 4 Change settings to suit your speakers and the listening position page 40 Setting the size and presence of your speakers Choose Yes for speakers you have connected Sound will not be output if you choose No Delay time Allows you to make up for differences in distance if you cann...

Страница 40: ... cursor buttons 3 4 2 1 to select Test and press ENTER A test signal is output from one speaker at a time starting with the front left speaker and proceeding clockwise FRONT L CENTER FRONT R v SURROUND L SURROUND R 2 While listening to the test signal press the cursor buttons 3 4 to adjust the volume of the center and surround speakers so they are the same apparent volume as the front speakers The...

Страница 41: ...to ON Alternatively press Í I to switch the player to the standby mode disconnect the AC mains lead and then reconnect it The player may not be operating properly due to lightning static electricity or some other external factor Go to the initial settings menu 6 TV Aspect and change the setting to suit your television You may also need to change the screen mode on the television itself P The Off s...

Страница 42: ...uages is set to French Select English L Check the connections 9 QjT If you have connected this player to an amplifier through the audio output terminals go to the initial settings menu 8 Speaker Setting and change the settings to suit your speakers Select Yes for all the speakers you have connected W If you have connected this player to an amplifier with built in decoder through the digital audio ...

Страница 43: ...ner static electric ity prevention liquids or any other solvent Do not attach labels or stickers to discs Do not use discs with ex posed adhesive from tape or left over peeled off stickers Do not use scratch proof protectors or covers other than those specified for use with this player Do not place or store discs in the following places Locations exposed to direct sunlight Humid or dusty locations...

Страница 44: ...nal output characteristics 1 Frequency response DVD linear audio 4 Hz 22 kHz 48 kHz sampling 4 Hz 44 kHz 96 kHz sampling CD audio 4 Hz 20 kHz EIAJ 2 S N ratio CD audio 115 dB EIAJ 3 Dynamic range DVD linear audio 103 dB CD audio 99 dB EIAJ 4 Total harmonic distortion CD audio 0 002 EIAJ Digital audio output Optical digital output Optical terminal Coaxial audio output Pin jack Headphone jack Output...

Отзывы: