background image

15

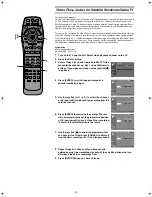
Video Plus+ Codes for Satellite Receivers/Cable TV

For the United Kingdom:
This unit is not designed to control (switch on or change channel) your satellite receiver or Cable 
TV box, however, it can be taught to recognise Video Plus+ Codes for Satellite stations. The 
Satellite receiver or Cable TV box must be switched on and the correct station selected. Some 
receivers have their own timer facility for this purpose. Please refer to your Satellite Receiver/
Cable TV box instructions for use of such timer facilities.

For your unit to recognise the Video Plus+ Codes for each satellite station, you must teach your 
unit which channel or AV input to record from for the first time. Otherwise when setting a Video 
Plus+ recording, the [

ss

] symbol will appear in the channel position indicating that the unit does 

not know which channel position to set. Once you have set the channel/AV input once the unit 
will remember it whenever you use a Video Plus+ Code for the station again.

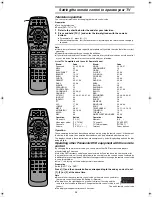
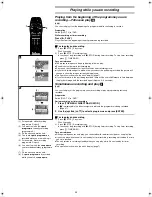
Preparation

Turn on the television.

Switch [DVD, TV] to “TV”.

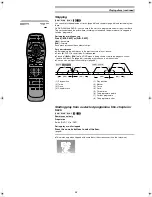
1

Turn on the TV and the unit. Select video playback channel on the TV.

2

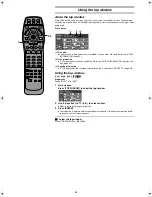
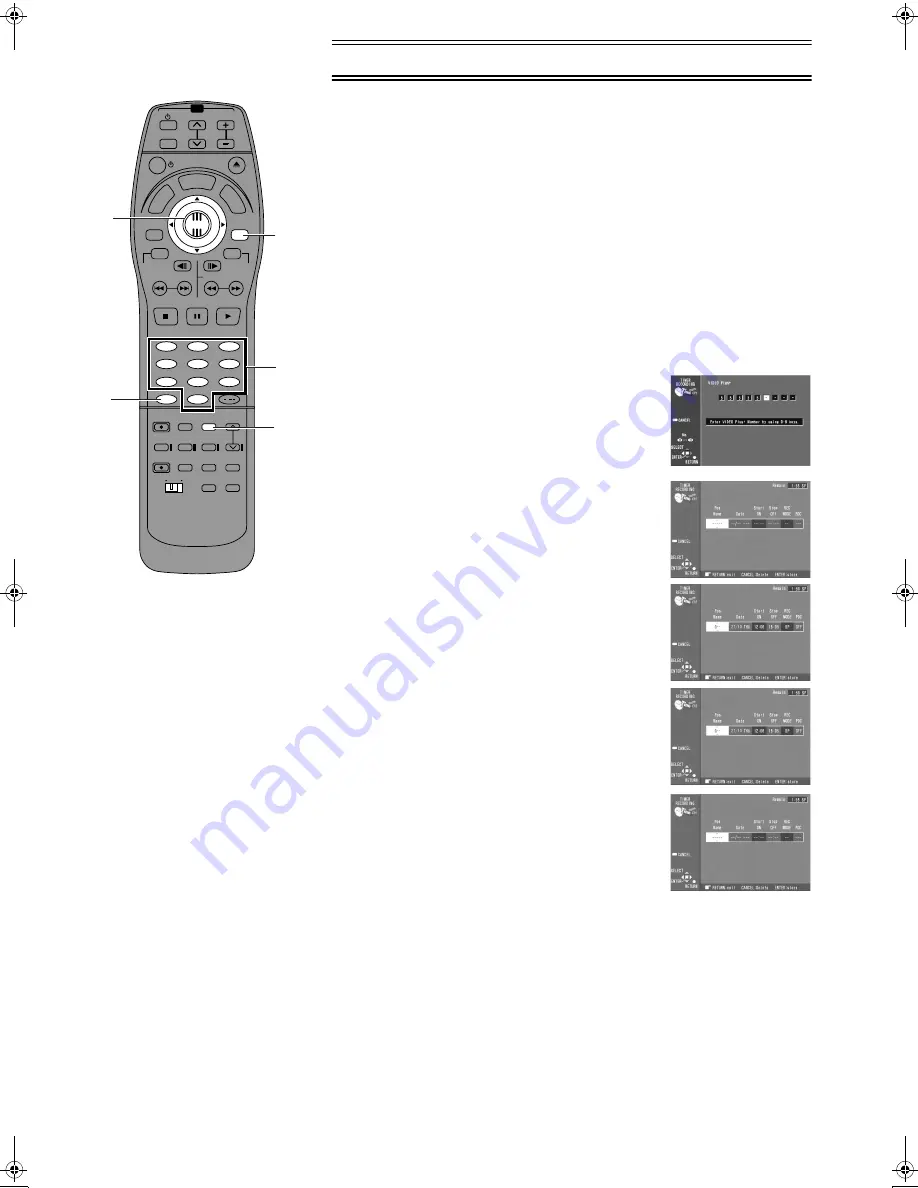
Press the SV/V+ button.

3

Enter a Video Plus+ Code from a Satellite TV Guide 
for a satellite channel, e.g. Sky 1 using the Numeric 
buttons. If you make a mistake, use the joystick [

2

2

2

2

to go back.

4

Press [ENTER]. [

ss

ss

ss

ss

] will appear instead of a 

channel number/AV input.

5

Use the joystick [

3

4

2

1

] to select the channel 

or AV input that is to be used for recording from the 
satellite channel.

6

Press [ENTER] to memorise the setting. The unit 
will now automatically set the programme position 
or AV input correctly when a Video Plus+ recording 
is set for this satellite station in the future.

7

Use the joystick [

3

3

3

3

] to select the programme that 

you have just set. Now press [CANCEL] to delete it 
from the timer recording list. It is no longer needed.

8

Repeat steps 2

s

s

s

s

7 above until you have set and 

deleted dummy timer recordings for each of the satellite stations that you 
will make Video Plus+ recordings from.

9

Press [RETURN] when you have finished.

TV

TV/AV

PROG / CHECK

TOP WINDOW

TV/TEXT

STOP

SV/V+

REC

TIME SLIP

AV LINK

SETUP

AUDIO

REC MODE

CANCEL

INPUT

SELECT

MANUAL

SKIP

LAST

MARKER

DIRECT

TV REC

TIMER

REC

1

2

3

4

5

6

7

8

9

0

PAUSE

PLAY

STATUS

RETURN

VOL

OPEN/CLOSE

T

C

E

R

I

D

R

O

T

A

G

I

V

A

N

TO

P

M

EN

U

M

E

N

U

DISPLAY

T

SI

L

Y

A

L

P

ENTER

TV

DVD

TV ASPECT

FRAME

SKIP

SLOW/SEARCH

Á

2

/

3·4·

5·6·

7

7

9

3

E‑Text1.fm  15 ページ  2001年9月6日 木曜日 午後4時13分

Содержание DMRE20 - DVD VIDEO RECORDER

Страница 1: ...corder Operating Instructions Model No DMR E20 Before connecting operating or adjusting this product please read these instructions completely Please keep this manual for future reference RQT6037 B For UK Customers Only ...

Страница 2: ...eo cassette player 38 Entering titles 40 DISC INFORMATION 41 Enter Title 41 Disc Protection 42 Releasing disc protection 43 Format 44 Finalize Creating DVD Video 45 Using the direct navigator 46 Selecting programmes to play 46 Erasing programmes 48 Entering and editing programme titles 49 Checking programme contents 50 Protecting programmes 51 Releasing programme protection 52 Erasing parts of a p...

Страница 3: ...ns lead are coloured in accordance with the following code Blue Neutral Brown Live As the colours of the wires in the mains lead of this appliance may not correspond with the coloured markings identifying the terminals in your plug proceed as follows The wire which is coloured BLUE must be connected to the terminal in the plug which is marked with the letter N or coloured BLACK The wire which is c...

Страница 4: ... from the digital video equipment even if using the DV cable Notes on these instructions These operating instructions describe operations mainly using the remote control If the name of the button is the same the operation described can also be performed with the main unit The contents of the screens used in these instructions may not necessarily match what you will see on your screen Displays The ...

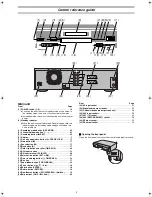
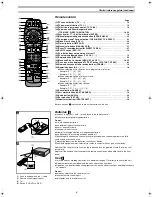
Страница 5: ...minal DV INPUT 69 14 External link button EXT LINK 27 15 Timer recording button Á TIMER REC 33 16 Disc tray 17 17 Top window button TOP WINDOW 30 18 Cursor buttons 3 4 2 1 18 19 Enter button ENTER 18 20 Return button RETURN 18 21 Slow Search buttons SLOW SEARCH 6 5 19 22 Skip buttons SKIP 9 20 Rear Page 23 AC input socket 11 24 Digital audio output socket 71 25 S video video audio output socket s ...

Страница 6: ...different types at the same time heat or expose to flame take apart or short circuit attempt to recharge alkaline or manganese batteries use batteries if the covering has been peeled off Mishandling of batteries can cause electrolyte leakage which can damage items the fluid contacts and may cause a fire If electrolyte leaks from the batteries consult your dealer Wash thoroughly with water if elect...

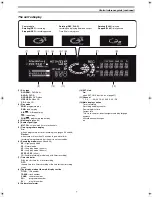
Страница 7: ...EP all on FR flexible recording mode only with timer recording 7 Timer indicator ON the start time for a timer recording OFF the end time for a timer recording or the time left until recording stops 8 The display mode of the main display section TITLE title number TRACK track number CHAP chapter number PG programme number PL play list number 9 Volume level meter 10 EXT Link On when EXT LINK functi...

Страница 8: ...r your reference DVD RAM recorded on this unit cannot be played on incompatible players including players manufactured by Panasonic Using a Panasonic DVD RAM you can record broadcasts that allow you to make one copy such as some satellite broadcasts This unit cannot record PAL signals to discs containing NTSC signals or vice versa This unit cannot record to discs containing both PAL and NTSC signa...

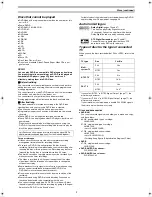
Страница 9: ...timer recordings The video is recorded in a 4 3 aspect irrespective of the video signal input Use the television s screen modes to change the screen size for play Some broadcasts carry signals that allow you to make one copy but you cannot record these broadcast with DVD R Use DVD RAM to record these kinds of broadcast Play may be impossible in some cases due the condition of the recording We reco...

Страница 10: ...g to the code you want to set 1 2 or 3 at the same time Note Be sure to set the same remote control code on the main unit as you did for the remote control itself page 80 Settings Remote The display on the right appears on the unit s display if its code and the remote control s code are different Change the remote control s code to suit the unit The display disappears after about 5 seconds Brand P...

Страница 11: ...nnecting a Satellite Receiver 21 pin Scart socket DVD 21 pin Scart socket TV To AC Mains socket Satellite Receiver not supplied AC Mains lead supplied AC Input socket AV2 21 pin Scart socket AV1 21 pin Scart socket RF Output socket RF Input socket Note 21 pin Scart leads are not supplied 1 Connect the aerial to the RF Input socket of the DVD Recorder 2 Connect the RF lead from the RF Output socket...

Страница 12: ...sc The S in the S Video socket stands for SEPARATED Y C not for S VHS After completing the above connections proceed to the Auto Setup page Page 14 Note The pictures output by this DVD Recorder can only be viewed when connected to a TV by either the Scart lead or S Video socket method Aerial not supplied Aerial Input socket Audio video Input socket TV with S Video Input socket not supplied To AC M...

Страница 13: ...same way 8 Press RETURN to make the Owner ID setting disappear Reference If you use a Panasonic Q Link TV and perform the operation step 1 above starting the downloading of the setup data will automatically display the Download indication However in case of a TV of another make the Download indication may not appear In this case select the AV input on your TV if you want to see the Download indica...

Страница 14: ...ts This takes about 5 minutes 5 To setup the Owner ID repeat the steps 3 8 on the previous page To Set Up this VCR with an existing Q Link TV 1 Switch the TV on 2 Select the AV input on your TV 3 Switch the DVD TV to DVD 4 Press Í Í Í Í to switch the DVD Recorder on Downloading of the setup data starts automatically 5 To setup the Owner ID repeat the steps 3 8 on the previous page TV TV AV PROG CH...

Страница 15: ...the SV V button 3 Enter a Video Plus Code from a Satellite TV Guide for a satellite channel e g Sky 1 using the Numeric buttons If you make a mistake use the joystick 2 2 2 2 to go back 4 Press ENTER ss ss ss ss will appear instead of a channel number AV input 5 Use the joystick 3 4 2 1 to select the channel or AV input that is to be used for recording from the satellite channel 6 Press ENTER to m...

Страница 16: ... screen Press RETURN For your reference Apart from TV Aspect other settings also affect how video appears on your television Check the following if video doesn t appear correctly on your television Connection 4 3 TV Settings for DVD RAM or 4 3 TV Settings for DVD Video page 77 The video setting on the disc How video appears is often specified by the disc itself The video settings on your televisio...

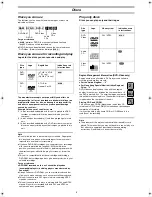
Страница 17: ...Press PAUSE Press again to restart playing ªAuto power off The unit switches to the standby mode after about 2 or 6 hours in the stop mode if you set the time page 75 Settings Off Timer ªWith non cartridge discs 1 Insert label up With double sided discs load so the label for the side you want to play is facing up 2 Guide for 5q 12 cm disc 3 Guide for 3q 8 cm disc 1 2 3 A 1 2 3 TV TV AV PROG CHECK ...

Страница 18: ... starts from where you stopped it ªTo cancel the resume function Press STOP while the indicated part of the center circle appears on the display The position is also cleared when you turn the unit off ªTo start play from a memorized position after turning the unit off Press LAST MARKER during play The message Position Memorized appears on the television Now when you press 1 PLAY after switching th...

Страница 19: ... the button Press 1 PLAY to restart play You will hear sound at speed one only forward when playing DVD RAM DVD R DVD Video and Video CDs You can turn this sound off if you want to page 76 Sound Sound during Search Sound is not heard during follow on play and simultaneous recording and play Slow motion play RAM DVD R DVD V VCD While paused Press 6 SLOW SEARCH or 5 SLOW SEARCH 6 backward does not w...

Страница 20: ...You can also mark positions to skip to page 68 1 Play position 2 Twice 3 Once 4 Chapter track 9 9 1 2 2 3 3 4 4 4 1 2 3 3 4 4 5 6 7 8 TV TV AV PROG CHECK TOP WINDOW TV TEXT STOP SV V REC TIME SLIP AV LINK SETUP AUDIO REC MODE CANCEL INPUT SELECT MANUAL SKIP LAST MARKER DIRECT TV REC TIMER REC 1 2 3 4 5 6 7 8 9 0 PAUSE PLAY STATUS RETURN VOL OPEN CLOSE T C E R I D R O T A G I V A N T O P M E NU M E...

Страница 21: ...ercials easily with this feature Preparation Switch DVD TV to DVD During play Press MANUAL SKIP Play restarts from approximately 30 seconds later Selecting an amount of time to skip Time Slip RAM DVD R Main unit only You can set an amount of time and then skip with one press of a button Preparation Switch DVD TV to DVD 1 During play Turn TIME SLIP on the main unit Turn up to increase in one minute...

Страница 22: ...ays displayed ªWhile playing a television programme recorded on DVD RAM B If it is a recording of a stereo broadcast LR L R ªWhile playing a DVD Video C You can change the audio channel number each time you press the button This allows you to change things like the soundtrack language ªWhile playing a Video CD D LR L R For your reference You can also use the on screen menu icons to change the audi...

Страница 23: ...select the track Repeat step 3 to select other tracks You can also use the joystick to select tracks 1 Press ENTER then use the joystick 3 4 to select the track 2 Press ENTER 4 Press 1 PLAY Play starts in the programmed sequence ªTo move to the page before or after the one shown Press 6 or 5 ªTo clear the programmed tracks one by one 1 Use the joystick 3 4 to select the track you want to clear 2 P...

Страница 24: ... I V A N T O P M E NU M E N U DISPLAY T S I L Y A L P ENTER TV DVD TV ASPECT FRAME SKIP SLOW SEARCH Á 2 3 1 Playing discs continued Random play CD VCD The unit plays the tracks on a disc in random order Preparation Switch DVD TV to DVD 1 While stopped Press TOP WINDOW 2 Use the joystick 3 4 2 1 to select RANDOM PLAY and press ENTER 3 Press 1 PLAY ªTo cancel random play 1 Press until the random pla...

Страница 25: ...on the disc is PAL system only The programme is recorded into the available space on the disc ªTo pause recording Press PAUSE Press again to restart recording ªTo stop recording Press STOP ªTo select channels with the remote control Press the numeric buttons page 6 ªConvenient features Follow on play playing from the beginning of the programme you are recording page 28 Simultaneous recording and p...

Страница 26: ...ing Specify a time to stop recording B RAM DVD R Main unit only This is a simple way of making timer recordings when you are in a hurry or before you go to bed You can set the time up to 4 hours in advance While recording Press REC on the main unit to select the recording time The time increases as illustrated each time you press the button The counter decreases in 1 minute units after you set a t...

Страница 27: ...Direct TV Recording Do not press AV LINK during Direct TV REC otherwise the recording may not be performed correctly 3 Press STOP to stop recording ªLinked timer recordings with external equipment EXT LINK If external equipment for example a satellite receiver with a timer function is connected to the AV2 socket of this unit by a 21 pin cable it is possible to control the recording of the unit fro...

Страница 28: ... part being recorded there will be a small difference in time between the playback image and the recorded signal Approx 4 5 seconds Simultaneous recording and play B RAM You can start play of the programme you are recording or play a programme previously recorded Preparation Switch DVD TV to DVD During recording or timer recording 1 Press TOP MENU DIRECT NAVIGATOR µ is displayed in the direct navi...

Страница 29: ...to increase in one minute units Turn down to decrease in one minute units 2 Press TIME SLIP on the main unit within 5 seconds to enter the time Play starts from the time you entered Note You cannot change the position being played with the remote control ªTo show both the recording and play images Press and hold TIME SLIP for about 3 seconds The picture in picture 2 screen becomes a full screen 1 ...

Страница 30: ...g used Disc display 1 Disc title The disc s title is displayed if one is recorded You can enter titles with Enter Title in DISC INFORMATION page 41 2 Disc protection ON is displayed if you have used Disc Protection in DISC INFORMATION to protect the disc page 42 3 Cartridge Protection ON is displayed if the cartridge s write protect tab is switched to PROTECT page 90 Using the top window RAM DVD R...

Страница 31: ...artial Erase RAM page 53 PLAY Disc play RAM DVD R DVD V CD VCD page 17 RESUME PLAY Start play from the point you stopped play RAM DVD R DVD V CD VCD page 18 CREATE PLAY LIST Creating play lists RAM page 56 PLAY LIST Play Scenes RAM page 58 Playing Play Lists RAM page 57 Edit Scenes RAM page 58 59 60 PL Copy RAM page 61 PL Erase RAM page 62 Enter Title RAM page 63 Properties RAM page 63 TOP MENU ME...

Страница 32: ...pers or in television guides You can programme up to 16 programmes one month in advance Programmes for everyday or every week are counted as one programme Preparation Switch DVD TV to DVD Ensure that this units clock is set correctly Insert a disc for recording make sure there is enough room for the programme you are going to record plus a little extra 1 Press SV V 2 Press the numeric buttons to e...

Страница 33: ...aining time displayed is calculated based on the current recording mode Approximetely 30 seconds at the beginning of subsequent programmes is not recorded when use timer recording to record multiple programmes to a DVD R Recording is not possible unless you set Disc Protection in DISC INFORMATION to Off You can not record to a disc if the write protect tab on a cartridge disc is set to protect Rel...

Страница 34: ...ewspaper magazine To activate the PDC Function Use the joystick 3 4 to make the ON indication appear ªIf appears under Pos Name after entering a Video Plus code Pos Name stands for Programme Position TV Station Name Normally the name of the TV station or the number of the programme position is displayed under Pos Name However if the TV station information was not automatically set during Preset Do...

Страница 35: ...ding make sure there is enough room for the programme you are going to record plus a little extra 1 Press PROG CHECK The Timer Programme List screen appears A line that is ready for programming highlighted 2 Press ENTER The Timer Programme Correction screen appears 3 Use the joystick 1 to move through the items and change the items with the joystick 3 4 The current settings are shown each time you...

Страница 36: ...rogramme Correction screen 2 Move through the items with the joystick 1 and change the settings with the joystick 3 4 and press ENTER To clear a timer recording programme Press CANCEL while the programme s Timer Programme Correction screen is being shown Alternatively use the joystick 3 4 to select the programme in the Timer Programme List screen and press CANCEL You can not delete programmes that...

Страница 37: ...d to record for some other reason ªTo change the programme page 36 ªTo exit from the Timer Programme List screen Press PROG CHECK or RETURN The programme the television is tuned to is shown For your reference Programmes that failed to record are displayed grey These programmes are deleted from the list at 4 a m the day after tomorrow Starting and canceling programmes ªTo put the unit on recording ...

Страница 38: ...de XP SP LP or EP page 26 1 While stopped Press W X or INPUT SELECT to select the input channel for the equipment you have connected Select AV1 AV2 AV3 or AV4 2 Start play on the other equipment 3 Press REC at the point you want to start recording When connected to DV equipment RAM DVD R You can record audio and video being played on a DV equipment connected to the input terminals Preparation Befo...

Страница 39: ...y on the other equipment as well For your reference Poor video quality or colouring may indicate that the material you are recording has copy protection DV Source page 8 Audio Mode for DV Input Bilingual Selection for DVD R REC Output AUDIO L ch R ch STEREO STEREO1 M1 L1 R1 STEREO2 L2 R2 Mix L1 L2 R1 R2 Bilingual STEREO1 L1 L1 STEREO2 L2 L2 Mix L1 L2 R1 R2 STEREO STEREO1 M2 L1 R1 STEREO2 L2 R2 Mix...

Страница 40: ...al letters 3 Lower case letters 4 Numbers 5 Symbols 6 ERASE 7 SET when you have finished entering text 8 SPACE ªTo enter other characters Repeat step 1 2 Use the joystick 3 4 2 1 to select SET and press ENTER The title is entered and the screen disappears ªTo correct a character 1 Use the joystick 3 4 2 1 to select the character you want to correct in the title field 2 Use the joystick 3 4 to move...

Страница 41: ...te protect and write enable DVD RAM Disc Protection You can format DVD RAM Format You can finalize DVD R so they can be played on compatible DVD players Finalize Enter Title RAM DVD R Each disc can be given a different title Preparation Switch DVD TV to DVD Insert a disc you have recorded on 1 While stopped Press TOP WINDOW 2 Use the joystick 3 4 2 1 to select DISC INFORMATION and press ENTER 3 Us...

Страница 42: ... TV ASPECT FRAME SKIP SLOW SEARCH Á 2 3 4 1 DISC INFORMATION continued Disc Protection RAM This allows you to protect discs from accidental erasure Preparation Switch DVD TV to DVD Insert the disc you want to protect 1 While stopped Press TOP WINDOW 2 Use the joystick 3 4 2 1 to select DISC INFORMATION and press ENTER 3 Use the joystick 3 4 to select Disc Protection and press ENTER 4 Use the joyst...

Страница 43: ...ASPECT FRAME SKIP SLOW SEARCH Á 2 3 4 1 DISC INFORMATION continued Releasing disc protection RAM This allows you to release disc protection Preparation Switch DVD TV to DVD Insert the disc you want to release protection 1 While stopped Press TOP WINDOW 2 Use the joystick 3 4 2 1 to select DISC INFORMATION and press ENTER 3 Use the joystick 3 4 to select Disc Protection and press ENTER 4 Use the jo...

Страница 44: ... disc is formatted Check the disc carefully before formatting to ensure it doesn t contain any programmes you want to keep ªTo stop formatting Select No in step 4 or Cancel in step 5 and press ENTER Or Press RETURN Note Do not turn the unit off or disconnect the AC power supply cord while the message Formatting the disc is on the television This can render the disc unusable This can take up to 70 ...

Страница 45: ... DVD Insert the disc you want to finalize 1 While stopped Press TOP WINDOW 2 Use the joystick 3 4 2 1 to select DISC INFORMATION and press ENTER 3 Use the joystick 3 4 to select Finalize and press ENTER 4 Use the joystick 2 to select Yes and press ENTER 5 Use the joystick 2 to select Start and press ENTER Finalizing starts The message Finalizing is finished appears when finalizing is finished Note...

Страница 46: ...IRECT NAVIGATOR and press ENTER The programme list appears The images for the currently highlighted list are played in the background 3 Use the joystick 3 4 to select the programme you want to watch and press ENTER or 1 PLAY Play of the images that were playing in the background continues ªTo clear the programme list Press TOP MENU DIRECT NAVIGATOR or RETURN For your reference You can also display...

Страница 47: ...ed when the programme is being recorded f Scroll bar If there are more than six programmes you can move down the list by using the joystick 3 4 and this bar shows your approximate position in the list g Total number of programmes Shows the total number of programmes h Sub menu Displayed when you use the joystick 1 You can see this during simultaneous recording and play but you are unable to perfor...

Страница 48: ...efore erasing it to ensure it isn t one you want to keep Preparation Switch DVD TV to DVD Insert a disc you have recorded on 1 While stopped Press TOP WINDOW 2 Use the joystick 3 4 2 1 to select DIRECT NAVIGATOR and press ENTER 3 Use the joystick 3 4 to select the programme you want to erase 4 Use the joystick 1 so the submenu appears 5 Use the joystick 3 4 to select Erase Programme and press ENTE...

Страница 49: ...or continued Entering and editing programme titles RAM DVD R Preparation Switch DVD TV to DVD Insert a disc you have recorded on 1 While stopped Press TOP WINDOW 2 Use the joystick 3 4 2 1 to select DIRECT NAVIGATOR and press ENTER 3 Use the joystick 3 4 to select the programme whose title you want to enter or edit 4 Use the joystick 1 so the submenu appears 5 Use the joystick 3 4 to select Enter ...

Страница 50: ... you want to check 4 Use the joystick 1 so the submenu appears 5 Use the joystick 3 4 to select Properties and press ENTER The contents of the programme are shown ªTo return to the previous screen Press RETURN TV TV AV PROG CHECK TOP WINDOW TV TEXT STOP SV V REC TIME SLIP AV LINK SETUP AUDIO REC MODE CANCEL INPUT SELECT MANUAL SKIP LAST MARKER DIRECT TV REC TIMER REC 1 2 3 4 5 6 7 8 9 0 PAUSE PLAY...

Страница 51: ...rotection and press ENTER 6 Use the joystick 2 to select Yes and press ENTER The padlock mark appears ªTo stop partway through Select No in step 6 and press ENTER Or Press RETURN For your reference Programmes will be erased even if they are protected if you format the disc with DISC INFORMATION page 44 TV TV AV PROG CHECK TOP WINDOW TV TEXT STOP SV V REC TIME SLIP AV LINK SETUP AUDIO REC MODE CANC...

Страница 52: ...the direct navigator continued Releasing programme protection RAM Preparation Switch DVD TV to DVD Insert a disc you have recorded on 1 While stopped Press TOP WINDOW 2 Use the joystick 3 4 2 1 to select DIRECT NAVIGATOR and press ENTER 3 Use the joystick 3 4 to select the programme you want to unprotect 4 Use the joystick 1 so the submenu appears 5 Use the joystick 3 4 to select Protection and pr...

Страница 53: ...he programme are erased completely when you use this procedure and cannot be retrieved Check the programme carefully to ensure it isn t one you want to keep Preparation Switch DVD TV to DVD Insert a disc you have recorded on 1 While stopped Press TOP WINDOW 2 Use the joystick 3 4 2 1 to select DIRECT NAVIGATOR and press ENTER 3 Use the joystick 3 4 to select the programme which contains the part y...

Страница 54: ...ted with the erased part are also erased ªTo stop partway through Select Cancel in step 9 and press ENTER Or Press RETURN ªTo erase another part of the same programme Select Next in step 8 then repeat steps 6 7 and 9 For your reference You can respecify the start or end points The points you specify last are used You cannot specify an end point before a start point or a start point after an end po...

Страница 55: ...AY LIST or RETURN The screen returns to the state it was in before you called up the play list ªWhat you can do with the play list screen Create play lists page 56 Play play lists page 57 Select a scene to play page 58 Add move re edit and erase scenes pages 58 59 60 Copy play lists page 61 Erase play lists page 62 Give play lists titles page 63 Check a play list s contents page 63 For your refere...

Страница 56: ...URN ªTo clear the play list screen Press MENU PLAY LIST or RETURN The screen returns to the state it was in before you called up the play list ªTo specify another scene Select Next after step 4 and press ENTER then repeat steps 3 and 4 For your reference One disc can have a maximum of 99 play lists and 999 scenes These numbers may be reduced under some conditions You can respecify the start or end...

Страница 57: ...ay list screen by pressing MENU PLAY LIST at step 1 You can fast forward rewind pause and slow motion while playing scenes just as you can during normal play You can also select play lists from the list in step 3 by entering a 2 digit number with the numeric buttons page 6 and pressing ENTER If you enter a number larger than the total number of play lists the last play list is selected TV TV AV PR...

Страница 58: ...4 Use the joystick 3 4 to select Edit Scenes and press ENTER 5 Use the joystick 2 1 to select Add and press ENTER 6 Use the joystick 3 4 2 1 to select the scene after the position you want to add the scene and press ENTER 7 Use search functions such as fast forward and slow motion to find the start point of the scene and press ENTER 8 Use search functions such as fast forward and slow motion to fi...

Страница 59: ...sert a disc you created play lists on 1 While stopped Press TOP WINDOW 2 Use the joystick 3 4 2 1 to select PLAY LIST and press ENTER 3 Use the joystick 3 4 to select the play list you want to edit and press 1 4 Use the joystick 3 4 to select Edit Scenes and press ENTER 5 Use the joystick 2 1 to select Move and press ENTER 6 Use the joystick 3 4 2 1 to select the scene you want to move and press E...

Страница 60: ... press ENTER 7 Use search function such as fast forward and slow motion to find the start point of the scene and press ENTER 8 Use search functions such as fast forward and slow motion to find the end point of the scene and press ENTER 9 Use the joystick 3 4 to select Exit and press ENTER ªTo re edit another scene 1 Use the joystick 3 4 after step 8 to select Next or Back and press ENTER until you...

Страница 61: ...ing play lists to edit programmes continued Copying play lists RAM Preparation Switch DVD TV to DVD Insert a disc you created play lists on 1 While stopped Press TOP WINDOW 2 Use the joystick 3 4 2 1 to select PLAY LIST and press ENTER 3 Use the joystick 3 4 to select the play list you want to copy and then use the joystick 1 4 Use the joystick 3 4 to select PL Copy and press ENTER 5 Use the joyst...

Страница 62: ...H Á 2 3 4 5 1 Using play lists to edit programmes continued Erasing a play list RAM Preparation Switch DVD TV to DVD Insert a disc you created play lists on 1 While stopped Press TOP WINDOW 2 Use the joystick 3 4 2 1 to select PLAY LIST and press ENTER 3 Use the joystick 3 4 to select the play list you want to delete and use the joystick 1 4 Use the joystick 3 4 to select PL Erase and press ENTER ...

Страница 63: ...2 3 4 1 Using play lists to edit programmes continued Titling play lists RAM Preparation Switch DVD TV to DVD Insert a disc you created play lists on 1 While stopped Press TOP WINDOW 2 Use the joystick 3 4 2 1 to select PLAY LIST and press ENTER 3 Use the joystick 3 4 to select the play list you want to title and then move the joystick 1 4 Use the joystick 3 4 to select Enter Title and press ENTER...

Страница 64: ...ach time you press the button Icons for disc information a l l Icons for unit information b l Original display c 2 Icons for unit information only While the leftmost icon is highlighted Use the joystick 3 4 to select the menu Each time you move the joystick Play menu d l l Video menu e l Audio menu f 3 Use the joystick 2 1 to select the item 4 Use the joystick 3 4 to select the setting Some option...

Страница 65: ...D V Turn the subtitles on or off Angle number DVD V Change the number to select an angle Audio channel RAM VCD Select the audio channel page 22 Menu play VCD with playback control only Indicates whether menu play playback control is on or off Cannot be changed here A Soundtrack Subtitle language B Audio attributes LPCM Î Digital DTS MPEG Signal type k kHz Sampling frequency b bit Number of bits ch...

Страница 66: ...e mode C Cinema mode mellows movie enhances detail in dark scenes U1 U2 User mode To change the user mode 1 Select User mode and move the joystick 1 2 Use the joystick 3 4 to select U1 or U2 3 Use the joystick 2 1 to select the item you want to change 4 Use the joystick 3 4 to change the setting MPEG DNR RAM DVD R DVD V VCD Displayed when the picture mode is N S F or C You can turn on and off the ...

Страница 67: ...tion between points A and B within a programme title or chapter Preparation Switch DVD TV to DVD Press DISPLAY DISPLAY to display the on screen menu icons and use the joystick 1 to highlight the A B repeat icon pages 64 and 66 During play Press ENTER The display changes as illustrated A B repeat starts when you specify point B Note A B repeat does not work if the DVD s elapsed play time is not sho...

Страница 68: ...rk To play from a marked position Preparation Switch DVD TV to DVD Press DISPLAY DISPLAY to display the on screen menu icons and use the joystick 1 to highlight the marker icon pages 64 and 66 1 Press ENTER 2 Use the joystick 2 1 to select a marker number 3 Press ENTER RAM DVD R When selecting markers 11 and above 1 Use the joystick 2 1 to highlight the marker pin icon 2 Use the joystick 3 4 to se...

Страница 69: ...uring recording as this will cause recording to stop One recording session from where recording is started to where it is stopped is counted as one programme and a play list is automatically created You can divide the recording into scenes by detecting the parts that REC is pressed during recording of the DV equipment The date of the first recording is used as the programme s title If Hybrid VBR R...

Страница 70: ...gnal to 48 kHz to enjoy this type of audio For your reference The equipment connections described are examples Before connection turn off all equipment and read the appropriate operating instructions Note You can enjoy Dolby Digital in stereo with this unit alone This unit does not have a DTS decoder Enjoying 5 1 channel surround sound with Dolby Digital and DTS Digital connection Connect to an am...

Страница 71: ... bit linear PCM When recording DVDs ensure the following conditions are met There is no copy guard recorded on the disc The recording equipment can handle a sampling frequency of 48 kHz 16 bit If you want to use the synchro recording feature on your digital recording equipment and you use connection A or B to record from CDs or video CDs first pause at the point you want to record from activate th...

Страница 72: ...rate Red Green Blue colour signals If you connect a TV equipped with RGB input capability to the AV1 socket on this unit and a decoder equipped with RGB output capability to the AV2 socket RGB signal will pass through the unit to the TV Connecting a satellite receiver or digital receiver D 1 Satellite receiver not supplied 2 21 pin Scart socket 3 21 pin Scart cable not supplied Connect a 21 pin Sc...

Страница 73: ...t to L MONO Both left and right channels are recorded when connected through L MONO When connecting to the input terminals on the rear of the unit Audio Video cable 1 Yellow VIDEO 2 White L 3 Red R Rear panel of this unit 4 S Video cable not supplied 5 Audio Video cable not supplied 6 Other playback equipment Connect to the video and audio output terminals Note If audio output on the other equipme...

Страница 74: ...onnection Select the menu s tab to display the items 2 Items A list of items in the menu you selected 3 Options This shows the current settings The options are shown when you select an item 2 Use the joystick 2 1 to select the menu s tab 3 Use the joystick 3 4 to select the item you want to change and press ENTER 4 Use the joystick 3 4 to select the option and press ENTER Some options require diff...

Страница 75: ...sponding ratings recorded on them 0 Lock All Prohibits play of all DVD Video Changing ratings When level 0 7 is selected Unlock Recorder Change Level Change Password Temporary Unlock Language code list Abkhazian 6566 Afar 6565 Afrikaans 6570 Albanian 8381 Ameharic 6577 Arabic 6582 Armenian 7289 Assamese 6583 Aymara 6588 Azerbaijani 6590 Bashkir 6665 Basque 6985 Bengali Bangla 6678 Bhutani 6890 Bih...

Страница 76: ...where scenes change Some play lists cannot be played seamlessly Off The points where scenes in play lists are played accurately but this may cause the picture to freeze for a moment when scenes change Sound Sound During Search RAM DVD R DVD V VCD Choose whether to have sound during search On Off Dynamic Range Compression DVD V Dolby Digital only Change the dynamic range for late night viewing On O...

Страница 77: ...er TU DSF30 S3 is connected for the linked timer recordings Ext Link2 When an external equipment with a timer function is connected for the linked timer recordings AV2 Input Video S Video Input signal TV System PAL NTSC Note PAL Select to record television programmes and PAL input from other equipment NTSC Select to record NTSC input from other equipment Television programmes cannot be recorded pr...

Страница 78: ...OUT terminal PCM Down Conversion No factory setting When you have used audio cables to connect the unit to other equipment analogue connection B page 71 Yes When you have used an optical digital cable to connect the unit to other equipment digital connection A page 71 Output is limited to 48 kHz 16 bit Output of audio with a sampling frequency of 96 kHz Audio is output as follows in accordance wit...

Страница 79: ... settings continued Off Timer Setting Preparation Switch DVD TV to DVD 1 Press SET UP The SET UP screen appears 2 Use the joystick 2 1 to select Settings tab 3 Use the joystick 3 4 to select Off Timer and press ENTER 4 Use the joystick 3 4 to select 2H 6H or Off and press ENTER 2H The unit s power is automatically turned off if no operation has been performed for about 2 hours or more 6H The unit ...

Страница 80: ... 3 4 to select Remote and press ENTER 4 Use the joystick 3 4 to select DVD 1 DVD 2 or DVD 3 and press ENTER DVD 1 Select this setting on both the unit and the remote control for normal use with one unit DVD 2 DVD 3 Select this setting on both the unit and the remote control when using this unit and another Panasonic unit in the same place This ensures that you can operate both units independently ...

Страница 81: ...e clock to correct time Under some reception conditions however the unit cannot set the clock automatically In this case follow the operation steps below to manually set the clock Manual Clock Setting Preparation Switch DVD TV to DVD 1 Press SET UP The SET UP screen appears 2 Use the joystick 2 1 to select Settings tab 3 Use the joystick 3 4 to select Clock and press ENTER 4 Use the joystick 3 4 t...

Страница 82: ...3 4 to select Clock and press ENTER 4 Use the joystick 3 4 to select On of Automatic and press ENTER Auto clock setting starts Under adverse reception conditions etc the automatic time correction function may not work In this case the indication for Automatic is automatically reset to Off If the reception conditions improve later on it may be possible to activate this function The following screen...

Страница 83: ...sired field and press ENTER Pos To change the order in which the TV stations are assigned to the programme positions Press the numeric buttons to enter the number of the desired programme position Name To enter or change the name of a TV station Use the joystick 3 4 2 1 to enter station name and press ENTER If the station name needs a blank space select the blank between Z and Channel To enter new...

Страница 84: ...gs tab 3 Use the joystick 3 4 to select Tuning and press ENTER 4 Use the joystick 3 4 to select Manual and press ENTER 5 Use the joystick 3 4 2 1 to select the desired TV station and use the colour buttons to select Delete Add Move Follow the operations below To delete a programme position Delete Press the TIME SLIP red To insert a blank programme position Add Press the MANUAL SKIP green To move a...

Страница 85: ...load or Shipping Condition 5 Press the ENTER prepare for Auto Setup start Download start or resetting the unit to the shipping condition Press the ENTER again to actually start the Auto Setup start the Download or change the settings back to the shipping condition After returning the unit to the shipping condition disconnect and reconnect the AC mains lead to re tune the unit 6 A message appears a...

Страница 86: ...me recording mode and a rough guide to how much space has been used for recording on the disc 4 Elapsed play time 5 Play position 6 Current media 7 Current recording or play status input channel Shows the current state of the unit and the input channel REC Recording PAUSE Recording paused PLAY Playing Playing Paused 5 Fast forwarding 5 speeds 6 Rewinding 5 speeds D Slow motion 5 speeds E Reverse s...

Страница 87: ...rs available on the market Do not use discs that are badly warped or cracked ªDo not place or store discs in the following places Locations exposed to direct sunlight Humid or dusty locations Locations directly exposed to a heat vent or heating appliance Bitstream This is the compressed form of digital signals A decoder decodes these signals into 5 1 surround and multi channel signals Channel when...

Страница 88: ... point where recording is started and the point where it is stopped Sampling frequency This is the number of samples of sound taken per second during conversion to a digital signal A high sampling frequency results in a sound close to the original when played back S video output The colour and luminance signals are separated before being sent to the television making for greater picture clarity Q ...

Страница 89: ...play doesn t disappear You have inserted a disc the unit cannot play or record on Insert a disc the unit can play or record on page 8 U14 The unit is hot The unit switches to standby automatically for safety reasons and you cannot operate it Wait for about 30 minutes for the service number to disappear Select a position with good ventilation when installing the unit Do not block the cooling fan on...

Страница 90: ...ontents of this disc are protected The programme is write protected Release the protection with the direct navigator page 52 The disc is write protected Release the protection with the disc protection sub menu of DISC INFORMATION page 43 Cannot finish recording completely The programme was copy protected The disc is full Recording was not completed for some other reason Cannot record on the disc T...

Страница 91: ...be solved by using a signal booster available from audio visual suppliers Consult your dealer if reception does not improve Screen size is wrong Check the settings on your television Check the settings for TV Aspect 4 3 TV Settings for DVD Video or 4 3 TV Settings for DVD RAM in the Connection menu pages 16 and 77 On screen messages do not appear Go to Display in the SET UP menus and select Automa...

Страница 92: ...and subtitles cannot be selected The languages are not recorded on the disc You may have to use the disc s menus to select languages Soundtrack subtitle language not the one selected with the SET UP menus The language is not recorded on the disc page 75 No subtitles Subtitles are not recorded on the disc Turn the subtitles on page 65 Angle cannot be changed This function depends on software availa...

Страница 93: ...ing does not work properly The timer programme is incorrect Make corrections to the programme and check them when you are finished pages 33 and 36 The unit is not on standby for timer recording Á on the unit s display is not on Different timer programme times overlap page 32 The clock is wrong Go to Settings in the SET UP menus and correct the clock with Clock page 81 The unit switches to standby ...

Страница 94: ...erminal PCM Dolby Digital DTS MPEG Television System Tuner System PAL I 75 ohm Channel Coverage For the United Kingdom UHF CH 21 68 For Hong Kong Special Administrative Region of China UHF CH 21 69 RF Converter Output Not provided Video Video System PAL colour signal 625 lines 50 fields NTSC colour signal 525 lines 60 fields Recording system MPEG2 Hybrid VBR Video In AV1 AV2 21 pin AV3 AV4 pin jac...

Страница 95: ...on play 28 Format 44 Frame by frame 19 ªM Manual tuning 83 Marker 68 MENU 18 MPEG 66 78 ªO Off timer 79 Owner ID 13 85 ªP PDC 34 88 PLAY 17 PLAY LIST 55 88 PROGRAMME PLAY 23 ªQ Q Link 13 88 ªR RANDOM PLAY 24 Ratings 75 78 Recording 25 38 Recording modes 26 Repeat play 67 RESUME PLAY 18 ªS Search 19 SET UP 74 ShowView 32 Simultaneous recording and play 28 Slow motion 19 Subtitle 65 75 ªT Time Slip ...

Страница 96: ...Matsushita Electric Industrial Co Ltd Web Site http www panasonic co jp global RQT6037 B F0901Ny0 ...

Отзывы: