background image

25

RQT8365

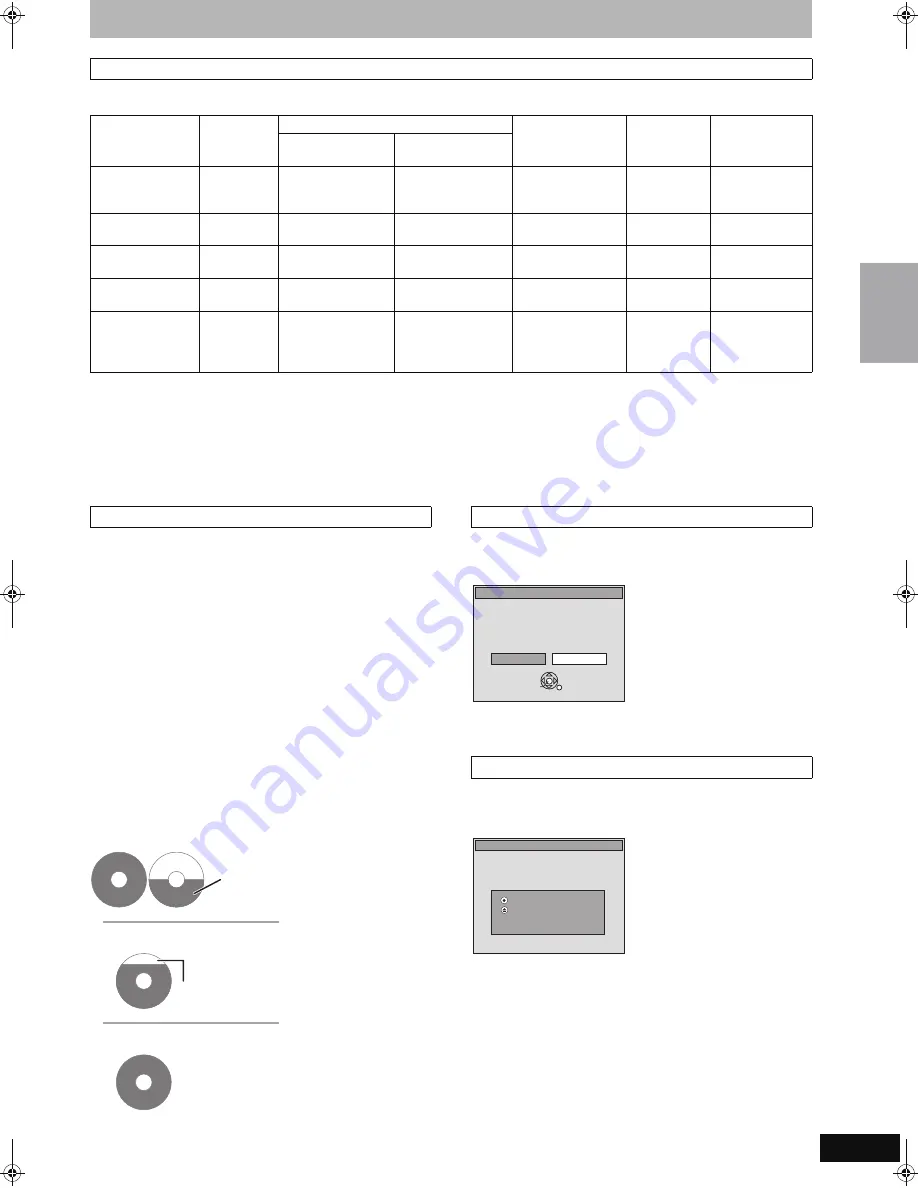
Depending on the content being recorded, the recording times may become shorter than indicated.
(The times provided on this chart are an estimate.)

§

1

It is not possible to record or play continuously from one side of a double sided disc to the other.

§

2

When “Recording Time in EP Mode” is set to “EP (6H)” in the Setup menu (

61).

The sound quality is better when using “EP (6H)” than when using “EP (8H)”.

§

3

You cannot directly record to these discs with this unit. The table shows the recording time when copying.

§

When recording to the HDD in FR mode (recordings 5 hours or longer) or EP mode, you cannot perform high-speed copy to +R, +R DL or +RW 
discs.

[RAM]

 When recording to DVD-RAM using EP (8H) mode, play may not be possible on DVD players that are compatible with DVD-RAM. Use EP 

(6H) mode if playback may be on other equipment.

The unit automatically selects a recording rate between XP and EP 
(8H) that will enable the recordings to fit in the remaining disc space 
with the best possible recording quality.

You can set FR (Flexible Recording) mode when using Flexible 
recording (

 26), programming scheduled recordings (

 29, 

Manually programming scheduled recordings) or copying (

 51, 

step 5).

Using “Flexible Recording” is convenient in 
these kinds of situations.

[RAM]


[-R]


[-RW‹V›]


[+R] [+RW]

When the amount of free space on the disc makes selecting an 
appropriate recording mode difficult

When you want to record a long program with the best picture 
quality possible

[HDD]

When you want to record a title to HDD so that it can then be 
copied to fit one 4.7 GB disc perfectly.
You do not need to edit the recorded title, or change the recording 
mode when copying, to fit the disc space.

e.g., Recording a 90 minutes program to disc

[RAM]


[-RW‹V›]


[+R] [+R]DL]


[+RW]

When you insert a new disc or a disc recorded on a computer or 
other equipment, a format confirmation screen is displayed. Format 
the disc to use it. However, all the recorded contents will be deleted.

Press [

2

,

1

] to select “Yes” and press [ENTER].

Several steps are necessary to format a disc. Refer to “Deleting all 

the contents of a disc or card—Format” (

57)

[-R] [-R]DL]


[-RW‹V›] [+R] [+R]DL]


When you press [

<

OPEN/CLOSE] on the main unit while stopped: 

The following screen appears when you have not processed the disc 
for play on other equipment.

To finalize the disc

Press [

¥

REC] on the main unit. 

You cannot stop this process once you have started it.

If you want to set the background, view the menu select screen or 

provide a disc name, select “Top Menu Style”, “Playback will start 
with:” (

 58) or “Disc Name” (

 56) in “DVD Management” before 

finalizing.

To open the tray without disc finalization

Press [

<

OPEN/CLOSE] on the main unit.

Recording modes and approximate recording times

HDD

(200 GB)

DVD-RAM

DVD-R

DVD-RW, +R

+RW (4.7 GB)

DVD-R DL 

§

3

(8.5 GB)

+R DL 

§

3

(8.5 GB)

Recording Mode

Single-sided

(4.7 GB)

Double-sided

§

1

(9.4 GB)

XP (High picture 
quality recording 
mode)

44 h

1 h

2 h

1 h

 1 h 45 min

 1 h 45 min

SP (Standard 
recording mode)

89 h

2 h

4 h

2 h

 3 h 35 min

3 h 35 min

LP (Long recording 
mode)

177 h

4 h

8 h

4 h

 7 h 10 min

 7 h 10 min

EP (Extra long 
recording mode)

§

4

355 h

(266 h

§

2

)

8 h (6 h

§

2

)

16 h (12 h

§

2

)

8  h  (6  h

§

2

)

 14 h 20 min

(10 h 45 min

§

2

)

Cannot copy

FR (Flexible 
Recording mode)

§

4

355 h 

maximum

8 h maximum

8 h maximum for one 

side

8 h maximum

 14 h 20 min

Approximately 9 h 

with video quality 

equivalent to LP 

mode.

FR (Flexible Recording)

4.7 GB

DVD-RAM

4.7 GB

DVD-RAM

4.7 GB

DVD-RAM

4.7 GB

DVD-RAM

If you select XP mode, the program will not fit one disc.

A second disc is necessary for 
30 minutes of the program.

If you select SP mode, the program will fit one disc.

However there will be 30 minutes remaining 
disc space.

If you select “Flexible Recording” the program will fit one disc 
perfectly.

When the format confirmation screen is displayed

When removing a recorded disc

ENTER

This disc is not formatted properly.
Do you want to format the 
disc in DVD Management?

Format

No

Yes

Finalizing is necessary to enable playback 
of the disc on compatible DVD players. 
Once finalized, titles cannot be added to the disc. 

It will take approximately 

±

 minutes. Start ?

Make compatible for playback on other DVD players ( Finalize )

Press 

REC

 to start finalizing.

Press the OPEN/CLOSE button to postpone 
finalizing. The disc can be played only on 
this unit. You can Finalize it later.

Re

co

rd

in

g

 te

le

visio

n

 p

ro

g

ra

m

s

EH55English.book  Page 25  Thursday, April 6, 2006  9:28 PM

Содержание DMR-EH55S

Страница 1: ...al for future reference Region number supported by this unit Region numbers are allocated to DVD players and DVD Video according to where they are sold The region number of this unit is 1 The unit will play DVDs marked with labels containing 1 or ALL Example 1 ALL 2 4 1 If you have any questions contact In the U S A 1 800 211 PANA 7262 In Canada 1 800 561 5505 For U S A only The warranty can be fo...

Страница 2: ...e exclamation point within an equilateral triangle is intended to alert the user to the presence of important operating and maintenance servicing instructions in the literature accompanying the ap pliance RISK OF ELECTRIC SHOCK DO NOT OPEN CAUTION DO NOT INSTALL OR PLACE THIS UNIT IN A BOOKCASE BUILT IN CABINET OR IN ANOTHER CONFINED SPACE ENSURE THE UNIT IS WELL VENTILATED TO PREVENT RISK OF ELEC...

Страница 3: ...ing on screen menus 42 Delete Navigator to delete titles 43 Deleting titles or pictures during play 43 Editing titles chapters 44 Editing titles chapters and playing chapters 44 Title operations 45 Chapter operations 45 Creating editing and playing playlists 46 Creating playlists 46 Editing and playing playlists chapters 47 Playlist operations 47 Chapter operations 47 Editing still pictures 48 Alb...

Страница 4: ...ingle side You cannot directly record to a DVD R DL disc on this unit 8 DVD RW 4 7 GB 12 cm 5z 1 4 GB 8 cm 3z Logo Indicated in these instructions by R before finalization R DL before finalization RW V before finalization DVD V after finalization DVD V after finalization DVD V after finalization Recording format DVD Video format This recording method is the same as commercially available DVD Video...

Страница 5: ...ecording format VR R RW Video Recording format This is a method for recording moving pictures to R RW discs You can playback such discs recorded in this method in a similar way as contents recorded in the DVD Video format Digital broadcasts that allow One time only recording cannot be recorded After finalizing the disc or creating the top menu you can play the disc on DVD players and other equipme...

Страница 6: ...y have been recorded to a CPRM compatible disc By formatting 57 the disc you can record to it in DVD Video format and play it on this unit It may be necessary to finalize the disc on the equipment used for recording Disc type DVD R CD Video CD Logo Indicated in these instructions by DivX CD DivX MP3 JPEG TIFF VCD Instructions DVD R with video recorded in DivX Recorded audio and music including CD ...

Страница 7: ...r of files tracks recognizable 1 999 files tracks Bit rates 32 kbps to 320 kbps Sampling frequency 16 kHz 22 05 kHz 24 kHz 32 kHz 44 1 kHz 48 kHz ID3 tags not compatible Playable discs and cards HDD RAM SD CD File format JPEG TIFF non compressed RGB chunky format Files must have the extension jpg JPG tif or TIF Number of pixels between 34k34 and 6144k4096 pixels Sub sampling is 4 2 2 or 4 2 0 Numb...

Страница 8: ...speed mode 49 however the above settings are necessary before recording to the HDD Recording of digital broadcasting It is not possible to record digital broadcasts that allow One time only recording onto DVD R DVD RW R RW or 8 cm 3z DVD RAM discs Use the HDD or CPRM 76 compatible DVD RAM One time only recording titles can only be transferred from the HDD to CPRM compatible DVD RAM They are delete...

Страница 9: ...right away because the HDD takes time to be re activated When not using the unit we recommend removing the disc in the tray in order to set the HDD to the SLEEP mode Setup precautions Do not place in an enclosed area where the rear cooling fan and the cooling vents on the side are covered up Place the unit on a surface that is flat and not subject to vibration or impact Do not place on anything th...

Страница 10: ... the operating environment Carefully read the lens cleaner s instructions before use Note Do not obstruct the rear panel s internal cooling fan When the card indicator SD on the unit s display is flashing the card is being read from or written to Do not turn off the unit or remove the card Such action may result in malfunction or loss of the card s contents Inserting foreign objects can cause a ma...

Страница 11: ...efer to Accessory Purchases on page 78 Only for Canada To order accessories call the dealer from whom you have made your purchase 1 Remote control EUR7659YR0 1 AC power supply cord K2CB2CB00018 1 75 coaxial cable K2KZ2BA00001 2 Batteries for remote control For use with this unit only Do not use it with other equipment Also do not use cords for other equipment with this unit 1 Audio video cable K2K...

Страница 12: ...M SKIP CM SKIP STATUS STATUS REC MODE REC MODE DISPLAY DISPLAY REC REC AUDIO AUDIO Info Info CREATE CREATE CHAPTER CHAPTER ENTER ENTER F U N C T I O N S D I R E C T N A V I G A T O R TVGUIDE RETURN RETURN SUB MENU SUB MENU S SCHEDULE SCHEDULE TIME SLIP TIME SLIP PLAY x1 3 PAUSE PAUSE STOP STOP SLOW SEARCH SLOW SEARCH SKIP SKIP DELETE DELETE VCR Plus VCR Plusi CH CH PAGE PAGE SELECT INPUT CANCEL 0 ...

Страница 13: ... will need to eject the disc and turn it over Automatic drive select function RAM Only for discs with the write protect tab on the cartridge set to PROTECT 56 Cartridge protection DVD V DVD A VCD CD If the unit is stopped or recording to the HDD it automatically switches to the DVD drive when a disc is inserted If you eject a disc and close the disc tray the HDD drive is automatically selected 1 2...

Страница 14: ... video cassette recorder to the television video signals will be affected by copyright protection systems and the picture may not be shown correctly Television VCR This unit A Connection with a television B Connection with a television and a video cassette recorder VHF UHF RF IN AUDIO IN R L VIDEO IN COMPONENT VIDEO OUT PR Y PB IN1 AV OUT IN3 S VIDEO VIDEO R AUDIO L DIGITAL AUDIO OUT PCM BITSTREAM...

Страница 15: ... VIDEO R AUDIO L S VIDEO RF OUT RF IN VHF UHF AC IN OUT2 OUT1 IN OUT RF OUT VIDEO S VIDEO R L AUDIO OUT IN RF Satellite Cable 10 6 3 7 8 9 4 1 2 5 IN3 Video cassette recorder If your television does not have AUDIO VIDEO terminals 17 c If you would like to enjoy higher picture quality 18 19 Television Cable from the wall or antenna signal Satellite antenna satellite receiver only Cable box or Direc...

Страница 16: ...higher picture quality 18 19 75 coaxial cable This unit Audio Video cable included Red White Yellow To a household AC outlet AC 120 V 60 Hz AC power supply cord included Connect only after all other connections are complete Satellite receiver 75 coaxial cable included Audio Video cable Red White Yellow Satellite antenna Red White Yellow Red White Yellow VHF UHF RF IN AUDIO IN R L VIDEO IN VHF UHF ...

Страница 17: ... IN VIDEO R L IN RF OUT RF S VIDEO AUDIO COMPONENT VIDEO OUT PR Y PB IN1 IN3 R VIDEO R AUDIO L S VIDEO RF OUT RF IN VHF UHF OUT2 OUT1 4 3 OUT Television This unit RF modulator 75 coaxial cable 75 coaxial cable Video cassette recorder Red White Yellow Red White Yellow Audio Video cable included d Connection with a television and a cable box or DirecTV receiver 15 C e Connection with a television an...

Страница 18: ...N1 IN3 V R AUDIO L VIDEO R AUDIO L S VIDEO RF OUT RF IN VHF UHF OUT2 OUT1 This unit Television Audio Video cable S Video cable Red White Red White Connecting to the COMPONENT VIDEO IN terminals COMPONENT VIDEO IN AUDIO IN R L COMPONENT VIDEO OUT PR Y PB IN1 IN3 VID R AUDIO L VIDEO R AUDIO L S VIDEO RF OUT RF IN VHF UHF OUT2 OUT1 This unit Television Audio Video cable Component video cable Red Whit...

Страница 19: ...rn off at the same time in the following conditions When you pressed REC and the unit is still recording When copying When finalizing For your reference When 1 PLAY is pressed on this unit for Automatic input switching or Power on link the playback image is not immediately displayed on the screen and it may not be possible to watch the contents from where playback started In this case press or 6 t...

Страница 20: ...enna and continue Then after exiting the Set Clock and Channels Automatically screen in step 8 press ENTER continue and press RETURN After this step perform Set Clock Manually 60 To learn more about the setup contents of various services see the list on the next page IMPORTANT The TV Guide On ScreenTM system must be set up whether it is then used or not You cannot use the scheduled recording featu...

Страница 21: ...tion channel RF Channel 2 RF Channel 3 RF Channel 4 IN3 IN3 is the usual selection If you are connecting the satellite receiver to this unit s RF terminal select RF Channel 2 RF Channel 3 or RF Channel 4 according to the satellite receiver setting 2 Check how the channels are input Select how your current DirecTV receiver inputs 2 3 and 4 digit numbered channels 3 Satellite receiver brand Move dow...

Страница 22: ...recTV receiver is turned on 2 Press TV GUIDE If you find TV Guide On Screen Setup Progress displayed on the television the unit has not yet downloaded the TV Guide On ScreenTM data If you press TV GUIDE without completing setup the start setup screen will appear If you want to complete TV Guide setup select Start setup This unit may download more than one channel line up Follow the on screen instr...

Страница 23: ...ress ENTER When the following indicator appears on the unit s display and you are unable to operate the unit Press and hold ENTER and the indicated number button at the same time for more than 2 seconds To return to the previous screen Press RETURN To exit the screen Press RETURN several times Selecting television type 4 3 standard aspect television 16 9 widescreen television When connected to a 4...

Страница 24: ...g will then be as a separate title You can record while the unit is in standby for scheduled recording but once the time for the scheduled recording to begin is reached any recording taking place will stop and the scheduled recording will begin To pause recording Press Press again to restart recording You can also press REC to restart Title is not split into separate titles To stop recording Press...

Страница 25: ...ntents of a disc or card Format 57 R R DL RW V R R DL When you press OPEN CLOSE on the main unit while stopped The following screen appears when you have not processed the disc for play on other equipment To finalize the disc Press REC on the main unit You cannot stop this process once you have started it If you want to set the background view the menu select screen or provide a disc name select T...

Страница 26: ...TER 3 Press 3 4 to select Flexible Recording and press ENTER 4 Press 2 1 to select Hour and Min and press 3 4 to set the recording time You can also set the recording time with the numbered buttons You cannot record for more than 8 hours 5 When you want to start recording Press 3 4 2 1 to select Start and press ENTER Recording starts All the recording modes from XP to EP appear in the display To e...

Страница 27: ... Stop recording and press ENTER Scheduled recording 28 HDD RAM Press AUDIO e g Stereo is selected appears when the unit is receiving the audio type you selected If you change the sound setting while recording the recorded sound will also change Note You cannot change the audio type in the following cases while the unit is stopped regardless of which drive is selected While a disc other than DVD RA...

Страница 28: ...e unit off by pressing Í DVD POWER Scheduled recordings are activated regardless of whether the unit is turned on off When using the cable box or the satellite receiver make sure the cable box or the satellite receiver is turned on Program listings for satellite services other than DirecTV cannot be received Customers using the DISH Network service can set scheduled recordings on the DISH Network ...

Страница 29: ...gram other recordings 5 Press TV GUIDE Returns to the television screen To cancel scheduled recording when it has already begun 1 Press DRIVE SELECT to select the recording drive 2 Press then press 2 1 to select Stop recording and press ENTER Manually programming scheduled recordings date Month Day Year start end You can set up to 8 hours Press 2 1 to select am or pm channel e g 5ch 0 0 5 input RF...

Страница 30: ...ing standby Scheduled recordings begin when the set time is reached even when recording or when playing Scheduled recordings do not begin while copying in normal speed mode 49 If the unit is turned on when scheduled recording begins it remains turned on after recording finishes It does not turn off automatically You can turn the unit off during scheduled recording If you are making consecutive rec...

Страница 31: ...een Components The screen displayed when TV GUIDE is pressed Remind icon Record icon Programs are categorized by color Green Sports Blue Children s Purple Movies Teal Other categories Listings Options menu This appears when you press SUB MENU LISTINGS 32 You can set scheduled recording and scheduled reminder SEARCH 33 You can search TV programs by genre keyword etc SETUP 34 You can change the sett...

Страница 32: ... press ENTER Note You cannot set a scheduled recording and a scheduled reminder for the same time on different channels You can configure the individual settings of the program listings When Episode Options menu is displayed left Press 3 4 to select the item and press ENTER to change the setting Items that can be set up differ depending on the situation Using the LISTINGS Service to set scheduled ...

Страница 33: ...f you search for a keyword and no match is found the input keyword is saved 5 Press 3 4 to select a program and press ENTER Episode Options menu 32 left column is displayed You can now set the scheduled recording or scheduled reminder 32 1 Press 2 1 to select KEYWORD 2 Press 3 4 to select a saved keyword and press ENTER Search starts and the programs that apply are displayed in the list If there a...

Страница 34: ...ayed 35 3 Press 3 4 to select the item and press 2 1 to change the setting 4 Press 3 4 to select done and press ENTER Continued on next page Using SETUP Service to change the settings of the TV Guide On ScreenTM system Access to the TV Guide On ScreenTM system setup screen Change system settings Customizing the channel line up Change channel display SCHEDULE SEARCH Change system settings Change ch...

Страница 35: ... unit start Change the start time for scheduled recording end Change the end time for scheduled recording recorder Select the recording drive quality Select the recording mode auto tune Choose whether the channel changes automatically or not when a scheduled reminder starts when Set the start time for a scheduled reminder e g On time or up to 15 minutes before after the start time of the program D...

Страница 36: ...ect Navigator screen icons If the video is stretched vertically 16 9 aspect images will be recorded as 4 3 images if recorded under the following conditions If recorded to the HDD or DVD RAM with Enable High Speed Mode set to On in the Setup menu The default setting is On 61 If recorded or copied to a DVD R DVD R DL DVD RW DVD Video format R R DL or RW disc You may be able to adjust it by changing...

Страница 37: ...all levels of search DivX Audio is not heard during all levels of search Depending on the type of the disc search may not be possible Skip During play or while paused press or 9 Skip to the title chapter or track you want to play Each press increases the number of skips DivX Backward direction only Starting from a selected item Press the numbered buttons Play starts from the selected title chapter...

Страница 38: ...ss 3 4 to select the time and press ENTER Play skips the specified time Each time you press 3 4 the time increases 3 or decreases 4 by 1 minute intervals Press and hold for 10 minute intervals CM Skip HDD RAM R R DL RW V R R DL RW RW VR Press CM SKIP Each time you press play restarts approximately a minute later 5 min This automatically disappears after approximately 5 seconds To show the screen a...

Страница 39: ...e if recording is performed on the HDD drive 1 While the file list is displayed Press 1 while a title is highlighted to display the tree screen 2 Press 3 4 to select a folder and press ENTER The file list for the folder appears To return to the previous screen Press RETURN Selecting file type to play To select file type CM SKIP CM SKIP STATUS STATUS REC MODE REC MODE DISPLAY DISPLAY REC REC AUDIO ...

Страница 40: ...s displayed Press 1 while a track is highlighted to display the tree screen You cannot select groups that contain no compatible files 2 Press 3 4 to select a group and press ENTER The file list for the group appears To return to the previous screen Press RETURN HDD RAM SD CD You can use SD Memory Cards with capacities from 8 MB to 2 GB 6 You can play still pictures recorded onto a CD R CD RW on a ...

Страница 41: ... Folder 100__DVD 002 003 004 0005 0006 0007 008 Pictures Menu Picture View CD JPEG F 1 3 021216_0026 103_DVD 104_DVD Useful functions during still picture play Start Slideshow Slideshow settings HDD RAM SD CD You can display still pictures one by one at a constant interval HDD RAM SD While the Album View screen is displayed Press 3 4 2 1 to select the album and press 1 PLAY You can also start slid...

Страница 42: ...RCH SLOW SEARCH SKIP SKIP DELETE DELETE VCR Plus VCR Plusi CH CH PAGE PAGE SELECT INPUT CANCEL 0 9 8 7 6 5 4 3 2 1 VOLUME VOLUME CH CH TV DRIVE DRIVE SELECT SELECT POWER TV VIDEO TV VIDEO POWER A B FUNCTIONS 3 4 2 1 ENTER DISPLAY RETURN DELETE DRIVE SELECT 9 B A Disc Video Audio Other Play Soundtrack Subtitle 1 Audio channel Off Stereo Î Digital 2 0ch Menu Item Setting Audio channel HDD RAM RW VR ...

Страница 43: ...elect On to enable progressive output Select Off if the picture is stretched horizontally When progressive output is on closed captions cannot be displayed Transfer When Progressive above is set to On Select the method of conversion for progressive output to suit the type of material being played 76 Film and video Auto1 normal Automatically detects the film and video content and appropriately conv...

Страница 44: ...TOR Title Chapter Programs are recorded as a single title consisting of one chapter HDD RAM You can divide a title into multiple chapters Each section between the division points becomes a chapter 38 45 HDD RAM You can change the order of chapters and create a playlist 46 R RW V R Titles are divided into about 5 minute R 8 minute chapters after finalizing 58 R DL R DL Even if you finalize the disc...

Страница 45: ...NTER at the point you want to divide the title 2Press 3 4 to select Exit and press ENTER 3Press 2 1 to select Divide and press ENTER To confirm the division point Press 3 4 to select Preview and press ENTER The unit plays 10 seconds before and after the division point To change the division point Restart play and press 3 4 to select Divide then press ENTER at the point where you want to divide the...

Страница 46: ...the screen Press RETURN several times You can arrange the chapters 44 to create a playlist Copying 49 a playlist will create a title Editing playlists doesn t modify the recorded data Playlists are not recorded separately so this doesn t use much capacity Creating playlists CM SKIP CM SKIP STATUS STATUS REC MODE REC MODE DISPLAY DISPLAY REC REC AUDIO AUDIO Info Info CREATE CREATE CHAPTER CHAPTER E...

Страница 47: ...Create Properties Edit View Chapters Delete Playlist Refer to Playlist operations PLAYLISTS Chapter View 01 10 27 Mon 0 30 001 002 HDD 0 10 00 0 20 00 Chapter View screen Move Chapter Create Chapter Combine Chapters Delete Chapter View Playlists Add Chapter Refer to Chapter operations Playlist operations Delete Playlist HDD RAM Press 2 1 to select Delete and press ENTER Once deleted the playlists ...

Страница 48: ...tored Make certain before proceeding When deleting an album files other than the still picture files inside the album will also be deleted This does not apply to albums under the album concerned Album Name HDD RAM SD You can give names to albums 59 Entering text Album names input using this unit may not be displayed on other equipment Protection Setup Set Protection Cancel Protection HDD RAM SD If...

Страница 49: ...pying speed of this unit may vary Copy 50 Copying using the copying list 50 Features Easy copying from HDD to DVD with no difficult settings You can set the unit to copy titles or playlists the way you want Copy direction HDD DVD Yes Yes DVD HDD No Yes RAM RW VR RW DVD V Only from a finalized disc High speed mode copy 1 Yes Yes DVD V You cannot perform high speed copy with finalized discs RW You c...

Страница 50: ...an arrange titles and playlists as desired for copy to disc You cannot copy to finalized discs See also Important notes for recording 8 1 While stopped Press FUNCTIONS 2 Press 3 4 to select Other Functions and press ENTER 3 Press 3 4 to select Advanced Copy and press ENTER If you are not going to change the registered list press 4 several times 51 step 7 4 Set the copy direction If you are not goi...

Страница 51: ...ow other pages Press 3 4 2 1 to select Previous or Next and press ENTER You can also press 9 to show other pages Multiple editing Select with 3 4 2 1 and press Repeat Press ENTER to register to the list A check mark appears Press again to cancel When you switch between the Video and Playlists tab the check mark is canceled To play the disc on other DVD players R R DL RW V R R DL Finalize the disc ...

Страница 52: ...can also press and hold RETURN for 3 seconds to stop copying If stopped partway copying will be up to that point Note The screen saver on the right is recorded at the beginning The content is recorded as 1 title from the start of copy to the end If play does not begin automatically or if the top menu does not display automatically press 1 PLAY to start Even if you copy a high quality video audio D...

Страница 53: ...EC MODE to select the recording mode 3 Turn on the DV equipment and pause play on the DV equipment at the point you want recording to start 1 While stopped Press FUNCTIONS 2 Press 3 4 to select Other Functions and press ENTER 3 Press 3 4 to select DV Camcorder Rec and press ENTER 4 Press 2 1 to select Record and press ENTER Recording starts When recording finishes The confirmation screen appears P...

Страница 54: ... list by repeating steps 2 3 4 Press 2 to confirm To register on a folder by folder basis 1 Press 3 4 to select Create List and press 1 2 Press 3 4 to select Picture Folder and press ENTER 3 Press 3 4 to select Folder and press ENTER 4 Press 3 4 to select New Entry and press ENTER 5 Press 3 4 to select the folder and press ENTER To select a multiple number of items together press to add the check ...

Страница 55: ...he SD drive 1 While stopped Press FUNCTIONS 2 Press 3 4 to select Other Functions and press ENTER 3 Press 3 4 to select Copy all Pictures and press ENTER 4 Press 3 4 to select Copy to and press 2 1 to select the drive 5 Press 3 4 2 1 to select Copy and press ENTER To stop copying Press and hold RETURN for 3 seconds To return to the previous screen Press RETURN To show other pages Press 3 4 2 1 to ...

Страница 56: ...name is displayed on the Top Menu RW The disc name is displayed only if you play the disc on other equipment Common procedures CM SKIP CM SKIP STATUS STATUS REC MODE REC MODE DISPLAY DISPLAY REC REC AUDIO AUDIO Info Info CREATE CREATE CHAPTER CHAPTER ENTER ENTER F U N C T I O N S D I R E C T N A V I G A T O R TV GUIDE RETURN RETURN SUB MENU SUB MENU S SCHEDULE SCHEDULE TIME SLIP TIME SLIP PLAY x1 ...

Страница 57: ...d press ENTER 5 Press 2 1 to select Yes and press ENTER 6 Press 2 1 to select Start and press ENTER A message appears when formatting is finished Note Formatting normally takes a few minutes however it may take up to a maximum of 70 minutes RAM Do not disconnect the AC power supply cord while formatting This can render the disc or the card unusable 7 Press ENTER Note When a disc or card has been f...

Страница 58: ...quipment other than this unit the background selected as Top Menu Style may not be displayed Discs finalized on this unit may not be playable on other players due to the condition of the recording Visit Panasonic s homepage for more information about DVDs http www panasonic com RW RW discs contain no Top Menu data Top Menu is a convenient function We recommend you create the menu before playing a ...

Страница 59: ...E CHAPTER CHAPTER ENTER ENTER F U N C T I O N S D I R E C T N A V I G A T O R TV GUIDE RETURN RETURN SUB MENU SUB MENU S SCHEDULE SCHEDULE TIME SLIP TIME SLIP PLAY x1 3 PAUSE PAUSE STOP STOP SLOW SEARCH SLOW SEARCH SKIP SKIP DELETE DELETE VCR Plus VCR Plusi CH CH PAGE PAGE SELECT INPUT CANCEL 0 9 8 7 6 5 4 3 2 1 VOLUME CH TV DRIVE SELECT POWER TV VIDEO POWER A B RETURN 3 4 2 1 ENTER SUB MENU 9 CAN...

Страница 60: ...DE RETURN RETURN SUB MENU SUB MENU S SCHEDULE SCHEDULE TIME SLIP TIME SLIP PLAY x1 3 PAUSE PAUSE STOP STOP SLOW SEARCH SLOW SEARCH SKIP SKIP DELETE DELETE VCR Plus VCR Plusi CH CH PAGE PAGE SELECT INPUT CANCEL 0 9 8 7 6 5 4 3 2 1 VOLUME VOLUME CH CH Í TV TV DRIVE DRIVE SELECT SELECT Í DVD POWER POWER TV VIDEO TV VIDEO POWER POWER A B RETURN 3 4 2 1 ENTER FUNCTIONS CANCEL Í DVD POWER Numbered butto...

Страница 61: ... copy recorded titles from the HDD to DVD R DVD R DL DVD RW DVD Video format R R DL and RW using high speed mode However screen size etc is restricted right We recommend turning the setting Off if high speed copy to DVD R etc is not necessary when recording a program On You can high speed copy to DVD R etc Press 2 1 to select Yes The following restrictions are applied to recorded titles Pictures a...

Страница 62: ...trouble for digital recording Bitstream When connecting to equipment displaying the Dolby Digital logo PCM When connecting to equipment not displaying the Dolby Digital logo DTS Bitstream When connecting to equipment displaying the DTS logo PCM When connecting to equipment not displaying the DTS logo Audio for XP Recording Choose the audio type when recording or copying with XP mode Dolby Digital ...

Страница 63: ...to a device that only supports RGB output Standard Enhanced When the black and white images are not distinct HDMI Audio Output On Off When the TV is connected to this unit with an HDMI cable and you are connected to an amplifier that does not support HDMI with an optical digital audio cable HDMI Connection Speakers Setting You can set the unit to output the best possible sound for your speakers Au...

Страница 64: ...ally select Clock Settings from the Setup tab and then select Set Clock Automatically If the time was not set correctly use Set Clock Manually 22 or adjust time zone 7 Press ENTER The unit configures channels according to the Signal Source RF IN settings as follows Adjust the time zone j1 or i1 if it was not set correctly with auto clock setting You cannot change this setting if you set the clock ...

Страница 65: ...o enter the other characters 8 Press 2 1 to return to the Channel Number column Repeat steps 6 8 to enter other channels 9 Press ENTER Set these guide channels so you can use the VCR Plusi programming number for scheduled recording Before setting up refer to a TV magazine for lists containing information on channels station names and guide channels After performing steps 1 4 left 5 Press 3 4 to se...

Страница 66: ...ideo standard is NTSC However you cannot play DVD Video if their region number does not include 1 or ALL Refer to the disc s jacket for more information Cover Can a DVD Video that does not have a region number be played The DVD Video region number indicates the disc conforms to a standard You cannot play discs that do not have a region number You also cannot play discs that do not conform to a sta...

Страница 67: ...f programs I have already set In most cases the scheduled recording of programs will be saved However if an extended power failure occurs it is strongly recommended that you verify the scheduled recording of programs that you had previously set Press SCHEDULE to display the SCHEDULE screen 30 I do not want to use TV Guide On ScreenTM system Set the unit with Set Channels Automatically in the Setup...

Страница 68: ...examples Available space on the HDD or disc The example SP 35 50 is displayed when less than 100 hours are available and the example LP 151h is displayed when over 100 hours are available SP and LP are recording modes 35 50 means 35 hours 50 minutes and 151h means 151 hours 24 UNFORMAT You inserted an unformatted DVD RAM DVD RW RW an unused R R DL or DVD RW DVD Video format that has been recorded ...

Страница 69: ...TM system set the clock with Set Clock Automatically 64 Compared to the actual recorded time the elapsed time displayed is less The displayed recording play time is converted from the number of frames at 29 97 frames equal to 0 999 seconds to one second There will be a slight difference between the time displayed and the actual elapsed time e g actual one hour elapsed time may display as approxima...

Страница 70: ...ter to scan the cable box or the DirecTV receiver channels and acquire the program listings data To watch a cable box or a DirecTV receiver program even if not recording turn the unit back on No sound Low volume Distorted sound Cannot hear the desired audio type Check the connections and the Digital Audio Output settings Check the input mode on the amplifier if you have connected one Press AUDIO t...

Страница 71: ...ng time Cannot record Cannot copy You haven t inserted a disc or the disc you inserted cannot be recorded on Insert a disc the unit can record onto The disc is unformatted Format the disc using DVD Management RAM RW V R R DL RW RAM The write protect tab on the cartridge is set to PROTECT or the disc is protected with DVD Management Some programs have limitations on the number of times they can be ...

Страница 72: ...he DV equipment appear on the television Recording may not be performed as desired if the time codes on the tape in the DV equipment are not successive Depending on the equipment the DV camcorder recording may not operate properly You can only record audio video images on a DV tape 53 There is no picture on the television during scheduled recording Scheduled recordings are activated regardless of ...

Страница 73: ...tup was incorrect e g The user entered the wrong ZIP postal code or selected the incorrect channel line up Select Change system settings menu and verify the data entered during initial setup If the settings are wrong set up the TV Guide On ScreenTM system again The Video window is locked to remain on the channel you were previously watching The station in question may have made recent program sche...

Страница 74: ...ay excluding HDD DVD A CD VCD SD MP3 DivX turn off the power a recording or scheduled recording was executed It takes time before play starts It will take a little time for DivX videos to start playing DivX Picture stops Picture may stop if the DivX files are greater than 2 GB DivX Cannot edit If there is not enough disc space on the HDD you cannot edit on the HDD Delete some unnecessary titles to...

Страница 75: ...ideo format DivX DVD R DL Dual Layer DVD Video format DVD RW DVD Video format DVD Video Recording format R R DL Double Layer RW DVD Video DVD Audio CD Audio CD DA Video CD CD R CD RW CD DA Video CD MP3 JPEG DivX System with 1 lens 2 integration units 662 nm wavelength for DVDs 780 nm wavelength for CDs Wave Length 780 nm CDs 662 nm DVDs Laser Power No hazardous radiation is emitted with the safety...

Страница 76: ...t makes play of a recorded CD R CD RW DVD R etc possible on equipment that can play such media You can finalize DVD R DVD R DL DVD RW DVD Video format R and R DL on this unit After finalizing the disc becomes play only and you can no longer record or edit However finalized DVD RW can be formatted to become recordable Folder This is a place on the hard disk or memory card where groups of data are s...

Страница 77: ...e unit has been exposed to rain or d The unit does not operate normally or exhibits a marked change in performance or e The unit has been dropped or the cabinet damaged 2 Servicing Do not attempt to service the unit beyond that described in these operating instructions Refer all other servicing to authorized servicing personnel 3 Replacement parts When parts need replacing ensure the servicer uses...

Страница 78: ... that is attributable to acts of God THERE ARE NO EXPRESS WARRANTIES EXCEPT AS LISTED UNDER LIMITED WARRANTY COVERAGE THE WARRANTOR IS NOT LIABLE FOR INCIDENTAL OR CONSEQUENTIAL DAMAGES RESULTING FROM THE USE OF THIS PRODUCT OR ARISING OUT OF ANY BREACH OF THIS WARRANTY As examples this excludes damages for lost time travel to and from the servicer loss of media or images data or other recorded co...

Страница 79: ...nty This warranty is extended to the original end user purchaser only A purchase receipt or other proof of date of original purchase is required before warranty service is performed THIS EXPRESS LIMITED WARRANTY IS IN LIEU OF ALL OTHER WARRANTIES EXPRESS OR IMPLIED INCLUDING ANY IMPLIED WARRANTIES OF MERCHANTABILITY AND FITNESS FOR A PARTICULAR PURPOSE IN NO EVENT WILL PANASONIC CANADA INC BE LIAB...

Страница 80: ...sde el menú CONFIGURACIÓN Salida de audio HDMI Activado predeterminado en la fábrica Repare en que los listados de programas no se descargan mientras que la unidad está desenchufada Conexión a un televisor y caja del cable o receptor DirecTV VIDEO S VIDEO R L AUDIO OUT IN RF Satellite Cable VHF UHF RF IN AUDIO IN R L VIDEO IN COMPONENT VIDEO OUT PR Y PB IN1 AV OUT IN3 S VIDEO VIDEO R AUDIO L DIGIT...

Страница 81: ... Desactivado en el receptor DirecTV con el objeto de recibir correctamente los datos TV Guide On ScreenTM Si cambia la visualización del canal entonces seleccione Yes Si todavía el receptor de satélite está ajustado al mismo canal seleccione No Cuando selecciona DISH Network ajuste lo siguiente Canal de conexión del receptor de satélite 7 Confirme los ajustes Si la información es correcta seleccio...

Страница 82: ...rogramada cuando ésta ya ha empezado 1 Pulse DRIVE SELECT para seleccionar la unidad de grabación 2 Pulse luego pulse 2 1 para seleccionar Parar grabación y por fin pulse ENTER HDD RAM Para detener la reproducción Pulse Para detener la grabación 2 segundos después de parar la reproducción Pulse Dependiendo del contenido que está siendo grabado los tiempos de grabación pueden ser inferiores a los i...

Страница 83: ...e Para volver a la pantalla de Vista de álbum o Imágenes JPEG Pulse RETURN Para salir de la pantalla Pulse DIRECT NAVIGATOR Reproducción de vídeo grabado Reproducción de discos de sola reproducción HDD RAM R R DL RW V R R DL RW RW VR Ej 5 0 0 5 15 0 1 5 115 1 1 5 Ej 5 0 5 15 1 5 Operaciones durante la reproducción Parada Pulse La posición de detención se memoriza Función de reanudación de la repro...

Страница 84: ...n Album 48 Card 56 Cartridge 56 Disc 56 Still picture 48 Title 45 Quick Start 26 Quick View 37 Ratings level 61 Recording DV camcorder recording 53 Flexible Recording 26 Mode 25 Relief 30 Scheduled 28 30 32 Recording for High Speed Copying 61 Relief Recording 30 Reminder Scheduled 32 Remote control code 23 Repeat play 42 Restore Default Settings 60 Resume play function 37 Satellite receiver 15 16 ...

Отзывы: