background image

44

RQT6920

Ad

v

a

nc

e

d

 ope

ra

tion

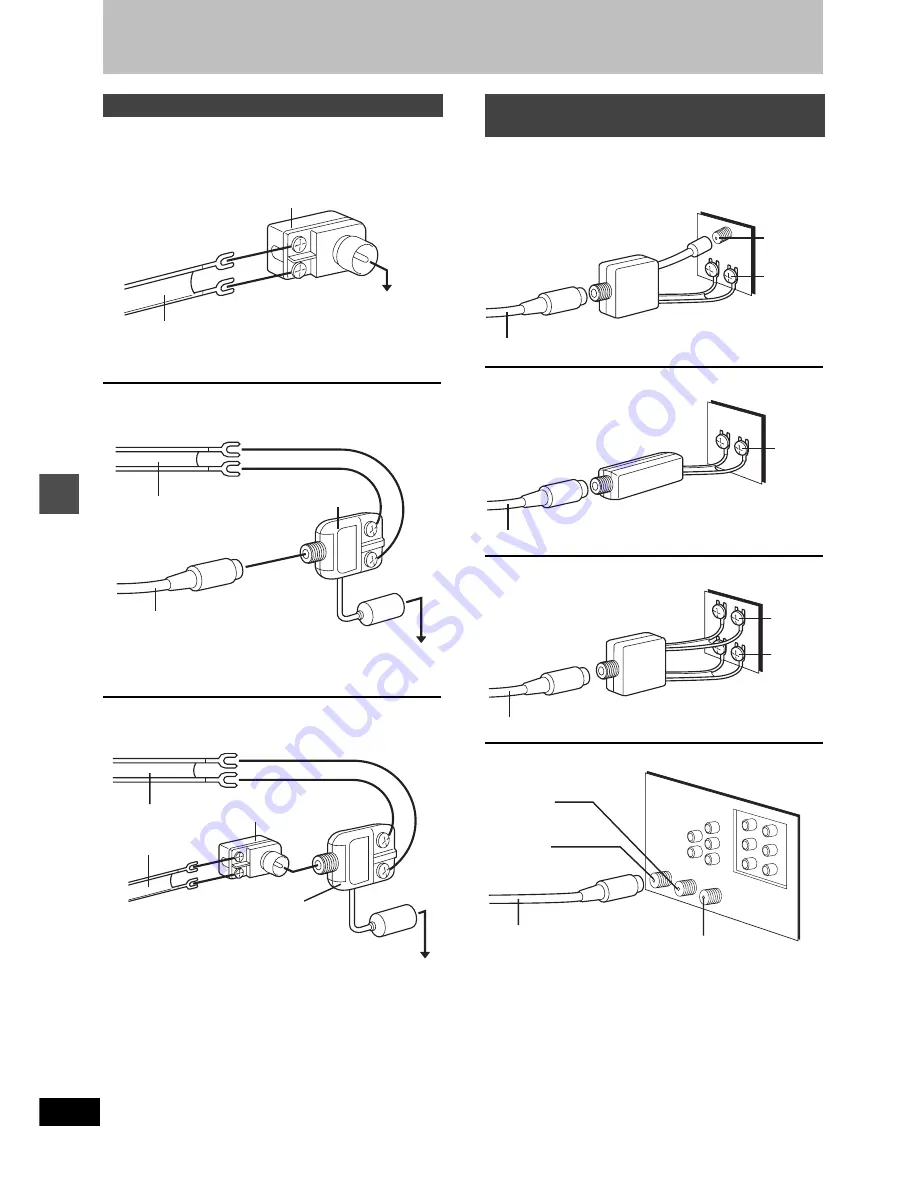
Other antenna connections

Use one of the following connections to suit the antenna lead.

A single twin lead

A twin lead and a coaxial cable

Two twin leads

If your television has both lead and coaxial VHF terminals, use the
lead connection to minimize signal loss.

Use one of the following connections to suit the antenna terminals
on your television. Refer to the television’s operating instructions.

A twin lead and coaxial plug terminal

A twin lead terminal

Two twin lead terminals

Multiple antenna terminals

Connect to one of the terminals, then change the television’s
setting as necessary.

Other antenna connection to the unit

300–75 

 transformer

(not included)

from the antenna

(Flat)
Twin lead
300 

 cable

To this unit’s
RF IN terminal

from the antenna

(Flat)
Twin lead
300 

 cable

To this unit’s
RF IN terminal

(Round)
75 

 coaxial cable

VHF/UHF band mixer
(not included)

from the antenna

To this unit’s
RF IN terminal

300–75 

 transformer

(not included)

(Flat)
Twin lead
300 

 cable

VHF/UHF band mixer
(not included)

Other antenna connection from the unit 
to the television

VHF/UHF band separator
(not included)

Television

75 

 coaxial cable

VHF

UHF

75 

 coaxial cable

75–300 

 transformer

(not included)

Television

VHF or 
UHF

75 

 coaxial cable

VHF/UHF band separator
(not included)

Television

VHF

UHF

ANT 2

ANT 1

Split out

Television

75 

 coaxial cable

Содержание DMR-E50K

Страница 1: ...ructions Model No DMR E50 For U S A only The warranty can be found on page 56 For Canada only The warranty can be found on page 57 Para la instalación y las operaciones básicas del aparato existe una guía en español en las páginas 58 a 63 RQT6920 P P Dear customer Thank you for purchasing this product For optimum performance and safety please read these instructions carefully Before connecting ope...

Страница 2: ...eiver is connected Consult the dealer or an experienced radio TV technician for help FCC Caution To assure continued compliance follow the attached installation instructions and use only shielded inter face cables when connecting to peripheral devices Any changes or modifications not expressly approved by the party responsible for compliance could void the user s author ity to operate this equipme...

Страница 3: ...se the Direct Navigator to find a program you have recorded and start play Make your own DVD Video Finalizing a DVD R that has been recorded on produces an origi nal DVD Video in accordance with DVD Video standards In addition to DVD Video movie software this unit can also play other types of discs including audio CDs and Video CDs This means that this unit has the potential to play a central role...

Страница 4: ...eo menu 38 On screen displays 39 Home Theater 40 Connecting a cable TV box satellite receiver 41 Connecting an amplifier or system component 42 Connecting other video equipment 43 Other antenna connections 44 Other antenna connection to the unit 44 Other antenna connection from the unit to the television 44 Changing the remote control code 45 Changing the unit s settings 46 Summary of settings 46 ...

Страница 5: ...an the VIDEO OUT terminal by separating the chrominance C and luminance Y signals Actual results depend on the tele vision When making this connection ensure you connect the audio cables to the corresponding audio input terminals on the televi sion When making this connection ensure you connect the audio cables to the corresponding audio input terminals on the television To the antenna Outdoor ant...

Страница 6: ... for the first time the unit assists you to set the menu language and automatically tunes in all the channels it can receive and sets the clock The unit automatically determines the type of transmission air or cable and puts them into channels as follows Batteries Use R6 LR6 AA UM 3 Remote control signal sensor 7 m 23 feet directly in front of the unit 30x 30x 20x 20x Band Channel TV Mode Air VHF ...

Страница 7: ...hannel setting press RETURN When finished the Com plete screen or time display is shown Press ENTER To return to the previous screen Press RETURN When you are finished Press SETUP Add or delete channels if necessary channels are not set or unnec essary channels are set While this unit is receiving the antenna signal but not during recording 1 Press the numbered buttons to select a channel e g 5 0 ...

Страница 8: ...CR Plus TV VIDEO REC MODE REC CH VOLUME TV TV DVD 1 2 3 7 8 9 0 100 4 5 6 SLOW SEARCH SKIP DIRECT NAVIGATOR TOP MENU MENU RETURN FUNCTIONS PROG CHECK TIME SLIP ADD DLT ENTER PLAY LIST CANCEL POWER Í Í SETUP RETURN CANCEL 3 4 2 1 ENTER Look up the guide channels for the stations in magazines Write down all the stations you can receive TAB SELECT Antenna System Auto Channel Setting Channel Caption P...

Страница 9: ... Press 3 4 to select the first char acter and then press 1 You can choose from the following characters A Z 0 9 space To delete the caption press CANCEL Repeat step 5 to enter the other characters 6 Press 2 1 to return to the Channel Number column when you are finished Repeat steps 4 5 and 6 as necessary 7 Press ENTER The Channel screen reappears To return to the previous screen Press RETURN When ...

Страница 10: ...Test by turning on the television and changing channels Repeat the procedure until you find the code that allows correct operation Note If your television brand is not listed or if the code listed for your tele vision does not allow control of your television this remote control is not compatible with your television Operation Point the remote control at the television OPEN CLOSE SETUP ERASE F Rec...

Страница 11: ...input Including discs recorded with MP3 The producer of the material can control how DVD Video and Video CDs are played This means that you may not be able to control play of a disc with some operations described in these operating instructions Read the disc s instructions carefully This unit can play CD R CD RW audio recording disc recorded with CD DA digital audio video CD video CD format 2 0 or...

Страница 12: ...F Recording button REC 14 G Recording mode button REC MODE 14 H Channel buttons for recorder and TV W X CH 10 14 I TV volume buttons r s VOLUME 10 J Slow search buttons 6 5 SLOW SEARCH 18 K Play quick view button 1 PLAY a1 3 16 19 L Menu and Play list button MENU PLAY LIST 17 28 M Return button RETURN 7 N One minute skip button CM SKIP 18 O Time slip button TIME SLIP 19 22 P Frame advance and fram...

Страница 13: ... mode page 15 E DVD indicator Flashes When you press Í DVD POWER to turn the unit off until it actually turns off F Channel G Main display section Recording and play counter and other miscellaneous messages Main unit OPEN CLOSE CH S VIDEO IN L2 VIDEO IN I POWER R L MONO AUDIO IN REC MODE ERASE REC TIME SLIP TIME SLIP a1 3 OPEN CLOSE U 1 V Y X F B O 7 K Z CH G W Controls such as 1 function the same...

Страница 14: ... record RAM When using a DVD RAM for the first time with this unit format it to ensure accurate recording Format page 34 There are limitations when recording to DVD R page 11 When recording MTS sound onto DVD R either the main channel or the sub channel can be recorded not both Select at Select MTS page 47 For your reference You can record up to 99 programs on one disc This unit is compatible with...

Страница 15: ...using L1 L2 or L3 terminals only the sound received at the time of recording will be recorded If flexible recording below is used instead of steps 2 and 4 settings can be made so that recording continues to the end of the video RAM DVD R The unit calculates a recording rate that enables the recording to fit in the time you set within the remaining time on the disc and with the best possible pictur...

Страница 16: ...To cancel press until PLAY goes out The position is also cleared when you turn the unit off or open the disc tray The screen saver may appear when you stop play Press again and you can use this unit s tuner to watch television To pause play Press Press again to restart play Auto power off The unit switches to standby after about 6 hours in the stop mode You can turn this feature off or change the ...

Страница 17: ... A list of programs is created as you record them You can use this list to find programs to watch 1 Press DIRECT NAVIGATOR The highlighted program plays in the background 2 Press 3 4 to select the program and press ENTER You can also select programs with the numbered buttons e g 5 0 5 15 1 5 Play of the images that were playing in the background con tinues To stop play Press To clear the program l...

Страница 18: ...Note This may not work with some discs This works only when stopped with some discs the screen saver is on the television RAM DVD R During play Press CM SKIP Play restarts from approximately a minute later Note If the start of the next program is within one minute of the point you skipped from play restarts from the beginning of that program Skipping OPEN CLOSE SETUP ERASE F Rec POSITIONMEMORY MAR...

Страница 19: ...ly with Dolby Digital You can increase the speed of play without disrupting the soundtrack Output is in stereo during Quick View During play Press and hold 1 PLAY k1 3 To return to normal speed Press 1 PLAY k1 3 Note Output is in PCM when using a digital connection page 42 A This is canceled if you perform operations to change the soundtrack skip or pause This does not work if the setting is Off i...

Страница 20: ...CM SKIP STATUS FRAME DISPLAY STOP PAUSE PLAY a1 3 DVD VCR Plus TV VIDEO REC MODE REC CH VOLUME TV TV DVD 1 2 3 7 8 9 0 100 4 5 6 SLOW SEARCH SKIP DIRECT NAVIGATOR TOP MENU MENU RETURN FUNCTIONS PROG CHECK TIME SLIP ADD DLT ENTER PLAY LIST CANCEL POWER Í Í RETURN DISPLAY MARKER CANCEL 3 4 2 1 ENTER Using on screen menus to mark positions Displaying the marker icon Marking positions When marking pos...

Страница 21: ...elected track no Total track no in all groups Using the tree screen to find a group Note Discs must conform to ISO9660 level 1 or 2 except for extended formats This unit is compatible with multi session but if there are a lot of sessions it takes more time for play to start Keep the num ber of sessions to a minimum to avoid this If you play a MP3 track that includes still picture data it will take...

Страница 22: ...ss TIME SLIP to show the play images in full Press again to show the play and recording images Playing from the beginning of the program you are recording Chasing Play To stop play and recording 1 Press Play stops Wait 2 seconds 2 Press Recording stops To stop timer recording press then ENTER within 5 seconds CM SKIP STOP PAUSE PLAY a1 3 DVD VCR Plus TV VIDEO REC MODE REC CH VOLUME TV TV DVD 1 2 3...

Страница 23: ...t is receiving the type of audio you selected PLAY L R DVD RAM Sound track 1 ENG Î Digital 3 2 1ch e g English is the selected language Using the FUNCTIONS window RAM DVD R DVD V VCD CD MP3 By using the FUNCTIONS window you may access the main func tions quickly and easily 1 While stopped Press FUNCTIONS e g DVD RAM 2 Press 3 4 2 1 to select an item Refer to the relevant pages for details Function...

Страница 24: ...cording mode Press REC MODE To enter the title of the program Press 2 1 to select Enter Title and press ENTER page 27 Repeat steps 1 3 to program other recordings 4 Press RETURN The timer recording list disappears and the message TURN RECORDER OFF FOR TIMER RECORDING is shown on the television 5 Press Í DVD POWER Ensure F lights on the unit s display Specify a time to stop recording OPEN CLOSE SET...

Страница 25: ...me 1 58 SP 3 26TUE 12 55 PM 3 00 PM 3 26 TUE MODE OFF ON CHANNEL DATE SP 64 ABC 2 30 PM EnterTitle To release the unit from recording standby If you want to record something else before the program start time for example Press Í DVD POWER The unit turns on and F goes out Be sure to press Í DVD POWER to return the unit to standby mode before the scheduled recording time Timer recording will work on...

Страница 26: ...t disappears 1 Press PROG CHECK The timer recording list appears 2 Press 3 4 to select the program You may also select programs by inputting a 2 digit number using the numbered buttons e g 5 0 5 15 1 5 Press 2 1 to move to the page preceding or following the one on display 3 Press CANCEL or ADD DLT to delete You cannot delete programs that are currently recording or press ENTER to change The timer...

Страница 27: ...Press ENTER To erase a character 1 Press 3 4 2 1 to select the character you want to erase in the title field 2 Press You can also erase characters by selecting ERASE and press ing ENTER Note The full title is shown in the Properties screen page 30 and 32 but if you enter a long title only part of it is shown in the program list or play list screen If you enter a long title only part of it is show...

Страница 28: ...n 3 seconds of each other Play pauses if the end of the last program on the disc is reached during this procedure Depending on the state of recording the actual number of play lists that can be recorded may be less than that specified in this manual OPEN CLOSE SETUP ERASE F Rec POSITIONMEMORY MARKER AUDIO INPUT SELECT CM SKIP STATUS FRAME DISPLAY STOP PAUSE PLAY a1 3 DVD VCR Plus TV VIDEO REC MODE...

Страница 29: ...h the numbered buttons e g 5 0 0 5 15 0 1 5 To stop scene play Press The scene list appears To clear the scene list Press RETURN 1 Press ERASE A confirmation screen will be displayed 2 Press 2 to select Erase and press ENTER Playing play lists Playing play list scenes PLAY LIST USJ 006 02 10 26 0 07 3 3 1 1 1 1 1 1 002 003 004 001 No DATE TOTAL SCENE EDIT TITLE Auto action 01 10 23 004 0 03 03 10 ...

Страница 30: ...his PLAY LIST Copy Copy PLAY LIST Cancel RETURN ENTER SELECT PLAY LIST No DATE TOTAL SCENE EDIT TITLE USJ 006 02 10 26 0 07 3 3 1 1 1 1 1 1 002 003 004 001 0 9 No RETURN ENTER SELECT PLAY LIST Edit Scenes 0 9 Select Page 001 001 1 10 23 0 03 004 Dinosaur Prev Next Add Move Re edit Erase RETURN ENTER SELECT 002 003 004 001 00 00 19 Entering text page 27 ENTER _ Enter Title 1 1 2 3 4 5 6 7 8 9 0 100...

Страница 31: ...ene Press 3 4 2 1 to select the scene and press ENTER Press 3 4 2 1 to select the scene and press ENTER Press ENTER at the start point of the scene PLAY Prev Note Use 6 5 and slow motion page 18 to find the start and end points You cannot specify an end point before a start point You may not be able to specify points within 3 seconds of each other Play pauses if the end of the last program is reac...

Страница 32: ...t number with the numbered buttons e g 5 0 5 Press 1 so the submenu appears Press 3 4 to select the item and press ENTER To clear the program list Press DIRECT NAVIGATOR To stop set up process Press RETURN For your reference You can only access Properties if the disc is write protected Release protection cartridge page 11 disc page 34 to access other items RAM RAM DVD R RAM DVD R Program informati...

Страница 33: ...E EDIT TITLE 01 4 02 6 03 13 3 3 1 1 1 1 1 ENTER 0 9 No TOTAL 3 SELECT RETURN Shorten Segment 0 00 01 Start End 3 Start End Next Exit 0 00 01 PLAY 03 RETURN ENTER SELECT N S 0 00 01 Start End 3 Start End Next Exit 0 10 15 RETURN ENTER SELECT 0 10 15 N S Shorten Segment 03 3 Divide Program Divide Cancel RETURN ENTER SELECT Press 2 to select Erase and press ENTER The program is erased Press ENTER at...

Страница 34: ...3 4 2 1 to select DISC SETTING and press ENTER Press 3 4 to select the item and press ENTER Erase all programs RAM All programs and play lists created from them will be erased irretrievably when you use this procedure Check carefully before proceeding Preparation Release protection cartridge page 11 program page 32 disc page 34 before proceeding RAM Some DVD RAM are unformatted Format them before ...

Страница 35: ...rience problems with other equipment Visit Panasonic s homepage for more information about DVDs http www panasonic com playDVD R Note Do not turn the unit off or disconnect the AC power supply cord while the message Formatting the disc is on the television This can render the disc unusable Formatting takes up to a maximum of 70 minutes The contents on the disc are erased when you format it even if...

Страница 36: ...c s menus If the subtitles overlap closed captions recorded on discs turn the subtitles off Common procedures OPEN CLOSE SETUP ERASE F Rec POSITIONMEMORY MARKER AUDIO INPUT SELECT CM SKIP STATUS FRAME DISPLAY STOP PAUSE PLAY a1 3 DVD VCR Plus TV VIDEO REC MODE REC CH VOLUME TV TV DVD 1 2 3 7 8 9 0 100 4 5 6 SLOW SEARCH SKIP DIRECT NAVIGATOR TOP MENU MENU RETURN FUNCTIONS PROG CHECK TIME SLIP ADD D...

Страница 37: ...the television press the num bered buttons to select a track page 18 2 Select the repeat mode Marker RAM DVD R DVD V VCD CD MP3 page 20 Audio menu Disc Video Audio Play V S S Dialog Enhancer OFF OFF Item Content Remarks V S S RAM DVD R DVD V Only with Dolby Digital with 2 or more channels Enjoy a surround like effect if you are using two front speakers only The effect is broadened and sound seems ...

Страница 38: ...3D NR Reduces overall noise Block NR Smoothes block noise Mosquito NR Reduces the smudging that appears around contrasting sections of the picture Item Content Progressive ON Enables progressive output OFF Disables progressive output Transfer When progres sive output is on Select the method of conversion for progres sive output to suit the type of material being played page 50 Film and video Auto1...

Страница 39: ...tion a Disc indication b Audio type page 23 Shows the selected audio type During reception Stereo Stereo is selected Mono Monaural is selected SAP Secondary audio program is selected appears when the type you have selected is actually being received During play LR R L a stereo program is recorded MAIN SAP an SAP program is recorded e g DVD RAM 0 50 XP 6 8 10 15 PM π PRG2 0 05 14 XP π PRG1 0 00 10 ...

Страница 40: ...n amplifier with built in decoders 42 A SETUP Audio Digital Audio Output Set PCM Down Conversion to suit the equipment Set Dolby Digital and DTS to suit the equipment 47 Change speaker settings on the amplifier Enjoying stereo or Dolby Pro Logic Analog connection Connect to an analog amplifier or system component 42 B SETUP Audio Digital Audio Output Set PCM Down Conversion to Off 47 Digital conne...

Страница 41: ...t do a timer recording unless the channel is first selected on the cable TV box or DSS receiver You can record and view both scrambled and unscrambled channels if connections are made as shown in the diagram below Change the video input on the television when you want to watch another program while recording You cannot do a timer recording unless the channel is first selected on the cable TV box O...

Страница 42: ...here are no limitations on recording analog signals as there are with digital signals Connecting an amplifier or system component R AUDIO L VIDEO OPTICAL DIGITAL AUDIO OUT PCM BITSTREAM OUT R AUDIO L R AUDIO L VIDEO VIDEO S VIDEO S VIDEO L3 L1 IN 1 IN 3 S VIDEO COMPONENT VIDEO OUT 480P 480I Y PB PR VHF UHF RF IN RF OUT A B OPTICAL OPTICAL IN AUX IN L R Digital connection Analog connection R AUDIO ...

Страница 43: ...ble not included Connecting other video equipment Connecting to the L2 input terminals on the front of the unit S VIDEO OUT AUDIO OUT VIDEO OUT L R S VIDEO IN L2 VIDEO IN I POWER R L MONO AUDIO IN Audio Video cable included S video cable Other video equipment Connect to the video and audio output terminals yellow white red yellow white red This unit Connecting to the input terminals on the rear of...

Страница 44: ...n change the television s setting as necessary Other antenna connection to the unit 300 75 transformer not included from the antenna Flat Twin lead 300 cable To this unit s RF IN terminal from the antenna Flat Twin lead 300 cable To this unit s RF IN terminal Round 75 coaxial cable VHF UHF band mixer not included from the antenna To this unit s RF IN terminal 300 75 transformer not included Flat T...

Страница 45: ...2 or 3 corresponding to the code you selected in step 4 The remote control code on the remote control has been set 6 Press SETUP The following display appears when you use a remote control with a different code If you are trying to use this unit s remote control change its code to match the unit s step 5 OPEN CLOSE SETUP ERASE F Rec POSITIONMEMORY MARKER AUDIO INPUT SELECT CM SKIP STATUS FRAME DIS...

Страница 46: ... language of each disc will be selected Other Input a code page 48 Subtitle Choose the subtitle language Automatic If the language selected for Audio is not avail able subtitles of that language will automatically appear if available on that disc English French Spanish Other Menus Choose the language for disc menus English French Spanish Other Ratings Set a ratings level to limit DVD Video play Th...

Страница 47: ...ent Dolby Digital Bitstream Select if the equipment you connected can decode the signal PCM Select if the equipment you connected cannot decode the signal DTS Bitstream Select if the equipment you connected can decode the signal Off Select if the equipment you connected cannot decode the signal Display Status Messages Choose whether to show on screen messages automatically Automatic Off Language o...

Страница 48: ...590 Bashkir 6665 Basque 6985 Bengali Bangla 6678 Bhutani 6890 Bihari 6672 Breton 6682 Bulgarian 6671 Burmese 7789 Byelorussian 6669 Cambodian 7577 Catalan 6765 Chinese 9072 Corsican 6779 Croatian 7282 Czech 6783 Danish 6865 Dutch 7876 English 6978 Esperanto 6979 Estonian 6984 Faroese 7079 Fiji 7074 Finnish 7073 French 7082 Frisian 7089 Galician 7176 Georgian 7565 German 6869 Greek 6976 Greenlandic...

Страница 49: ... first Sunday in April and ending at 2 a m on the last Sunday in October TIME ZONE EST CST MST PST AST HST s5 s6 s7 s8 s9 s10 J 5 Press ENTER The clock starts Note When you change the time zone the recording times for programs recorded before the time zone was changed also change to corre spond to the new time zone Adjust the time zone s1 or r1 if it was not set correctly with auto clock setting Y...

Страница 50: ...utput from the VIDEO OUT terminal or S VIDEO OUT terminal I P B MPEG 2 the video compression standard adopted for use with DVD Video codes frames using these 3 picture types I Intra coded picture This picture has the best quality and is the best to use when adjusting the picture P Predictive coded picture This picture is calculated based on past I or P pictures B Bidirectionally predictive coded p...

Страница 51: ...this unit s region number This unit can only play discs with the region numbers compatible with this unit 1 All or including the number 1 Cover page Your selection exceeds the recorder s rating limit A ratings level has been set for DVD Video with this unit Unlock the unit with Ratings in Disc 46 Finalizing is necessary for compatible playback To enable playback of your DVD R on compatible equipme...

Страница 52: ...unit do not appear on the television Make sure that the television is connected to the AUDIO VIDEO terminal S VIDEO OUT ter minal or COMPONENT VIDEO OUT terminal on this unit Make sure that the television s input setting e g VIDEO 1 is correct You have set TV Type to 4 3 480P or 16 9 480P in the TV Screen menus but the television isn t compatible with progressive signals Press and hold and TIME SL...

Страница 53: ... 36 Angle cannot be changed This function depends on software availability Angles can only be changed during scenes where different angles are recorded You have forgotten your rat ings password Return the ratings setting to 8 While the disc tray is open press and hold 6 and 5 9 on the main unit at the same time for 5 or more seconds The display is dim Go to the Display menu and change the display ...

Страница 54: ...losest to you Cannot record You haven t inserted a disc or the disc you inserted cannot be recorded on Insert a disc the unit can record onto The disc is unformatted Format the disc so this unit can record on it The write protect tab on the cartridge is set to PROTECT Some programs have limitations on the number of times they can be recorded CPRM The disc is protected with DISC SETTING The disc is...

Страница 55: ... 0 Vp p 75 C 0 286 Vp p 75 Output LINE pin jack a1 1 0 Vp p 75 S connectora1 Y 1 0 Vp p 75 C 0 286 Vp p 75 Component video output 480P 480i Y 1 0 Vp p 75 PB 0 7 Vp p 75 PR 0 7 Vp p 75 Antenna reception input TV Channel 2ch 69ch 75 CATV Channel 1ch 125ch 75 Audio system Recording system Dolby Digital XP SP LP EP Input LINE pin jack a3 Reference input 309 mVrms FS 2 Vrms 1 kHz 0 dB Input impedance 4...

Страница 56: ...to acts of God THERE ARE NO EXPRESS WARRANTIES EXCEPT AS LISTED UNDER LIMITED WARRANTY COVERAGE THE WARRANTOR IS NOT LIABLE FOR INCIDENTAL OR CONSEQUENTIAL DAMAGES RESULTING FROM THE USE OF THIS PRODUCT OR ARISING OUT OF ANY BREACH OF THIS WARRANTY As examples this excludes damages for lost time travel to and from the servicer loss of media or images data or other recorded content The items listed...

Страница 57: ...NADA INC BE LIABLE FOR ANY SPECIAL INDIRECT OR CONSEQUENTIAL DAMAGES In certain instances some jurisdictions do not allow the exclusion or limitation of incidental or consequential damages or the exclusion of implied warranties so the above limitations and exclusions may not be applicable WARRANTY SERVICE For product operation and information assistance please contact your Dealer or our Customer C...

Страница 58: ...tación de CA incluido Conecte por último Conecte también los cables de alimentación de CA para el otro equipo Cable de audio vídeo incluido Cable de antena desconectado normalmente desde el televisor A la toma de CA del hogar CA 120 V 60 Hz Este aparato Ventilador de refrigeración Rojo Blanco Amarillo Rojo Blanco Amarillo o 75 cable coaxial incluido Para disfrutar del vídeo progresivo Conecte a lo...

Страница 59: ...es de su televisor 1 Pulse SETUP para visualizar los menús 2 Pulse 3 4 para seleccionar Pantalla TV y pulse 1 3 Pulse 3 4 para seleccionar Tipo TV y pulse ENTER 4 Pulse 3 4 para seleccionar el elemento y pulse ENTER Para volver a la pantalla anterior Pulse RETURN Cuando haya finalizado Pulse SETUP Si selecciona el elemento para salida progresiva 480P Seleccione Vídeo en el menú en pantalla y ajust...

Страница 60: ...e la protección durante la grabación RAM Al utilizar un soporte DVD RAM por primera vez con este aparato formatéelo y asegúrese de que la grabación sea precisa En la grabación en DVD R hay limitaciones Durante la grabación de sonido MTS en DVD R únicamente se puede grabar o el canal principal o el subcanal Seleccione en Select MTS del Menú de audio Para su referencia Puede grabar hasta 99 programa...

Страница 61: ...roducción se inicia a partir de los 30 segundos anteriores Las imágenes que se están grabando en ese momento se muestran como imágenes dentro de imágenes y podrá escuchar el audio de reproducción 2 Pulse 3 4 para introducir la hora y pulse ENTER Pulse TIME SLIP para mostrar las imágenes de reproducción enteras Vuelva a pulsar para mostrar las imá genes de reproducción y grabación Introducción de d...

Страница 62: ... se cancela la posición al apagar el aparato o abrir la bandeja del disco Al detener la reproducción puede que aparezca el salvapantallas en el lado derecho Vuelva a pulsar y podrá utilizar el sintonizador del aparato para ver el televisor Para hacer una pausa en la reproducción Pulse Vuelva a pulsar para reanudar la reproducción Apagado automático El aparato pasa al modo en espera después de apro...

Страница 63: ...lsar POSITION MEMORY para memorizar una posición se reanudará la reproducción desde la posición pulsada al pulsar 1 PLAY RAM DVD R Al grabar una serie de programas se crea un lista Puede utilizar esta lista para encontrar programas para su visualización 1 Pulse DIRECT NAVIGATOR El programa resaltado se reproduce de fondo 2 Pulse 3 4 para seleccionar el programa y pulse ENTER También puede seleccio...

Страница 64: ... 24 V S S 37 C 2002 Matsushita Electric Industrial Co Ltd Printed in Japan Apparatus Claims of U S Patent Nos 4 631 603 4 577 216 and 4 819 098 licensed for limited viewing uses only This product incorporates copyright protection technology that is protected by method claims of certain U S patents and other intellectual property rights owned by Macrovision Corporation and other rights owners Use o...

Отзывы: