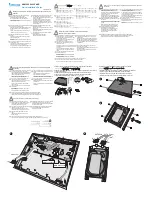
9.4. Checking the Power Supply P.C.B.
1. Remove the Top Cover.
2. Remove the Front Panel.
3. Remove the screw which fixed Rear Panel and AC Inlet on the
Power Supply P.C.B..
4. Remove the HDD with HDD bracket.
5. Use the extension cable (RFKZ0169) to connect the HDD and
Power supply P.C.B.
6. Remove the Power Supply P.C.B., fix it on the insulation sheet.
7. Use the extension cables (RFKZ0170,RFKZ0171) to connect the
Main P.C.B. and Power Supply P.C.B..
8. Use the extension cable (RFKZ0165) to connect the Main P.C.B.
and Front (L) P.C.B.
9. Use the extension cable (RFKZ0166) to connect the Power Supply
P.C.B. and Front (R) P.C.B.
Service tools
Extension Cable
(Main P.C.B. - Front (L) P.C.B.)
RFKZ0165 (20pin)
Extension Cable
(Power supply P.C.B. - Main
P.C.B.)
RFKZ0170 (19pin)
Extension Cable
(Power supply P.C.B. - Main
P.C.B.)
RFKZ0171 (15pin)
Extension Cable
(Power supply P.C.B. - Front
(R) P.C.B.)
RFKZ0166 (10pin)
Extension Cable
(Power supply P.C.B. - HDD)
RFKZ0169 (4pin)
32
Содержание DMR-E100HPC
Страница 13: ...6 2 3 Other Items needed Digital P C B HDD Conditions Nothing special 13 ...
Страница 14: ...6 2 4 Some defective functions Items needed PC card adaptor media Digital P C B conditions Nothing special 14 ...
Страница 25: ...2 Pull out the HDD holder vertically from Super sheet and HDD 25 ...
Страница 55: ...16 Exploded Views 16 1 Casing Parts Mechanism Section 1 16 2 Casing Parts Mechanism Section 2 55 ...
Страница 56: ...16 3 Packing Accessories Section 56 ...
Страница 69: ...69 ...
Страница 125: ...1 A B C 2 3 4 Location Map REAR DMR E100H P PC PL Main P C B REP3603B 1 4 Section 1 4 2 4 3 4 4 4 FRONT ...
Страница 126: ...5 6 7 8 Location Map REAR DMR E100H P PC PL Main P C B REP3603B 2 4 Section 1 4 2 4 3 4 4 4 FRONT ...
Страница 127: ...MAIN P C B D E F Location Map REAR DMR E100H P PC PL Main P C B REP3603B 3 4 Section 1 4 2 4 3 4 4 4 FRONT ...
Страница 128: ...Location Map REAR DMR E100H P PC PL Main P C B REP3603B 4 4 Section 1 4 2 4 3 4 4 4 FRONT ...


