background image

91

VQT1S88

Advanced (Playback)

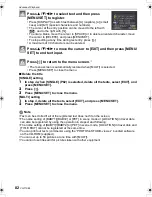
Press [

] to return to the menu screen.

Press [MENU/SET] to close the menu.

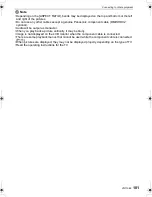
Canceling all the [PROTECT] settings

1

Select [CANCEL] on the screen shown in step 

2

 and then press [MENU/SET].

2

Press 

3

 to select [YES] and then press [MENU/SET].

3

Press [MENU/SET] to close the menu.

If you press [MENU/SET] while canceling protection, the canceling will stop halfway.

Note

The protect setting may not be effective on other equipment.

Even if you protect pictures in the built-in memory or a card, they will be deleted if the built-in 
memory or the card is formatted.

Even if you do not protect pictures on an SD Memory Card or an SDHC Memory Card, they 
cannot be deleted when the card’s Write-Protect switch is set to [LOCK].

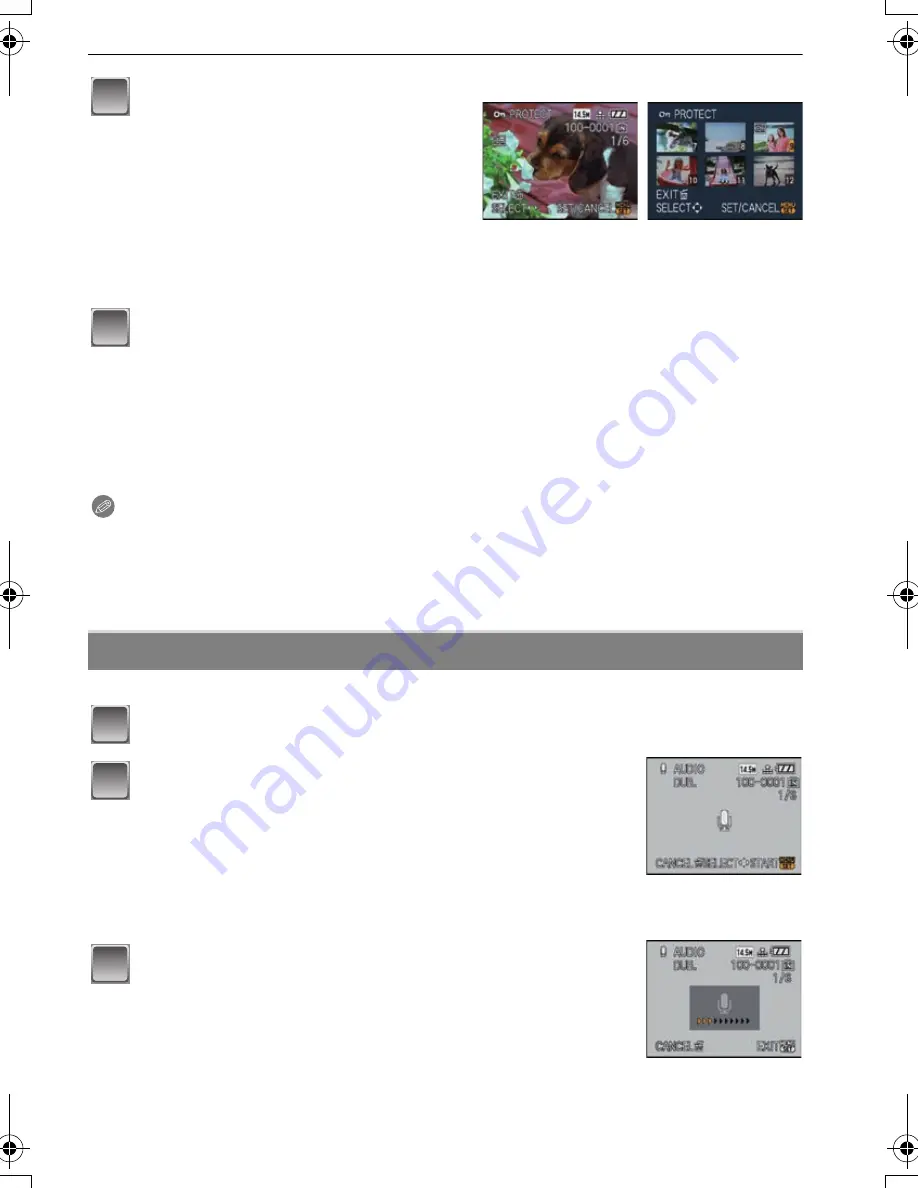
You can add the audio after taking a picture.

Select [AUDIO DUB.] on the [PLAYBACK] mode menu. (P18)

Select the picture, and then press 
[MENU/SET].

When [MULTI] has been selected

Repeat these steps for each picture.

The settings are canceled when [MENU/
SET] is pressed again.

[SINGLE]

[MULTI]

Press 

2

/

1

 to 

select the picture.

Press 

3

/

4

/

2

/

1


to select the 
pictures.

B


[AUDIO DUB.]

Press 

2

/

1

 to select the picture and then press 

[MENU/SET] to start audio recording.

The message [OVERWRITE AUDIO DATA?] screen appears 
when audio has already been recorded. Press 

3

 to select [YES] 

and then press [MENU/SET] to start audio recording. (The 
original audio is overwritten.)

Audio is recorded from the built-in microphone on the camera.

If you press [

], the audio dubbing is canceled.

Press [MENU/SET] to stop recording.

It will automatically stop after recording about 10 seconds without 
pressing [MENU/SET].

3

4

1

2

3

DMCFX150-VQT1S88_mst.book  91 ページ  2008年7月9日 水曜日 午後8時18分

Содержание DMC FX150K - Lumix Digital Camera

Страница 1: ... P VQT1S88 For USA assistance please call 1 800 211 PANA 7262 or contact us via the web at http www panasonic com contactinfo For Canadian assistance please call 1 800 99 LUMIX 1 800 995 8649 or send e mail to lumixconcierge ca panasonic com Operating Instructions Digital Camera Model No DMC FX150 ...

Страница 2: ...trols and components menu items etc of your Digital Camera may look somewhat different from those shown in the illustrations in these Operating Instructions SDHC Logo is a trademark Microsoft product screen shot s reprinted with permission from Microsoft Corporation Other names company names and product names printed in these instructions are trademarks or registered trademarks of the companies co...

Страница 3: ... and can radiate radio frequency energy and if not installed and used in accordance with the instructions may cause harmful interference to radio communications However there is no guarantee that interference will not occur in a particular installation If this equipment does cause harmful interference to radio or television reception which can be determined by turning the equipment off and on the ...

Страница 4: ...terference that may cause undesired operation Information on Disposal in other Countries outside the European Union This symbol is only valid in the European Union If you wish to discard this product please contact your local authorities or dealer and ask for the correct method of disposal CAUTION Battery pack Lithium ion battery pack Use the specified unit to recharge the battery pack Do not use ...

Страница 5: ...s on the camera use a dry cloth to wipe the camera body carefully About Condensation When the lens is fogged up Condensation occurs when the ambient temperature or humidity changes Be careful of condensation since it causes lens stains fungus and camera malfunction If condensation occurs turn the camera off and leave it for about 2 hours The fog will disappear naturally when the temperature of the...

Страница 6: ...s NORMAL PLAY 33 Displaying Multiple Screens Multi Playback 33 Using the Playback Zoom 34 Switching the PLAYBACK mode 34 Deleting Pictures 35 To delete a single picture 35 To delete multiple pictures up to 50 or all the pictures 35 Advanced Recording pictures About the LCD Monitor 36 Taking Pictures using the Built in Flash 38 Switching to the appropriate flash setting 38 Adjust the flash output 4...

Страница 7: ...AUDIO DUB 91 S COPY 92 Connecting to other equipment Connecting to a PC 93 Printing the Pictures 95 Selecting a single picture and printing it 96 Selecting multiple pictures and printing them 96 Print Settings 97 Playing Back Pictures on a TV Screen 99 Playing back pictures using the AV cable supplied 99 Playing back pictures on a TV with an SD Memory Card slot 100 Playing back on the TV with comp...

Страница 8: ...ra is shipped Charge the battery before use Insert the battery and the card P14 When you do not use the card you can record or play back pictures on the built in memory P15 Refer to P15 when you use a card Turn the camera on to take pictures 1 Slide the REC PLAYBACK selector switch to 2 Press the shutter button to take pictures P26 Play back the pictures 1 Slide the REC PLAYBACK selector switch to...

Страница 9: ...HC Memory Card and MultiMediaCard are indicated as card in the text The card is optional You can record or play back pictures on the built in memory when you are not using a card For information about optional accessories refer to the Digital Camera Accessory System P126 If any accessories are lost customers in the USA should contact Panasonic s parts department at 1 800 833 9626 and customers in ...

Страница 10: ...AYBACK selector switch P17 10 Cursor buttons A 3 Exposure compensation P43 Flash output adjustment P40 Auto bracket P44 Color bracket P45 B 4 Macro mode P41 AF Tracking P27 67 C 2 Self timer button P42 D 1 Flash setting button P38 White balance fine adjustment P65 In these operating instructions the cursor buttons are described as shown in the figure below or described with 3 4 2 1 e g When you pr...

Страница 11: ...op it 19 Lens barrel 20 COMPONENT OUT socket P100 21 AV OUT DIGITAL socket P93 95 99 22 DC IN socket P93 95 Always use a genuine Panasonic AC adaptor DMW AC5PP optional This camera cannot charge the battery even when the AC adaptor DMW AC5PP optional is connected to it 23 Tripod receptacle When you use a tripod make sure the tripod is stable when the camera is attached to it 24 Card Battery door P...

Страница 12: ...function The battery will be exhausted if left for a long period of time after being charged The battery can be recharged even when it still has some charge left but it is not recommended that the battery charge be frequently topped up while the battery is fully charged The battery has characteristics that will reduce its operating duration and cause the battery to swell up When the operating time...

Страница 13: ...er LCD mode and Power LCD mode P21 The number of recordable pictures varies depending on the recording interval time If the recording interval time becomes longer the number of recordable pictures decreases e g When recording once every 2 minutes the number of recordable pictures decreases to about 82 The number of recordable pictures and playback time will vary depending on the operating conditio...

Страница 14: ...uch the connection terminals of the card The card may be damaged if it is not fully inserted 1 Close the card battery door 2 Slide the release lever in the direction of the arrow If the card battery door cannot be completely closed remove the card check its direction and then insert it again Note Remove the battery after use Store the removed battery in the battery carrying case supplied Do not re...

Страница 15: ...ith 4 GB or more capacity Please confirm the latest information on the following website http panasonic co jp pavc global cs This Site is English only The following operations can be performed using this unit When a card has not been inserted Pictures can be recorded in the built in memory and played back When a card has been inserted Pictures can be recorded on the card and played back When using...

Страница 16: ... the camera is shipped Press MENU SET Press 2 1 to select the items year month day hour minute display sequence or time display format and press 3 4 to set A Time at the home area B Time at the travel destination P60 Cancel without setting the clock Select either 24HRS or AM PM for the time display format AM PM is displayed when AM PM is selected When AM PM is selected as the time display format m...

Страница 17: ...hem back just as you like and menus that enable you to have more fun with the camera and use it more easily In particular the SETUP menu contains some important settings relating to the camera s clock and power Check the settings of this menu before proceeding to use the camera Changing the clock setting MODE playback mode menu P33 75 to78 A REC PLAYBACK selector switch This menu lets you select t...

Страница 18: ...K menu and SETUP menu as well Example Setting AF MODE from Ø to š in the program AE mode Setting menu items Turn the camera on A MENU SET button B REC PLAYBACK selector switch C Mode dial Slide the REC PLAYBACK selector switch to When selecting the PLAYBACK mode menu settings set the REC PLAYBACK selector switch to and proceed to step 4 Set the mode dial to Press MENU SET to display the menu You c...

Страница 19: ...E P64 AF MODE P66 Press 3 4 to select AF MODE Select the item at the very bottom and press 4 to move to the second screen Press 1 Depending on the item its setting may not appear or it may be displayed in a different way Press 3 4 to select š Press MENU SET to set Using the quick menu Press and hold Q MENU when recording Press 3 4 2 1 to select the menu item and the setting and then press MENU SET...

Страница 20: ...hen you connect the camera to a TV the volume of the TV speakers does not change U CLOCK SET Setting Date Time WORLD TIME Set the time in your home area and travel destination DESTINATION Travel destination area HOME Your home area TRAVEL DATE Set the departure date and the return date of the vacation TRAVEL SETUP OFF SET LOCATION OFF SET r BEEP This allows you to set the beep and shutter sound r ...

Страница 21: ... is around the camera POWER LCD The LCD monitor becomes brighter and easier to see even when taking pictures outdoors GUIDE LINE Set the pattern of the guide lines displayed when taking pictures You can also set whether or not to have the recording information displayed when the guide lines are displayed P36 REC INFO OFF ON PATTERN HISTOGRAM This allows you to set either to display or not display ...

Страница 22: ...ber cannot be reset We recommend formatting the card P24 after saving the data on a PC or elsewhere To reset the folder number to 100 format the built in memory or the card first and then use this function to reset the file number A reset screen for the folder number will then appear Select YES to reset the folder number q ECONOMY You can conserve the battery life by setting these menus Also it wi...

Страница 23: ...nected PAL video out is not available on the version DMC FX150P sold in the U S This will work when the AV cable is connected w RESET The REC or SETUP menu settings are reset to the initial settings x USB MODE Select the USB communication system after or before connecting the camera to your PC or your printer with the USB connection cable supplied y SELECT ON CONNECTION Select either PC or PictBri...

Страница 24: ...TTER SUBJ MOVE DEMO cannot be displayed Press DISPLAY to close JITTER SUBJ MOVE DEMO Press MENU SET to close AUTO DEMO JITTER SUBJ MOVE DEMO is an approximation AUTO DEMO has no TV output capability FORMAT The built in memory or card is formatted Formatting irretrievably deletes all the data so check the data carefully before formatting LANGUAGE Set the language displayed on the screen ENGLISH DEU...

Страница 25: ...K selector switch to Switching the mode by rotating the mode dial Align a desired mode with part C Rotate the mode dial slowly and surely to adjust to each mode The part where there is no mode will not turn Intelligent auto mode P26 The subjects are recorded using settings automatically selected by the camera Program AE mode P29 The subjects are recorded using your own settings º Manual exposure m...

Страница 26: ... ñ The status indicator 3 lights when you turn this unit on 2 It turns off after about 1 second 1 Shutter button Hold this unit gently with both hands keep your arms still at your side and stand with your feet slightly apart A Flash B AF assist lamp Press the shutter button halfway to focus The focus indication 1 green lights when the subject is focused The AF area 2 is displayed around the subjec...

Страница 27: ...different scene may be identified for the same subject Subject conditions When the face is bright or dark The size of the subject The distance to the subject The contrast of the subject When the subject is moving When zoom is used Recording conditions Sunset Sunrise Under low brightness conditions When the camera is shaken To take pictures in an intended scene it is recommended that you take pictu...

Страница 28: ...TR SPEED HISTOGRAM HIGHLIGHT Adjusting flash output The other items on the SETUP menu can be set in a mode such as the Program AE mode What is set will be reflected in the Intelligent auto mode About the flash Settings in Intelligent auto mode Item Settings GUIDE LINE P21 REC INFO OFF ECONOMY POWER SAVE P22 5MIN AUTO REVIEW P22 2SEC Focus range The focus range becomes the same as macro mode 5 cm 0...

Страница 29: ...ector switch Set the mode dial to To change the setting while taking pictures refer to Using the REC Mode Menu P61 Aim the AF area at the point you want to focus on Press the shutter button halfway to focus The focus indication green lights when the subject is focused The focus range is 50 cm 1 64 feet to If pictures are to be taken at an even closer range refer to Taking Close up Pictures P41 Pre...

Страница 30: ...itter occurs When the camera is too close to the subject or when taking a picture of both distant and near subjects When the jitter alert appears use STABILIZER P73 a tripod or the self timer P42 Shutter speed will be slower particularly in the following cases Keep the camera still from the moment the shutter button is pressed until the picture appears on the screen We recommend using a tripod Slo...

Страница 31: ...can enter the digital zoom range by continuously rotating the zoom lever to Tele or releasing the zoom lever once and then rotating it to Tele again Using the Optical Zoom Using the Extended Optical Zoom EZ Using the Digital Zoom To make subjects appear closer use Tele Rotate the zoom lever towards Tele To make subjects appear further away use Wide Rotate the zoom lever towards Wide Feature Optica...

Страница 32: ...epending on the picture size that is set To return to Wide using the easy zoom Zooming returns at high speed as far as Wide When the zoom position returns to the Wide while the maximum picture size is set the picture size which was changed in the extended optical zoom range now returns to what it was originally Also the picture size returns to what it was originally when the zoom position has been...

Страница 33: ...ture and the total number of recorded pictures Rotate the zoom lever towards Z T to return to the previous screen Pictures are not rotated for display To return to normal playback 1 Press 3 4 2 1 to select a picture An icon will be displayed depending on the recorded picture and the settings 2 Press MENU SET The picture that was selected will appear Slide the REC PLAYBACK selector switch A to Norm...

Страница 34: ...m lever towards L W after enlarging the picture the magnification becomes lower When you change the magnification the zoom position indication A appears for about 1 second and the position of the enlarged section can be moved by pressing 3 4 2 1 The more a picture is enlarged the more its quality deteriorates When you move the position to be displayed the zoom position indication appears for about...

Страница 35: ...s To delete a single picture Select the picture to be deleted and then press A DISPLAY button B button Press 2 to select YES and then press MENU SET To delete multiple pictures up to 50 or all the pictures Press Press 3 4 to select DELETE MULTI or DELETE ALL and then press MENU SET DELETE ALL step 5 Press 3 4 2 1 to select the picture and then press DISPLAY to set Repeat this step appears on the s...

Страница 36: ... About the LCD Monitor Press DISPLAY to change A LCD monitor B DISPLAY button When the menu screen appears the DISPLAY button is not activated During playback zoom P34 while playing back motion pictures P78 and during a slide show P75 you can only select Normal display F or No display H In recording mode In playback mode 1 If the HISTOGRAM in SETUP menu is set to ON histogram will be displayed 2 S...

Страница 37: ...ea will also have a histogram like this Examples of histogram Note When you take pictures with the flash or in dark places the histogram is displayed in orange because the recorded picture and the histogram do not match each other When the manual exposure assistance is other than n0EV during exposure compensation or in the manual exposure mode When the flash is activated In FLASH BURST STARRY SKY ...

Страница 38: ...he flash is automatically activated when the recording conditions make it necessary It is activated once before the actual recording to reduce the red eye phenomenon eyes of the subject appearing red in the picture and then activated again for the actual recording Use this when you take pictures of people in low lighting conditions Forced flash ON Forced ON Red eye reduction The flash is activated...

Страница 39: ... Set the flash setting again if necessary The flash setting is memorized even if the camera is turned off However the scene mode flash setting is reset to the initial setting when the scene mode is changed The available flash range to take pictures The available flash range is an approximation Œ Œ ñ í ï 9 ô 0 5 4 6 8 7 1 2 3 n ISO sensitivity Available flash range Wide Tele AUTO 60 cm 1 97 feet to...

Страница 40: ...s turned off The flash output adjustment cannot be used while in FLASH BURST in scene mode Shutter speed for each flash setting 1 It may vary depending on the MIN SHTR SPEED setting P73 2 When Intelligent ISO is set P63 3 SPORTS BABY1 BABY2 and PET in scene mode P47 2 3 The shutter speed becomes a maximum of 1 second in the following cases When the optical image stabilizer is set to OFF When the c...

Страница 41: ...ictures of a subject e g when taking pictures of flowers You can take pictures of a subject as close as 5 cm 0 17 feet from the lens by rotating the zoom lever upmost to Wide 1k Press 4 In macro mode is displayed To cancel press 4 again Take the pictures Focus range The focus range changes in steps Note We recommend using a tripod and the self timer We recommend setting the flash to Œ when you tak...

Страница 42: ...is fixed to 3 The number of pictures which can be taken in FLASH BURST in scene mode is fixed to 5 Self timer cannot be set to 2 seconds in Intelligent auto mode Self timer cannot be set to 10 seconds in SELF PORTRAIT in scene mode Self timer cannot be used while in HI SPEED BURST in scene mode Press 2 ë Press 3 4 to select a mode You can also press 2 ë to select Press MENU SET You can also press ...

Страница 43: ...utter speed The exposure compensation value appears on the lower left of the screen The set exposure value is memorized even if the camera is turned off The compensation range of the exposure will be limited depending on the brightness of the subject Under exposed Properly exposed Overexposed Compensate the exposure towards positive Compensate the exposure towards negative Press 3 È until EXPOSURE...

Страница 44: ...n is pressed You can select the picture with the desired exposure from the 3 pictures with different exposures With auto bracket d1 EV Auto Bracket 1st picture 2nd picture 3rd picture d0 EV j1 EV i1 EV Press 3 È until AUTO BRACKET appears set the compensation range of the exposure with 2 1 When you do not use auto bracket select OFF 0 Press MENU SET to finish You can also press the shutter button ...

Страница 45: ...ed the exposure compensation value appears on the lower left of the screen The auto bracket setting is canceled if you turn the camera off or POWER SAVE is activated When auto bracket color bracket is set the auto review function is activated regardless of the auto review setting The picture is not enlarged You cannot set the auto review function in the SETUP menu The exposure may not be compensat...

Страница 46: ... assistance A appears for about 10 seconds to indicate the exposure Set the aperture value and the shutter speed again when the exposure is not adequate Manual setting screen is displayed when 3 is pressed Take the pictures Manual Exposure Assistance Manual exposure assistance is an approximation It is recommended to record by confirming in playback mode Note Brightness of the LCD monitor may diff...

Страница 47: ...u press DISPLAY again the screen returns to the scene mode menu Note To change the scene mode press MENU SET and then press 1 and return to step 3 above Refer to P40 for information about the shutter speed The scene mode flash setting is reset to the initial setting when the scene mode is changed When you take a picture with a scene mode that is not adequate for the purpose the hue of the picture ...

Страница 48: ...he zoom lever as far as possible to Tele 2 Move close to the subject to make this mode more effective Note If a part of the background etc is a color close to skin color this part is also smoothed This mode may not be effective when there is insufficient brightness The initial setting for AF MODE is š Subject can be recorded either slim or stretched and at the same time skin can be recorded smooth...

Страница 49: ... set to off or 2 seconds If it is set to 2 seconds this setting will remain until the camera is turned off the scene mode is changed or REC mode or PLAYBACK mode is selected The stabilizer function mode is fixed to MODE2 P73 The initial setting for AF MODE is š This allows you to take pictures of a wide landscape Note The focus range is 5 m 16 4 feet to Set here when you want to take pictures of s...

Страница 50: ...e allows you to take pictures of food with a natural hue without being affected by the ambient light in restaurants etc Note The focus range becomes the same as macro mode 5 cm 0 17 feet Wide 30 cm 0 99 feet Tele to Select this when you want to take pictures at a wedding reception an indoor party etc This allows you to take pictures of people and the background with near real life brightness Techn...

Страница 51: ...as been set the age or name will not be displayed Before taking pictures set AGE or NAME to ON The focus range becomes the same as macro mode 5 cm 0 17 feet Wide 30 cm 0 99 feet Tele to INTELLIGENT ISO is activated and maximum ISO sensitivity level becomes ISO400 If the camera is turned on with BABY1 BABY2 set the age and name are displayed at the lower left of the screen for about 5 seconds along...

Страница 52: ...Wide 30 cm 0 99 feet Tele to This is a convenient mode for shooting rapid movement or a decisive moment 1 Press 3 4 to select SPEED PRIORITY or IMAGE PRIORITY and then press MENU SET to set 2 Press 3 4 to select the picture size and aspect ratio and then press MENU SET to set 3M 4 3 2 5M 3 2 or 2M 16 9 is selected as the picture size 3 Take pictures Still pictures are taken continuously while the ...

Страница 53: ...y Note QUALITY is automatically fixed to You can take pictures suitable for 4qk6q 10k15 cm printing The focus range becomes the same as macro mode 5 cm 0 17 feet Wide 30 cm 0 99 feet Tele to The focus zoom exposure shutter speed ISO sensitivity and flash level are fixed to the settings for the first picture INTELLIGENT ISO is activated and maximum ISO sensitivity level becomes ISO3200 See the Note...

Страница 54: ...bilizer function 1 4th of a second or 2 seconds The shutter speed becomes 2 seconds only when the camera has determined that there is little jitter such as when using a tripod etc You can change the shutter speed by compensating the exposure The AF area is not displayed ISO sensitivity is fixed to ISO100 This allows you to take even more vivid pictures of the blue color of the sea sky etc It also ...

Страница 55: ...Picture is taken with a grainy texture as though blasted with sand Picture size and aspect ratio 7 AERIAL PHOTO PIN HOLE Press 3 4 to select the picture size and aspect ratio and then press MENU SET to set 3M 4 3 2 5M 3 2 or 2M 16 9 is selected as the picture size Note QUALITY is automatically fixed to You can take pictures suitable for 4qk6q 10k15 cm printing The focus range becomes the same as m...

Страница 56: ... and the elapsed recording time C is displayed on the bottom right of the screen After pressing the shutter button fully release it straight away If the button is held down the sound will not be recorded for a few seconds when recording starts When the subject is focused the focus indication lights The focus and zoom are fixed to the setting when recording starts the first frame The audio is also ...

Страница 57: ...ss indication may appear for a while after recording motion pictures This is not a malfunction When motion pictures recorded with the camera are played back on other equipment the quality of the picture and sound may deteriorate and it may not be possible to play them back Also the recording information may not be displayed correctly Due to implemented sound quality improvements motion pictures sh...

Страница 58: ...T STAMP P83 The number of days that have passed since the departure date can be printed out using the PHOTOfunSTUDIO viewer bundled software on the CD ROM supplied Select CLOCK SET to set the current date and time in advance P16 Recording which Day of the Vacation You Take the Picture Select TRAVEL DATE from the SETUP menu and then press 1 Press 3 to select TRAVEL SETUP and then press 1 Press 4 to...

Страница 59: ... the pictures which day of the vacation you took them is not displayed If you set a departure date and then take a picture on a date before this departure date minus is displayed in orange and the day of the vacation that you took the picture is not recorded If the travel date is displayed as minus in white there is a time difference that involves date change between the HOME and DESTINATION It wi...

Страница 60: ...it the PLEASE SET THE HOME AREA message appears Press MENU SET and set the home area on the screen in step 3 Press 4 to select HOME and then press MENU SET Press 2 1 to select the home area and then press MENU SET A Current time B Time difference from GMT Greenwich Mean Time If daylight saving time is used at the home area press 3 Press 3 again to return to the original time The daylight saving ti...

Страница 61: ...e is made of numerous dots called pixels The higher the numbers of pixels the finer the picture will be when it is printed on a large piece of paper or displayed on a PC monitor A Many pixels Fine B Few pixels Rough These pictures are examples to show the effect If you change the aspect ratio set the picture size again PICTURE SIZE 14 5M 4416k3312 pixels 10M 3648k2736 pixels 7M 3072k2304 pixels 5M...

Страница 62: ...ed picture editing if you use RAW files You can save RAW files in a file format JPEG TIFF etc that can be displayed on your PC etc develop them and edit them using the software SILKYPIX Developer Studio by Ichikawa Soft Laboratory on the CD ROM supplied images are recorded with a smaller data volume than The following PLAYBACK mode menu can be used for or CALENDAR ROTATE PROTECT For details on REC...

Страница 63: ...T is set to AUTO the ISO limit is set automatically up to a maximum of ISO800 For details on REC mode menu settings refer to P18 This allows the sensitivity to light ISO sensitivity to be set Setting to a higher figure enables pictures to be taken even in dark places without the resulting pictures coming out dark Applicable modes AUTO 100 200 400 800 1600 Note When setting to AUTO ISO sensitivity ...

Страница 64: ...this item adjusts to the color of white which is closest to what is seen by the eye in accordance with the light source Applicable modes n Note The optimal white balance will differ depending on the type of halogen lighting being recorded under so use AWB or The white balance setting is memorized even if the camera is turned off However the white balance setting for a scene mode returns to AWB whe...

Страница 65: ...e standard setting center point in the following cases When you reset the white balance in or When you reset the color temperature manually in Auto white balance Depending on the conditions prevailing when pictures are taken the pictures may take on a reddish or bluish tinge Furthermore when a multiple number of light sources are being used or there is nothing with a color close to white auto whit...

Страница 66: ...subject on the center of the screen and measure the whole screen evenly Ù Spot This is the method to measure the subject in the spot metering target A AF MODE š Face detection The camera automatically detects the person s face The focus and exposure can then be adjusted to fit that face no matter what portion of the picture it is in max 15 areas AF Tracking Focus can be adjusted to a specified sub...

Страница 67: ...detected Other faces that are the same distance away as faces within the yellow AF areas are also focused Under certain picture taking conditions including the following cases the facial recognition function may fail to work making it impossible to detect faces AF MODE is switched to When the face is not facing the camera When the face is at an angle When the face is extremely bright or dark When ...

Страница 68: ...COLOR EFFECT is set It is not possible to set in STARRY SKY FIREWORKS PIN HOLE or FILM GRAIN in scene mode or in the motion picture mode The focus range becomes the same as macro mode 5 cm 0 17 feet Wide 30 cm 0 99 feet Tele to About AF area selection You can select the AF area when ƒ Ø or Ù is selected It will switch to the AF area select screen by selecting AF MODE with 3 4 and then pressing 1 I...

Страница 69: ...mory or the card is full The focus is fixed when the first picture is taken When the burst speed is set to the exposure and white balance are fixed at the settings used for the first picture for the subsequent pictures as well When the burst speed is set to ò they are adjusted each time you take a picture When the self timer is used the number of recordable pictures in burst mode is fixed to 3 If ...

Страница 70: ...pplicable modes 1 Select START and then press MENU SET 2 Decide on the composition and take the first picture After taking the picture press the shutter button halfway down to take the next picture Press 3 4 to select the item and then press MENU SET for one of the following operations 3 Decide on the composition and take the second picture After taking the picture the first and second pictures ta...

Страница 71: ...l not be able to use the following functions Burst mode AUTO BRACKET COLOR BRACKET Extended optical zoom Digital zoom I EXPOSURE AUDIO REC We recommend using a tripod if taking pictures with multiple exposures The multiple exposure setting is released at the following times When the power has been turned off When the card has been changed When the USB connection cable has been connected to the cam...

Страница 72: ...ncreasing the setting for NOISE REDUCTION or lowering the setting for each of the items other than NOISE REDUCTION H COLOR EFFECT OFF This is the standard setting B W The picture becomes black and white SEPIA The picture becomes sepia COOL The picture becomes bluish WARM The picture becomes reddish I PICT ADJ CONTRAST r Increases the difference between the brightness and the darkness in the pictur...

Страница 73: ...refer to P18 You can take a picture brightly in dark places by setting MIN SHTR SPEED slower Also you can set it faster to reduce the blur of the subject Applicable modes 1 125 1 60 1 30 1 15 1 8 1 4 1 2 1 Note This should usually be set to 1 8 to take pictures When you select a minimum shutter speed other than 1 8 appears on the screen Setting MIN SHTR SPEED to slower speed might increase the cha...

Страница 74: ...ing difficult Applicable modes n For details on REC mode menu settings refer to P18 To set the year month day and time It functions in exactly the same way as CLOCK SET in the SETUP menu B AUDIO REC OFF Audio will not be recorded ON B is displayed on the screen Audio will be recorded as soon as the image is recorded It will stop in 5 seconds F AF ASSIST LAMP OFF The AF assist lamp does not turn on...

Страница 75: ...iew the pictures you have taken Slide the REC PLAYBACK selector switch to and then press MENU SET Press 1 Press 3 4 to select SLIDE SHOW and then press MENU SET When ALL or FAVORITE has been selected in step 4 When CATEGORY SELECTION has been selected in step 4 Press 3 4 to select the item and then press MENU SET FAVORITE can be selected only when FAVORITE on the PLAYBACK menu P88 is at ON and the...

Страница 76: ...e pictures are played back with the recommended effects in each category SETUP DURATION or REPEAT can be set DURATION can be set only when OFF has been selected as the EFFECT setting AUDIO will be displayed only when the EFFECT is set to OFF Audio will be played along with the still picture with audio by setting the AUDIO to ON Note Motion pictures cannot be played back as a slide show It is not p...

Страница 77: ...ke time to search the picture files if there are a lot on the card or the built in memory If you press while searching the searching will stop halfway Pictures are sorted into the categories shown below Still pictures created from a motion picture cannot be played back from the motion pictures category in category playback CATEGORY PLAY CATEGORY Recording information e g scene modes CATEGORY Recor...

Страница 78: ...with a motion picture icon such as and then press 3 to play back A The motion picture recording time B Motion picture icon C Motion picture playback icon After playback starts the elapsed playback time is displayed on the upper right of the screen For example 8 minutes and 30 seconds is displayed as 8m30s Operations performed during motion picture playback The cursor displayed during playback is t...

Страница 79: ...than usual PLAYBACK mode Creating still pictures from a motion picture You can create a single still picture with 1 screen or 9 screens from a recorded motion picture This is effective in moving scenes when you want to look carefully at the movement of a sportsperson etc Press 3 to pause motion picture playback To save the displayed image as 1 picture go to step 3 To save the motion picture as 1 p...

Страница 80: ...V a new edited picture is created A new picture cannot be created if there is no free space on the built in memory or the card so we recommend checking that there is free space and then editing the picture You can display pictures by recording date Picture size Item 1 picture 9 pictures 2 M 2 M 0 3 M 2 M 0 3 M 1 M CALENDAR Select CALENDAR on the PLAYBACK mode menu P18 You can also rotate the zoom ...

Страница 81: ...t can be included in prints using TEXT STAMP P83 Only alphabetic characters and symbols can be entered Select TITLE EDIT on the PLAYBACK mode menu P18 Press 3 4 to select SINGLE or MULTI and then press MENU SET Press MENU SET to display the pictures that were recorded on the selected date Press to return to the calendar screen Press 3 4 2 1 to select a picture and then press MENU SET The picture t...

Страница 82: ...T to close the menu Delete the title SINGLE setting 1 In step 4 when SINGLE P82 is selected delete all the texts select EXIT and press MENU SET 2 Press 3 Press MENU SET to close the menu MULTI setting 1 In step 4 delete all the texts select EXIT and press MENU SET 2 Press MENU SET to close the menu Note Text can be scrolled if all of the registered text does not fit on the screen The name setting ...

Страница 83: ... DATE is stamped on the pictures TITLE Text is printed together with the image for pictures that have already been recorded with text in BABY1 BABY2 or PET name settings in scene mode LOCATION in travel date or TITLE EDIT Press MENU SET If you set TEXT STAMP for a picture with a picture size larger than the picture size will become smaller as shown below TEXT STAMP Select the picture and then pres...

Страница 84: ...may be cut at printing Check before printing When text is stamped onto the pictures it is difficult to read it Text and dates cannot be stamped on the pictures taken with other equipment We recommend resizing to if you want to attach a picture to an e mail or use it on a website Pictures set to the minimum number of pixels for ASPECT RATIO cannot be further reduced in size Select RESIZE on the PLA...

Страница 85: ...e and then clip the important part of the recorded picture Select TRIMMING on the PLAYBACK mode menu P18 MULTI setting 1 Press 3 4 to select the size and then press MENU SET When DISPLAY is pressed an explanation of resizing is displayed 2 Press 3 4 2 1 to select the picture and then press DISPLAY Repeat this step for each picture and press MENU SET to set MULTI TRIMMING Press 2 1 to select the pi...

Страница 86: ...inute tilting of the image can be adjusted Select LEVELING on the PLAYBACK mode menu P18 Press to return to the menu screen Press MENU SET to close the menu Note Quality of image may become coarse when levelling is performed Recorded pixels may decrease compared to original image when levelling is performed Levelling may not be performed on images recorded with other equipment LEVELING Press 2 1 t...

Страница 87: ...lly display pictures vertically if they were recorded holding the camera vertically or rotate pictures manually in 90o steps Select ROTATE on the PLAYBACK mode menu P18 The ROTATE function is disabled when ROTATE DISP is set to OFF ASPECT CONV Press 3 4 to select Y or X and then press MENU SET Press 2 1 to select a picture taken with W aspect ratio and then press MENU SET Press 2 1 to determine th...

Страница 88: ...ou can do the following if a mark has been added to pictures and they have been set as favorites Play back only the pictures set as favorites FAVORITE PLAY Play back the pictures set as favorites only as a slide show Delete all the pictures not set as favorites ALL DELETE EXCEPTÜ Select FAVORITE on the PLAYBACK mode menu P18 The picture rotates clockwise in steps of 90o The picture rotates counter...

Страница 89: ...Digital Print Order Format is a system that allows the user to select which pictures to print how many copies of each picture to print and whether or not to print the recording date on the pictures when using a DPOF compatible photo printer or photo printing store For details ask at your photo printing store When you want to use a photo printing store to print pictures recorded on the built in mem...

Страница 90: ...rinting be sure to order the printing of the date additionally if required Depending on the photo printing store or the printer the date may not be printed even if you set to print the date For further information ask at your photo printing store or refer to the operating instructions for the printer The date cannot be printed on pictures stamped with text Note The number of prints can be set from...

Страница 91: ...e Protect switch is set to LOCK You can add the audio after taking a picture Select AUDIO DUB on the PLAYBACK mode menu P18 Select the picture and then press MENU SET When MULTI has been selected Repeat these steps for each picture The settings are canceled when MENU SET is pressed again SINGLE MULTI Press 2 1 to select the picture Press 3 4 2 1 to select the pictures B AUDIO DUB Press 2 1 to sele...

Страница 92: ...ufficient free space the picture data will only be copied halfway We recommend using a card which has more free space than the built in memory about 50 MB If a picture exists with the same name folder number file number as the picture to be copied in the copy destination when is selected a new folder is created and the picture is copied If a picture exists with the same name folder number file num...

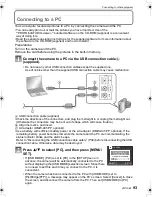
Страница 93: ... s screen Select Cancel to close the screen and disconnect the camera from the PC Then set USB MODE to PC again A USB connection cable supplied Check the directions of the connectors and plug them straight in or unplug them straight out Otherwise the connectors may be bent out of shape which will cause trouble B Align the marks and insert C AC adaptor DMW AC5PP optional Use a battery with sufficie...

Страница 94: ...r is created when pictures are taken in the following situations After NO RESET P22 in the SETUP menu has been executed When a card containing a folder with the same folder number has been inserted Such as when pictures were taken using another make of camera When there is a picture with file number 999 inside the folder Connection in the PTP mode WindowsR XP Windows VistaR and Mac OS X only Set U...

Страница 95: ...the connectors and plug them straight in or unplug them straight out Otherwise the connectors may be bent out of shape which will cause trouble B Align the marks and insert C AC adaptor DMW AC5PP optional Use a battery with a sufficient battery power or the AC adaptor DMW AC5PP optional If the remaining battery power becomes low while the camera and the printer are connected the status indicator b...

Страница 96: ...he picture and then press MENU SET The message disappears in about 2 seconds Press 3 to select PRINT START and then press MENU SET Refer to P97 for the items which can be set before starting to print the pictures Press MENU SET to cancel printing halfway Disconnect the USB connection cable after printing Selecting multiple pictures and printing them Press 3 Press 3 4 to select an item and then pre...

Страница 97: ...ate printing the date cannot be printed on the picture Since the printer s settings may take precedence over the print with date setting check the printer s print with date setting as well Note When asking the photo shop to print the pictures By stamping the date using TEXT STAMP P83 or setting date printing at the time of the DPOF PRINT P89 setting before going to a photo shop the dates can be pr...

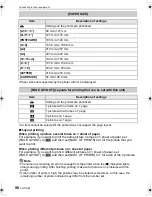
Страница 98: ...ge from the printer when the indication lights orange during printing After finishing printing make sure there are no problems with the printer If the number of prints is high the pictures may be printed several times In this case the remaining number of prints indicated may differ from the number set PAPER SIZE Item Description of settings Settings on the printer are prioritized L 3 5qk5q 89 mmk1...

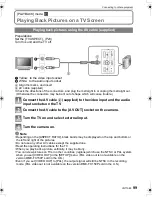
Страница 99: ...the TV on and select external input Turn the camera on Note Depending on the ASPECT RATIO black bands may be displayed on the top and bottom or the left and right of the pictures Do not use any other AV cables except the supplied one Read the operating instructions for the TV When you play back a picture vertically it may be blurry You can view pictures on TVs in other countries regions which use ...

Страница 100: ...tures on a TV with an SD Memory Card slot Playing back on the TV with component socket Preparations Turn this unit and the TV off 1 Component Plugs Connect the plugs to the component video input sockets on the TV with same color Indication on the TV might be different 2 Audio Pin Plugs to the audio input socket 3 TV with component socket A Align the marks and insert B Component cable DMW HDC2 opti...

Страница 101: ...nt cable DMW HDC2 optional Audio will be output as monaural When you play back a picture vertically it may be blurry Image is not displayed on the LCD monitor when the component cable is connected There are some playback menus that cannot be used while the component cable is connected P111 When pictures are displayed they may not be displayed properly depending on the type of TV Read the operating...

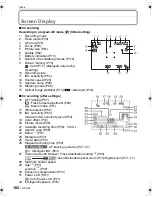
Страница 102: ... In recording after settings 16 AF Tracking P67 Flash output adjustment P40 Macro mode P41 17 White balance P64 18 ISO sensitivity P63 maximum ISO sensitivity level P63 19 Color effect P72 20 Picture mode P56 21 Available recording time P56 22 Spot AF area P66 23 Name 1 P51 24 Histogram P37 25 Travel date P58 26 Elapsed recording time P56 AF tracking operation P27 67 Intelligent ISO P63 27 Current...

Страница 103: ...e P33 2 Protected picture P90 3 Favorites P88 4 Stamped with text indication P83 5 Picture size P61 Motion picture icon P78 6 Quality P62 7 Battery indication P13 8 Folder File number P94 Built in memory P15 Elapsed playback time P78 9 Picture number Total pictures 10 Motion picture recording time P78 11 Histogram P37 12 Exposure compensation P43 13 Recording information P36 14 Favorites settings ...

Страница 104: ... If the camera is adversely affected by electromagnetic equipment and stops functioning properly turn the camera off and remove the battery or disconnect AC adaptor DMW AC5PP optional Then reinsert the battery or reconnect AC adaptor and turn the camera on Do not use the camera near radio transmitters or high voltage lines If you record near radio transmitters or high voltage lines the recorded pi...

Страница 105: ...als are damaged Inserting a damaged battery in the camera will damage the camera Bring charged spare batteries when going out Be aware that the operating time of the battery becomes shorter in low temperature conditions such as at a ski resort When you travel do not forget to bring the battery charger supplied so that you can charge the battery in the country that you are traveling in Dispose of u...

Страница 106: ... and the card from the camera If the battery is left inserted in the camera it will discharge even if the camera is turned off If the battery continues to be left in the camera it will discharge excessively and may become unusable even if charged When storing the battery for a long period of time we recommend charging it once a year Remove the battery from the camera and store it again after it ha...

Страница 107: ...AMP P83 or RESIZE P84 has been exceeded Reduce the number of pictures set and then repeat the operation More than 999 favorites have been set CANNOT BE SET ON THIS PICTURE TITLE EDIT TEXT STAMP or DPOF PRINT cannot be set for pictures not based on the DCF standard NOT ENOUGH SPACE ON BUILT IN MEMORY NOT ENOUGH MEMORY ON THE CARD There is no space left on the built in memory or the card When you co...

Страница 108: ... Insert a different card MOTION RECORDING WAS CANCELLED DUE TO THE LIMITATION OF THE WRITING SPEED OF THE CARD When you set the picture quality to or we recommend using a high speed card with 10MB s or greater displayed on the package Depending on the type of SD Memory Card or SDHC Memory Card motion picture recording may stop in the middle A FOLDER CANNOT BE CREATED A folder cannot be created bec...

Страница 109: ...During playback zoom CALENDAR POWER SAVE P22 When using the AC adaptor When connecting to a PC or a printer MULTI EXPO When recording or playing back motion pictures During a slide show AUTO DEMO AUTO LCD OFF P22 When using the AC adaptor While the menu screen is displayed While the self timer is set MULTI EXPO While recording motion pictures When connecting to a PC or a printer AUTO REVIEW P22 mo...

Страница 110: ...CENE MODE mode When INTELLIGENT ISO is set to ON ISO LIMIT SET P64 SCENE MODE mode WHITE BALANCE P64 1 2 3 ï 5 4 6 8 7 and in SCENE MODE WB ADJUST P65 B W SEPIA COOL or WARM in COLOR EFFECT is set METERING MODE P66 SCENE MODE QUICK AF P69 5 and 4 in SCENE MODE mode BURST P69 ô 5 and in SCENE MODE mode AUDIO REC When QUALITY is set to or MULTI EXPO I EXPOSURE P70 SCENE MODE mode When QUALITY is set...

Страница 111: ...etting the clock or title Motion pictures Still pictures with audio Pictures stamped with TEXT STAMP Pictures taken with or RESIZE P84 Motion pictures Still pictures with audio Pictures stamped with TEXT STAMP Pictures taken with or TRIMMING P85 Motion pictures Still pictures with audio Pictures stamped with TEXT STAMP Pictures taken with or LEVELING P86 Motion pictures Still pictures with audio P...

Страница 112: ...ry remaining on the built in memory or the card Delete the pictures which are not necessary to increase the available memory P35 The picture can become whitish if there is dirt e g fingerprints on the lens If the lens is dirty turn on the camera eject the lens barrel P11 and gently wipe the lens surface with a soft dry cloth Was this picture taken with the flash at the close range when the zoom is...

Страница 113: ...TO when the camera is shipped Therefore when taking pictures indoors etc noise will appear Decrease the ISO sensitivity P63 Increase the setting for NOISE REDUCTION in PICT ADJ or lower the setting for each of the items other than NOISE REDUCTION P72 Take pictures in bright places Has HIGH SENS or HI SPEED BURST in the scene mode been set If so the resolution of the recorded picture decreases slig...

Страница 114: ...come longer This phenomenon appears when you press the shutter button halfway to set the aperture value and does not affect the recorded pictures This phenomenon also appears when the brightness changes when the camera is zoomed or when the camera is moved This is because of operation of the automatic aperture of the camera and it is not a malfunction The LCD monitor may flicker for a few seconds ...

Страница 115: ...he built in memory or the card The pictures on the built in memory appear when a card is not inserted The picture data on the card appears when a card is inserted Is this a picture whose file name has been changed in the PC If it is it cannot be played back by this unit Has CATEGORY PLAY or FAVORITE PLAY been set for playback Change to NORMAL PLAY P33 Is this a non standard picture a picture which...

Страница 116: ...is connected to the PC or the printer Connect it only to the TV Depending on the TV model the pictures may be extended horizontally or vertically or they may be displayed with their edges cut off Are you trying to play back the motion pictures by directly inserting the card in the card slot of the TV Connect the camera to the TV with the AV cable supplied or with the component cable DMW HDC2 optio...

Страница 117: ... LAMP on the REC mode menu set to ON P74 The AF assist lamp does not turn on in bright places The surface of the camera may become warm during use This does not affect the performance or quality of the camera When the brightness changes due to zoom or camera movement etc the lens may click and the picture on the screen may drastically change However the picture is not affected The sound is caused ...

Страница 118: ...to the operation P94 If the battery was inserted or removed without first turning the camera s power off the folder and file numbers for the pictures taken will not be stored in the memory When the power is then turned back on and pictures are taken they may be stored under file numbers which should have been assigned to previous pictures Check the clock P16 and birthday settings P51 The lens barr...

Страница 119: ...16k3132 10M 3648k2736 7M 3072k2304 5M 2560k1920 Quality A A A A Built in Memory Approx 50 MB 2 2 6 13 9 20 14 28 20 40 Card 32 MB 1 1 3 7 5 11 7 16 11 23 64 MB 3 2 7 16 11 24 16 34 24 48 128 MB 7 5 16 33 24 49 35 69 50 99 256 MB 13 11 33 66 48 97 68 135 98 190 512 MB 27 22 66 130 97 190 135 270 195 380 1 GB 55 45 130 260 195 380 270 540 390 770 2 GB 110 92 270 530 390 770 550 1090 790 1530 4 GB 22...

Страница 120: ... 14440 35080 49120 500 410 1220 2400 16 GB 9880 19000 15440 29070 70590 98840 1010 830 2450 4840 32 GB 19820 38120 30970 58310 141620 198270 2030 1680 4930 9710 Aspect ratio Y Picture size 9M 3648k2432 6M 3072k2048 4 5M 2560k1712 2 5M 2048k1360 Quality A A A A Built in Memory Approx 50 MB 11 22 15 32 22 45 36 69 Card 32 MB 6 12 8 18 13 26 20 40 64 MB 13 27 19 38 27 54 43 83 128 MB 27 55 39 78 56 1...

Страница 121: ...0 4090 16 GB 1190 990 2900 5740 4220 8230 32 GB 2400 1990 5830 11520 8470 16520 Aspect ratio W Picture size 5 5M 3072k1728 3 5M 2560k1440 2M 1920k1080 Quality A A A Built in Memory Approx 50 MB 18 37 27 53 47 92 Card 32 MB 10 21 15 30 27 53 64 MB 22 45 32 63 57 105 128 MB 46 92 66 125 115 220 256 MB 91 180 130 250 220 430 512 MB 180 350 250 500 450 860 1 GB 360 710 520 1000 900 1720 2 GB 730 1420 ...

Страница 122: ... 35 s 64 MB 16 s 33 s 39 s 1 min 58 s 5 min 20 s 128 MB 37 s 1 min 10 s 1 min 22 s 4 min 00 s 10 min 50 s 256 MB 1 min 15 s 2 min 15 s 2 min 40 s 7 min 50 s 21 min 10 s 512 MB 2 min 30 s 4 min 30 s 5 min 20 s 15 min 40 s 42 min 00 s 1 GB 5 min 00 s 9 min 20 s 10 min 50 s 31 min 20 s 1 h 24 min 2 GB 10 min 30 s 19 min 00 s 22 min 10 s 1 h 4 min 2 h 51 min 4 GB 20 min 40 s 37 min 30 s 43 min 40 s 2 ...

Страница 123: ...s Shutter system Electronic shutteriMechanical shutter Motion picture recording 1280k720 pixels 24 frames second only when using a Card 848k480 pixels 30 frames second only when using a Card 640k480 pixels 30 frames second only when using a Card 320k240 pixels 30 frames second 10 frame second With audio Burst recording Burst speed 2 pictures second Normal Approx 1 5 pictures second Unlimited Numbe...

Страница 124: ... SD Memory Card SDHC Memory Card MultiMediaCard Still pictures only Picture size Still picture When the aspect ratio setting is X 4416k3312 pixels 3648k2736 pixels 3072k2304 pixels 2560k1920 pixels 2048k1536 pixels 1600k1200 pixels 640k480 pixels When the aspect ratio setting is Y 4416k2944 pixels 3648k2432 pixels 3072k2048 pixels 2560k1712 pixels 2048k1360 pixels When the aspect ratio setting is ...

Страница 125: ... Approx 96 7 mm W k54 0 mm H k24 8 mm D 3 13 16q W k2 1 8q H k31 32q D excluding the projecting parts Mass Weight Approx 151 g 5 33 oz excluding card and battery Approx 179 g 6 31 oz with card and battery Operating temperature 0 oC to 40 oC 32 oF to 104 oF Operating humidity 10 to 80 Battery Charger Panasonic DE A41B Information for your safety Input 110 V to 240 V 50 60 Hz 0 2 A Output CHARGE 4 2...

Страница 126: ...l dealer Accessory Description Figure DMW CHFX30 DMW AC5PP AC Adaptor Semi Hard Case CGA S005A Battery Pack RP SDV32GU1K RP SDV16GU1K RP SDV08GU1K RP SDM04GU1K RP SDV04GU1K RP SDM02GU1A RP SDV02GU1A RP SDR01GU1A RP SDV01GU1A 32 GB SDHC Memory Card 16 GB SDHC Memory Card 8 GB SDHC Memory Card 4 GB SDHC Memory Card 4 GB SDHC Memory Card 2 GB SD Memory Card 2 GB SD Memory Card 1 GB SD Memory Card 1 G...

Страница 127: ...ER OFFICE 20421 84th Avenue South Kent WA 98032 Ship To Mr Mrs Ms First Last Street Address City State Zip Phone Day Night 4 Shipping information UPS delivery requires complete street address Please photocopy this form when placing an order 3 Method of payment check one Check of Money Order enclosed NO C O D SHIPMENTS VISA MasterCard Make Check or Money Order to PANASONIC ACCESSORIES Please do not...

Страница 128: ...ouhy Ave Elk Grove Village IL 60007 Request for Service Notice USA Only Please photocopy this form when making a request for service notice In the unlikely event this product needs service Please include your proof of purchase Failure to do so will delay your repair To further speed your repair please provide an explanation of what wrong with the unit and any symptom it is exhibiting ...

Страница 129: ...ce it with a new or refurbished product The decision to repair or replace will be made by the warrantor During the Labor warranty period there will be no charge for labor During the Parts warranty period there will be no charge for parts You must carry in or mail in your product during the warranty period If non rechargeable batteries are included they are not warranted This warranty only applies ...

Страница 130: ...ANTIES EXCEPT AS LISTED UNDER LIMITED WARRANTY COVERAGE THE WARRANTOR IS NOT LIABLE FOR INCIDENTAL OR CONSEQUENTIAL DAMAGES RESULTING FROM THE USE OF THIS PRODUCT OR ARISING OUT OF ANY BREACH OF THIS WARRANTY As examples this excludes damages for lost time travel to and from the servicer loss of media or images data or other memory content The items listed are not exclusive but are for illustratio...

Страница 131: ... our Web Site at http www pstc panasonic com or send your request by E mail to npcparts us panasonic com You may also contact us directly at 1 800 332 5368 Phone 1 800 237 9080 Fax Only Monday Friday 9 am to 9 pm EST PANASONIC SERVICE AND TECHNOLOGY COMPANY 20421 84th Avenue South Kent WA 98032 We Accept Visa MasterCard Discover Card American Express and Personal Checks Obtain Product Information ...

Страница 132: ... et au son AVERTISSEMENT POUR RÉDUIRE LES RISQUES D INCENDIE DE CHOC ÉLECTRIQUE OU DE DOMMAGES À L APPAREIL N EXPOSEZ PAS CET APPAREIL À LA PLUIE À L HUMIDITÉ À L ÉGOUTTEMENT OU AUX ÉCLABOUSSEMENTS ET NE PLACEZ SUR L APPAREIL AUCUN OBJET REMPLI DE LIQUIDE COMME PAR EXEMPLE DES VASES UTILISEZ EXCLUSIVEMENT LES ACCESSOIRES RECOMMANDÉS NE RETIREZ PAS LE COUVERCLE OU LE PANNEAU ARRIÈRE IL N Y A AUCUNE...

Страница 133: ...terie batterie au lithium ion Utilisez l unité spécifiée pour recharger la batterie N utilisez la batterie avec aucun autre appareil que l appareil spécifiée Évitez le contact des saletés du sable du liquide ou autres corps étrangers avec les bornes Ne touchez pas les bornes des fiches i et j avec des objets métalliques Évitez de démonter remodeler chauffer ou jeter au feu Si de l électrolyte entr...

Страница 134: ...olor Bracket 45 Color Effect 72 Color Temperature Setting 65 Component Cable 100 Condensation 5 Copy 92 D Date Printing 90 97 DCF standard 34 Deleting Pictures 35 Demo Mode 24 Digital Zoom 31 71 DPOF Print Setting 89 E Easy Zoom 32 Economy Mode 22 Exposure Compensation 43 Extended Optical Zoom 31 EZ 31 32 61 119 F Face Detection 27 66 Favorite 88 Favorite Play 78 File Number 22 94 103 Film Grain M...

Страница 135: ... Mode 48 Power LCD 21 Power Save 22 Program AE mode 29 Protect 90 Q Quality 62 119 Quick AF 69 Quick Menu 19 R RAW 62 Reset of Setting 23 Resizing 84 Rotate 87 Rotate Display 87 S Scene Detection 27 Scene Menu 23 Scene Mode 47 Scenery Mode 49 Self Portrait Mode 49 Self timer 42 Setup Menu 20 Shutter Volume 20 Slide Show 75 Snow Mode 54 Soft Skin Mode 48 Sound 20 Sports Mode 49 Spot 66 Spot focusin...

Страница 136: ...NJ 07094 Panasonic Puerto Rico Inc Ave 65 de Infantería Km 9 5 San Gabriel Industrial Park Carolina Puerto Rico 00985 Panasonic Canada Inc 5770 Ambler Drive Mississauga Ontario L4W 2T3 2008 Matsushita Electric Industrial Co Ltd QuickTime and the QuickTime logo are trademarks or registered trademarks of Apple Inc used under license therefrom ...

Отзывы: