background image

99

RQT9299

Reference

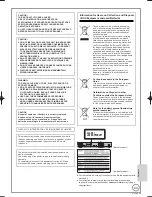
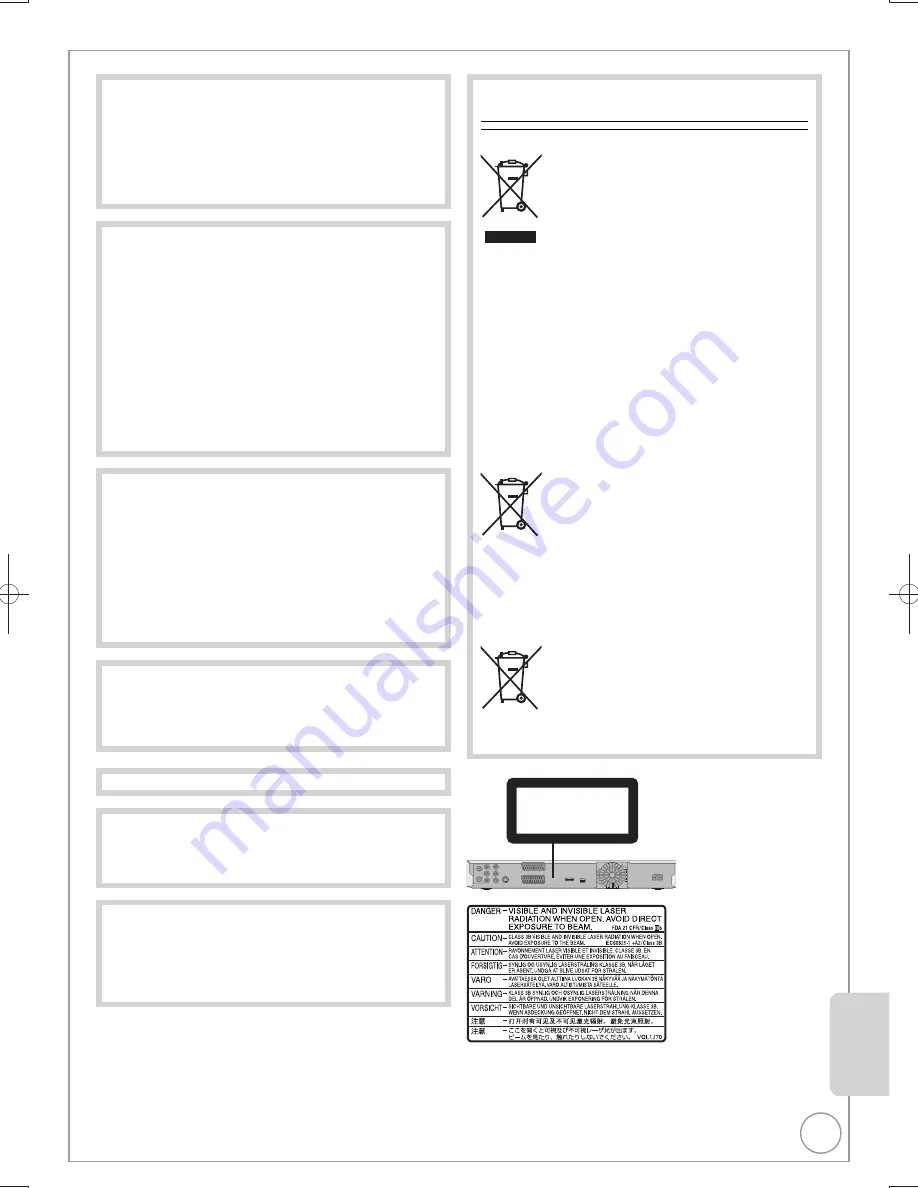
CAUTION!
THIS PRODUCT UTILIZES A LASER.
USE OF CONTROLS OR ADJUSTMENTS OR 
PERFORMANCE OF PROCEDURES OTHER THAN THOSE 
SPECIFIED HEREIN MAY RESULT IN HAZARDOUS 
RADIATION EXPOSURE.
DO NOT OPEN COVERS AND DO NOT REPAIR YOURSELF. 
REFER SERVICING TO QUALIFIED PERSONNEL.

CAUTION!


DO NOT INSTALL OR PLACE THIS UNIT IN A BOOKCASE, 
BUILT-IN CABINET OR IN ANOTHER CONFINED SPACE. 
ENSURE THE UNIT IS WELL VENTILATED. TO PREVENT 
RISK OF ELECTRIC SHOCK OR FIRE HAZARD DUE 
TO OVERHEATING, ENSURE THAT CURTAINS AND 
ANY OTHER MATERIALS DO NOT OBSTRUCT THE 
VENTILATION VENTS.


DO NOT OBSTRUCT THE UNIT’S VENTILATION OPENINGS 
WITH NEWSPAPERS, TABLECLOTHS, CURTAINS, AND 
SIMILAR ITEMS.


DO NOT PLACE SOURCES OF NAKED FLAMES, SUCH AS 
LIGHTED CANDLES, ON THE UNIT.


DISPOSE OF BATTERIES IN AN ENVIRONMENTALLY 
FRIENDLY MANNER.

WARNING:
TO REDUCE THE RISK OF FIRE, ELECTRIC SHOCK OR 
PRODUCT DAMAGE, 


DO NOT EXPOSE THIS APPARATUS TO RAIN, MOISTURE, 
DRIPPING OR SPLASHING AND THAT NO OBJECTS 
FILLED WITH LIQUIDS, SUCH AS VASES, SHALL BE 
PLACED ON THE APPARATUS.


USE ONLY THE RECOMMENDED ACCESSORIES.


 DO NOT REMOVE THE COVER (OR BACK); THERE 
ARE NO USER SERVICEABLE PARTS INSIDE. REFER 
SERVICING TO QUALIFIED SERVICE PERSONNEL.

CAUTION
Danger of explosion if battery is incorrectly replaced. 
Replace only with the same or equivalent type 
recommended by the manufacturer. Dispose of used 
batteries according to the manufacturer’s instructions.

THIS UNIT IS INTENDED FOR USE IN MODERATE CLIMATES.

This product may receive radio interference caused by mobile 
telephones during use. If such interference is apparent, please 
increase separation between the product and the mobile 
telephone. 

The socket outlet shall be installed near the equipment and 
easily accessible.
The mains plug of the power supply cord shall remain readily 
operable.
To completely disconnect this apparatus from the AC Mains, 
disconnect the power supply cord plug from AC receptacle.

CLASS 1

LASER PRODUCT


For your safety, be sure not to connect or handle the equipment with 
wet hands.


Your attention is drawn to the fact that recording pre-recorded 
tapes or discs or other published or broadcast material may infringe 
copyright laws.

(Back of product)

(Inside of product)

Information for Users on Collection and Disposal 
of Old Equipment and used Batteries

These symbols on the products, packaging, 
and/or accompanying documents mean that 
used electrical and electronic products and 
batteries should not be mixed with general 
household waste.
For proper treatment, recovery and recycling 
of old products and used batteries, please 
take them to applicable collection points, in 
accordance with your national legislation and 
the Directives 2002/96/EC and 2006/66/EC.
By disposing of these products and batteries 
correctly, you will help to save valuable 
resources and prevent any potential negative 
effects on human health and the environment 
which could otherwise arise from inappropriate 
waste handling.
For more information about collection and 
recycling of old products and batteries, please 
contact your local municipality, your waste 
disposal service or the point of sale where you 
purchased the items.
Penalties may be applicable for incorrect 
disposal of this waste, in accordance with 
national legislation.

For business users in the European 
Union

If you wish to discard electrical and electronic 
equipment, please contact your dealer or 
supplier for further information.

[Information on Disposal in other 
Countries outside the European Union]

These symbols are only valid in the European 
Union. If you wish to discard these items, please 
contact your local authorities or dealer and ask 
for the correct method of disposal.

Cd

Note for the battery symbol (bottom two 
symbol examples):

This symbol might be used in combination with 
a chemical symbol. In this case it complies with 
the requirement set by the Directive for the 
chemical involved.

DMR-EX79EB.indb   99

DMR-EX79EB.indb   99

2009/01/14   14:53:14

2009/01/14   14:53:14

Содержание Diga DMR-EX79EB

Страница 1: ...roadcasting Project Declaration of Conformity No 5956 22nd October 2008 Notice for DVB functions This DVD Recorder is for viewing and recording free to view channels only not Pay TV or encrypted channels unless connected to an external source capable of receiving Pay TV or encrypted channels This unit does not have an analogue broadcast tuner This unit has the capability for DVB specifications But...

Страница 2: ... the Timer Recordings on Digital STB Digital Satellite Receiver when it is connected to this unit with Scart cable EXT LINK 28 Linked timer recordings with external equipment Pause Live TV 43 Pause the TV programme you are watching High Quality Picture Connection with HDMI terminal 12 Deep Colour 96 HDMITM V 1 3a with Deep Colour Easy to Find and Select Two or more titles recorded in the daily wee...

Страница 3: ...KEEP DRY Before use Remove the connector cover How to replace the fuse The location of the fuse differ according to the type of AC mains plug figures A and B Confirm the AC mains plug fitted and follow the instructions below Illustrations may differ from actual AC mains plug 1 Open the fuse cover with a screwdriver Fuse cover Figure A Figure B 2 Replace the fuse and close or attach the fuse cover ...

Страница 4: ...here DC is used AC mains lead protection Ensure the AC mains lead is connected correctly and not damaged Poor connection and lead damage can cause fire or electric shock Do not pull bend or place heavy items on the lead Grasp the plug firmly when unplugging the lead Pulling the AC mains lead can cause electric shock Do not handle the plug with wet hands This can cause electric shock Foreign matter...

Страница 5: ...Unit 86 General Issues Power 87 General Issues Displays 87 General Issues Operation 88 General Issues GUIDE Plus 88 General Issues DVB T 89 General Issues VIERA Link 90 General Issues USB 90 Playback Issues Picture 90 Playback Issues Sound 91 Playback Issues Operation 92 Recording Issues Recording Timer Recording Copying External input 93 Recording Issues Music 95 Editing Issues HDD DVD 95 Editing...

Страница 6: ...usceptible to damage As a basic rule save important content to a disc as backup The HDD is a device that is not built to withstand vibration shock or dust Depending on the setup environment and handling of the HDD some content may become damaged and play and recording may no longer be possible Especially during operation do not subject the unit to any vibration shock or remove the AC mains lead fr...

Страница 7: ...ions that came with the cloth Observe the following points to ensure continued listening and viewing pleasure Dust and dirt may adhere to the unit s lens over time making it impossible to record or play discs Use the DVD lens cleaner not included about once every year depending on frequency of use and the operating environment Carefully read the lens cleaner s instructions before use DVD lens clea...

Страница 8: ... screen 34 for selecting programme category 30 34 46 for editing Favourites 70 Recording function REC Start recording 21 REC MODE Change recording mode 21 EXT LINK Linked timer recordings with external equipment 28 DIRECT TV REC Direct TV recording 26 DVB function TEXT Show Digital Teletext service 46 STTL Show subtitles 46 Transmission window TV operations 77 Channel select Change pages in the GU...

Страница 9: ... 1 Audio output CH2 R 2 Audio input CH2 R 3 Audio output CH1 L 4 Audio ground 5 Blue ground 6 Audio input CH1 L 7 Blue output 8 Switching voltage output 9 Green ground 10 Q Link control signal 11 Green output 12 Reserved 13 Red ground 14 Blanking ground 15 Red output chrominance output 16 Blanking output 17 Video output ground 18 Video input ground 19 Video output luminance output 20 Video input 2...

Страница 10: ... the RF coaxial cable Keep the RF coaxial cables as far away as possible from other cables Do not roll up the RF coaxial cables TV RF IN AV RF IN HDMI AV OUT HDMI IN AV1 RF OUT 1 2 3 This unit TV HDMI cable You can enjoy high quality picture by adding the HDMI cable connection 12 The RF coaxial cable cannot be used for showing pictures from the unit The unit must be connected using another method ...

Страница 11: ...P 2 Using a fully wired 21 pin Scart cable You can use a variety of Q Link functions by connecting the unit to a Q Link compatible television 44 You can enjoy high quality viewing by connecting the unit to an RGB compatible television AV1 Output in the Setup menu is set to RGB 1 without component or RGB 2 without component 75 AV2 Input settings in the Setup menu 75 When the unit is not to be used ...

Страница 12: ...e will be down mixed 96 and output as 2 channels even if connecting with an HDMI cable some discs cannot be down mixed You cannot connect this unit to DVI devices that are incompatible with HDCP For display units compatible with HDCP High Bandwidth Digital Content Protection that are equipped with a digital DVI input terminal PC monitors etc Depending on the unit picture may not be displayed prope...

Страница 13: ...f a 4 digit PIN number Owner ID RETURN leave PIN number Name House No Postcode RETURN Make a note of the PIN number don t forget as it is not possible to return to the factory preset OK to store the PIN number continued on the next page TIME SLIP DISPLAY A A STATU A A S TEXT DIRECTTVREC EXT LINK REC MODE REC CREAT A A E CHAPTER F U N C T I O N M E N U D I R E C T N A V A I G A T A A O R GUIDE RETU...

Страница 14: ...lock Setting the Channels and Clock to select Yes then OK The cursor moves to Name to enter the name to select a letter then to move to next character Repeat this to enter the name OK to store the name and and then repeat steps to enter and store House No and Postcode RETURN The Owner ID settings screen disappears Auto Setup for your unit is complete You can now choose your favourite channels and ...

Страница 15: ...dable layer Inner section of the disc DVD R DL R DL When switching layers Video and audio may momentarily cut Outer section of the disc First recordable layer Playback direction The available space Title 1 Title 2 Can do Cannot do Recording Modes and Durations 25 HDD and Disc Handling Quick Start Guide STEP 3 Formatting and or recording initializing constraints may prevent you from playing or reco...

Страница 16: ...ision is not equipped to handle PAL 525 60 signals the picture will not be shown correctly 2 Select NTSC in TV System 75 When playing back a disc or title recorded on the HDD ensure that you match the TV System setting to the disc or title PAL or NTSC 75 TV type Disc Titles recorded on HDD Yes No Multi system TV PAL NTSC PAL TV PAL NTSC 1 PAL60 NTSC TV PAL NTSC 2 HDD and Disc Handling Disc type Lo...

Страница 17: ... not work Only the first partition on USB memories with multi partition is supported Standard symbol USB Data that can be recorded and played File format DivX MP3 WMA Still pictures JPEG Playing Copying to HDD Instructions You can play DivX files recorded with a computer onto the USB memory 38 You can play MP3 WMA files recorded with a computer onto the USB memory and copy them to HDD 39 64 You ca...

Страница 18: ...aking folders as shown below However depending on the method of writing data writing software play may not be in the order you number the folders Structure of MP3 WMA folders R R DL CD USB Prefix with 3 digit numbers in the order you want to play them The file name extension of WMA files will be wma Structure of still pictures folders R R DL CD USB Files inside a folder are displayed in the order ...

Страница 19: ...hing Television Basic Operations Preparation Turn on the television and select the appropriate video input to suit the connections to this unit Important This unit does not have an analogue broadcast tuner Refer to GUIDE Plus system 33 for detail information This DVD recorder has a tuner which allows it to directly receive and record digital terrestrial channels Preparation Connect a digital satel...

Страница 20: ...pear on the TV may be navigated as follows e g DINOSAUR Play Chapter List Subtitles Trailer DVDTOPMENU DVD V to select an item then OK You can sometimes use the numbered buttons to select an item VCD Press the numbered buttons to select an item e g 5 0 5 15 1 5 HDD RAM R R DL RW V R R DL RW DVD V RW VR VCD CD to turn the unit on DRIVE SELECT to select the HDD or DVD drive If you selected the DVD d...

Страница 21: ... T A A O R GUIDE RETURN PLAY x1 A A 3 PA P P USE STOP SLOW SEARCH SKIP CH PAGE 0 9 8 7 6 5 4 3 2 1 AV A A TV DRIVE SELECT DELETE MANUAL SKIP PROG CHECK EXIT OK OPTION STTL SELECT INPUT CH VOL Tips If a programme to record has subtitle Audio Description or multiple audio you can record with them They cannot be switched after recording To record with subtitle Before start recording show the subtitle...

Страница 22: ...Category Time info BBC 1 BBC 2 Channel 4 Channel 5 2 OPTION Select Advert etc Holiday Programme 2 BBC 2 Guide Link Split and Series are displayed here If Selection Screen appears press to select Single Timer Rec then press OK Refer to Series recording 34 for Series Timer Rec Confirm the programme start and end time by TV magazine etc and correct if necessary using then OK Timer icon y The settings...

Страница 23: ...FUNCTION MENU OK RETURN Playback Recording Copy Others Drive Select Delete Remain 30 00 SP HDD Video Picture Music TV Guide to select the title then PAUSE A check mark is displayed Repeat this step until you select all necessary items Press again to cancel OK to select Delete then OK Tips To return to the previous screen Press RETURN To view other pages Press to select Previous or Next then press ...

Страница 24: ...EN DC IN 9V I CD SEQUENTIAL DISC DOUBLE RE MASTER DISC EXCHANGE DISC SKIP OPEN CLOSE 1 2 3 4 5 Record to DVD R etc Finalise Play on other DVD equipment RW If the disc failed to play on other equipment we recommend you create top menu 69 You cannot directly record to a DVD R DL and R DL disc on this unit Record to the HDD and then copy to the disc RAM CPRM compatible discs only R RW V R RW It is no...

Страница 25: ...ta recorded to suit the picture quality so actual recording times and remaining recording times shown by the unit will be different R DL R DL The difference will be especially noticeable Use a disc enough remaining blank space When recording to DVD RAM using EP 8Hours mode play may not be possible on DVD players even if they are compatible with DVD RAM In this case use EP 6Hours mode Tips Maximum ...

Страница 26: ... RW V R RW This function allows specifying the length of recording time up to 4 hours Notes This function does not work during timer recording or Flexible Recording Recording stops and the set time is cleared if you press The unit turns off automatically after recording finished During recording On the main unit only repeatedly until the desired time is reached The recording time and the unit s di...

Страница 27: ...ess OK Notes During playing while you are recording you cannot edit or delete titles HDD RAM R RW V R RW The unit sets the best possible picture quality that fits the programme within the remaining disc space The recording mode becomes FR mode Refer to FR Flexible recording mode 25 Flexible Recording Notes You cannot record more than 8 hours Tips To exit the screen Press EXIT To stop recording par...

Страница 28: ...CLOSE l etc When you operate press EXT LINK to cancel EXT LINK standby mode or recording The unit turns on and EXT L disappears Tips To cancel the external control Press EXT LINK to stop recording or to cancel linked timer recording standby The unit turns on and EXT L disappears Manual timer recordings 30 Notes In order to prevent accidental operation press EXT LINK to cancel the setting after rec...

Страница 29: ...NO on the AV3 input terminals at the front L MONO AUDIO R VIDEO S VIDEO DV IN AV3 IN This unit S Video cable 1 Audio video cable 2 Other video equipment Connect to Audio Video output terminals 4 pin DV cable Preparation When the output signal from the external device is NTSC change the TV System to NTSC in the Setup menu 75 This unit cannot record NTSC signals to discs that already have PAL signal...

Страница 30: ...ms and to set the items Channel TV Station Name External Input When recording digital satellite programmes select AV2 You can press the Blue button to change the category e g Free Channels Radio Registered Favourites 70 Favourites Edit Date You can set a daily or weekly programme right Tips Start start time Stop end time Hold button to change in 30 minute increments or decrements Drive HDD or DVD ...

Страница 31: ...n also delete a programme with the following steps 1 Press to select the programme and press OPTION 2 Press to select Delete and press OK To exit the timer recording list Press PROG CHECK Notes Recording may fail if there are changes to the station s programming disappears from the unit s display when no timer programme is set or when all timer programmes are deactivated is displayed on a series r...

Страница 32: ...hannels BBC 1 AD OFF Notes on timer recording When a timer recording is set DVDs that were recorded using a different TV system cannot be played unless the TV system is changed in the Setup menu 75 or the timer recording has completed or has been cancelled Timer recordings are activated regardless of whether the unit is turned on off Timer recordings begin when the set time is reached even when pl...

Страница 33: ...ture programmes and you can set the timer recording of the programmes using the advertisement screen Follow the on screen instructions The information from the GUIDE Plus system will not be lost even if the unit is turned off at the mains outlet Tips When the unit displays No Data or the empty GUIDE Plus list The empty field Landscape TV Guide Tue 18 08 09 19 45 Tue 18th All Channels AllTypes Time...

Страница 34: ...ries for 13 weeks Selecting the programme from the desired programme type or category This function lets you display a GUIDE Plus list sorted by programme type e g Movie Sport or category e g Free Channels Radio GUIDE The GUIDE Plus list appears AllChannels FreeChannels Data All Channels Radio Favourite 1 Favourite 2 Favourite 3 Favourite 4 AllTypes Movie Entertainment Sport Children s Education L...

Страница 35: ...DE Plus list appears OPTION Select Advert Free Word Search to select Free Word Search then OK Enter the word you would like to search for then STOP Entry method 47 Entering text to select Simplified Search or Detailed Search then OK Free Word Search Simplified Search Detailed Search Detailed Search may result in many hits but search time will be longer Simplified Search It searches the programme n...

Страница 36: ...n in Table Display only This function is convenient when searching for one title to playback from many titles Press OPTION Press to select Sort then press OK Press to select the item then press OK If you select an item other than No The DIRECT NAVIGATOR screen will reappear after playback of the selected title has finished You cannot play titles continuously Skip and Time Slip will only function w...

Страница 37: ...yback While paused OK Each press shows the next or previous frame Press and hold to advance or reverse frame by frame in succession Press PLAY to restart normal playback Notes If continued for approx 5 minutes slow motion play pauses automatically except DVD V VCD VCD allow slow motion in the forward direction only HDD RAM R R DL RW V R R DL This function does not work with finalised discs RW RW V...

Страница 38: ...Certified device that plays DivX video You can play DivX video contents recorded with a computer onto DVD R DVD R DL CD R CD RW and USB memory Playing DivX video contents Show DivX Menu screen left Showing the menu screen CD DivX OK RETURN DivX Menu N o Title Name Tree Page 001 001 TotalTitle 001 001 ABC avi Folder1 00025 Files are treated as titles to select the title then OK Play starts on the s...

Страница 39: ...xpired is displayed When playing this content The number of remaining plays is reduced by one if you press you press you press DIRECT NAVIGATOR you press or etc and arrive at another content or the start of the content being played timer recording starts on the HDD you press DRIVE SELECT to change the drive Resume functions do not work Regarding DivX VOD content Tips indicates the track currently ...

Страница 40: ... View Slideshow Previous Page 01 01 Next OK RETURN OPTION Press OK to show pictures HDD 001 002 Total 5 Total 3 Date 1 2 2006 Date 1 1 2006 MUSIC PICTURE VIDEO Regarding Album View screen right to select the album then OK DIRECT NAVIGATOR Picture JPEG View Previous Page 001 001 Next 0001 Album Name 103__DVD 0002 0003 0004 0005 0006 0007 0008 0009 OK RETURN OPTION HDD PICTURE Slideshow e g HDD to s...

Страница 41: ...iginal size Press to select Zoom out in step then press OK When zooming in the still picture may be cut off Zoom in information is not stored Zoom in and Zoom out do not work with images that have a resolution larger than 640 480 pixels Slideshow You can display still pictures one by one with regular interval From the Album View screen to select an album then PLAY x1 3 You can also start Slideshow...

Страница 42: ...the track with the numbered buttons e g 5 0 5 15 1 5 To play music CD Tips To exit the screen Press DIRECT NAVIGATOR Playback continues Operations during play Stop Press The stopped position is memorized Press PLAY to restart from this position If is pressed several times the position is cleared The position is cleared if the unit is turned off Pause Press Press again or PLAY to restart play Searc...

Страница 43: ...e the TV programme Press L R HDD BBC Pause Live TV Pause Live TV This icon indicates that the Pause Live TV is working When you want to resume playback Press PLAY The programme is saved on the HDD in SP recording mode 25 regardless of the recording mode and the drive selected before starting saving At least 1 hour up to 8 hours of TV programmes can be temporarily saved on the HDD This may vary dep...

Страница 44: ...ual manuals for other manufacturers equipment supporting VIERA Link function What is Q Link Q Link Q Link is a convenient function that offers linked operations of this unit and a Panasonic TV You can use this function by connecting the equipment with a fully wired 21 pin Scart cable When the TV is on Easy playback VIERA Link Q Link When the TV is on and the following operations are performed the ...

Страница 45: ...e TV remote control Select Control Panel then press OK in step of Using the OPTION menu window to operate this unit above The Control Panel is displayed right While playing a title or DVD Video etc Pause Stop Search backward Search forward OK Play EXIT Exit the Control Panel While playing still pictures Stop View previous picture View next picture EXIT Exit the Control Panel When you want to leave...

Страница 46: ...subtitles Press again to hide Notes Programmes are recorded with subtitles when you record them with the subtitles setting set to Subtitles On You cannot switch subtitles during timer recording Tips To select subtitle language 71 DVB Preferred Subtitles Showing Subtitles Listening to the Audio Description This function can aid visually impaired viewers by adding an audio track to describe events o...

Страница 47: ...titles etc Also you can search for desired programmes on GUIDE Plus list by entering key words or the programme name Free Word Search Find Titles 35 When viewing the Enter Name screen etc _ Enter Name 1 2 3 4 5 A B C a D E F d G H I N O g J K L j M m 6 7 8 9 0 b c e f h i k l n _ o Space P Q R S p T U V t W X Y Z w q r s u v x y z OK RETURN SELECT 1 2 3 4 5 6 7 8 9 0 Top Menu Preview Add to List D...

Страница 48: ... list To view more options Press to select Edit then press OK Items that cannot be selected are grey If you select Chapter View 50 Switching the DIRECT NAVIGATOR appearance 36 To edit the group of titles HDD 36 Refer to Title Operations right Set up Protection Cancel Protection Partial Delete Divide Title ChangeThumbnail EnterTitle Name Properties Create Group Release Grouping Table Display PICTUR...

Страница 49: ...K Tips For quicker editing Use Search 37 or Time Slip 37 to find the desired point To skip to the start or end of a title press start or end For better precision use Slow motion 37 and Frame by Frame 37 Notes Divided titles retain the name of the original A short amount of video and audio just before and after the division point get cut out You cannot divide a title when the resulting parts are to...

Страница 50: ...ss DIRECT NAVIGATOR To view other pages Press to select Previous or Next then press OK You can also press to view other pages Multiple editing Only Delete Chapter Select with then press Repeat A check mark appears Press again to cancel Chapter Operations You can divide a title into multiple chapters Perform steps of Accessing the Chapter View left Press to select Create Chapter then press OK Combi...

Страница 51: ...tep Press to select the source chapter you want to add to a playlist then press OK Press to cancel Press OPTION to select Create Chapter then press OK if you want to create a new chapter in the source title 50 Press to select the position to insert the chapter then press OK Press repeatedly to return to step if you want to add additional source titles Chapters are registered to the playlist Repeat...

Страница 52: ... Multiple editing right Tips To play Press OK To edit Press OPTION to display the menu list You can go back to the Playlist View Move Chapter Create Chapter Combine Chapters Delete Chapter Playlist View Add Chapter Refer to Chapter Operations right Chapter Operations Add Chapter Press to select Add Chapter then press OK 51 Creating Playlists Move Chapter Press to select Move Chapter then press OK ...

Страница 53: ...ete Picture HDD RAM R JPEG Important Once deleted contents cannot be recovered When deleting an album non picture files in the album will also be deleted This does not apply to subordinate folders in the album R Available space does not increase even after pictures are deleted Perform steps of Accessing the Album still picture Picture View left Press to select Delete Album or Delete Picture then p...

Страница 54: ...pment Change Date HDD RAM You can change the date of this picture Perform steps of Accessing the Album still picture Picture View 53 Press to select Change Date then press OK Press to select the item then press to change Press OK Set up Protection Cancel Protection HDD RAM Set protection to prevent pictures from being accidentally deleted Perform steps of Accessing the Album still picture Picture ...

Страница 55: ...ed Press DRIVE SELECT to select the HDD or DVD drive Press FUNCTION MENU Press to select Delete then press OK HDD RAM Press to select Picture or Music Deleting an album 5a Press to select the item then press DELETE Deleting a still picture or track 5b 1 Press to select the album which contains the still picture or track to delete then press OK 2 Press to select the still picture or track then pres...

Страница 56: ...recording mode with better picture quality than the original the picture quality does not improve However it does prevent against degradation of picture quality R DL You cannot copy in EP or FR recordings 5 hours or longer mode 3 You cannot select Top Menu or Auto Play Select If you want to set auto play select or the background colour select Top Menu or Auto Play Select in DVD Management before c...

Страница 57: ... to fill a new disc when copying to it the equivalent of up to 4 hours of free space in SP mode is needed on the HDD When the number of titles recorded to the HDD and the number of titles to be copied to the DVD R DL and R DL is greater than 499 in total When playing a title recorded on both layers video and audio may momentarily cut out when the unit is switching layers 15 Regarding copying of th...

Страница 58: ... 005 006 007 Title Name Time No Channel Date Day 008 BBC 11 10 SAT 21 00 RETURN OK Rec time 0 52 SP Disc Space 4310MB Total Size 0MB 0 Total 0 Sort Properties Grouped Titles Properties Press to select Properties then press OK The name recording date channel etc of the selected title are shown Sort All Titles screen only Press to select Sort then press OK Press to select the item then press OK This...

Страница 59: ...O Select BBC 1 11 10 SAT 0 30 XP Press to select the title or playlist then press A check mark is displayed Repeat this step until you select all necessary items Press again to cancel The items will be copied in the order of the copying list If you want to specify the order repeat selecting one item at a time When you switch between the VIDEO and Playlists tab the check mark is cancelled When copy...

Страница 60: ...e set time Operations and on screen displays during copy are also recorded Almost all DVD Video on sale have been treated to prevent illegal copying and cannot be copied Preparation Insert the finalised disc 81 After performing steps Format is automatically set to DVD Video 59 Copying using the copying list Advanced Copy Set Copy Time If you are not going to change the setting step Setting the uni...

Страница 61: ...enu is displayed Press to select the title you want to start copying then press OK My favourite 01 02 01 Chapter 1 03 05 02 04 06 Chapter 2 Chapter 3 Chapter 4 While playing in order all the titles after the selected title are recorded until the set time After the last title on the disc has finished playing the top menu is recorded until the set time is reached Copying SD Video from a video equipm...

Страница 62: ...s again to cancel The items will be copied in the order of the copying list If you want to specify the order repeat selecting one item at a time To show other pages 63 To select another folder 63 Press OK to confirm To edit the copying list right Press to confirm Copying Still Pictures Edit the copying list Select the item in step for a still picture left or for a folder above Press OPTION or Pres...

Страница 63: ...urn off the unit open the tray change the copy direction etc Tips To stop copying Press and hold RETURN for 3 seconds USB HDD While stopped Insert the USB memory 81 The menu is automatically displayed Copy All Pictures Copy from USB Copy to HDD Copy all pictures JPEG by date Copy Cancel RETURN SELECT USB device OK RETURN SELECT Play Video DivX Play Pictures JPEG Copy Pictures JPEG Play Music MP3 W...

Страница 64: ... CD USB MP3 WMA HDD You can copy MP3 or WMA files recorded on USB memory or CD R CD RW DVD R DVD R DL to the HDD by file or folder One folder is recorded on the HDD as one group The maximum number of albums on HDD 300 The maximum number of tracks on HDD 3000 Depends on the remaining capacity If titles or pictures are recorded then the number of albums that can be recorded will be reduced Folders w...

Страница 65: ...ss RETURN Notes The sequence in which the MP3 WMA files are registered on the copy list may not be the same at the copy destination If MP3 WMA files are already contained inside the copy destination folder the new MP3 WMA files are recorded following the existing MP3 WMA files To edit the copying list Select the item in step for a MP3 WMA file or for a folder 64 Copying music from a USB memory or ...

Страница 66: ...ptions will differ based on disc type and contents Setting On Screen Display HDD RAM R R DL RW V R R DL RW DVD V RW VR VCD and DivX You can change the settings of disc audio subtitle etc Soundtrack HDD RAM R R DL RW V R R DL RW RW VR The disc s audio attributes appear below Audio attributes DVD V Select the audio and language below Audio attributes Soundtrack Subtitle language VCD SVCD and DivX Se...

Страница 67: ...lm contents with different frame rates and appropriately converts it Video Select when using Auto1 and Auto2 and the content is distorted Input NR Reduces the noise while recording Automatic Noise reduction only works on picture input from a video tape On Noise reduction works for any video input Off Noise reduction is off Select when you want to record input as is HDD RAM R R DL RW V R R DL RW DV...

Страница 68: ...hen press OK Press to select Start then press OK Formatting starts RAM may take up to a maximum of 70 minutes A message appears when formatting is finished Press OK to complete HDD and DVD Management Accessing the Management Menus Tips To return to the previous screen Press RETURN To exit the screen Press EXIT Preparation RAM Release protection disc cartridge below Setting Protection Insert a disc...

Страница 69: ...ress OK to complete Notes Do not disconnect the AC mains lead while finalising This can render the disc unusable When finalising a high speed recording compatible disc it may take longer than displayed on the confirmation screen approximately 4 times longer After finalising R R DL R R DL The disc becomes play only and you can no longer record or edit it RW V You can record and edit the disc after ...

Страница 70: ...the Favourites during timer recording standby Channel numbers cannot be changed due to broadcast restrictions Setup Disc Picture Sound Display Connection Tuning Others OK RETURN TAB SELECT Favourites Edit DVB Auto Setup DVB Manual Tuning AddNewDVBChannels Signal Condition DVB Preferred Multi Audio DVB Preferred Subtitles English English Favourites Editor RETURN SELECT Favourite Select Add All Add ...

Страница 71: ...EWS 24 27 TV 9 BBC Radio Wales 27 Radio 9 The unit starts searching for newly available digital terrestrial channels This takes about 5 minutes The bar over the table shows you the search progress At the end of the search the number of found new digital stations appears No new DVB channels found is displayed when no new channels can be found Press OK to save the newly found channels Tips To cancel...

Страница 72: ...ther Subtitle Automatic English German French Italian Spanish Other Menus English German French Italian Spanish Other Settings for Recording Press OK to show the following settings Recording time in EP mode Select the maximum number of hours for recording in EP mode EP 6Hours You can record for 6 hours on an unused 4 7 GB disc EP 8Hours You can record for 8 hours on an unused 4 7 GB disc Chapter C...

Страница 73: ...narration L2 R2 subsequent to original recording Mix Records both Stereo 1 and Stereo 2 When recording bilingual broadcast select the type of audio in advance from Bilingual Audio Selection left Incorrect settings can cause noise to be output which can be harmful to your ears and speakers and audio will not be recorded properly on media such as mini discs Refer to the operating instructions for co...

Страница 74: ...splay On Screen Messages 5 sec Bright Screen Saver On FUNCTION MENU Display Off Automatic New Channel Message select Connection select item OK Setup Picture Sound Display Connection Tuning Others Disc Progressive TV Aspect 16 9 Off HDMI Settings AV 1 Output RGB 2 AV 2 Settings PAL TV System RETURN TAB SELECT TV Aspect This setting needs to be changed when connected to a 4 3 standard aspect TV 16 9...

Страница 75: ...nd component this is not a malfunction of the unit 4 3 Picture output expands left or right 16 9 Picture is output as original aspect with side panels Digital Audio Output HDMI and Optical Optical Only Select when this unit is connected to an amplifier with an optical digital audio cable 80 and connected to a TV with an HDMI cable 80 and you want to enjoy the highest quality of audio from discs VI...

Страница 76: ...wnload in Standby and Software Update in Standby below to Off and update manually below Software Update Search Now TV Guide Download in Standby On When the unit is turned off TV Guide data is downloaded automatically Off Software Update in Standby On You can perform the unit updates automatically when the unit is turned off Off TV Guide Software search period Selects the time to automatically perf...

Страница 77: ...nt codes if available Some TVs may not be compatible with the unit s remote control TV operation buttons Remote Control Codes for the TV Manufacturer Code No Panasonic 01 02 03 04 AIWA 35 AKAI 27 30 BEJING 33 BEKO 05 71 72 73 74 BENQ 58 59 BP 09 BRANDT 10 15 BUSH 05 CENTREX 66 CHANGHONG 69 CURTIS 05 DAEWOO 64 65 DESMET 05 DUAL 05 ELEMIS 05 Manufacturer Code No FERGUSON 10 34 FINLUX 61 FISHER 21 FU...

Страница 78: ... cables as far away as possible from other cables Do not roll up the RF coaxial cables RF IN AV RF IN RF IN HDMI AV OUT HDMI IN RF OUT RF OUT AV This unit TV VCR HDMI cable 21 pin Scart cable RF coaxial cable AV1 TV AV2 EXT You can enjoy high quality picture by adding the HDMI cable connection 12 The RF coaxial cable cannot be used for showing pictures from the unit The unit must be connected usin...

Страница 79: ...r The S VIDEO OUT terminal achieves a more vivid picture than the VIDEO OUT terminal Actual results depend on the television AUDIO IN VIDEO IN R L AUDIO VIDEO This unit TV L R Notes If you have a regular television CRT cathode ray tube Use component output with progressive Off Factory setting 74 even if it is progressive compatible because progressive output can cause some flickering This is the s...

Страница 80: ...nd quality by connecting this unit to an amplifier or system component using the audio cable or the optical digital audio cable This unit Amplifier or System Component OPTICAL OPTICALIN DIGITALAUDIOOUT PCM BITSTREAM Insert fully with this side up Do not bend cable sharply AUDIO IN R L AUDIO VIDEO This unit Amplifier or System Component L R Connect an amplifier or system component with a built in D...

Страница 81: ...mage to the unit Cracked discs Discs with exposed adhesive from removed stickers or labels such as may occur with rental discs or improperly cared for discs that were previously labeled or re labeled Disc Care RAM Use cartridges to protect them from scratches and dirt Media Handling Disc USB Memory Automatic drive select function RAM Only for discs with the write protect tab on the cartridge set t...

Страница 82: ... Quality Video up converted to 1080p Connect the unit to 1080p compatible HDTV using an HDMI cable Set HDMI Video Format in the Setup menu to 1080p 12 75 What equipment is necessary to play multi channel surround sound You cannot playback multi channel sound on this unit without other equipment You must connect this unit with an HDMI cable or an optical digital cable to an amplifier with a built i...

Страница 83: ...are altered by more than 10 minutes Guide Link will not be able to function 30 Can I receive GUIDE Plus system data via a connected digital satellite receiver or a Set Top Box No only via the built in tuner To perform timer recordings with digital satellite receivers or Set Top Boxes please use the External Link feature or your unit s manual timer programming 28 30 How can I cancel a timer program...

Страница 84: ...s Available space on the HDD or disc The example SP 35 50 is displayed when less than 100 hours are available and the example LP 151h is displayed when over 100 hours are available SP and LP are recording modes 35 50 means 35 hours 50 minutes and 151h means 151 hours UNSUPPORT You have inserted a disc the unit cannot play or record onto 15 16 You tried to operate with a non compatible USB memory 1...

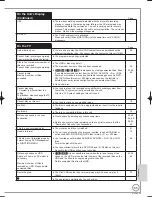
Страница 85: ...y items 23 48 55 68 Delete one or more items registered on the copy list to ensure that the Destination Capacity is not exceeded 59 62 65 This is a non recordable disc The disc may be dirty or scratched 81 Unable to format The unit cannot record on the disc you inserted Insert a DVD RAM or unfinalised DVD R DVD RW DVD Video format R or RW disc 15 This disc is not formatted properly Format it using...

Страница 86: ...indicator appears on the unit s display Change the code on the remote control to match the code displayed for the main unit step To Reset This Unit To reset the unit s settings To reset the ratings level settings To restore the unit if it freezes With the unit stopped Press OPEN CLOSE to open the disc tray Press DRIVE SELECT to select the DVD drive On the main unit Press and hold REC and x1 3 for ...

Страница 87: ... 76 The following does not indicate a problem with the unit Regular disc rotating sound Poor reception due to atmospheric conditions Image disturbance during search Periodic interruptions to the reception due to digital satellite broadcasting breaks Operations are slow to respond when Power Save is set to On Operations are not working due to a poor quality disc Try again using a Panasonic disc The...

Страница 88: ...layed and the disc cannot be ejected The unit is carrying out the recovery process The disc may be defective Do the following to eject the disc Try another disc 1 Press I on the main unit to switch to standby mode If the unit doesn t switch to standby mode reset the unit 86 To restore the unit if it freezes 2 While the unit is turned off press and hold and CH on the main unit at the same time for ...

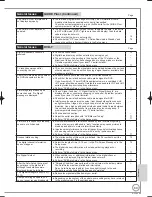
Страница 89: ...cations may cause pictures to break up and audio to mute or distort momentarily Impulse noise interference from an infrequently used electrical appliance or a passing vehicle or lawn mower with a noisy ignition system Perform DVB Auto Setup in the Setup menu 71 Unusual station sorting The station sorting of this unit is pre defined Use Favourites to sort the stations as you want them 70 The digita...

Страница 90: ...e with the unit The contents on the USB memory may be damaged 17 18 The USB memory contains a folder structure and or file extensions that are not compatible with this unit 18 Turn off and then turn on the unit again USB memories connected using a USB extension cable or a USB hub may not be recognized by this unit Some USB memories cannot be used with this unit 17 If inserted during playback recor...

Страница 91: ...le played If connecting to a TV that supports VIERA Link with an HDMI cable When PLAY is pressed on this unit s remote control but you may not be able to see the beginning of the title played until the picture is displayed on the TV Using return to the beginning of the title The picture is distorted during play or video will not play correctly You may be playing a TV programme recorded with poor r...

Страница 92: ...set a ratings level to limit DVD Video play Change this setting Cover 72 Alternative soundtrack and subtitles cannot be selected The languages are not recorded on the disc You may not be able to use the on screen menus to change the soundtrack and subtitles on some discs Use the disc s menus to make changes 20 No subtitles Subtitles are not recorded on the disc Turn the subtitles on and select Tex...

Страница 93: ...it cannot record NTSC signals to discs that already have PAL signal recordings However both types of programmes can be recorded onto the HDD Play of discs recorded with both PAL and NTSC on another unit is not guaranteed 75 Some broadcasts are copyright protected 15 24 96 Timer recording does not work properly The timer programme is incorrect or different timer programme times overlap Correct the ...

Страница 94: ...ded in 16 9 aspect R R DL RW V If recorded in 16 9 aspect using EP mode or FR recordings 5 hours or longer mode 56 R R DL RW Titles recorded on other Panasonic DVD Recorders with Recording Format Rec for High Speed Copy set to Video format On and then copied to the HDD on this unit may not copy to R R DL or RW discs with high speed copy When copying it takes a long time even in high speed mode Use...

Страница 95: ...omanian 8279 Telugu 8469 Afar 6565 Corsican 6779 Hebrew 7387 Macedonian 7775 Russian 8285 Thai 8472 Afrikaans 6570 Croatian 7282 Hindi 7273 Malagasy 7771 Samoan 8377 Tibetan 6679 Albanian 8381 Czech 6783 Hungarian 7285 Malay 7783 Sanskrit 8365 Tigrinya 8473 Amharic 6577 Danish 6865 Icelandic 7383 Malayalam 7776 Scots Gaelic 7168 Tonga 8479 Arabic 6582 Dutch 7876 Indonesian 7378 Maltese 7784 Serbia...

Страница 96: ...akes play of a recorded CD R CD RW DVD R etc possible on equipment that can play such media You can finalise DVD R DVD R DL DVD RW DVD Video format R and R DL on the unit After finalising the disc becomes play only and you can no longer record or edit However finalised DVD RW can be formatted to become recordable Folder This is a place on the hard disk or disc where groups of data are stored toget...

Страница 97: ...very For more information visit www gracenote com Gracenote Proprietary Legends CD and music related data from Gracenote Inc copyright 2000 2009 Gracenote Gracenote Software copyright 2000 2009 Gracenote This product and service may practice one or more of the following U S Patents 5 987 525 6 061 680 6 154 773 6 161 132 6 230 192 6 230 207 6 240 459 6 330 593 and other patents issued or pending S...

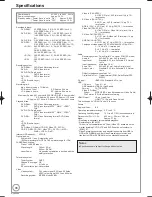
Страница 98: ...ed Video Video system PAL colour signal 625 lines 50 fields NTSC colour signal 525 lines 60 fields Recording system MPEG2 Hybrid VBR Video In PAL NTSC AV1 AV2 21 pin AV3 pin jack 1 Vp p 75 termination S Video In PAL NTSC AV2 21 pin AV3 S terminal 1 Vp p 75 termination RGB In PAL AV2 21pin 0 7 Vp p PAL 75 termination Video Out PAL NTSC AV1 AV2 21 pin Video Out pin jack 1 Vp p 75 termination S Video...

Страница 99: ...pparatus from the AC Mains disconnect the power supply cord plug from AC receptacle CLASS 1 LASER PRODUCT For your safety be sure not to connect or handle the equipment with wet hands Your attention is drawn to the fact that recording pre recorded tapes or discs or other published or broadcast material may infringe copyright laws Back of product Inside of product Information for Users on Collectio...

Страница 100: ...ure 53 Title 48 Enabling discs to be played on other equipment Finalise 69 Encrypted 46 Finalise 69 96 Flexible Recording 27 Format 68 96 FR Flexible recording mode 25 FREEVIEW 22 FUNCTION MENU Display 43 Gracenote database 64 GUIDE Plus 22 33 35 HDAVI Control 12 44 45 75 80 HDMI 12 75 80 High Speed Copy 72 Initialize 76 JPEG 18 40 41 96 Language Code list 95 Disc menu 72 Soundtrack 66 72 Subtitle...

Отзывы: