background image

7

ª

Sales and Support Information

Customer Care Centre

For UK customers: 08705 357357 

For Republic of Ireland customers: 01 289 8333

Visit our website for product information

E-mail: [email protected]

Technical Support for AV Software 

For callers in UK: 08701 505610

For callers in ROI: 0044 8701 505610

Direct Sales at Panasonic UK

Order accessory and consumable items for your product with 
ease and confidence by phoning our Customer Care Centre 
Monday–Friday 9:00am–5:30pm. (Excluding public holidays)

Or go on line through our Internet Accessory ordering application 
at www.panasonic.co.uk.

Most major credit and debit cards accepted.

All enquiries transactions and distribution facilities are provided 
directly by Panasonic UK Ltd. 

It couldn’t be simpler!

Also available through our Internet is direct shopping for a wide 
range of finished products, take a browse on our website for 
further details.

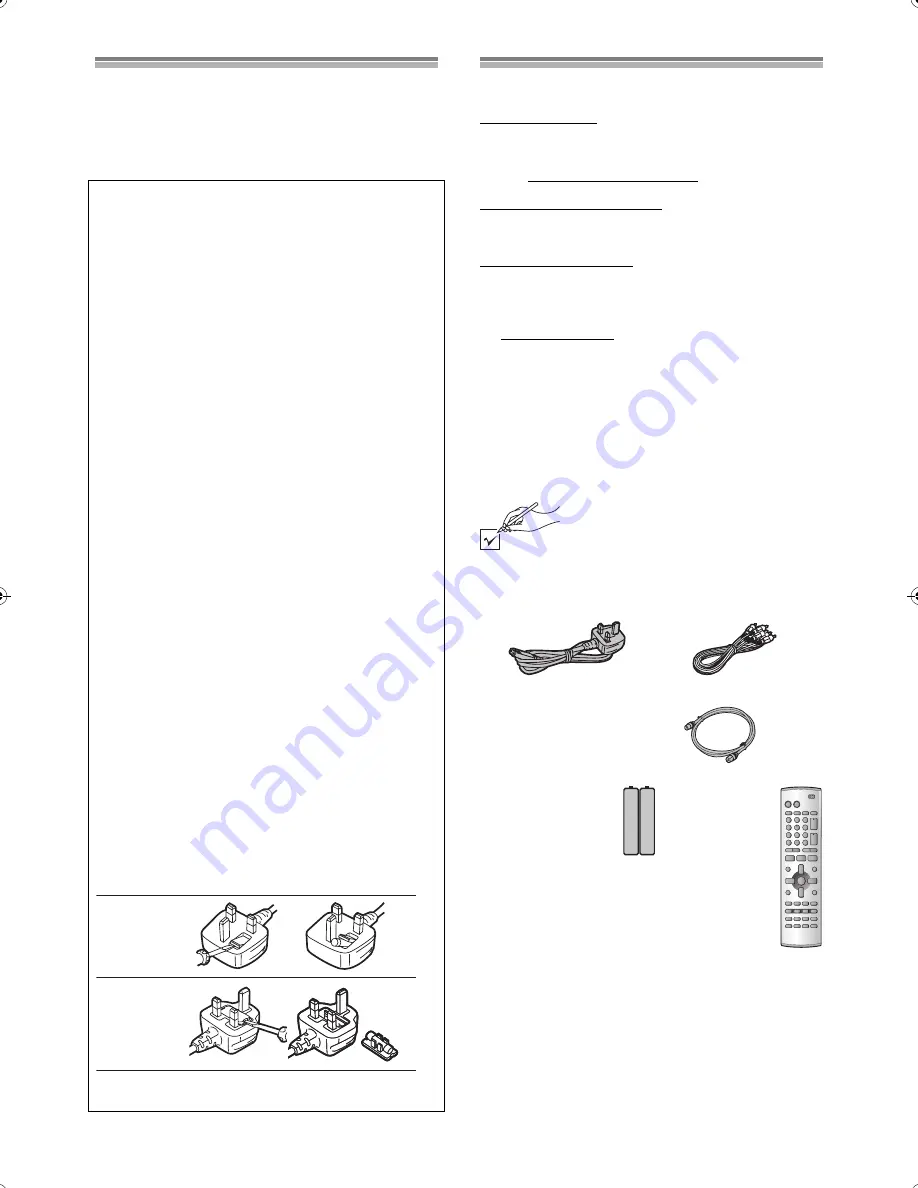
Check that you have the accessories shown

Dear Customer

May we take this opportunity to thank you for purchasing this 
Panasonic DVD Video Recorder.
We would particularly advise that you carefully study the Operating 
Instructions before attempting to operate the unit and that you note 
the listed precautions.

Caution for AC Mains Lead

For your safety please read the following text carefully

This appliance is supplied with a moulded three-pin mains plug for 
your safety and convenience.
A 5-ampere fuse is fitted in this plug.
Should the fuse need to be replaced please ensure that the 
replacement fuse has a rating of 5-amperes and it is approved by 
ASTA or BSI to BS 1362.
Check for the ASTA mark 

Ï

 or the BSI mark 

Ì

 on the body of the 

fuse.

If the plug contains a removable fuse cover you must ensure that it 
is refitted when the fuse is replaced. 
If you lose the fuse cover, the plug must not be used until a 
replacement cover is obtained.
A replacement fuse cover can be purchased from your local 
Panasonic Dealer.

IF THE FITTED MOULDED PLUG IS UNSUITABLE FOR THE 
SOCKET OUTLET IN YOUR HOME THEN THE FUSE SHOULD 
BE REMOVED AND THE PLUG CUT OFF AND DISPOSED OF 
SAFELY. THERE IS A DANGER OF SEVERE ELECTRICAL 
SHOCK IF THE CUT OFF PLUG IS INSERTED INTO ANY 
13

-

AMPERE SOCKET.

If a new plug is to be fitted please observe the wiring code as 
shown below.
If in any doubt, please consult a qualified electrician.

IMPORTANT

The wires in this mains lead are coloured in accordance with the 
following code:

Blue; Neutral,

Brown; Live

As the colours of the wires in the mains lead of this appliance may 
not correspond with the coloured markings identifying the terminals 
in your plug, proceed as follows:
The wire which is coloured BLUE must be connected to the 
terminal in the plug which is marked with the letter N or coloured 
BLACK.

The wire which is coloured BROWN must be connected to the 
terminal in the plug which is marked with the letter L or coloured 
RED.

Under no circumstances should either of these wires be connected 
to the earth terminal of the three pin plug, marked with the letter E 
or the Earth Symbol 

Ó

.

How to replace the Fuse

There are two types of the AC mains lead assembly: 

A

 and 

B

 as shown.

1

Open the fuse compartment with a screwdriver.

2

Replace the fuse and fuse cover.

1

2

1

2

TYPE

A

TYPE

B

Checking the Accessories

Audio/Video Cable

K2KA6CA00001

Remote Control

EUR7624KJ0

Batteries for the 

Remote Control

R6 size

RF lead to connect VCR and TV

K2KF2BA00001
or
K1TWACC00001

AC Mains lead

RJA0053-3X
or
RJA0044-3C

Tick off as you 
unpack the 
accessories.

Guarantee Card

Quick Start Guide

DVD-RAM disc

B.book  7 ページ  2003年5月2日 金曜日 午前10時8分

Содержание Diga DMR-E60

Страница 1: ...ing Instructions Model No DMR E60 Before connecting operating or adjusting this product please read these instructions completely Please keep this manual for future reference RQT7082 B EB Web Site http www panasonic europe com ...

Страница 2: ...canceling programmes 34 To clear a timer recording programme 34 Recording from a video cassette player 35 When connected to non DV equipment 35 When connected to DV equipment 35 To select the TV system PAL NTSC 35 Entering titles 36 DISC INFORMATION 37 Enter Title 37 Disc Protection Releasing disc protection 37 Erase all programmes 37 Format 38 Finalize Creating DVD Video 38 Using the DIRECT NAVIG...

Страница 3: ...ear in the text DVD TV INPUTSELECT VIDEOPlus DIRECTTVREC AV CH VOLUME SKIP DIRECTNAVIGATOR PLAY LIST TOP MENU ENTER MENU FUNCTIONS RETURN STOP PAUSE PLAY x1 3 SLOW SEARCH CANCEL 1 2 3 DVD TV 4 5 6 7 8 9 0 FRAME MANUAL SKIP TIME SLIP ERASE REC PROG CHECK TIMER F Rec RECMODE STATUS MARKER AUDIO DISPLAY POSITION MEMORY B D A C AV3 TIMER REC EXT LINK 7 J M Q 1 O G P ...

Страница 4: ...on memory button POSITION MEMORY 21 19 DVD TV switch DVD TV 8 20 TV on off button Í TV 9 21 Television input mode selector AV 9 22 Input select button INPUT SELECT 35 23 Channel up down buttons W X CH 26 24 TV volume up down buttons r s VOLUME 9 25 Slow Search buttons 6 5 SLOW SEARCH 21 26 Play t1 3 button 1 20 27 Menu and Play List button MENU PLAY LIST 20 42 28 Return button RETURN 19 29 Time sl...

Страница 5: ...n timer recording 6 External link display page 28 On when a linked timer recording with external equipment is in standby mode or being performed 7 SD PC Card indicator page 49 On When a SD card or PC card is set in the unit Flashes When a SD card or PC card is being read written to 8 Down mix indicator On When a multi channel soundtrack is downmixed to 2 channel output 9 Channel 1 2 3 99 A1 A2 A3 ...

Страница 6: ... match what you will see on your screen Displays The displays shown in these instructions are examples only Actual displays depends on the disc being played Manufactured under license from Dolby Laboratories Dolby Pro Logic and the double D symbol are trademarks of Dolby Laboratories DTS and DTS Digital Out are trademarks of Digital Theater Systems Inc CAUTION THIS PRODUCT UTILIZES A LASER USE OF ...

Страница 7: ... plug contains a removable fuse cover you must ensure that it is refitted when the fuse is replaced If you lose the fuse cover the plug must not be used until a replacement cover is obtained A replacement fuse cover can be purchased from your local Panasonic Dealer IF THE FITTED MOULDED PLUG IS UNSUITABLE FOR THE SOCKET OUTLET IN YOUR HOME THEN THE FUSE SHOULD BE REMOVED AND THE PLUG CUT OFF AND D...

Страница 8: ...eries consult your dealer Wash thoroughly with water if electrolyte comes in contact with any part of your body Remove if the remote control is not going to be used for a long period of time Store in a cool dark place Replace if the unit does not respond to the remote control even when held close to the front panel Use Aim at the sensor avoiding obstacles at a maximum range of 7 m directly in fron...

Страница 9: ...EIDER 05 06 29 30 31 SELECO 06 25 SHARP 18 SIEMENS 09 SINUDYNE 05 06 33 SONY 08 TELEFUNKEN 10 11 12 13 14 THOMSON 10 15 TOSHIBA 16 WHITE WESTINGHOUSE 05 06 Operation Button On and off TV Í 20 Video input mode AV 21 Channels W X CH 23 Volume i j VOLUME 24 Numeric 0 9 4 ªThe 3 methods for switching to the AV input on your Panasonic TV Your Panasonic TV uses one of 3 different methods for switching b...

Страница 10: ...with both non cartridge and cartridge DVD RAM but cartridge type discs give better protection to your valuable recordings For your reference DVD RAM recorded on this unit cannot be played on incompatible players including players manufactured by Panasonic Using a Panasonic DVD RAM you can record broadcasts that allow you to make one copy such as some satellite broadcasts This unit cannot record PA...

Страница 11: ... The first 30 seconds of a programme may not be recorded if you make successive timer recordings The video is recorded in a 4 3 aspect irrespective of the video signal input Use the television s screen modes to change the screen size for play Some broadcasts carry signals that allow you to make one copy but you cannot record these broadcast with DVD R Use DVD RAM to record these kinds of broadcast...

Страница 12: ...ictures MOTION JPEG etc that are not compliant with the DCF standard and still pictures other than JPEG and TIFF cannot be displayed Still pictures created or edited on a computer may not be playable TIFF is compatible with uncompressed RGB chunky formats Other types of TIFF files cannot be played Note When there are a lot of folders and files it may take a long time to display copy or erase Folde...

Страница 13: ...ke in most commercially available 21 pin Scart cables all 21 pins of one plug on a fully wired 21 pin Scart cable are connected to the matching pins on the other end of the cable Reference If the TV set is equipped with a 21 pin scart socket that features Y C signal separation set the AV1 Output to S Video see page 63 so that you can play back with high picture quality and use a fully wired 21 pin...

Страница 14: ...ither SKY ONE or SKY NEWS If after Auto Setup is complete the programme position of the satellite receiver is not to your preference or SAT name is not shown in the programme list you can rearrange the programme position and enter SAT name manually See page 67 RF IN RF OUT OPTICAL AV1 TV AV2 DECODER EXT DIGITAL AUDIO OUT PCM BIT STREAM R AUDIO L VIDEO S VIDEO R AUDIO L VIDEO S VIDEO AV4 IN OUT 1 4...

Страница 15: ...on television through a Scart terminal called TV Scart on a Sky Digital STB In the case of a Sky Digital STB recording of RGB signals from the TV Scart terminals is possible but the Personal Planner function for timer recording cannot be used in conjunction with the External Link1 function of this DVD Recorder To record programmes by RGB signals Make connections as shown Set your Sky Digital STB t...

Страница 16: ...d Postcode in the same way 8 Press RETURN 28 to make the Owner ID setting disappear RETURN Download Download in progress please wait RETURN to abort Pos 4 Indication during downloading Menu for Owner ID setting RETURN Owner ID RETURN leave Name House No Postcode PIN number Hint If you use a Panasonic Q Link TV and perform the operation step 1 above starting the downloading of the setup data will a...

Страница 17: ...only Select an unused channel pre set on your TV and tune it to the RF output channel number shown on the DVD Recorder display or until you can clearly see the Auto Setup screen Store the new video playback channel refer to the instructions for your TV 5 To set up the Owner ID repeat the steps 3 8 on the previous page When no stations have been set confirm all connections and restart Auto Setup Se...

Страница 18: ...ty for this purpose Please refer to your Satellite Receiver Cable TV box instructions for use of such timer facilities For your unit to recognise the Video Plus Codes for each satellite station you must teach your unit which channel or AV input to record from for the first time Otherwise when setting a VIDEO Plus recording the symbol will appear in the channel position indicating that the unit doe...

Страница 19: ...our reference Apart from TV Aspect other settings also affect how video appears on your television Check the following if video doesn t appear correctly on your television Connection Norm 4 3 TV Settings DVD RAM or Norm 4 3 TV Settings DVD Video page 63 The video setting on the disc How video appears is often specified by the disc itself The video settings on your television N S N S Disc Protectio...

Страница 20: ... the numeric buttons 4 to select an item or move 3 4 2 1 10 to select an item and press ENTER 10 You can return to menus after you start play by pressing TOP MENU 9 DVD Audio DVD Video or MENU 27 DVD Video or RETURN 28 Video CD Note The disc continues to rotate while the menu is displayed even after you finish playing an item Press 7 when you finish to preserve the unit s motor and your television...

Страница 21: ...rent position You cannot mark positions if the disc is write protected with DISC INFORMATION page 37 or with the write protect tab page 74 Release the protection before marking position If you press 7 before switching the unit to standby after pressing POSITION MEMORY 18 to memorize a position play will resume from the position you pressed 7 when you press 1 26 Fast forward and rewind SEARCH RAM D...

Страница 22: ...l only Preparation Switch DVD TV 19 to DVD During play Press the numeric buttons 4 to select the item page 4 This works only when stopped with some discs the screen saver is on the television DVD A A group number can be specified while the screen saver is displayed e g 5 5 Playing bonus group Some discs contain bonus groups If a password screen appears after selecting a group enter the password wi...

Страница 23: ... audio for the images being played with simultaneous recording and play and Time Slip ªWhen you have connected the unit to other equipment with an optical digital cable You cannot change the audio type when you have used only an optical digital cable for connection in the following cases While playing stereo or bilingual broadcasts recorded on DVD RAM While playing something recorded from other eq...

Страница 24: ... 1 10 to highlight 1 10 2 Use 3 4 10 to select 11 20 You can select the next group of 10 when the current group is full 3 Use 1 10 The first asterisk is highlighted 4 Press ENTER 10 to mark a position To play from a marked position 1 Use 2 1 10 to select a marker number 2 Press ENTER 10 Play starts from the marked position ªTo clear a marker Use 2 1 10 to select a marker number and press CANCEL 5 ...

Страница 25: ...ta it will take some time before the music itself starts playing and the elapsed time will not be displayed during this time Even after the track starts the correct play time will not be displayed Maximum number of tracks and groups recognizable 999 tracks and 99 groups Compatible compression rate between 32 kbps and 320 kbps ªNaming folders and files At the time of recording give folder and file ...

Страница 26: ...e Sound menu When recording bilingual audio with connecting to a decoder or a digital receiver Select the audio type either M1 or M2 on the connected devices You cannot select the audio type on this unit For your reference RAM Select the audio type both M1 and M2 on the connected devices You can also select the audio type on this unit Note DVD R You cannot use AUDIO 36 or the DISPLAY menu to chang...

Страница 27: ...tandby Unit s Display Counter 30 60 90 240 180 120 2 Shows recording will stop in 30 minutes ªTo cancel During recording press REC 31 until the counter appears Recording continues ªTo show the time remaining until recording finishes Press STATUS 15 several times For your reference This does not work during timer recordings or while using flexible recording You cannot use the remote control to spec...

Страница 28: ...set to Ext Link 2 this function does not work if the input signal is NTSC system The play picture or menu picture is not output from AV2 socket during Linked timer recording standby mode Some televisions have separate terminals for RGB input and Q Link and this means you cannot view RGB signals and use Direct TV Recording at the same time Refer to your television s operating instructions and selec...

Страница 29: ...that were recorded previously Preparation Switch DVD TV 19 to DVD While recording or timer recording Press TIME SLIP 29 Play starts 30 seconds previous 1 Play images 30 seconds before 2 Current recording ªTo change the part being played Press 3 4 10 to enter the time Press 3 10 to increase or 4 10 to decrease in one minute units Press and hold 3 10 to increase or 4 10 to decrease in 10 minute unit...

Страница 30: ...VD R DVD A DVD V CD VCD MP3 Preparation Switch DVD TV 19 to DVD 1 While stopped Press FUNCTIONS 11 to show the FUNCTIONS window 2 Use 3 4 2 1 10 to select an item Refer to the relevant pages for details 3 Press ENTER 10 Your selection is entered and the FUNCTIONS window disappears If the operation requires further selections another screen appears ªTo clear the FUNCTIONS window Press FUNCTIONS 11 ...

Страница 31: ...e 40 Protection RAM page 41 Partial Erase RAM page 41 Divide RAM page 42 PLAY Disc play RAM DVD R DVD A DVD V CD VCD MP3 page 20 RESUME PLAY Start play from the point you stopped play RAM DVD R DVD A DVD V CD VCD MP3 page 21 TOP PLAY Start play from the oldest programme on the disc RAM DVD R DVD A DVD V CD VCD MP3 page 20 DV AUTO REC Display the DV input recording screen RAM page 54 CREATE PLAY LI...

Страница 32: ...n Name Date Current date the day before one month later Daily Sunday to Saturday Daily Monday to Saturday Daily Monday to Friday Weekly Sundays Weekly Saturdays Current date Start start time Stop finish time The time increases or decreases in 30 minute increments if you hold the button Mode Recording mode XP FR EP LP SP XP page 26 PDC ON OFF The PDC signals cannot be detected in Auto Setup because...

Страница 33: ... one onwards will not be recorded Recording is not possible unless you set Disc Protection in DISC INFORMATION to Off page 37 You can not record to a disc if the write protect tab on a cartridge disc is set to protect Release this before operation page 74 Even if the unit is put in the timer recording standby mode or the timer recording is being performed you can play a programme If the unit is no...

Страница 34: ...r of programmes or scenes was reached so the programme failed to record The television programme was copy guarded so the programme failed to record X The programme did not complete recording because the disc is dirty or some other reason Disc space B OK Displayed if the recording can fit in the remaining space on the disc However when the programme becomes longer than scheduled during the recordin...

Страница 35: ... recording are given in Bilingual Audio Selection page 62 ªTo skip unwanted parts Press 8 to pause recording Press again to restart recording ªTo stop recording Press 7 Note Stop play on the other equipment as well This unit does not support recording the signal from a personal computer The audio recorded through the DV Input terminal is the audio selected in the Audio mode for DV input For your r...

Страница 36: ...e by using 3 4 2 1 10 to select SET and pressing ENTER 10 To enter a space You may enter a space by pressing 4 and then press ENTER 10 ªUsing the numeric buttons 4 to enter characters e g entering the letter R 1 Press 7 4 to move to the 7th row 2 Press 7 4 twice to highlight R 3 Press ENTER 10 You may enter a space by pressing 4 and then ENTER 10 ªTo correct a character 1 Use 3 4 2 1 10 to select ...

Страница 37: ...bly when you use this procedure Preparation Switch DVD TV 19 to DVD Insert a disc you have recorded on After performing steps 1 to 2 of Enter Title perform the following steps 3 Use 3 4 10 to select Erase all programmes and press ENTER 10 4 Use 2 10 to select Yes and press ENTER 10 5 Use 2 10 to select Start and press ENTER 10 All programmes and play lists are erased ªTo stop partway through Selec...

Страница 38: ...d if the write protect tab is switched to PROTECT Release the protection to continue page 74 Formatting cannot be performed on DVD R or CD R RW The message Unable to format appears when you try to format discs this unit cannot use If you have used the DIRECT NAVIGATOR to protect a programme page 41 the message Contents on the disc have been protected Start formatting the disc appears in step 5 Sel...

Страница 39: ...Currently recording Displayed when the programme is being recorded g Scroll bar If there are more than 5 programmes you can move down the list by using 3 4 10 and this bar shows your approximate position in the list h Total number of programmes Shows the total number of programmes i Sub menu Displayed when you use 1 10 You can see this during simultaneous recording and play but you are unable to p...

Страница 40: ...ss ENTER 10 5 Enter or edit the title Entering titles page 36 For your reference You can give DVD RAM titles of up to 64 characters a maximum of 44 characters is possible when inputting a title from the timer recording menu You can give DVD R titles of up to 44 characters The full title is shown in the Properties screen but if you enter a long title only part of it is shown in the programme list C...

Страница 41: ...s created with the erased part are also erased ªTo stop partway through Select Cancel in step 8 and press ENTER 10 Or Press RETURN 28 ªTo erase another part of the same programme Select Next in step 7 and perform step 8 then repeat steps 5 8 For your reference Use search and slow motion to find the points You cannot specify an end point before a start point or a start point after an end point You ...

Страница 42: ...Divide Programme Once divided this programme cannot be re combined Divide Cancel RETURN ENTER SELECT Using PLAY LIST to edit programmes Displaying PLAY LIST RAM Preparation Switch DVD TV 19 to DVD Insert a disc you have recorded on Press PLAY LIST 27 The play list screen appears Scenes are not displayed if you have not yet created a play list with the disc ªTo clear the PLAY LIST screen Press PLAY...

Страница 43: ...t point Similarly if you specify a start point but not an end point the unit determines the end of the programme as the end point You may not be able to specify start and end points if the material is still pictures recorded on other equipment The unit pauses play when the end of the last programme on the disc is reached during this procedure You can also display the CREATE PLAY LIST screen by sel...

Страница 44: ... to select the desired play list and press 1 10 3 Use 3 4 10 to select Edit and press ENTER 10 4 Use 2 1 10 to select Add and press ENTER 10 5 Use 3 4 2 1 10 to select the scene after the position you want to add the scene and press ENTER 10 6 Use search functions such as fast forward and slow motion to find the start point of the scene and press ENTER 10 7 Use search functions such as fast forwar...

Страница 45: ...w motion to find the start point of the scene and press ENTER 10 7 Use search functions such as fast forward and slow motion to find the end point of the scene and press ENTER 10 8 Use 3 4 10 to select Exit and press ENTER 10 ªTo re edit another scene 1 Use 3 4 10 after step 7 to select Next or Back and press ENTER 10 until you find the scene you want to re edit 2 Repeat steps 5 7 to continue re e...

Страница 46: ...s ENTER 10 4 Use 2 10 to select Yes and press ENTER 10 The play list is erased ªTo stop partway Select No in step 4 and press ENTER 10 Or Press RETURN 28 Titling PLAY LIST RAM Preparation Switch DVD TV 19 to DVD Insert a disc you created play lists on After performing steps 1 to 2 of Adding Scenes to a PLAY LIST page 44 perform the following steps 3 Use 3 4 10 to select Enter Title and press ENTER...

Страница 47: ...ill picture number When Return is displayed Select Return and press ENTER 10 to return to the default page When RANDOM is displayed Select RANDOM and press ENTER 10 the picture changes randomly each time you press ENTER 10 Slide Show DVD A Display only Audio channel RAM VCD Select the audio channel page 23 PBC VCD Playback control on off Indicates whether menu play playback control is on or off A ...

Страница 48: ...nnel or over only including a center channel The volume of the center channel is raised to make dialog easier to hear ON OFF Repeat play RAM DVD R DVD A DVD V CD VCD MP3 During play Use 3 4 10 The display changes as illustrated RAM DVD R PRG PROGRAMME All OFF J DVD V Chapter Title OFF J CD VCD Track All OFF J DVD A MP3 Track Group OFF J While playing a play list RAM PL PLAY LIST OFF If the Video C...

Страница 49: ...es still pictures and files that are in the selected folder 5 Use 3 4 10 to select the still picture folder You can also select the still picture folder by entering a 3 digit number with the numeric buttons 4 It is possible to give the folder a title 6 Press ENTER 10 For your reference Scene and File refer to numbers inside the folder selected Lower files are not included If there is more than one...

Страница 50: ... steps 4 Use 3 4 10 to select Slide Show and press ENTER 10 The still pictures in the folder selected are displayed in numerical order ª To change the display interval timing page 54 ª To stop slide show Press RETURN 28 Menu screen appears ª To select the next or previous still picture While in still picture display use 2 1 10 1 10 next still picture 2 10 previous still picture The still picture c...

Страница 51: ...creen is displayed 1 Use 3 4 10 to select Destination and press ENTER 10 2 Use 2 3 4 10 to select the drive 3 Use 1 3 4 10 to select the folder and press ENTER 10 Some folders page 12 cannot be copied to 8 Use 4 2 1 10 to select Copy and press ENTER 10 Copying still pictures begins ª To stop partway through Select Cancel in step 8 and press ENTER 10 Or Press RETURN 28 For your reference When there...

Страница 52: ...ctures Check it carefully before proceeding After performing steps 1 to 2 of Displaying still pictures Album Display page 50 perform the following steps 3 Select the folder for displaying to erase page 49 Selecting the drive and the folder 4 Use 3 4 10 to select Erase and press ENTER 10 5 Use 3 4 2 1 10 to select Folder or still picture you wish to erase and press ENTER 10 Repeat this if you erase...

Страница 53: ...R 10 5 Use 3 4 2 1 10 to select Whole or still pictures you wish to print and press ENTER 10 Repeat this if you print more than one still picture ª To select all the still pictures in the folder Use 3 4 2 1 10 to select Whole and press ENTER 10 A check mark appears on the folder s name check marks inputted separately will be erased To cancel check marks Use 3 4 2 1 10 to select the folder or still...

Страница 54: ...ble on other equipment JPEG Others Others Slide Show Intervals 5 sec Format RETURN ENTER SELECT SD CARD JPEG Others Others Slide Show Intervals 5 sec Format RETURN ENTER SELECT SD CARD DV Automatic Recording DV AUTO REC RAM Automatic generation of programmes and play lists is possible for using the DV AUTO REC function when connecting DV equipment e g Digital Video Camera to the DV input terminal ...

Страница 55: ...ning message and cancels recording Check the equipment carefully before trying to record from it The DV equipment name may not be shown correctly You cannot record and play simultaneously You cannot start recording until the images from the DV equipment appear on the television We recommend using Panasonic digital video camera Recording may not be performed as desired if the time codes on the tape...

Страница 56: ...ges 62 64 Set PCM Down Conversion to On Set Dolby Digital and DTS to suit the equipment Change speaker settings on the amplifier ªTo enjoy stereo or Dolby Pro Logic Analog connection Connect to an analog amplifier or system component B page 57 SETUP Sound pages 62 64 Set PCM Down Conversion to Off Digital connection Connect to a digital amplifier or system component A page 57 SETUP Sound pages 62 ...

Страница 57: ...ure the following conditions are met There is no copy guard recorded on the disc The recording equipment can handle a sampling frequency of 48 kHz 16 bit You cannot record MP3 If you want to use the synchro recording feature on your digital recording equipment and you use connection A or B to record from CDs or video CDs first pause at the point you want to record from activate the synchro feature...

Страница 58: ...pped with RGB output capability to the AV2 socket the TV can receive RGB signal input from the decoder via the unit Connecting a satellite receiver or digital receiver 1 Satellite receiver not supplied 2 21 pin Scart socket 3 21 pin Scart cable not supplied Connect a 21 pin Scart cable not supplied to the AV2 21 pin Scart socket on the unit and to the 21 pin Scart socket on the satellite receiver ...

Страница 59: ...e to operate the unit from the other equipment Only one piece of DV equipment e g Digital Video Camera can be connected to the unit via the DV Input terminal The picture compression system of the DV equipment you have connected may differ from that used in this unit In such cases dubbing from these equipments will not be possible When connecting to the input terminals on the rear of the unit Audio...

Страница 60: ...ows the current settings The options are shown when you select an item 3 Use 3 4 10 to select the menu s tab and press 2 or 1 10 4 Use 3 4 10 to select the item you want to change and press ENTER 10 5 Use 3 4 10 to select the option and press ENTER 10 Some options require different operations Follow the on screen instructions and the instructions described ªTo return to the previous screen Press R...

Страница 61: ...o Limit All DVD Video can be played 1 to 7 Prohibits play of DVD Video with corresponding ratings recorded on them 0 Lock All Prohibits play of all DVD Video Changing ratings When level 0 7 is selected Unlock Recorder Change Password Change Level Temporary Unlock DVD Video mode Select how to play pictures contained on some DVD Audio The setting returns to Off when you change the disc or turn the u...

Страница 62: ...ate the Quick View Play k1 3 or not and whether to have sound during search On Off DVD A You may hear sound regardless of this setting with some discs Dynamic Range Compression PLAY DVD V Dolby Digital only Change the dynamic range for late night viewing On Off Bilingual Audio Selection REC page 23 Select whether to record the main or secondary audio type when recording to DVD R or when recording ...

Страница 63: ... appear in the letterbox style with black bands above and below the picture despite the setting here Letterbox Video recorded for a widescreen is played in the letterbox style Norm 4 3 TV Settings DVD RAM You can select how to reflect the image on the TV when you watch 16 9 images DVD RAM on 4 3 TV Norm 4 3 Pan Scan Letterbox Norm 4 3 Programmes played as recorded Pan Scan Video recorded for a wid...

Страница 64: ...AL AUDIO OUT terminal PCM Down Conversion Off Factory preset When you have used audio cables to connect the unit to other equipment analog connection B page 57 On When you have used an optical digital cable to connect the unit to other equipment digital connection A page 57 Output is limited to 48 kHz 16 bit Output of audio with a sampling frequency of 96 kHz Audio is output as follows in accordan...

Страница 65: ...changing the remote control code you can operate other DVD recorders and players manufactured by Panasonic Most of the DVD recorders and players manufactured by Panasonic use the same system for their remote controls so if you operate them in the same place the controls can be confused by the different pieces of equipment Use the following procedure to change the remote control code to solve this ...

Страница 66: ...atic time correction function may not work In this case the indication for Automatic is automatically reset to Off If the reception conditions improve later on it may be possible to activate this function The following screen appears when setting is complete 5 Press RETURN 28 ªTo stop auto clock setting Press RETURN 28 Note If Automatic is set to On when you open the Clock screen do not set it to ...

Страница 67: ...nformation the name of the TV station is recorded automatically The unit s clock must be set correctly In case of a TV station with Teletext information it may take over 30 minutes to get the title or may fail to get pages 36 40 5 Press RETURN 28 Adding deleting and moving channels Use this function if Channels were not set correctly using automatic tuning A channel that should have been set wasn ...

Страница 68: ...and then use the numeric buttons 4 or 3 4 2 1 10 to enter the current PIN number After entering the correct PIN number you can change the Name House No and Postcode 5 Press ENTER 10 to conclude the setting 6 Use 3 4 2 1 10 and ENTER 10 to select and change the desired information 7 Press RETURN 28 to exit the Owner ID setting menu ªTo Display the Owner ID setting menu While stopped Hold down 7 on ...

Страница 69: ...5 Available recording time and recording mode e g 0 50 XP indicates 50 minutes in XP mode 6 The current date and time 7 Recording time Shows recording time recording mode and a rough guide to how much space has been used for recording on the disc 8 Elapsed play time 9 Play position 10 Video bit rate when recording 11 Video bit rate when playing 12 Bit rate display Shows as Mbps Mega bit per second...

Страница 70: ...o hold a disc Do not touch the recorded surface ªIf there is dirt or condensation on the disc If the disc is dirty wipe with a damp cloth and then wipe dry Moisture may condense on discs after they are brought inside from the cold DVD RAM and DVD R Clean and dry with an optional DVD RAM PD disc cleaner LF K200DCA1 where available Do not use cleaners or clothes for CDs to clean DVD RAM and DVD R Ne...

Страница 71: ...coding colour still pictures If you select JPEG as the storage system on digital cameras etc the data will be compressed to 1 10 1 100 of its original size The special quality of this standard is that there is little deterioration in picture quality in comparison to the degree of compression Linear PCM This is a form of signal that has been digitized without compressing it CDs are recorded with 44...

Страница 72: ...aturing the Q Link function PDC PDC Programme Delivery Control Programme Delivery Control adjusts the start and stop time of a timer recording automatically to ensure the recording starts and finishes in line with the programme broadcast This is useful when a programme over runs the published times The station must be transmitting PDC and the exact time must be set for PDC to work The unit detects...

Страница 73: ...aning Take the cleaner out of the unit UNSUPPORT You have inserted a disc the unit cannot play or record on Insert a disc the unit can play or record on page 10 U14 The unit is hot The unit switches to standby automatically for safety reasons and you cannot operate it Wait for about 30 minutes for the service number to disappear Select a position with good ventilation when installing the unit Do n...

Страница 74: ...ull No space left on the disc Create space by erasing any unwanted programmes page 40 Use a new disc This disc may not be played in your region You tried to play a disc with a region number different from this unit s region number This unit can play only play discs with the region numbers compatible with this unit page 10 Your selection exceeds the recorder s rating limit A ratings level has been ...

Страница 75: ...gs for TV Aspect Norm 4 3 TV Settings DVD Video or Norm 4 3 TV Settings DVD RAM in the Connection menu pages 19 and 63 The picture flickers Adjust the television s vertical hold Read the television s operating instructions or consult your dealer On screen messages do not appear Go to Display in the SETUP menus and select Automatic for On Screen Messages page 62 Press STATUS 15 to show the on scree...

Страница 76: ...switch the unit to standby then press TIMER 14 again to turn the unit on The unit may not be operating correctly due to lightning static electricity or some other external factor The Child Lock function is activated page 56 A title or chapter doesn t play when it is selected Some titles and chapters on DVD Video are not played when you have changed the ratings level page 64 Picture distorted durin...

Страница 77: ...ring a VIDEO Plus number Use 3 4 10 repeatedly to select the programme position on which the TV programme to be recorded will be broadcast Timer recording does not work properly The timer programme is incorrect Make corrections to the programme and check them when you are finished pages 32 and 34 The unit is not on standby for timer recording on the unit s display is not on Different timer program...

Страница 78: ...mes take a few hours When repeating copying or erasing it may sometimes take a long time Format the disc or memory card The tray won t open close The tray cannot be opened or closed while the still pictures are played back and editing screen is being displayed Press RETURN 28 a few times to clear the screen The PC card cannot be removed Make sure the PC card has been slotted home firmly before att...

Страница 79: ... AV2 21 pin Video Out pin jack 1 Vp p 75 ohm termination S Video Out PAL NTSC AV1 21 pin S Video Out S terminal 1 Vp p 75 ohm termination RGB Out PAL NTSC AV1 21 pin 0 7 Vp p PAL 75 ohm termination DV Input PAL NTSC 4 pin SD PC Card Slot SD Card Slot SD Memory Card Slot PC Card Slot PC Card Type II Compatible Media SD Card Slot SD Memory Card MultiMediaCard Compatible Media PC Card Slot A PC Card ...

Страница 80: ...frame 21 FUNCTIONS window 30 ªJ JPEG 12 49 71 ªL Language 47 LPCM 23 62 71 ªM Manual tuning 67 Marker 24 MENU 20 MPEG 64 ªO Owner ID 68 ªP PC card 12 49 PDC 33 72 PLAY 20 PLAY LIST 42 71 ªQ Q Link 72 Quick View Play k1 3 21 ªR Ratings 61 64 Recording 26 35 Recording modes 26 Remaining time 26 Repeat play 48 RESUME PLAY 21 RGB 15 ªS SD card 12 49 Search 21 SETUP 60 Simultaneous recording and play 2...

Страница 81: ...81 ...

Страница 82: ...Matsushita Electric Industrial Co Ltd Web Site http www panasonic co jp global RQT7082 B F0503Mn0 ...

Отзывы: