background image

21

(EN)

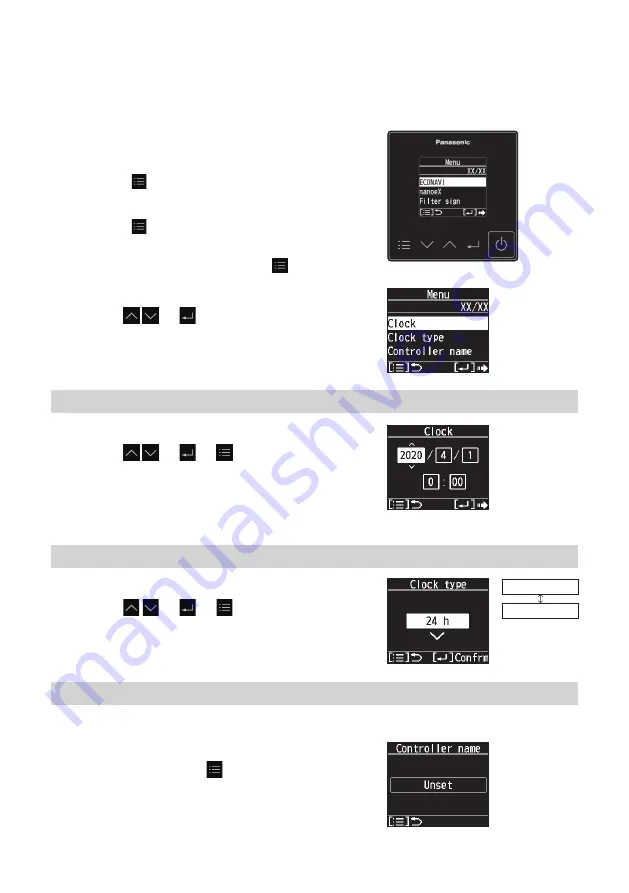
Clock/Clock type/Controller name

Steps 1 and 2 are common operations for each item.

1

Display the menu screen.


„

When stopped

Press   .


„

When operating

Press   repeatedly until the menu screen is 

displayed.

• To return to the top screen, press   .

2

Select the item to set.

Press   

 →  

 .

Clock

3

Set the present date and time.

Press   

 →   →  

 .

                   (Repeat)      (Press to finish.)
• [--] appears in situations where the clock is reset, 

such as when power is not supplied to the remote 

controller for 24 hours or more.

Clock type

3

Select the type to display.

Press   

 →   →  

 . 

(Press to finish.)

24 h

AM/PM

Controller name

The controller name can be set only with the “Panasonic H&C Control App”.

3

Confirm the name.

Confirm, then press  

 . 

(Press twice to finish.)

Содержание CZ-RTC6BLW

Страница 1: ... 8 Operation guide 8 z z Basic operations 9 z z Menu list 12 z z ECONAVI function 13 z z nanoe X function 16 z z Filter sign 18 z z Outing function 19 z z Clock Clock type Controller name 21 z z Touch sound Contrast 22 z z Backlight Language 23 z z Contact address Display mode 24 z z Setting information list 25 z z Bluetooth settings 28 z z Wireless LAN settings 60 z z Troubleshooting 89 z z Speci...

Страница 2: ... outdoor units in a safe place z z Be sure to keep this manual in a place easily accessible by users In the case of user change be sure to give this manual to the new user NOTICE The English text is the original instructions Other languages are translation of the original instructions Internet Bluetooth functionality Wireless LAN Panasonic Comfort Cloud app via wireless LAN network P 60 Panasonic ...

Страница 3: ...ons including children with reduced physical sensory or mental capabilities or lack of experience and knowledge unless they have been given supervision or instruction concerning use of the appliance by a person responsible for their safety Children should be supervised to ensure that they do not play with the appliance for European market only This appliance can be used by children aged from 8 yea...

Страница 4: ...use only in the country where it was purchased This product uses signals in the 2 4 GHz band Signals in the 2 4 GHz band are used by medical devices other similar devices and nonlicensed amateur radio stations hereafter referred to as other radio stations 1 Before using this product make sure there are no other radio stations in the vicinity 2 If a radio interference occurs between this product an...

Страница 5: ...r using mobile device application When operating an air conditioner from a remote controller located outside the visibility of the air conditioner make sure that the operation of the air conditioner will not negatively affect its surroundings or the occupants beforehand When occupants include children elderly people people with ailments or people with disabilities make sure the product is used in ...

Страница 6: ...tting information icon Only the partial settings can be checked on the top screen To check all the settings P 25 You can limit the number of icons to be displayed to simplify the display P 24 Setting information icons displayed on the top screen Icon details P 26 Menu button When pressed repeatedly during operation this shows operating status confirmation set temperature operation mode fan speed f...

Страница 7: ...7 EN Part names Note Press centre No glove No pen If no operation is performed for an extended period the backlight turns off to save electricity Press any button for illumination ...

Страница 8: ... Press z z To resume operation Press Key operations locked Prohibited Keys are locked so operations are not possible z z To return to the top screen Press Being centrally controlled operation is not possible z z To return to the top screen Press Operation stop screen When inspection is required Refer to Troubleshooting P 89 Operation guide The currently operable content is displayed Menu button En...

Страница 9: ...To stop operation Press 2 Check the current operating status Press When no operation is performed for several seconds the display returns to the top screen Set temperature Fan speed Flap Operation mode 3 Select the item to set Press Repeat When no operation is performed for several seconds the display returns to the top screen SET TEMP Set temperature is not displayed in Fan mode SET TEMP MODE FAN...

Страница 10: ...ress Press to finish Auto The mode is automatically switched to Cool or Heat to achieve the set temperature Operation modes that cannot be set are not displayed Heat Cool Dry Fan Auto Fan speed 4 Change the setting Press Press to finish Auto Cannot be selected in Fan mode Depending on the model selectable fan speed may differ High Low Medium Auto Depending on the model either of the displays appea...

Страница 11: ...d with the flap movement Depending on the type of indoor unit and operation mode Flap can be set in 3 levels The flap display differs from the actual flap angle Menu 4 Select the menu item Press To return to the top screen Press See Menu list P 12 for the menu items When no operation is performed for several minutes the display returns to the top screen The menu screen can also be displayed if you...

Страница 12: ...9 Contrast Sets the screen contrast P 22 10 Backlight Sets the backlight brightness of the screen P 23 11 Language Sets the display language P 23 12 Contact address Confirms the contact address and telephone number for servicing P 24 13 Display mode Changes the display of the top screen P 24 14 Bluetooth Makes Bluetooth settings P 28 15 WLAN Makes wireless LAN settings P 60 Some menus cannot be us...

Страница 13: ...e is 1 C higher than the set temperature Heating Target temperature is the same as the set temperature No one in the room No one in the room for 20 minutes Cooling Target temperature is 2 C higher than the set temperature Heating Target temperature is 2 C lower than the set temperature No one in the room for 3 hours When no one is in the room for approx 3 hours or more the unit operates in the spe...

Страница 14: ...fter a lapse of 3 hours since the room has been empty Operates in the Fan mode only Stops and resumes operations after human movements are detected Stops and will not resume operations even after human movements are detected Continues operation in the current mode If you need to do so please contact the dealer This depends on the type of indoor unit z z Turn the ECONAVI function OFF if You want to...

Страница 15: ...is displayed To return to the top screen press 2 Select ECONAVI Press 3 Select ON or OFF Press Press to finish When ECONAVI is set to ON will appear on the top screen When the indoor unit is stopped will disappear ON OFF Note z z If the function is not fitted the display shown on the right appears and this function cannot be used ...

Страница 16: ...of nanoe X Under operation of nanoe X nanoe X For a fresher and cleaner environment nanoe X generates negative ions using the air in the room to give a healthy air It also reduces the smell in the room and constrains propagations of mold and bacteria ...

Страница 17: ... to the top screen press 2 Select nanoeX Press 3 Select ON or OFF Press Press to finish When nanoe X is set to ON will appear on the top screen When the indoor unit is stopped will disappear ON OFF Note z z In the following case the message appears and this function cannot be used When the indoor unit is not supported or the nanoe X kit is not equipped ...

Страница 18: ... top screen Filter sign reset 1 Display the menu screen When stopped Press When operating Press repeatedly until the menu screen is displayed To return to the top screen press 2 Select Filter sign Press 3 Select Filter sign reset Press Press to finish The filter cleaning time count is reset ...

Страница 19: ...e the operation mode temperature needs to be set beforehand so that the outing function turns on the air conditioner with your desired operation mode temperature setting If the room temperature rapidly changes the room temperature may get over the upper or lower limit when the outing function is activated The outing function is invalid during FAN AUTO operation mode The air conditioner s stop orde...

Страница 20: ...played To return to the top screen press 2 Select Outing function Press 3 Select Enable disable Press 4 Select Enable Press Enable Disable 5 Select Set limit temp Press 6 Set the temperature range 0 5 C steps Press Press twice to finish To disable Outing function 1 Start with Step 1 and select Disable in Step 4 2 Press 3 Press twice to finish ...

Страница 21: ...lect the item to set Press Clock 3 Set the present date and time Press Repeat Press to finish appears in situations where the clock is reset such as when power is not supplied to the remote controller for 24 hours or more Clock type 3 Select the type to display Press Press to finish 24 h AM PM Controller name The controller name can be set only with the Panasonic H C Control App 3 Confirm the name...

Страница 22: ...ay the menu screen When stopped Press When operating Press repeatedly until the menu screen is displayed To return to the top screen press 2 Select the item to set Press Touch sound 3 Select ON or OFF Press Press to finish ON OFF Contrast 3 Set the screen contrast Press Press to finish ...

Страница 23: ... the menu screen is displayed To return to the top screen press 2 Select the item to set Press Backlight 3 Set the backlight brightness of the screen Press Press to finish Language 3 Select the language to display from among 7 languages shown on the right Press Press to finish Default setting ENGLISH ENGLISH РУССКИЙ POLSKI ESPAÑOL ITALIANO DEUTSCH FRANÇAIS ...

Страница 24: ... number Confirm then press Press twice to finish If you need to contact for servicing check the back cover of the operating instructions for indoor units or outdoor units Display mode 3 Select the display mode for the top screen Press Press to finish Detailed The number of icons is not limited During operation the current operation mode fan speed and flap are displayed on the top screen Refer to S...

Страница 25: ...Display the setting information screen Press on the top screen Press and hold for 4 seconds or more 2 Select the icon Press Only icons currently being displayed on the screen are displayed here 3 Check the meaning of the icon Confirm then press Press to finish Scroll through the screen with ...

Страница 26: ... set Separate timers are set for each day Energy saving is on to control energy consumption The operation capacity of the outdoor unit is restricted Units are operated at the capacity set by schedule If the set temp is changed the temp will return to the registered set temp after a preset time Upper and lower set temperature limits have been changed Operation automatically stops in the set time zo...

Страница 27: ...ng is in process P 8 Connected with a mobile device via Bluetooth functionality P 28 alternately Bluetooth module is considered abnormal P 92 Connected to a wireless LAN network via a router Signal strength Strong P 62 Connected to a wireless LAN network via a router Signal strength Moderate Connected to a wireless LAN network via a router Signal strength Weak Connected to a wireless LAN network v...

Страница 28: ...tion functions helps you equalize the operating times The backup function allows operation to continue even when an error has occurred 1 This is not synchronised with the Weekly timer set with the Panasonic Comfort Cloud app 2 Supported only by models that support the power consumption monitor 3 Rotation operation is available only when there is a control group of 2 PAC systems each system being a...

Страница 29: ...p screen press 2 Select Bluetooth Press 3 Select Enable disable Press 4 Select Enable Press Press twice to finish Enable cannot be set for the Bluetooth functionality and Wireless LAN functionality simultaneously Enable Disable To disable Bluetooth functionality 1 Start with Step 1 and select Disable in Step 4 2 Press 3 Press twice to finish Bluetooth settings ...

Страница 30: ... disable wireless communication with the following procedure 1 Display the wireless setting screen Press on the top screen Press and hold for 4 seconds or more 2 Select enable or disable Press Press to finish Bluetooth This setting is the same as Step 4 on page 29 WLAN Wireless LAN This setting is the same as Step 4 on page 61 enable cannot be set for the Bluetooth functionality and Wireless LAN f...

Страница 31: ...layed on the Home screen Remote controllers that have been paired have displayed to the left Remote controller last connected Unconnected remote controller within Bluetooth communication range Connected remote controller outside Bluetooth communication range 2 Select the remote controller you want to operate Mobile device Tap If the remote controller is not displayed slide down to update and the r...

Страница 32: ...ice Tap Pair Remote controller Press Tap 5 Confirm that the Bluetooth connection is completed is displayed on the top screen when the Bluetooth connection is established Once this step is complete subsequent connections will be made automatically When the Bluetooth connection is complete the mobile device information is stored and the above Steps 3 and 4 are unnecessary from next time Refer to pag...

Страница 33: ...yed To return to the top screen press 2 Select Bluetooth Press 3 Select Initialization Press 4 Start initialization Press Select YES Do not connect the mobile device via Bluetooth functionality while initializing 5 Confirm that initialization has completed Confirm then press Press 3 times to finish Note z z Delete information of Bluetooth connection with the remote controller stored on the mobile ...

Страница 34: ... P 44 Remote controller clock Outdoor ambient temperature ON OFF timer P 41 Fan speed P 36 Tap again to switch to the Flap screen Change set temperature or P 35 Weekly timer P 39 Remote control operation is restricted by a central control device Energy saving operation On Off P 42 Change set temperature dial P 35 Remote controller s name Bluetooth settings Functions are not displayed in the Panaso...

Страница 35: ... to select the operation mode Operation mode Auto mode is automatically switched to Cool or Heat to achieve the set temperature Operation modes that cannot be set are not displayed Set temperature Change set temperature dial Change set temperature or ...

Страница 36: ...eed The swing position and the airflow direction shown on the screen are not synchronized with the actual flap movement The flap display differs from the actual flap angle Change swing position Auto fan toggle Auto air swing toggle Press to stop swinging the flap at your preferred position Go to the screen for locking individual flaps P 38 Go to the screen for flap setting P 37 Flap setting for ea...

Страница 37: ...1 1 2 to 1 8 MAX ALL ALL All units connected to the remote contloller When setting flaps for each indoor unit Flaps of all air outlets of 1 indoor unit face the same direction e g unit 1 1 e g unit 1 3 Change swing position Auto air swing toggle Press to stop swinging the flap at your preferred position ...

Страница 38: ... other than the 4 way cassette type this screen does not appear and this function cannot be used Select the air outlet The square mark indented on the panel of the indoor unit indicates air outlet No 1 There are some models that do not have a square mark indented The air outlet No changes according to the installation direction Check by actual operation Select the indoor unit 1 1 1 2 to 1 8 MAX AL...

Страница 39: ...ation schedule The operation ON OFF schedule or temperature setting schedule can be set by setting the day and time e g 8 00 AM from every Monday to Friday Up to 8 settings are available for each day Select the day of the week Add new timer Complete the settings Copy timer Edit timer On Off timer toggle Enable Disable Show the list of saved template settings Change delete timer ...

Страница 40: ... Select the day of the week setting destination to apply the settings More than one can be selected Select temperature Operation ON OFF toggle Complete the settings Copy timer Add new timer Change delete timer Delete timer Edit timer Change timer Complete the settings ...

Страница 41: ...top Set Operation start 3 hours 3 hours ON OFF OFF ON Use OFF timer for example when Reducing electric consumption while sleeping Use ON timer for example when Operating the air conditioner according to the meeting start time Cancel the OFF ON timer Unset is displayed when cancelled Set the OFF timer Set the ON timer Complete the settings Edit timer ...

Страница 42: ...42 EN Bluetooth settings Bluetooth settings Energy saving Energy saving operation on off toggle Energy saving operation Off Energy saving operation On Refer to page 49 for information about the function ...

Страница 43: ...isplayed when you press the icon Air conditioner error messages Displays the time remaining in hours until the next filter cleaning is required Press after cleaning the filter Display outdoor unit information Display indoor unit information Display remote controller information Bluetooth settings A dialogue is displayed and when you press OK the time remaining until filter cleaning is reset ...

Страница 44: ...enus displayed when a remote controller is not connected Depending on the model there are some menus that are not available The menu is not displayed in this case If the remote controller time is not set Figure 1 or is wrong Figure 2 set it in Controller settings There are functions such as the weekly timer that need the remote controller time to work Bluetooth settings Figure 1 Figure 2 ...

Страница 45: ...ation settings Change the application s settings Refer to page 46 to change the remote controller s settings Change the type of Celsius Fahrenheit display of the application Change the type of clock display of the application 12h 24h Change the display language of the application ...

Страница 46: ...Celsius Fahrenheit display of the remote controller Set the present date and time of the remote controller Change the display language of the remote controller Change the name of the remote controller Change the type of clock display of the remote controller Display indoor unit information Remote controller operation sound on off toggle Change the display mode for the top screen of the remote cont...

Страница 47: ...up and down around where the person is present Indirect airflow The unit avoids directly hitting wind at a person s body Circulation When using Panel for cassette ECONAVI type only Cooling If the ECONAVI sensor detects high temperature of the floor while group controlling the Circulation air circulation is performed to alleviate the unevenness of temperature between near the ceiling and near the f...

Страница 48: ...estored according to the level of human activity Stop no restart Stops the operation After stopped the operation is not resumed even if human activity is detected Stop restart Stops the operation After stopped the operation is resumed if human activity is detected and the operation status is restored according to the level of human activity 2 Types of the Direct Indirect airflow Not set Operation ...

Страница 49: ...ses e g Only when a guest comes z z Temp range Restricting the temperature range that can be set Temperatures outside the range cannot be set z z Auto shutoff When the operation is stopped at a specified time e g closing time and resumed afterwards this function detects the operation status at regular time intervals and stops operation automatically e g 60 min z z Repeat off timer This stops opera...

Страница 50: ...function on off toggle nanoe X function on off toggle nanoeX settings Menu Ú H C settings Ú nanoeX settings Outing function on off toggle Set the upper temperature and lower temperature for the outing function Outing function Menu Ú H C settings Ú Outing function ...

Страница 51: ...th settings Ventilation operation on off toggle Ventilation Menu Ú H C settings Ú Ventilation Internal drying function on off toggle Internal drying settings Menu Ú H C settings Ú Internal drying Bluetooth settings ...

Страница 52: ...ngs are enabled for 10 minutes You are logged out after 10 minutes There is a warning displayed 1 minute before The password needs to be entered again if you are logged out The password also needs to be entered again if the Panasonic H C Control App ends or if the Bluetooth connection is interrupted Password entry is required to use the administrator settings ...

Страница 53: ...of the remote controller or the indoor units Initial settings Menu Ú Administrator settings Ú Initial settings Duration of absence detection The operation off timing can be changed The setting can be made between 0 and 60 minutes by the minute Select External device interlock mode Human activity YES NO Synchronizes the presence absence output of the motion sensor Indoor unit ON OFF Synchronizes th...

Страница 54: ... Menu Ú Administrator settings Ú Schedule peak cut This reduces the operation capacity for the specified time period Complete the settings Set the time to perform quiet operation Complete the settings Outdoor unit quiet operation on off toggle Quiet operation Menu Ú Administrator settings Ú Quiet operation Enable disable toggle Enable Disable ...

Страница 55: ...en controlling 2 refrigerant systems of Single split system combination of 1 outdoor unit and 1 indoor unit by one remote controller z z Backup operation The backup operation is a support operation performed by a refrigerant system in standby mode when the room temperature does not reach the set temperature due to poor performance or occurrence of an alarm Example When an error occurs while System...

Страница 56: ...ol mode Performs the support operation when the room temperature exceeds set temperature set value In Heat mode Performs the support operation when the room temperature is below set temperature set value Change the main system setting When Cycle is set System that performs the preceding operation When Cycle is OFF System that always performs the operation The other system is a backup system Comple...

Страница 57: ...ssword change Change the remote controller s password Operation locks Menu Ú Administrator settings Ú Operation lock Complete the settings Retype the password to confirm Input new password Complete the settings Locks operations Note z z It is recommended that the password be changed periodically ...

Страница 58: ...roller can be saved as templates even when there is no connection with the remote controller When the connection is established with the remote controller you can load the setting templates you have saved and apply them Select Weekly timer or Controller settings to make a template Make the settings you want to save as a template You can give any name to the template You can create up to 8 template...

Страница 59: ...oller settings templates are the same Show the list of saved template settings Select the settings to be loaded The template settings are applied to the weekly timer The original data is overwritten How to load For the weekly timer Bluetooth settings ...

Страница 60: ... The data for Statistics is collected on and managed by a Panasonic server The power consumption data in particular may possibly show a difference to the data shown on the Panasonic H C Control App 3 Supported only by models that support the power consumption monitor Installing the Panasonic Comfort Cloud app For iOS user Open Search for Panasonic Comfort Cloud app Download and install For Android...

Страница 61: ... disable Press 4 Select Enable Press Press twice to finish This can also be set using the procedure shown on page 30 Enable cannot be set for the Bluetooth functionality and Wireless LAN functionality simultaneously Enable Disable To disable Wireless LAN functionality 1 Start with Step 1 and select Disable in Step 4 2 Press 3 Press twice to finish Note z z Depending on the type of indoor unit the ...

Страница 62: ...elect WLAN Press 3 Select Network status Press 4 Check the status of the connection to the wireless LAN network Confirm then press Press 3 times to finish Not connected to router Connecting to router Operating in Auto mode Operating in Manual mode Connected to router is displayed on the top screen An icon is displayed to indicate the strength of the wireless LAN signal table shown on the right Ico...

Страница 63: ...ort Cloud app to perform these settings 1 Start the Panasonic Comfort Cloud app Step 1 2 Connect wirelessly with a router Step 2 Step 5 3 Register the information for the air conditioner on the server Step 6 Step 7 1 Start the Panasonic Comfort Cloud app 1 Start the Panasonic Comfort Cloud app and login If you do not have a Panasonic ID create one and then login Refer to To create new Panasonic ID...

Страница 64: ...to add new product Mobile device Tap 2 Select the Commercial air conditioner and choose the Wired Remote controller Mobile device Tap Commercial air conditioner Tap Wired Remote controller 3 Tap Start to begin the connection setup Mobile device Tap Start ...

Страница 65: ...less LAN functionality on the remote controller is set to Enable P 61 tap Next Remote controller Follow the instructions on the app screen Mobile device Tap Next 2 Select the option that matches the status displayed on the remote controller screen Remote controller Follow the instructions on the app screen Mobile device Tap to select the option ...

Страница 66: ...uctions and proceed as follows If the router supports the WPS mode go to Step 4 If the router does not support the WPS mode or if you do not know whether it supports the mode go to Step 5 4 Connect to the network using WPS mode 1 Press the WPS button on the router to establish connection 2 Tap Next after the router is ready for connection Mobile device Tap Next ...

Страница 67: ...the network connection to the router is successful Connected to router is displayed on the remote controller screen It may take some minutes for the connection to be established Mobile device Tap Next Note z z If the remote controller screen does not change to Connected to router check the wireless LAN router connections This completes the settings for connecting to the router Go to Step 6 to cont...

Страница 68: ...te controller operate in Manual mode Remote controller Follow the instructions on the app screen Mobile device Confirm that Operating in Manual mode is displayed then tap Next 2 Join to connect to the Panasonic CZ C wirelessAP network Mobile device First time only Tap Allow While Using App Then tap Join Subsequent connections Tap Join ...

Страница 69: ... connection to be established Mobile device Tap Next Then tap Join Note z z If Connected to router is displayed on the remote controller connect the mobile device to wireless router return to this application after completing the wireless network settings to continue the setup z z If the remote controller screen does not change to Connected to router check the wireless LAN router connections This ...

Страница 70: ... to register Then tap Register 2 Make the remote controller operate in registration mode Remote controller Follow the instructions on the app screen Mobile device Tap Next 3 Set a password for new air conditioner model to complete the registration Password must be between 8 15 characters with letters and numbers Mobile device Tap and enter the password Then tap Register Note z z Keep the password ...

Страница 71: ... estimated energy consumption and perform comparisons for different time frames by referring to the statistic s graph is displayed on the top screen of the remote controller when network settings are completed The network information and air conditioner information are saved in the Wireless LAN module so even if the power of the remote controller is lost due to a power failure the connection with ...

Страница 72: ...e new Panasonic ID to register Password must be 8 16 characters with letters and numbers You can input the following characters As of October 2020 Numeric characters 0123456789 Alphabetical characters upper and lower cases ABCDEFGHIJKLMNOPQRSTUVWXYZ abcdefghijklmnopqrstuvwxyz Symbols _ z z For registered user login using your Panasonic ID and password Note z z It is recommended that the password b...

Страница 73: ...ed on the top screen of the remote controller Login Password Panasonic ID Start a demonstration Register for new Panasonic ID Reset Panasonic ID Password 1st group Device Add new device P 63 2nd group Home screen This Operating Instructions can be found under Menu tab The Panasonic Comfort Cloud app is connected to the remote controller and ready for use Tap ...

Страница 74: ...door ambient temperature Switch between connected devices Air conditioner ON OFF Statistics P 77 Air conditioner status P 75 Advanced settings P 76 Operating mode P 76 Change set temperature dial Set temperature Features vary depending on air conditioner model Change set temperature or Weekly timer P 78 Main menu P 82 ...

Страница 75: ...ers awaiting approval Air conditioner status Status of all air conditioners in the same group User approval Air conditioner error messages Notifications User s control right Individual ON OFF toggle Air conditioners status ON OFF mode and set temperature All ON OFF ...

Страница 76: ...rating mode Change fan speed Auto fan toggle Change swing position Auto air swing toggle Additional features ON OFF Features vary depending on air conditioner model Mode selection Supported models only Features vary depending on air conditioner model ...

Страница 77: ...ature Comparison of selected dates Date selection Information of selected date Estimated energy consumption may not be supported by certain models Information of date selected for comparison Dates are greyed out if data could not be obtained Date selection Week selection Month selection Year selection Comparison ...

Страница 78: ...ss LAN settings Weekly timer Edit timer ON OFF timer toggle Enable disable Edit timer Add edit timer 1 Tap Edit timer Select the day of the week Add new timer 2 Add new timer or edit timer Delete timer Change timer ...

Страница 79: ...79 EN Wireless LAN settings Select temperature Operation ON OFF toggle Complete the settings Select mode 3 Set time and conditions 4 Tap Apply to complete settings ...

Страница 80: ...80 EN Wireless LAN settings Copy timer 1 Tap Edit timer Select the day of the week 2 Select the copy source day Then tap Copy Edit timer ON OFF timer toggle Enable disable ...

Страница 81: ...81 EN Wireless LAN settings 3 Select the day of the week setting destination to apply settings Then tap OK 4 Tap Apply to complete settings ...

Страница 82: ...r only User list P 83 Change device password P 83 Replace device P 84 Change router settings P 84 List of devices P 85 List of groups P 86 Change the language of the app Operating Instructions Terms of use Copyright Logout from current Panasonic ID Privacy notice ...

Страница 83: ...ce password Menu Ú Owner Ú Change device password Enter old password Enter new password Retype new password User list Menu Ú Owner Ú User list Edit the name of the user Enable control of user Edit delete the user control User s control rights ...

Страница 84: ...vice Changing router settings Menu Ú Owner Ú Change router settings Select Replace device from the menu Tap Start Follow step by step instructions on the app Follow step by step instructions on the app Refer to page 65 Select Change router settings from the menu Tap Start ...

Страница 85: ... settings Device list Menu Ú Device list Edit device information and setting Edit device name Change device group Time zone selection Features selection Features vary depending on air conditioner model Delete the device ...

Страница 86: ...86 EN Wireless LAN settings Group list Menu Ú Group list Delete group Enter new group name Add new group Edit group name ...

Страница 87: ... communication is considered abnormal reset the wireless LAN module hardware 1 Display the menu screen When stopped Press When operating Press repeatedly until the menu screen is displayed To return to the top screen press 2 Select WLAN Press 3 Select Restart Press 4 Restart Press Select YES Press twice to finish ...

Страница 88: ...ing default condition 1 Display the menu screen When stopped Press When operating Press repeatedly until the menu screen is displayed To return to the top screen press 2 Select WLAN Press 3 Select Initialization Press 4 Start initialization Press Select YES 5 Confirm that initialization has completed Confirm then press Press 3 times to finish ...

Страница 89: ... press again If operation does not start turn off the circuit breaker and consult the dealer of purchase about the symptom and Model No Is displayed Alarm indication e g Defective indoor unit No z z If any of the following alarm indications appears stop operation once and restart approx 1 minute later Alarm indication off E04 E06 P10 P20 H06 If the indication does not reappear use the unit If the ...

Страница 90: ...splay the z z The indoor unit has stopped Turn on the indoor unit z z The unit is in Fan mode The ECONAVI function does not operate in Fan mode z z The ECONAVI function is set to OFF Turn the ECONAVI function ON with the remote controller P 15 z z The indoor unit may not support the ECONAVI function If you turn the ECONAVI function ON with the remote controller but there is no change the indoor un...

Страница 91: ...le one of the timer settings P 39 P 78 z z If the timer is set on the Panasonic Comfort Cloud app check that the Time zone setting is correct P 85 The Panasonic H C Control App cannot be installed in mobile device z z Check if OS of the mobile device is compatible The Panasonic H C Control App is not guaranteed to work with all versions of iOS and Android OS See page 96 for the versions of the OS ...

Страница 92: ...he mobile device P 31 The remote controller screen displays alternately z z Bluetooth module is considered abnormal Set Bluetooth functionality to Disable with the remote controller P 29 and contact the retailer or point of purchase with the Model No and problem The remote controller screen displays alternately z z Wireless LAN module is considered abnormal Refer to Restart P 87 and restart the wi...

Страница 93: ...he top screen of the remote controller Confirm that the Wireless LAN setting on the remote controller is set to Enable P 61 Ensure the router s wireless LAN signal reaches the remote controller the SSID is not hidden the MAC address setup is enabled for the remote controller the router s dual band signal is enabled for 2 4 GHz connection Check the network connections P 62 Refer to the mobile devic...

Страница 94: ...d z z It is possible that the network connection is not stable Refer to Network status P 62 and check the strength of the signal Suspicious unauthorised access to the air conditioner remote controller z z Refer to Initialization P 88 and initialize To unregister the air conditioner unit from Panasonic Comfort Cloud app select and choose Device list to delete the set unit Functions set on the Panas...

Страница 95: ...e performed by authorised service dealer To transfer or dispose the remote controller When resetting the mobile device because you have forgotten the password z z Refer to Initialization P 88 and initialize To unregister the air conditioner unit from Panasonic Comfort Cloud app select and choose Device list to delete the set unit Operations are not possible from the mobile device z z Check the fol...

Страница 96: ... 4 2 or later Wireless LAN standard IEEE 802 11 b g n Frequency range 2 4 GHz band Encryption WPA2 PSK TKIP AES OS version on the mobile device for Panasonic Comfort Cloud app iOS 9 0 or later Android 4 4 or later The Bluetooth word mark and logos are registered trademarks owned by Bluetooth SIG Inc and any use of such marks by Panasonic Corporation is under license Other trademarks and trade name...

Страница 97: ... accordance with national legislation For business users in the European Union If you wish to discard electrical and electronic equipment please contact your dealer or supplier for further information Information on Disposal in other Countries outside the European Union These symbols are only valid in the European Union If you wish to discard these items please contact your local authorities or de...

Страница 98: ...ivative Works thereof Contribution shall mean any work of authorship including the original version of the Work and any modifications or additions to that Work or Derivative Works thereof that is intentionally submitted to Licensor for inclusion in the Work by the copyright owner or by an individual or Legal Entity authorized to submit on behalf of the copyright owner For the purposes of this defi...

Страница 99: ...tted for inclusion in the Work by You to the Licensor shall be under the terms and conditions of this License without any additional terms or conditions Notwithstanding the above nothing herein shall supersede or modify the terms of any separate license agreement you may have executed with Licensor regarding such Contributions 6 Trademarks This License does not grant permission to use the trade na...

Страница 100: ...tice this list of conditions and the following disclaimer 2 Redistributions in binary form must reproduce the above copyright notice this list of conditions and the following disclaimer in the documentation and or other materials provided with the distribution 3 Neither the name s of the above listed copyright holder s nor the names of its contributors may be used to endorse or promote products de...

Страница 101: ...nsor shall mean the copyright owner or entity authorized by the copyright owner that is granting the License Legal Entity shall mean the union of the acting entity and all other entities that control are controlled by or are under common control with that entity For the purposes of this definition control means i the power direct or indirect to cause the direction or management of such entity whet...

Страница 102: ...responsible for determining the appropriateness of using or redistributing the Work and assume any risks associated with Your exercise of permissions under this License 8 Limitation of Liability In no event and under no legal theory whether in tort including negligence contract or otherwise unless required by applicable law such as deliberate and grossly negligent acts or agreed to in writing shal...

Страница 103: ...er you this license which gives you legal permission to copy distribute and or modify the software Also for each author s protection and ours we want to make certain that everyone understands that there is no warranty for this free software If the software is modified by someone else and passed on we want its recipients to know that what they have is not the original so that any problems introduce...

Страница 104: ...g the Program or any work based on the Program you indicate your acceptance of this License to do so and all its terms and conditions for copying distributing or modifying the Program or works based on it 6 Each time you redistribute the Program or any work based on the Program the recipient automatically receives a license from the original licensor to copy distribute or modify the Program subjec...

Страница 105: ...of author This program is free software you can redistribute it and or modify it under the terms of the GNU General Public License as published by the Free Software Foundation either version 2 of the License or at your option any later version This program is distributed in the hope that it will be useful but WITHOUT ANY WARRANTY without even the implied warranty of MERCHANTABILITY or FITNESS FOR ...

Страница 106: ...n Indoor unit model name Indoor unit serial number Outdoor unit model name Outdoor unit serial number System commissioning date Remote controller installation date Installer Contact Details Name Telephone number Maximum radio frequency power transmitted in the frequency bands Type of wireless Frequency band Max EIRP dBm Bluetooth functionality 2402 2480 MHz 6 7 dBm Wireless LAN functionality 2412 ...

Отзывы: