−
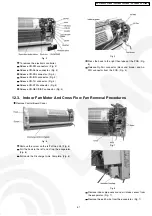
Release the generator complete wire (green and red).
(Fig. 8)
−
Remove 2 screws on the right and 1 screw at the left
side of the control board. (Fig. 7)
−
Press down the hook on the left side of control board.
(Fig. 7)
−
Then pull out the Control Board Complete from the unit.
(Fig. 7)
Fig. 9
−
Remove the cross flow fan bushing from the chassis.
(Fig. 9)
−
Loosen the fan boss screw at the cross flow fan. (Fig. 9)
•
When the batteries are inserted for the first time or the
batteries are replaced, you may notice the indications at
remote control’s display screen blink continuously and not
functionable. If this condition happens, try to reset the
remote control by pushing the reset terminal with a pointing
device.
•
You may also do the reset to erase the setting at remote
control and restore back the default setting.
Fig. 10
−
Push up the evaporator and remove cross flow fan by
pulling both cross flow fan and fan motor. (Fig. 10)
12.4. Remote Control Reset
58
CS-V7DKE CU-V7DKE / CS-V9DKE CU-V9DKE / CS-V12DKE CU-V12DKE
Содержание CS-V7DKE
Страница 15: ...5 Refrigeration Cycle Diagram 15 CS V7DKE CU V7DKE CS V9DKE CU V9DKE CS V12DKE CU V12DKE...
Страница 16: ...6 Block Diagram 16 CS V7DKE CU V7DKE CS V9DKE CU V9DKE CS V12DKE CU V12DKE...
Страница 17: ...7 Wiring Diagram 17 CS V7DKE CU V7DKE CS V9DKE CU V9DKE CS V12DKE CU V12DKE...
Страница 64: ...14 3 3 CS V12DKE CU V12DKE 64 CS V7DKE CU V7DKE CS V9DKE CU V9DKE CS V12DKE CU V12DKE...
Страница 75: ...75 CS V7DKE CU V7DKE CS V9DKE CU V9DKE CS V12DKE CU V12DKE...
Страница 77: ...19 2 Remote Control 77 CS V7DKE CU V7DKE CS V9DKE CU V9DKE CS V12DKE CU V12DKE...
Страница 79: ...TOP VIEW 79 CS V7DKE CU V7DKE CS V9DKE CU V9DKE CS V12DKE CU V12DKE...

