


26
BB-HCM511A/BB-HCM531A
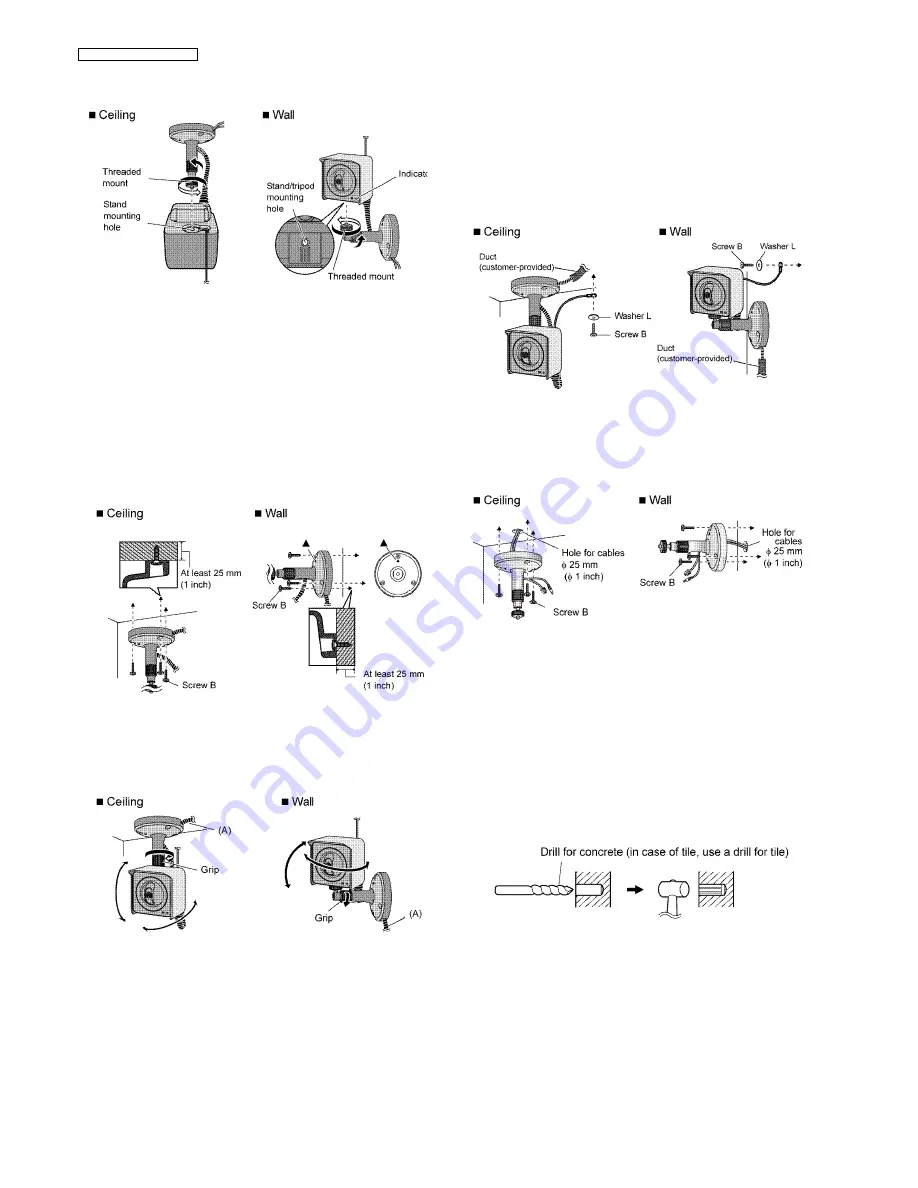
7. Attach the camera by screwing the threaded mount into the
stand mounting hole.
8. Mount the flexible stand firmly to the ceiling or wall with
screw B (included).
• Do not drive the screws into a soft material. Drive the
screws into a secure area of the wall, such as a column,
otherwise the camera may fall and be damaged.
• Use screws that are suited for the type of material the
camera is mounted to.
• Be careful not to nip the cables.
• Make sure the flexible stand is firmly mounted on a beam
of wood (25 mm [1 inch] and greater) etc. When there is
no beam, apply a board on the other side of the ceiling or
wall to make sure the camera does not drop.
9. Adjust the camera position and tighten the flexible stand
grip firmly.
• Confirm that the cords have been waterproofed and that
the portion of the cord protruding from the flexible stand
is wrapped in self bonding tape, as shown in (A) below.
10. Secure the safety wire to the ceiling or wall using screw B
(included) and washer L (included).
• Leave some slack in the safety wire, as shown.
• Make sure the safety wire is firmly mounted on a beam of
wood (25 mm [1 inch] and greater) etc. When there is no
beam, apply a board on the other side of the ceiling or
wall to make sure the camera does not drop.
• Make sure to waterproof the opening of the duct so that
water does not enter it.
n
Wiring through a hole made in the ceiling or wall
For BB-HCM511A: (INDOOR USE ONLY)
Make a hole for cables in the ceiling or wall. Secure the safety
wire to the camera and pass the cables through the notch.
Then follow steps 7, 8, 9 and 10.
When mounting on a mortar or concrete surface
• Prepare anchors for 4 mm (3/16 inch) diameter screws for
mounting.
1. Place the flexible stand on the ceiling or wall where you
plan to mount the flexible stand and mark the points where
you are going to make holes.
2. Make holes with an electric drill. Insert anchors (customer-
provided) into the holes and push them inside the holes
with a hammer.
•Mortar ceilings or walls break easily when drilling. Be
careful of pieces of mortar which may become loose and
fall.
3. Mount the flexible stand using the screws.
Содержание BB-HCM511A
Страница 5: ...5 BB HCM511A BB HCM531A I O BOARD PoE BOARD ...
Страница 20: ...20 BB HCM511A BB HCM531A 6 1 3 Connecting External Audio Devices 6 1 4 Connecting a Video Device ...
Страница 21: ...21 BB HCM511A BB HCM531A 6 1 5 Connecting External Sensors ...
Страница 29: ...29 BB HCM511A BB HCM531A 7 3 Power Supply Block Check ...
Страница 30: ...30 BB HCM511A BB HCM531A 7 4 CPU Peripheral Block Check Note Refer to Waveform P 78 for Waveform A1 A5 ...
Страница 31: ...31 BB HCM511A BB HCM531A 7 5 Image Block Check Note Refer to Waveform P 78 for Waveform ...
Страница 32: ...32 BB HCM511A BB HCM531A 7 6 Audio Block Check Note Refer to Waveform P 78 for Waveform ...
Страница 33: ...33 BB HCM511A BB HCM531A Note Refer to Waveform P 78 for Waveform ...
Страница 34: ...34 BB HCM511A BB HCM531A 7 7 LAN Block Check Note Refer to Waveform P 78 for Waveform ...
Страница 35: ...35 BB HCM511A BB HCM531A 7 8 Motor Block Check Note Refer to Waveform P 78 for Waveform ...
Страница 36: ...36 BB HCM511A BB HCM531A 7 9 I O Terminal Check ...
Страница 37: ...37 BB HCM511A BB HCM531A 7 10 SD Card Block Check ...
Страница 38: ...38 BB HCM511A BB HCM531A 7 11 RTC Circuit Check Note Refer to Waveform P 78 for Waveform ...
Страница 39: ...39 BB HCM511A BB HCM531A 7 12 LED Circuit Check ...
Страница 40: ...40 BB HCM511A BB HCM531A 7 13 Diagnosis NG Check ...
Страница 41: ...41 BB HCM511A BB HCM531A 7 14 Version Upgrade Check ...
Страница 78: ...78 BB HCM511A BB HCM531A 13 2 Waveform A1 A3 A4 A5 A2 A B C1 C2 C3 D1 ...
Страница 79: ...79 BB HCM511A BB HCM531A E F2 F1 F6 F5 F4 F3 G1 G2 G3 H1 H2 H3 G4 D2 I ...
Страница 80: ...80 BB HCM511A BB HCM531A K L1 L2 M1 M2 J L M ...
Страница 81: ...81 BB HCM511A BB HCM531A N Q O P R S1 S2 S3 ...
Страница 82: ...82 BB HCM511A BB HCM531A T1 T4 T2 T3 U1 U2 V W1 W2 W3 W4 ...
Страница 83: ...83 BB HCM511A BB HCM531A X2 X1 X3 X4 Y2 Y1 Z ...
Страница 84: ...84 BB HCM511A BB HCM531A 13 3 Terminal Guide of ICs Transistors and Diodes ...
Страница 85: ...85 BB HCM511A BB HCM531A ...
Страница 87: ...87 BB HCM511A BB HCM531A 14 2 Accessories and Packing Materials 14 2 1 BB HCM511A ...
Страница 88: ...88 BB HCM511A BB HCM531A 14 2 2 BB HCM531A ...