background image

F-13

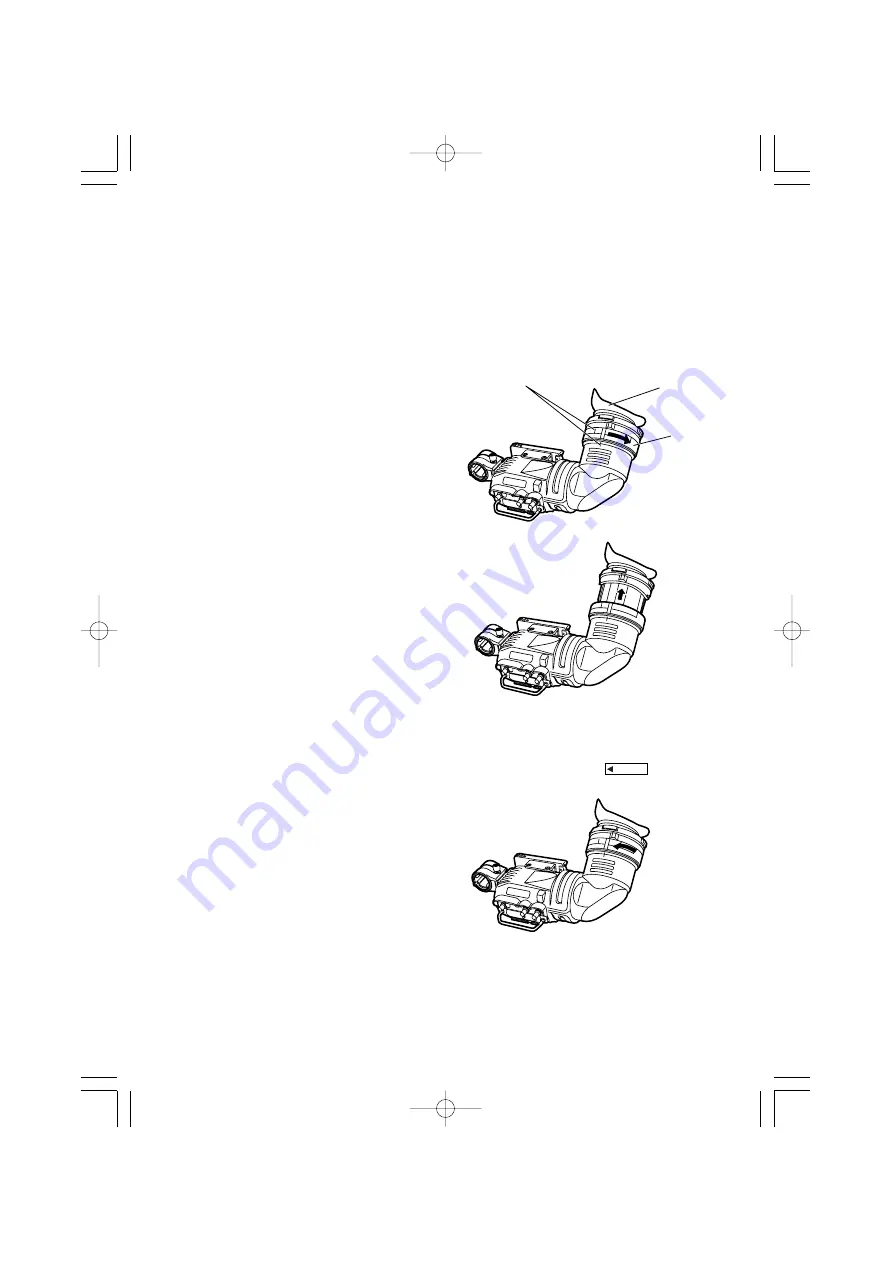
Retrait de l’œilleton

Si de la poussière colle au tube image ou au miroir, détacher l’œilleton et le retirer.

<Remarque>

En aucun cas on n’essuiera la surface du miroir, car elle a été spécialement traitée. La
poussière qui colle au miroir devra être enlevée avec une poire soufflante, par exemple.

1.

Tourner la bague de verrouillage à
fond vers la droite ou vers la gauche
de façon à amener les repères
d’alignement de la bague de
verrouillage sur ceux du barillet du
viseur.

2.

Retirer l’œilleton.

Remontage de l’œilleton

1. Amener les repères d’alignement de la bague de verrouillage sur ceux du barillet du

viseur, et glisser l’œilleton pour le remettre en place.

2. Tourner la bague de verrouillage vers la droite jusqu’à la position 

.

LOCK

Œilleton

Bague de
verrouillage

Repères d’alignement

03.21G/27G仏(16)  06.4.3  9:10  ページ13

Содержание AJHVF21G - HD EVF - MULTI-LANG

Страница 1: ...future use Bitte lesen Sie diese Bedienungsanleitung vor der Inbetriebnahme dieses Produkts aufmerksam durch und bewahren Sie sie für späteres Nachschlagen auf Avant d utiliser l appareil lire attentivement ce mode d emploi et le conserver à des fins de référence ultérieure Prima di far funzionare questo prodotto leggere attentamente le istruzioni e conservare questo manuale per riferimenti futuri...

Страница 2: ...limits for a class A digital device pursuant to Part 15 of the FCC Rules These limits are designed to provide reasonable protection against harmful interference when the equipment is operated in a commercial environment This equipment generates uses and can radiate radio frequency energy and if not installed and used in accordance with the instruction manual may cause harmful interference to radio...

Страница 3: ...eras compatible with the standard slide rail 6 Mounting the Viewfinder 6 Adjusting the viewfinder s left right position 7 Adjusting the viewfinder s front back position 7 Detaching the Viewfinder 8 For cameras compatible with the mounting unit 9 Mounting the Viewfinder 10 Detaching the Viewfinder 10 Position Adjustment 11 Diopter Adjustment 12 Screen Adjustment 12 Detaching the Eyepiece 13 Mountin...

Страница 4: ...righter OFF Turns the front tally lamp off LOW Makes the front tally lamp dimmer TALLY Switch 2 Features OThe high resolution CRT delivers superb picture sharpness making focusing easier OThe low flare CRT makes the screen clear and easy on the eyes OThe large eyepiece aperture makes it possible to see the screen even when holding the viewfinder at some distance from your eye OThe eyepiece is easi...

Страница 5: ... Back Tally Lamp 9 Adjust this control to match the vision of the person using the camera so that the image on the screen in the viewfinder is as clear as possible Diopter Adjustment Ring Connection Plug Lock Ring Microphone Holder Slide rail Eyepiece 8 Parts and Their Functions Adjusts the brightness of the screen inside the viewfinder The setting of this control has no effect on the output signa...

Страница 6: ...ons The lamp and picture tube indications will differ depending on the camera used with the viewfinder Refer to the instruction manual of the camera for details Internal LEDs TALLY REC BATT SAVE 01 21G 27G英 17 06 4 6 11 50 ページ5 ...

Страница 7: ...ng 4 While pulling up the viewfinder stopper attach the viewfinder by sliding it in the direction of the arrow 2 Insert the plug into the connection jack of the viewfinder Note Be sure to insert the plug all the way into the connection jack 1 Confirm that the POWER switch of the camera is OFF Viewfinder stopper Loosen the ring 5 Tighten the viewfinder left right position anchoring ring The followi...

Страница 8: ... Loosen the viewfinder left right position anchoring ring Viewfinder left right position anchoring ring Tighten the ring Adjusting the viewfinder s front back position 3 Tighten the viewfinder front back position anchoring ring 2 Slide the viewfinder to the front or back and adjust it to a position that allows easy viewing 1 Loosen the viewfinder front back position anchoring ring Viewfinder front...

Страница 9: ...ove the viewfinder by sliding it in the direction of the arrow 4 Release the viewfinder cable and mic cable from the cable clamps and disconnect the cables 2 Loosen the viewfinder left right position anchoring ring 1 Confirm that the POWER switch of the camera is OFF Viewfinder stopper Tighten the ring 01 21G 27G英 17 06 4 6 11 50 ページ8 ...

Страница 10: ...l Screws Screws Mounting unit Camera model number Viewfinder model number AJ HVF21G AJ HDC20A AJ HDC20AP AJ HVF27BG AJ HDC27F AJ HDC27FP AJ HDC27FE AJ HDC27FMC The standard slide rail can be removed and replaced with the mounting unit VYQ1818 To purchase the mounting unit consult your dealer while bearing in mind that this unit is a repair part The following cameras support the mounting unit 01 21...

Страница 11: ...re to insert the plug all the way into the connection jack 1 Confirm that the POWER switch of the camera is OFF 3 Disconnect the connection jack from the viewfinder cable connector 2 Loosen the stopper screw and detach the viewfinder by pulling it straight up Note Use both hands to detach the viewfinder The viewfinder may not detach smoothly with one hand resulting in damage to the viewfinder 1 Co...

Страница 12: ... right position clamp lever to disengage the lock 3 Adjust the position of the viewfinder by moving it forward backward left or right 2 Loosen the viewfinder forward backward left right position clamp lever 4 Return the viewfinder forward backward left right position clamp lever to the locked position 01 21G 27G英 17 06 4 6 11 50 ページ11 ...

Страница 13: ...mera to ON A picture will appear in the viewfinder 1 Set the POWER switch of the camera to ON 2 Set the OUTPUT switch of the camera to BAR 3 Turn the viewfinder BRIGHT and CONTRAST controls to adjust the picture brightness and contrast Turning the PEAKING control makes the picture appear sharper A sharper picture facilitates focusing the lens 2 Turn the diopter adjustment ring to adjust the diopte...

Страница 14: ...with a blower etc 1 Turn the lock ring as far as possible in the clockwise and counterclockwise directions to line up the alignment marks on the lock ring and viewfinder barrel 2 Detach the eyepiece Remounting the Eyepiece 1 Line up the alignment marks on the lock ring and the viewfinder barrel and slide the eyepiece back into place 2 Turn the lock ring clockwise as far as the position LOCK Eyepie...

Страница 15: ...w to install the AJ MC700P or the AJ MC900G microphone kit sold separately MIC IN jack 1 Open the microphone holder 2 Mount the microphone 3 Plug the microphone connector cable into the MIC IN jack Viewfinder Microphone holder 01 21G 27G英 17 06 4 6 11 50 ページ14 ...

Страница 16: ...ustment controls Controls BRIGHT CONTRAST PEAKING Switches TALLY HIGH OFF LOW ZEBRA ON OFF Allowable temperature range 0 C to 40 C 32 F to 104 F Allowable humidity range 85 or less no condensation External dimensions WaHaD 240 mma80 mma206 mm 9 1 2 inchesa3 3 16 inchesa8 1 8 inches Weight 750 g 1 65 lb indicates safety information Weight and dimentions when shown are approximately Specifications a...

Страница 17: ...o save valuable resources and prevent any potential negative effects on human health and the environment which could otherwise arise from inappropriate waste handling Please contact your local authority for further details of your nearest designated collection point Penalties may be applicable for incorrect disposal of this waste in accordance with national legislation For business users in the Eu...

Страница 18: ...pfiehlt es sich das störende Gerät vor dem Betrieb in größerer Entfernung aufzustellen ist die Sicherheitsinformation Vorsichtsmaßnahmen WARNUNG ZUR REDUZIERUNG DER GEFAHR VON BRAND UND ELEKTRISCHEM SCHLAG DIESES GERÄT WEDER NÄSSE NOCH FEUCHTIGKEIT AUSSETZEN UM BRAND ODER STROMSCHLAGGEFAHR ZU REDUZIEREN MUSS DIESES GERÄT VON ALLEN FLÜSSIGKEITEN FERNGEHALTEN WERDEN VERMEIDEN SIE GEBRAUCH UND LAGERU...

Страница 19: ...tion des Suchers 7 Einstellen der Längsposition des Suchers 7 Abnehmen des Suchers 8 Für Kameras die mit der Montageeinheit kompatibel sind 9 Anbringen des Suchers 10 Abnehmen des Suchers 10 Positionseinstellung 11 Dioptrieneinstellung 12 Sucherschirmeinstellung 12 Abnehmen des Okulars 13 Anbringen des Mikrofons 14 Technische Daten 15 02 21G 27G独 16 06 3 27 13 49 ページ2 ...

Страница 20: ...ampe aus LOW Verringert die Helligkeit der vorderen Signallampe Signallampenschalter TALLY 2 ON OFF 1 9 6 8 2 5 3 4 7 Merkmale ODie hochauflösende Kathodenstrahlröhre liefert eine überragende Bildschärfe und erleichtert die Scharfeinstellung ODie geringe Elektronenstreuung der Kathodenstrahlröhre sorgt für ein scharfes Bild zur ermüdungsfreien Betrachtung ODie große Okularöffnung ermöglicht die Be...

Страница 21: ...ch die Einstellung des Schalters TALLY HIGH oder LOW beeinflußt Vordere Signallampe 6 Dient zum Anbringen und Abnehmen des Suchers Sucheranschlag 7 Leuchtet auf wenn die Kamera aufnimmt Die Lampe blinkt außerdem als Warnsignal wie die Lampe REC im Sucher Die rückwärtige Signallampe ist verdeckt wenn sich der Hebel in der Stellung OFF befindet Rückwärtige Signallampe 9 Dient zur Anpassung des Suche...

Страница 22: ...tionen Die Lampen und Bildröhrenanzeigen hängen von der mit dem Sucher verwendeten Kamera ab Einzelheiten sind der Bedienungsanleitung der Kamera zu entnehmen Interne LEDs TALLY REC BATT SAVE 02 21G 27G独 16 06 3 27 13 49 ページ5 ...

Страница 23: ...e des Suchers einführen Hinweis Führen Sie den Stecker bis zum Anschlag in die Anschlußbuchse ein 1 Sicherstellen daß sich der Schalter POWER der Kamera in der AUS Stellung befindet Sucheranschlag Den Ring lösen 5 Ziehen Sie den Querpositions Feststellring des Suchers an Die folgenden Kameras unterstützen die Standard Gleitschiene Kamera Modellnummer Sucher Modellnummer AJ HVF21G AJ HDX400 AJ HDX4...

Страница 24: ...em ablesbar ist 1 Lösen Sie den Querpositions Feststellring des Suchers Sucher Querpositions Feststellring Den Ring anziehen Einstellen der Längsposition des Suchers 3 Ziehen Sie den Längspositions Feststellring des Suchers an 2 Schieben Sie den Sucher nach vorn oder hinten um seine Position so einzustellen dass der Suchermonitor bequem ablesbar ist 1 Lösen Sie den Längspositions Feststellring des...

Страница 25: ...n in Pfeilrichtung während Sie den Sucheranschlag hochziehen 4 Lösen Sie das Sucherkabel und das Mikrofonkabel aus den Kabelklemmen und trennen Sie die Kabel ab 2 Lösen Sie den Querpositions Feststellring des Suchers 1 Confirm that the POWER switch of the camera is OFF Sucheranschlag Den Ring anziehen 02 21G 27G独 16 06 3 27 13 49 ページ8 ...

Страница 26: ...e Montageeinheit OUmrüsten von Gleitschiene auf Montageeinheit 1 Entfernen Sie die zwei Schrauben und nehmen Sie dann die Standard Gleitschiene ab 2 Die Montageeinheit mit den zwei Schrauben befestigen Für Kameras die mit der Montageeinheit kompatibel sind Gleitschiene Schrauben Schrauben Montageeinheit Kamera Modellnummer Sucher Modellnummer AJ HVF21G AJ HDC20A AJ HDC20AP AJ HVF27BG AJ HDC27F AJ ...

Страница 27: ...ußbuchse ein 1 Sicherstellen daß sich der Schalter POWER der Kamera in der AUS Stellung befindet 3 Den Sucherkabelstecker von der Anschlußbuchse abziehen 2 1 Sicherstellen daß sich der Schalter POWER der Kamera in der AUS Stellung befindet Die Halteschraube lösen und den Sucher zum Abnehmen gerade nach oben ziehen Hinweis Benutzen Sie beide Hände zum Abziehen des Suchers Das Abziehen des Suchers m...

Страница 28: ...itions Feststellhebel anheben um die Verriegelung freizugeben 3 Die Position des Suchers durch Verschieben in die gewünschte Richtung einstellen 2 Den Sucherpositions Feststellhebel lösen 4 Den Sucherpositions Feststellhebel wieder auf die Verriegelungsstellung zurückstellen 02 21G 27G独 16 06 3 27 13 49 ページ11 ...

Страница 29: ...en Ein Bild erscheint im Sucher 1 Den Schalter POWER der Kamera auf die EIN Stellung stellen 2 Den Schalter OUTPUT der Kamera auf BAR stellen 3 Helligkeit und Kontrast des Sucherbilds durch Drehen der Regler BRIGHT und CONTRAST am Sucher einstellen Die Konturenschärfe durch Drehen des Reglers PEAKING erhöhen Ein schärferes Sucherbild erleichtert das Fokussieren des Objektivs 2 Das Okular durch Dre...

Страница 30: ...entfernt werden 1 Den Verriegelungsring so weit wie möglich nach rechts und links drehen um die Ausrichtmarkierungen an Verriegelungsring und Suchertubus zur Deckung zu bringen 2 Das Okular abnehmen Anbringen des Okulars 1 Die Ausrichtmarkierungen an Verriegelungsring und Suchertubus zur Deckung bringen und das Okular wieder einschieben 2 Den Verriegelungsring bis zur Position nach rechts drehen L...

Страница 31: ... aus um den Mikrofonsatz AJ MC700P oder AJ MC900G getrennt erhältlich zu montieren Buchse MIC IN 1 Den Mikrofonhalter öffnen 2 Das Mikrofon anbringen 3 Den Stecker des Mikrofonkabels an die Buchse MIC IN anschließen Sucher Mikrofonhalter 02 21G 27G独 16 06 3 27 13 49 ページ14 ...

Страница 32: ...r Regler BRIGHT CONTRAST PEAKING Externe Schalter Schalter TALLY HIGH OFF LOW ZEBRA ON OFF Zulässiger Temperaturbereich 0 C bis 40 C Zulässiger Luftfeuchtigkeitsbereich 85 oder weniger keine Kondensation Außenabmessungen BaHaT 240 mma80 mma206 mm Gewicht 750 g ist die Sicherheitsinformation Bei den Angaben zu Gewicht und Abmessungen handelt es sich um Näherungswerte Änderungen der technischen Date...

Страница 33: ...che schädliche Auswirkungen auf Mensch und Umgebung die aus einer unsachgemäßen Handhabung von Abfall entstehen können Genauere Informationen zur nächstgelegenen Sammelstelle erhalten Sie bei Ihrer Gemeindeverwaltung In Übereinstimmung mit der Landesgesetzgebung können für die unsachgemäße Entsorgung dieser Art von Abfall Strafgebühren erhoben werden Für Geschäftskunden in der Europäischen Union B...

Страница 34: ...areil avant l utilisation CET APPAREIL NUMÉRIQUE DE LA CLASS A EST CONFORME À LA NORME NMB 003 DU CANADA Informations concernant la sécurité Précautions à prendre Attention Pour le Canada AVERTISSEMENT POUR RÉDUIRE LES RISQUES D INCENDIE OU DE CHOC ÉLECTRIQUE ÉVITEZ D EXPOSER CET APPAREIL À LA PLUIE OU À L HUMIDITÉ POUR RÉDUIRE TOUT RISQUE DE FEU OU DE CHOC ÉLECTRIQUE ÉLOIGNER L APPAREIL DES LIQUI...

Страница 35: ...sition gauche droite du viseur 7 Réglage de la position avant arrière du viseur 7 Retrait du viseur 8 Pour les caméras compatibles avec le module de montage 9 Montage du viseur 10 Retrait du viseur 10 Réglage de la position 11 Réglage de la correction dioptrique 12 Réglage de l écran 12 Retrait de l œilleton 13 Montage du microphone 14 Fiche technique 15 03 21G 27G仏 16 06 4 3 9 10 ページ2 ...

Страница 36: ...e signalisation avant LOW Rend le voyant de signalisation avant moins brillant Commutateur de signalisation TALLY 2 Caractéristiques OLe tube cathodique à haute résolution délivre une extraordinaire netteté d image ce qui facilite la mise au point OLe tube cathodique à faible lumière parasite rend l écran plus facile à voir et moins fatiguant pour les yeux OLa grosse ouverture de l œilleton permet...

Страница 37: ... réglage du commutateur TALLY HIGH ou LOW Voyant de signalisation avant 6 Elle permet de fixer et de retirer le viseur Vis d arrêt du viseur 7 S allume pendant la prise de vues Par ailleurs il clignote à titre d avertissement de la même manière que le voyant REC dans le viseur Le voyant de signalisation arrière est dissimulé lorsque le levier est en position OFF Voyant de signalisation arrière 9 C...

Страница 38: ...fonctions Les indications du tube image et des voyants varient en fonction de la caméra utilisée avec le viseur Pour les détails voir le mode d emploi de la caméra LED internes TALLY REC BATT SAVE 03 21G 27G仏 16 06 4 3 9 10 ページ5 ...

Страница 39: ... de raccordement du viseur Remarque Bien insérer la fiche à fond dans la prise de raccordement 1 Vérifier que l interrupteur POWER de la caméra est éteint OFF Butée du viseur Desserrer la bague 5 Serrer la bague d ancrage de la position gauche droite du viseur Les caméras suivantes supportent le rail coulissant standard No de modèle de la caméra Numéro de modèle du viseur AJ HVF21G AJ HDX400 AJ HD...

Страница 40: ... bague d ancrage de la position gauche droite du viseur Bague d ancrage de la position gauche droite du viseur Serrer la bague Réglage de la position avant arrière du viseur 3 Serrer la bague d ancrage de la position avant arrière du viseur 2 Glisser le viseur vers l avant ou vers l arrière et le régler sur la position permettant une vue facile des données sur l écran 1 Desserrer la bague d ancrag...

Страница 41: ...iseur en le glissant dans le sens de la flèche 4 Dégager le câble du viseur et le câble du microphone des colliers de câble et débrancher les câbles 2 Desserrer la bague d ancrage de la position gauche droite du viseur 1 Vérifier que l interrupteur POWER de la caméra est éteint OFF Butée du viseur Serrer la bague 03 21G 27G仏 16 06 4 3 9 10 ページ8 ...

Страница 42: ... Vis Module de montage Il est possible de retirer le rail coulissant et de le remplacer par le module de montage VYQ1818 Pour se procurer le module de montage consulter son revendeur en sachant que ce module est une pièce de rechange Les caméras suivantes supportent le module de montage No de modèle de la caméra Numéro de modèle du viseur AJ HVF21G AJ HDC20A AJ HDC20AP AJ HVF27BG AJ HDC27F AJ HDC2...

Страница 43: ...d dans la prise de raccordement 1 Vérifier que l interrupteur POWER de la caméra est éteint OFF 3 Débrancher la prise de raccordement du connecteur de câble du viseur 2 Desserrer la vis d arrêt et retirer le viseur en tirant droit dessus Remarque Utiliser les deux mains pour retirer le viseur Avec une seule main le viseur risque de ne pas s enlever facilement ce qui pourrait l endommager 1 Vérifie...

Страница 44: ...ite du viseur de façon à dégager le verrouillage 3 Régler la position du viseur en le déplaçant vers l avant l arrière la gauche ou la droite 2 Desserrer le levier de serrage de position avant arrière gauche droite du viseur 4 Ramener le levier de serrage de position avant arrière gauche droite du viseur sur sa position verrouillée 03 21G 27G仏 16 06 4 3 9 10 ページ11 ...

Страница 45: ...eur POWER de la caméra sur ON Une image apparaît dans le viseur 1 Mettre l interrupteur POWER de la caméra sur ON 2 Régler le commutateur OUTPUT de la caméra sur BAR 3 Tourner les commandes BRIGHT et CONTRAST pour régler la luminosité et le contraste de l image Si l on tourne la commande PEAKING l image devient plus nette Une image plus nette facilite la mise au point 2 Tourner la bague de correct...

Страница 46: ... bague de verrouillage à fond vers la droite ou vers la gauche de façon à amener les repères d alignement de la bague de verrouillage sur ceux du barillet du viseur 2 Retirer l œilleton Remontage de l œilleton 1 Amener les repères d alignement de la bague de verrouillage sur ceux du barillet du viseur et glisser l œilleton pour le remettre en place 2 Tourner la bague de verrouillage vers la droite...

Страница 47: ...C700P ou AJ MC900G vendu séparément procéder de la façon suivante Prise MIC IN 1 Ouvrir le support du microphone 2 Monter le microphone 3 Brancher le câble de raccordement du microphone dans la prise MIC IN Viseur Support de microphone 03 21G 27G仏 16 06 4 3 9 10 ページ14 ...

Страница 48: ...ommandes de réglage externes Commandes de niveau BRIGHT CONTRAST PEAKING Commutateurs TALLY HIGH OFF LOW ZEBRA ON OFF Plage de température admissible 0 C à 40 C Plage d humidité admissible 85 ou moins sans condensation Dimensions externes LaHaP 240 mma80 mma206 mm Poids 750 g Informations concernant la sécurité Le poids et les dimensions sont approximatifs Les données techniques sont sujettes à de...

Страница 49: ...uerez à la conservation des ressources vitales et à la prévention des éventuels effets négatifs sur l environnement et la santé humaine qui pourraient survenir dans le cas contraire Afin de connaître le point de collecte le plus proche veuillez contacter vos autorités locales Des sanctions peuvent être appliquées en cas d élimination incorrecte de ces déchets conformément à la législation national...

Страница 50: ...per esempio allontanando la sorgente dei campi magnetici da questo apparecchio prima dell uso sono le informazioni sulla sicurezza Precauzioni per l uso ATTENZIONE PER RIDURRE IL RISCHIO D INCENDIO O DI SCOSSE NON ESPORRE QUESTO PRODOTTO ALLA PIOGGIA O ALL UMIDITÀ PER RIDURRE IL RISCHIO D INCENDIO O DI SCOSSE ELETTRICHE TENERE QUESTO PRODOTTO LONTANO DA TUTTI I LIQUIDI USARLO E CONSERVARLO SOLTANT...

Страница 51: ...el mirino 7 Regolazione della posizione avanti indietro del mirino 7 Modo di staccare il mirino 8 Videocamere compatibili con l unità di montaggio 9 Montaggio del mirino 10 Modo di staccare il mirino 10 Regolazione della posizione 11 Regolazione delle diottrie 12 Regolazione dello schermo 12 Modo di staccare l oculare 13 Montaggio del microfono 14 Dati tecnici 15 04 21G 27G伊 16 06 4 6 17 09 ページ2 ...

Страница 52: ...spia di ripresa anteriore LOW Rende più fioca la spia di ripresa anteriore Interruttore TALLY 2 Caratteristiche OIl CRT ad alta risoluzione produce una superba nitidezza delle immagini che rende più facile la messa a fuoco OIl CRT a basso riflesso rende lo schermo chiaro e non affatica gli occhi OLa grande apertura dell oculare consente di vedere lo schermo anche tenendo il mirino ad una certa dis...

Страница 53: ...azione dell interruttore TALLY HIGH o LOW Spia di ripresa anteriore 6 Serve ad attaccare e rimuovere il mirino Fermo mirino 7 Si accende quando la videocamera esegue la ripresa Lampeggia anche come un indicatore di avvertimento allo stesso modo della spia REC all interno del mirino La spia di ripresa posteriore è nascosta quando la leva si trova sulla posizione OFF Spia di ripresa posteriore 9 Que...

Страница 54: ...Le spie e le indicazioni del cinescopio differiscono secondo la videocamera usata con il mirino Per i dettagli riferirsi al manuale di istruzioni della videocamera LED interni TALLY REC BATT SAVE 04 21G 27G伊 16 06 4 6 17 09 ページ5 ...

Страница 55: ...essione del mirino Nota Inserire completamente la spina nella presa di connessione 1 Accertarsi che l interruttore POWER della videocamera sia posizionato su OFF Fermo mirino Allentare l anello 5 Stringere l anello di ancoraggio posizione destra sinistra mirino La rotaia di scorrimento standard è supportata dalle videocamere seguenti Modello videocamera Numero modello mirino AJ HVF21G AJ HDX400 AJ...

Страница 56: ...l anello di ancoraggio posizione destra sinistra mirino Anello di ancoraggio posizione destra sinistra mirino Stringere l anello Regolazione della posizione avanti indietro del mirino 3 Stringere l anello di ancoraggio posizione avanti indietro mirino 2 Spingere il mirino avanti o indietro e regolarlo su una posizione che permetta una comoda visione 1 Allentare l anello di ancoraggio posizione ava...

Страница 57: ...irino spingendolo nella direzione della freccia 4 Rilasciare il cavo del mirino e il cavo del microfono dai morsetti e staccare i cavi 2 Allentare l anello di ancoraggio posizione destra sinistra mirino 1 Accertarsi che l interruttore POWER della videocamera sia posizionato su OFF Fermo mirino Stringere l anello 04 21G 27G伊 16 06 4 6 17 09 ページ8 ...

Страница 58: ...i Viti Unità di montaggio La rotaia di scorrimento standard può essere rimossa e sostituita con l unità di montaggio VYQ1818 Per acquistare l unità di montaggio rivolgersi al rivenditore tenendo presente che questa unità è una parte di ricambio L unità di montaggio è supportata dalle videocamere seguenti Modello videocamera Numero modello mirino AJ HVF21G AJ HDC20A AJ HDC20AP AJ HVF27BG AJ HDC27F ...

Страница 59: ...ina nella presa di connessione 1 Accertarsi che l interruttore POWER della videocamera sia posizionato su OFF 3 Staccare la spina di connessione dal connettore del cavo del mirino 2 Allentare la vite di fermo e staccare il mirino tirandolo su diritto Nota Usare entrambe la mani per staccare il mirino Il mirino potrebbe non staccarsi facilmente se si usa soltanto una mano e potrebbe danneggiarsi 1 ...

Страница 60: ... sinistra mirino per rilasciare il bloccaggio 3 Regolare la posizione del mirino spostandolo in avanti indietro a destra o a sinistra 2 Allentare la leva di fissaggio posizione avanti indietro destra sinistra mirino 4 Rimettere la leva di fissaggio posizione avanti indietro destra sinistra mirino nella posizione di bloccaggio 04 21G 27G伊 16 06 4 6 17 09 ページ11 ...

Страница 61: ... Sul mirino appaiono le immagini 1 Posizionare l interruttore POWER della videocamera su ON 2 Posizionare l interruttore OUTPUT della videocamera su BAR 3 Girare i controlli BRIGHT e CONTRAST del mirino per regolare la luminosità e il contrasto delle immagini Girando il controllo PEAKING si rendono le immagini più nitide Le immagini più nitide facilitano la messa a fuoco dell obiettivo 2 Girare l ...

Страница 62: ...ecc 1 Girare al massimo l anello di bloccaggio in senso orario o antiorario per allineare i segni di allineamento sull anello di bloccaggio e sul cilindro del mirino 2 Staccare l oculare Modo di rimontare l oculare 1 Allineare i segni di allineamento sull anello di bloccaggio e sul cilindro del mirino e rispingere l oculare in posizione 2 Girare l anello di bloccaggio in senso orario fino alla pos...

Страница 63: ... AJ MC700P o AJ MC900G venduto separatamente seguire il procedimento dei passi sotto Presa MIC IN 1 Aprire il supporto del microfono 2 Montare il microfono 3 Attaccare il cavo connettore microfono alla presa MIC IN Mirino Supporto microfono 04 21G 27G伊 16 06 4 6 17 09 ページ14 ...

Страница 64: ...J HVF21G 720 righe 60 campi AJ HVF27BG Controlli di regolazione esterna Controlli BRIGHT CONTRAST PEAKING Interruttori TALLY HIGH OFF LOW ZEBRA ON OFF Temperatura di esercizio 0 C 40 C Umidità permissibile 85 o meno senza condensa Dimensioni esterne LaAaP 240 mma80 mma206 mm Peso 750 g sono le informazioni sulla sicurezza Il peso e le dimensioni sono approssimativi Dati tecnici soggetti a modifich...

Страница 65: ...ar risparmiare preziose risorse ed evitare potenziali effetti negativi sulla salute umana e sull ambiente che potrebbero derivare altrimenti da uno smaltimento inappropriato Per ulteriori dettagli contattare la propria autorità locale o il punto di raccolta designato più vicino In caso di smaltimento errato di questo materiale di scarto potrebbero venire applicate delle penali in base alle leggi n...

Страница 66: ...este aparato el aparato que genera los campos magnéticos antes de iniciar el funcionamiento indica información de seguridad Precauciones para la utilización ADVERTENCIA PARA REDUCIR EL RIESGO DE PRODUCIR UN INCENDIO O RECIBIR UNA DESCARGA ELÉCTRICA NO EXPONGA ESTE EQUIPO A LA LLUVIA NI A LA HUMEDAD PARA REDUCIR EL RIESGO DE INCENDIO O SACUDIDA ELÉCTRICA MANTENGA ESTE EQUIPO ALEJADO DE TODOS LOS LÍ...

Страница 67: ... o hacia la izquierda del visor 7 Ajuste de la posición hacia adelante o hacia atrás del visor 7 Desmontaje del visor 8 Para cámaras compatibles con la unidad de montaje 9 Montaje del visor 10 Desmontaje del visor 10 Ajuste de posición 11 Ajuste de dioptrías 12 Ajuste de pantalla 12 Desmontaje del ocular 13 Montaje del micrófono 14 Especificaciones 15 05 21G 27G西 16 06 3 27 13 52 ページ2 ...

Страница 68: ...icadora delantera LOW Hace que la lámpara indicadora delantera brille menos Conmutador TALLY 2 Características OEl tubo de rayos catódicos de alta definición suministra una extraordinaria nitidez de imagen facilitando considerablemente el enfoque OEl tubo de rayos catódicos de poco brillo hace que la pantalla quede más clara y no se cansen los ojos OLa abertura grande del ocular permite ver la pan...

Страница 69: ...ión del conmutador TALLY HIGH o LOW Lámpara indicadora delantera 6 Se utiliza para colocar y retirar el visor Tope del visor 7 Se enciende cuando la cámara está filmando Además parpadea como indicación de aviso de igual forma que la lámpara REC en el interior del visor La lámpara indicadora trasera se oculta cuando la palanca se pone en la posición OFF Lámpara indicadora trasera 9 Ajuste este cont...

Страница 70: ...ras y las indicaciones del tubo de imagen cambiarán según la videocámara utilizada con el visor Consulte el manual de instrucciones de la videocámara para tener detalles LEDs internos TALLY REC BATT SAVE 05 21G 27G西 16 06 3 27 13 52 ページ5 ...

Страница 71: ...el visor Nota Asegúrese de insertar a fondo la clavija en la toma de conexión 1 Confirme que el conmutador POWER de la videocámara esté en OFF Tope del visor Afloje el anillo 5 Apriete el anillo de fijación de la posición hacia la derecha o hacia la izquierda del visor Las cámaras siguientes son compatibles con el riel de deslizamiento estándar Número de modelo de videocámara Número de modelo del ...

Страница 72: ...n hacia la derecha o hacia la izquierda del visor Anillo de fijación de la posición hacia la derecha o hacia la izquierda del visor Apriete el anillo Ajuste de la posición hacia adelante o hacia atrás del visor 3 Apriete el anillo de fijación de la posición hacia adelante o hacia atrás del visor 2 Deslice el visor hacia delante o hacia atrás y ajústelo en la posición que permita ver su pantalla fá...

Страница 73: ...zándolo en el sentido de la flecha 4 Suelte el cable del visor y el cable del micrófono de las abrazaderas de cables y desconecte los cables 2 Afloje el anillo de fijación de la posición hacia la derecha o hacia la izquierda del visor 1 Confirme que el conmutador POWER de la videocámara esté en OFF Tope del visor Apriete el anillo 05 21G 27G西 16 06 3 27 13 52 ページ8 ...

Страница 74: ...rnillos Unidad de montaje El riel de deslizamiento estándar se puede quitar y cambiar por la unidad de montaje VYQ1818 Para adquirir la unidad de montaje consulte a su concesionario teniendo en cuenta que esta unidad es una pieza de recambio Las cámaras siguientes son compatibles con la unidad de montaje Número de modelo de videocámara Número de modelo del visor AJ HVF21G AJ HDC20A AJ HDC20AP AJ H...

Страница 75: ...se de insertar a fondo la clavija en la toma de conexión 1 Confirme que el conmutador POWER de la videocámara esté en OFF 3 Desconecte la toma de conexión del conector del cable del visor 2 Afloje el tornillo de tope y desmonte el visor tirando de él hacia arriba Nota Utilice ambas manos para desmontar el visor El visor tal vez no se separe suavemente si se utiliza una sola mano pudiéndose estrope...

Страница 76: ...a del visor para soltar el cierre 3 Ajuste la posición del visor moviéndolo hacia adelante atrás izquierda o derecha 2 Afloje la palanca de fijación de posición hacia adelante atrás izquierda derecha del visor 4 Vuelva a poner la palanca de fijación de posición hacia adelante atrás izquierda derecha del visor en la posición de bloqueo 05 21G 27G西 16 06 3 27 13 52 ページ11 ...

Страница 77: ...a en ON En el visor aparecerá una imagen 1 Ponga el conmutador POWER de la videocámara en ON 2 Ponga el conmutador OUTPUT de la videocámara en BAR 3 Gire los controles BRIGHT y CONTRAST del visor para ajustar el brillo y el contraste de la imagen Al girar el control PEAKING la imagen aparece más nítida La imagen más nítida facilita el enfoque del objetivo 2 Gire el anillo de ajuste de dioptrías de...

Страница 78: ...Gire todo lo posible hacia la derecha y hacia la izquierda el anillo de bloqueo para alinear las marcas de alineación del anillo de bloqueo y del tambor del visor 2 Desmonte el ocular Montaje del ocular 1 Alinee las marcas de alineación del anillo de bloqueo y del tambor del visor y deslice el ocular para colocarlo en su lugar 2 Gire el anillo de bloqueo hacia la derecha todo lo posible hasta que ...

Страница 79: ... para instalar el juego del micrófono AJ MC700P o AJ MC900G vendido por separado Toma MIC IN 1 Abra el soporte del micrófono 2 Monte el micrófono 3 Enchufe el cable del micrófono en la toma MIC IN Visor Soporte del micrófono 05 21G 27G西 16 06 3 27 13 52 ページ14 ...

Страница 80: ...21G 720 líneas 60 campos AJ HVF27BG Controles de ajuste externo Controles BRIGHT CONTRAST PEAKING Conmutadores TALLY HIGH OFF LOW ZEBRA ON OFF Gama de temperaturas disponible 0 C a 40 C Gama de humedad permisible 85 o menos sin condensación Dimensiones externas AnaAlaProf 240 mma80 mma206 mm Peso 750 g indica información de seguridad El peso y las dimensiones son aproximados Las especificaciones e...

Страница 81: ...s y a evitar cualquier posible efecto negativo en la salud de las personas y en el medio ambiente que pudiera producirse debido al tratamiento inadecuado de desechos Póngase en contacto con su autoridad local para que le informen detalladamente sobre el punto de recogida designado más cercano De acuerdo con la legislación nacional podrían aplicarse multas por la eliminación incorrecta de estos des...

Страница 82: ...压元件 请不要拆卸本产品 O不要将目镜直接对着太阳 操作注意事项 在任何产生强磁场的设备附近进行操作都可能引起视频和音频信号中的噪声 如果是 这种情况 要有所处理 例如在操作前将磁场源移开 使其远离本机 显示安全信息 使用注意事项 警告 为了减少火灾或触电的危险 不要让本机受到雨淋或放置在潮湿的地方 为减少火患或电击的危险 本设备应避开一切使用液体的场合 并只能存放 在没有滴液或溅液危险的地方 也不要在本设备顶端放置任何液体容器 ...

Страница 83: ...C 2 中 文 目录 特性 3 部件及其功能 3 有关兼容标准滑轨的摄像机 6 寻像器的安装 6 调节寻像器左右位置 7 调节寻像器前后位置 7 寻像器的拆卸 8 有关兼容安装装置的摄像机 9 寻像器的安装 10 寻像器的拆卸 10 位置调整 11 屈光度调整 12 屏幕调整 12 目镜的拆卸 13 麦克风的安装 14 规格 15 ...

Страница 84: ... 请参阅摄像机的使用说明书 ZEBRA 斑马纹 开关 1 控制前记录灯 HIGH 使用前记录灯变亮 OFF 关闭前记录灯 LOW 使用前记录灯变暗 TALLY开关 2 特性 O 高清晰度CRT 阴极射线管 能够提供极佳的图像清晰度 使聚焦更容易 O 低闪烁CRT使屏幕清晰 使眼睛舒适 O 大的目镜孔径即使在离您的眼睛一段距离操作寻像器时也能看见屏幕 O 目镜容易拆卸 O 根据来自摄像机的控制信号的不同 图像系统可以在 1080 60 个半帧和 1080 50 个半帧之 间切换 仅限AJ HVF21G ON OFF 1 9 6 8 2 5 3 4 7 ...

Страница 85: ...机正在拍摄且TALLY开关拨到HIGH或LOW时点亮 在寻像器内 该灯一亮一灭闪烁也作为报警指示 也起到与REC 记录 灯同样的功能 前记录灯的亮度由TALLY开关的设置控制 HIGH或LOW 前记录灯 6 用来安装和取下寻像器 寻像器止动螺钉 7 摄像机正在拍摄时点亮 在寻像器内 该灯一亮一灭闪烁也作为报警指示 也起到与 REC 灯同样的功能 当灯的开关柄位于OFF位置时 后记录灯隐藏起来 后记录灯 9 调整该控制环匹配个人用摄像机时的视力 以使寻像器内屏幕上的图像尽可能地清晰 屈光度调整环 连接插头 锁定环 麦克风支架 目镜 8 调整寻像器内屏幕的亮度 该控制旋钮的设置对摄像机的输出信号没有影响 BRIGHT 亮度 旋钮 5 滑轨 ...

Страница 86: ...C 5 部件及其功能 灯和显像管指示根据和寻像器一起使用的摄像机情况而有所不同 有关详情 请参阅摄像机的使用说明书 内部LED TALLY REC BATT SAVE ...

Страница 87: ...寻像器左右位置固定环 4 在拉起寻像器止动螺钉时 按箭头方向滑动并安装寻像器 2 将插头插入寻像器的连接插孔内 注 务必将插头全部插入连接插孔内 1 确认摄像机的POWER开关在 OFF 位置 寻像器止动螺钉 松开环 5 紧固寻像器左右位置固定环 下列摄像机支持标准滑轨 摄像机型号 寻像器型号 AJ HVF21G AJ HDX400 AJ HDX400P AJ HVF27BG AJ HDC27H AJ HDC27HP AJ HDC27HE AJ HDC27HMC ...

Страница 88: ...C 7 有关兼容标准滑轨的摄像机 调节寻像器左右位置 3 紧固寻像器左右位置固定环 2 向左或向右滑动寻像器 使其调节到方便观看的位置 1 松开寻像器左右位置固定环 寻像器左右位置固定环 紧固此环 调节寻像器前后位置 3 紧固寻像器前后位置固定环 2 向前或向后滑动寻像器 使其调节到方便观看的位置 1 松开寻像器前后位置固定环 寻像器前后位置固定环 ...

Страница 89: ...C 8 中 文 有关兼容标准滑轨的摄像机 寻像器的拆卸 3 拉起寻像器止动螺钉时 按箭头方向滑动寻像器来卸下它 4 从电缆夹钳处松开寻像器电缆和麦克风电缆 并断开电缆 2 松开寻像器左右位置固定环 1 确认摄像机的POWER开关在 OFF 位置 寻像器止动螺钉 紧固此环 ...

Страница 90: ...下两颗螺丝 然后拆下标准滑轨 2 将安装装置用两个螺丝固定 有关兼容安装装置的摄像机 滑轨 螺丝 螺丝 安装装置 可将标准滑轨拆下 替换为安装装置 VYQ1818 若要选购安装装置 请向您的经销商咨询 请记住该装置为备用件 下列摄像机支持安装装置 摄像机型号 寻像器型号 AJ HVF21G AJ HDC20A AJ HDC20AP AJ HVF27BG AJ HDC27F AJ HDC27FP AJ HDC27FE AJ HDC27FMC ...

Страница 91: ...安装装置的摄像机 寻像器的安装 止动螺丝 寻像器的拆卸 止动螺丝 3 将寻像器向下推到位 4 牢牢地拧紧止动螺丝 2 将插头插入寻像器的连接插孔内 注 务必将插头全部插入连接插孔内 1 确认摄像机的POWER开关在 OFF 位置 3 从寻像器电缆接口上断开连接插孔 2 松开止动螺丝 向上拉寻像器将其拆下 注 请用两只手来拆卸寻像器 用一只手可能无法将寻像器顺利地拆下 会损坏寻像器 1 确认摄像机的POWER开关在 OFF 位置 ...

Страница 92: ...C 11 有关兼容安装装置的摄像机 位置调整 杆 寻像器 1 向上抬寻像器前 后 左 右位置夹持杆解除锁定 3 前 后 左 右移动寻像器来调节它的位置 2 松开寻像器前 后 左 右位置夹持杆 4 将寻像器前 后 左 右位置夹持杆回位 锁定该位置 ...

Страница 93: ... 轮廓 调整PEAKING控制旋钮 PEAKING控制旋钮 CONTRAST控制旋钮 BRIGHT控制旋钮 PEAKING CONTRAST BRIGHT 1 将摄像机的POWER开关设为 ON 寻像器内将出现一幅图像 1 将摄像机的POWER开关设为 ON 2 将摄像机的OUTPUT开关设为 BAR 3 转动寻像器的BRIGHT和CONTRAST控制旋钮 调整图像的亮度和对比度 转动PEAKING控制旋钮 使图像显得更清晰 清晰的图像有助于镜头的聚焦 2 转动屈光度调整环来调整屈光度 使寻像器内的图像看得更清楚 屈光度调整环 ...

Страница 94: ...卸 如果有灰尘粘附在CRT屏幕上或反射镜上 请将目镜拆下并将它拿走 注 在任何情况下都不要擦拭反射镜的表面 因为它已经过特殊处理 粘附在反射镜上的灰尘应 该用吹球等吹除 1 沿顺时针和逆时针方向转动锁定环 使 锁定环上的对准标记和寻像器节圈上的 对准标记对准 2 拆下目镜 重新安装目镜 1 将锁定环上的对准标记和寻像器节圈上的对准标记对准 将目镜滑回到位 2 沿 位置顺时针转动锁定环 LOCK 目镜 锁定环 对准标记 ...

Страница 95: ...C 14 中 文 麦克风的安装 按照下列步骤安装AJ MC700P或AJ MC900G麦克风套件 另售 MIC IN插孔 1 打开麦克风支架 2 安装麦克风 3 将麦克风的接口电缆插入MIC IN插孔 寻像器 麦克风支架 ...

Страница 96: ...G 规格 显像管 2英寸高清晰度单色显像管 图像系统 1080线 50 60个半帧切换 AJ HVF21G 720线 60个半帧 AJ HVF27BG 外部调整控制旋钮 控制旋钮 BRIGHT CONTRAST PEAKING 开关 TALLY HIGH OFF LOW ZEBRA ON OFF 允许的温度范围 0 oC到40 oC 允许的湿度范围 85 或更低 不结露 外形尺寸 宽 高 深 240 mm 80 mm 206 mm 重量 750 g 显示安全信息 所示的重量和尺寸为近似值 规范如有修改 恕不另行通知 ...

Страница 97: ...C 16 中 文 在欧盟以外其它国家的废物处置信息 此符号仅在欧盟有效 如果要废弃此产品 请与当地机构或经销商联系 获取正确的废弃 方法 ...

Страница 98: ...9 ビューファインダーの左右位置調整 10 ビューファインダーの前後位置調整 10 ビューファインダーの取り外し 11 取り付けユニット対応カメラの場合 12 ビューファインダーの取り付け 13 ビューファインダーの取り外し 13 位置調整 14 視度調整 15 画面調整 15 アイピースの取り外し 16 マイクを取り付ける 17 保証とアフターサービス 18 定 格 19 保証書別添付 製造番号は 品質管理上重要なものです 製品本体と保証書の製造番号をお確かめください 07 21G 27G国内 23 06 4 7 10 44 ページ1 ...

Страница 99: ...の表示の欄は 死亡または重傷などを負う可能性が想定され る 内容です この表示の欄は 傷害を負う可能性または物的損害のみが発生 する可能性が想定される 内容です 警告 注意 このような絵表示は 気をつけていただきたい 注意喚起 内容 です このような絵表示は してはいけない 禁止 内容です このような絵表示は 必ず実行していただく 強制 内容です 警告 煙が出ている 変なにおいや 音がするなどの異常状態の場 合は 接続プラグを抜く 火災 感電の原因と なります Oお買い上げの販売店に 修理をご 依頼ください 分 解 禁 止 本機を分解 改造しない 内部に高電圧部があ り感電 火災の原因 となります また 使用機器を損傷 することがあります O点検 整備 修理は お買い上げ の販売店に ご依頼ください 07 21G 27G国内 23 06 4 7 10 44 ページ2 ...

Страница 100: ...場合は 接続プラ グを抜く そ の ま ま 使 用 す る と 火災 感電を起 こすおそれがありま す J 3 警告 確実に固定する 外れると 落下したり してけがの原因となり ます ぬれた手で 接続プラグの 抜き差しはしない 感電の原因となりま す ぬれ手禁止 安全上のご注意 必ずお守りください 接続プラグは 根元まで確 実に差し込む 感電の原因になりま す 乗り物を運転しながら使 わない 事故の誘発につなが ります O歩行中でも周囲の状況 路面の状 況などに十分ご注意ください 機器が濡れたり 水が入 らないようにする 火災 感電のおそれ があります 雨天 降雪 海岸 水辺での使用は 特 にご注意ください 禁 止 07 21G 27G国内 23 06 4 7 10 44 ページ3 ...

Страница 101: ...J 4 日 本 語 警告 安全上のご注意 必ずお守りください 不安定な場所に置かない 落ちたり 倒れたり してけがの原因とな ります 禁 止 水場で使用しない 火災 感電の原因と なります 水場使用禁止 07 21G 27G国内 23 06 4 7 10 44 ページ4 ...

Страница 102: ...ピースを太陽や強い光 源に向けない 禁 止 接続プラグを抜くときは コードを引っ張らない コードが傷つき 火 災 感電の原因とな ることがあります O必ず接続プラグを持って抜いてく ださい 安全上のご注意 必ずお守りください 飛行機内で使うときは 航空 会社の指示に従う 本機が出す電磁波な どにより 飛行機の 計器に影響を及ぼす 恐れがあります O病院などで使うときも 病院の指 示に従ってください 禁 止 直射日光の当たる場所や異 常に温度が高くなる場所に 置かない 特に真夏の社内 車 のトランクの中は 想像以上に高温 約 60 以上 になり ます 絶対に放置し ないでください 外装ケースや内部部 品が劣化するほか 火災の原因になりま す 07 21G 27G国内 23 06 4 7 10 44 ページ5 ...

Страница 103: ...フロントタリーランプを設定します HIGH フロントタリーランプが明るくなります OFF フロントタリーランプが消灯します LOW フロントタリーランプが暗くなります TALLY スイッチ 2 ON OFF 1 9 6 8 2 5 3 4 7 特 長 O高解像度 CRT が きめ細かな画像を映し出し フォーカス操作を容易に行うことがで きます O低フレアの CRT を採用していますので 画面が見やすくなっています O大口径ですので 目を離しても画面は見やすくなっています Oアイピース部を容易に脱着できます Oカメラからの制御信号により 映像方式を 1080 60 フィールドと 1080 50 フィー ルドに切り替えることができます AJ HVF21G のみ 07 21G 27G国内 23 06 4 7 10 44 ページ6 ...

Страница 104: ...ビューファインダー内の REC ランプと同様に点滅し 警 告表示も行います レバーを OFF 側にすると バックタリーランプが隠れます バックタリーランプ 9 カメラマンの視度に合わせて ビューファインダー画面上の映像が最もはっきり見え るように調整します 視度調整リング 接続プラグ ロックリング マイクホルダー スライドレール アイピース 8 各部の名称と機能 ピントを合わせやすくするために ビューファインダー内の映像の輪郭を調整します カメラの出力信号には影響ありません PEAKING ピーキング つまみ 3 ビューファインダー内の画面の濃淡を調整します カメラの出力信号には影響ありません CONTRAST 濃淡 つまみ 4 ビューファインダー内の画面の明るさを調整します カメラの出力信号には影響ありません BRIGHT 明るさ つまみ 5 07 21G 27G国内 23 06 4 7...

Страница 105: ...J 8 日 本 語 各部の名称と機能 各ランプやブラウン管の表示内容は 組み合わせるカメラによって異なります 詳しくは カメラの取扱説明書をご覧ください 内部 LED TALLY REC BATT SAVE 07 21G 27G国内 23 06 4 7 10 44 ページ8 ...

Страница 106: ...を矢印の 方向へスライドさせて取り付けます 2 ビューファインダー接続端子にプラグを接続します ノート ビューファインダー接続端子にプラグを接続するときはしっかり確実に押し込ん でください 1 カメラの POWER スイッチが OFF であることを確認します ビューファインダー ストッパー ゆるめる 標準スライドレールには 下記のカメラが対応しています カメラのモデル No AJ HDX400 AJ HDX400P AJ HDC27H AJ HDC27HP AJ HDC27HE AJ HDC27HMC AJ HVF21G AJ HVF27BG ビューファインダーのモデル No 07 21G 27G国内 23 06 4 7 10 44 ページ9 ...

Страница 107: ...左右位置固定リングを締めます 2 ビューファインダーを左右にスライドさせ 見やすい位置に調整します 1 ビューファインダー左右位置固定リングをゆるめます ビューファインダー 左右位置固定リング 締める ビューファインダーの前後位置調整 3 ビューファインダー前後位置固定レバーを締めます 2 ビューファインダーを前後にスライドさせ 見やすい位置に調整します 1 ビューファインダー前後位置固定レバーをゆるめます ビューファインダー前後位置固定レバー 07 21G 27G国内 23 06 4 7 10 44 ページ10 ...

Страница 108: ...ンダーの取り外し 3 ビューファインダーストッパーを引き上げながら ビューファインダーを矢印の 方向へスライドして取り外します 4 ビューファインダーケーブルとマイクケーブルをクランプから外し それぞれの ケーブルを抜きます 2 ビューファインダー左右位置固定リングをゆるめます 1 カメラの POWER スイッチが OFF であることを確認します ビューファインダー ストッパー ゆるめる 07 21G 27G国内 23 06 4 7 10 44 ページ11 ...

Страница 109: ... ねじ 2 本で取り付けます 取り付けユニット対応カメラの場合 標準のスライドレールを取り外し 取り付けユニット VYQ1818 に交換することが できます 取り付けユニットをお求めになる場合は 補修部品としてお買い上げの販売店 にお申し付けください 取り付けユニットには 下記のカメラが対応しています カメラのモデル No AJ HDC20A AJ HDC20AP AJ HDC27F AJ HDC27FP AJ HDC27FE AJ HDC27FMC AJ HVF21G AJ HVF27BG ビューファインダーのモデル No 07 21G 27G国内 23 06 4 7 10 44 ページ12 ...

Страница 110: ...接続端子にプラグを接続します ノート ビューファインダー接続端子にプラグを接続するときはしっかり確実に押し込ん でください 1 カメラの POWER スイッチが OFF であることを確認します 3 ビューファインダーケーブル端子からプラグを抜き取ります 2 ストッパーネジを緩め ビューファインダーを真上に引き上げて 抜き取ります ノート ビューファインダーを抜き取る時は 両手で行ってください 片手ではスムーズ に取り外すことができない場合があり またファインダーが破損するおそれがあ ります 1 カメラの POWER スイッチが OFF であることを確認します 07 21G 27G国内 23 06 4 7 10 44 ページ13 ...

Страница 111: ...14 日 本 語 取り付けユニット対応カメラの場合 位置調整 レバー ビューファインダー 1 ビューファインダー前後左右位置固定レバーを引き上げるとロックがはずれます 3 ビューファインダーを前後左右に移動させ 位置を調整します 2 前後左右位置固定レバーをゆるめます 4 ビューファインダー前後左右位置固定レバーをロック位置まで締めます 07 21G 27G国内 23 06 4 7 10 44 ページ14 ...

Страница 112: ...BRIGHT つまみ PEAKING CONTRAST BRIGHT 1 カメラの POWER スイッチを ON にします ビューファインダーに画像が見 えます 1 カメラの POWER スイッチを ON にします 2 カメラの OUTPUT スイッチを BAR にします 3 ビューファインダーの BRIGHT と CONTRAST つまみを回して 画像の明るさ とコントラストを調整します PEAKING つまみを回すと 画像をよりシャープに調整できます シャープにすると レンズでのピント合わせがやり易くなります 2 視度調整リングを回して ビューファインダーの画像がはっきり見えるように調 整します 07 21G 27G国内 23 06 4 7 10 44 ページ15 ...

Страница 113: ...理をほどこしていますので 絶対にふかないでください ほこりが 付着した時はブロワなどで ふき飛ばしてください アイピース ロックリング 合いマーク 1 ロックリングを時計と反対方向にいっ ぱいに回し ロックリングとビューフ ァインダーの筒の合いマークを合わせ ます 2 アイピースを抜き取ります 再び取りつけるには 1 ロックリングの合いマークをビューファインダーの筒の合いマークに合わせ アイ ピースを差し込みます 2 ロックリングを時計方向に の位置まで確実に回してください LOCK 07 21G 27G国内 23 06 4 7 10 44 ページ16 ...

Страница 114: ...J 17 マイクを取り付ける マイクキット AJ MC700P AJ MC900G 別売品 のマイクを取りつけることができ ます ビューファインダー MIC IN 端子 マイクホルダー 1 マイクホルダーを開きます 2 マイクを取りつけます 3 マイクの接続ケーブルをカメラの MIC IN 端子に接続します 07 21G 27G国内 23 06 4 7 10 44 ページ17 ...

Страница 115: ...造打ち切り後 8 年間保有してい ます 補修用性能部品とは その製品の機能を維 持するために必要な部品です 保証期間 お買い上げ日から本体 1 年間 定期点検 定期点検は 機器の機能を常に良好な状態に 維持して お客様が安心して機器をご使用い ただくためのものです 部品の劣化 ゴミ ホコリの付着などによる 突発的な故障 トラブルを未然に防ぐととも に 安定した機能 性能を維持するために 定期点検 有料 を行われることを推奨いた します 詳しい内容は お買い上げの販売店にご相談 ください この取扱説明書を再度ご確認の上 お買い上げ の販売店までご連絡ください 保証期間中の修理は 保証書の記載内容に従って 修理させていた だきます 詳しくは 保証書をご覧ください 保証期間経過後の修理は 修理により 機能 性能の回復が可能な場合 は ご希望により有料で修理させていただき ます 修理を依頼されると...

Страница 116: ...ーム管 映像方式 1080 本 50 60 フィールド切り替え式 AJ HVF21G 720 本 60 フィールド AJ HVF27BG 外部調整器 コントロールつまみ BRIGHT CONTRAST PEAKING スイッチ TALLY HIGH OFF LOW ZEBRA ON OFF 許容温度 0 C 40 C 許容湿度 85 以下 結露なきこと 外形寸法 240 mm 80 mm 206 mm 幅 高さ 奥行 質 量 750 g は安全項目です この仕様は 性能向上のため変更することがあります 07 21G 27G国内 23 06 4 7 10 44 ページ19 ...

Страница 117: ...J 20 日 本 語 ヨーロッパ連合以外の国の廃棄処分に関する情報 このシンボルマークは EU 域内でのみ有効です 製品を廃棄する場合には 最寄りの市町村窓口 または販売店で 正しい 廃棄方法をお問い合わせください 07 21G 27G国内 23 06 4 7 10 44 ページ20 ...

Страница 118: ...J 21 MEMO 07 21G 27G国内 23 06 4 7 10 44 ページ21 ...

Страница 119: ...J 22 MEMO 07 21G 27G国内 23 06 4 7 10 44 ページ22 ...

Страница 120: ...8 7162 WESTERN ZONE 3330 Cahuenga Blvd W Los Angeles CA 90068 323 436 3500 Government Marketing Department One Panasonic Way 2E 10 Secaucus NJ 07094 201 348 7587 Broadcast PARTS INFORMATION ORDERING 9 00 a m 5 00 p m EST 800 334 4881 24 Hr Fax 800 334 4880 Emergency after hour parts orders 800 334 4881 TECHNICAL SUPPORT Emergency 24 Hour Service 800 222 0741 Panasonic Canada Inc 5770 Ambler Drive ...

Отзывы: