background image

34

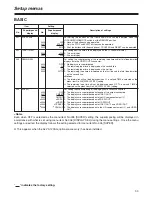
BASIC

Item

Setting

No.

Superimposed

display

No.

Superimposed

display

Description of settings

Setup menus

” indicates the factory setting.

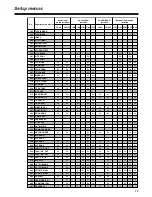
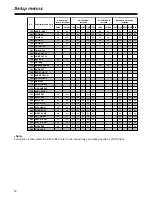
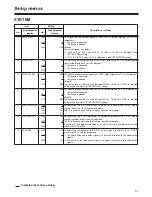
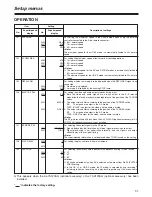
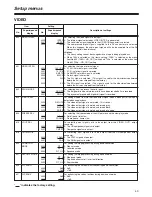
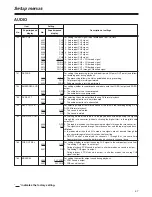
009

CHARA TYPE

0000
0001

WHITE

W/OUT

For setting the superimposed display and menu display type.
0: White characters are displayed on a black background.
1: White characters with black edges are displayed.

008

CHARA V-POS

0000

:

0023

:

0032

0

:

23

:

32

For setting the vertical position at which the superimposed characters are to be
displayed.

007

CHARA H-POS

0000

:

0006

:

0037

0

:

6

:

37

For setting the horizontal position at which the superimposed characters are to be
displayed.

<Note>

If the PAGE button and DATA+ button or DATA– button are pressed when menu items No.007 [CHARA H-POS]
and No.008 [CHARA V-POS] are set, the superimposed information is displayed so that its setting can be
checked.
Even while the PAGE button is pressed, the actual statuses can be checked using the DATA+ button or DATA–
button.

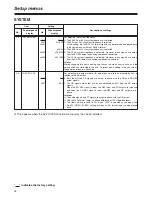
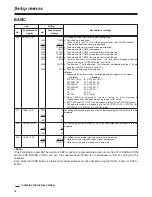
006

DISPLAY SEL

0000

0001
0002
0003
0004
0005
0006
0007

0008

0009

TIME

T&STA

T&S&M

T&RT

T&YMD
T&MDY
T&DMY

T&UB

T&CTL

T&T

For setting what the information to be superimposed.
0: Only the data is displayed.

(“Data” refers to the CTL, TC or UB value selected by the COUNTER button.)

1: The data and operation status are displayed.
2: The data, operation status and mode are displayed.
3: The data and REC TIME are displayed.
4: The data and REC DATE (year/month/day) are displayed.
5: The data and REC DATE (month/day/year) are displayed.
6: The data and REC DATE (day/month/year) are displayed.
7: The data and user’s bit are displayed.  The time code is displayed after the

user’s bit when the COUNTER button is set to UB.

8: The data and CTL are displayed.  The time code is displayed after the CTL data

when the COUNTER button is set to CTL.

9: The data and time code are displayed.

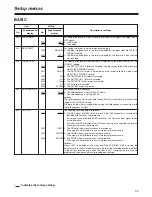
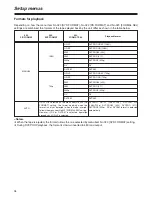
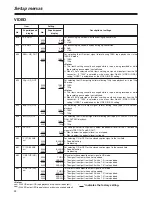
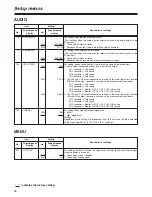
<Notes>

O

Depending on the format used, the following displays appear for the modes.

<Format>

<Display>

DVCPRO HD-LP

5

DVCPRO_HD-LP

DVCPRO HD

5

DVCPRO_HD

DVCPRO50

5

DVCPRO_50

DVCPRO50P

5

DVCPRO_P

DVCPRO

5

DVCPRO

DV

5

DV

DVCAM

5

DVCAM

O

When T&S&M is selected as the item setting, an error message is
superimposed onto the display when a warning or error occurs.

O

REC TIME and REC DATE are displayed only during DV or DVCAM playback.
The operation mode is displayed with the DVCPRO HD-LP, DVCPRO HD,
DVCPRO50, DVCPRO50P or DVCPRO format.

Содержание AJHD1200A - DVCPRO HD VTR

Страница 1: ...on become operational only when the AJ YA120AG optional accessory or AJ YAD120AG optional accessory has been installed VQT0L36 1 Before operating this product please read the instructions carefully and save this manual for future use Operating Instructions Model No AJ P ...

Страница 2: ...der to maintain adequate ventilation Ensure that curtains and any other materials do not obstruct the ventilation to prevent risk of electric shock or fire hazard due to overheating CAUTION TO REDUCE THE RISK OF FIRE OR SHOCK HAZARD REFER CHANGE OF SWITCH SETTING INSIDE THE UNIT TO QUALIFIED SERVICE PERSONNEL WARNING OTO REDUCE THE RISK OF FIRE OR SHOCK HAZARD DO NOT EXPOSE THIS EQUIPMENT TO RAIN ...

Страница 3: ... the instruction manual may cause harmful interference to radio communications Operation of this equipment in a residential area is likely to cause harmful interference in which case the user will be required to correct the interference at his own expense Warning To assure continued FCC emission limit compliance the user must use only shielded interface cables when connecting to external units Als...

Страница 4: ... Setting the time code from the front panel 20 Setting the user s bit 21 Playing back the time code and user s bit 21 Superimposed screen displays 22 Setup initial settings 24 Setting method using the on screen menus 24 Returning to the factory settings 24 Setting the user defaults 25 Loading the user defaults 26 Menu protection 26 Releasing the menu protection mode 27 Displaying the DIAG menu 27 ...

Страница 5: ...space in a standard rack compared to conventional models DVCPRO HD cassette tapes used The unit uses 1 4 inch wide cassette tapes Note When recording2 HD signals use DVCPRO HD cassettes High image quality The unit achieves a high image quality by recording 4 2 2 HD component signals with a recording rate 100 Mbps which is four times as high as that for existing DVCPRO formats 1080i or 720p NTSC or...

Страница 6: ...bles HD signals to be monitored with ease AC DC operation The unit supports AC supply voltages ranging from 100V to 240V and DC12V power supply as well Follow on recording function2 Using the REC button and PAUSE button together activates the auto back function enabling the next image to follow on from the last image with no disruptions in the continuity On screen menu settings Highly detailed and...

Страница 7: ...h the center of the slot and push it gently inside The cassette tape is loaded automatically 3EJECT button When this is pressed the tape is unloaded and several seconds later the cassette will be automatically ejected When it is pressed while the counter display shows the CTL display the display will be reset 4REC REC INH lamp REC The lamp lights during recording2 REC INH The lamp lights when the ...

Страница 8: ...s of the output signals are shown during playback Cassette insertion tape travel indicator lamp This lights when a cassette is inside the unit This appears when a tape is inserted and the STANDBY ON mode is established This appears when a tape is inserted and the STANDBY OFF HALF LOADING mode is established This appears when the tape is traveling and the segment display moves as the tape travels W...

Страница 9: ...o monitor output and headphone output channel Parts and their functions Front panel Reference Combination of setup menu items and audio outputs selected by the front panel switches 2 This function is operational only when the AJ YA120AG optional accessory has been installed Setup menu item No 780 AUD OUT SEL No 770 MONITOR MIX No 771 H PHONE MIX Front panel Audio monitor selector switch B Audio ou...

Страница 10: ...he stop mode is established immediately after a tape is inserted into the unit When a still image is displayed noise may appear on the monitor this is normal and not indicative of trouble IFF button Press this to fast forward the tape While the button is held down in one of the search modes search still REV search REV search still or FWD search still the FWD search mode is established and the tape...

Страница 11: ...signals However when 1394 is selected as the VIDEO IN SEL setting the audio input signals will also be supplied from the DV connector digital video interface Note The image and sound may be disrupted when this switch s position is changed Front panel PRESET button When this is pressed in the CTL mode the counter display is reset to zero QREC INHIBIT switch2 This is used to enable or disable record...

Страница 12: ...V the unit s power is automatically turned off When TYPE A or TYPE B is not selected as the menu item No 180 BATTERY SEL setting Even when the supply voltage is restored later the power will not automatically come back on The POWER switch must be set to OFF and then back to ON several seconds later When both AC power supply and DC power supply are connected the AC power supply takes priority 3DC O...

Страница 13: ... Video signals with superimposed information embedded can be output from the VIDEO OUT2 connector Whether superimposed information is to be embedded in the signals is selected using menu item No 005 SUPER Notes OWhen HD analog component output or HD SDI output2 signals are output with the 60 Hz or 24 Hz system frequency the SD SDI2 signals will be output without the sync signals NO SYNC and the an...

Страница 14: ...0P HD playback tapes L cassettes DVCPRO HD LP Tapes with up to 92 minutes of recording playback AJ HP64ELG AJ HP92ELG DVCPRO 25 50 50P HD playback tapes Precautions for using consumer DV and DVCAM cassettes OUse a cassette adapter AJ CS455P when using mini DV or DVCAM cassette tapes Inserting a mini DV or DVCAM cassette tape into the unit without using a cassette adapter may cause trouble or malfu...

Страница 15: ...g on the unit s power 1 2 3 Turn on the unit s power 1 When the STOP button is pressed the unit is set to the STOP mode The STOP lamp lights and the tape stops traveling OIn order to protect the tape inside the unit the unit is set to the tape protection mode when the time selected as the menu item No 400 STILL TIMER has elapsed When the STOP REW FF or PLAY button is pressed the unit is transferre...

Страница 16: ... signals 1 Connect the signals to be recorded 2 Use menu item No 700 AUDIO IN SEL to select the audio input signals Note When 1394 is selected as the menu item No 600 VIDEO IN SEL setting the audio signals are input from the DV connector digital video interface regardless of the AUDIO IN SEL setting 2 Adjusting the analog audio levels OAdjust the levels of the audio input signals when analog audio...

Страница 17: ...2 To end playback press the STOP button The VTR is set to the stop mode 3 Notes OCheck that the SERVO lamp remains lighted during recording When it flashes or it is off the playback images will be disrupted OWhen playback starts up the images will be disrupted for a moment Resulting VTR operation VTR operation status Button operated SEARCH Search still FF or REW FF or REW PLAY or STOP PLAY PLAY ST...

Страница 18: ...y operating the search dial on the AJ A95 Notes ONoise may appear on the screen when the tape is playing back at a speed other than 1k ODuring variable speed playback the sound recorded on the analog CUE track is played back Resulting VTR operation VTR operation status Button operated PAUSE STILL PLAY PAUSE PLAY PLAY PLAY STOP STOP Any status STOP 5 FF FF STOP 5 REW REW Any status PAUSE STILL or P...

Страница 19: ...o 162 END and press the DATA button PAUSE STILL button or DATA button PLAY button Note Whether a setting is to be entered can be selected by operating the DATA button and DATA button The display appears when there is no setting When repeat playback is performed in this status the BEGIN point serves as the tape start and END point as the tape end 2 Use the COUNTER button to select TC or CTL Note Wh...

Страница 20: ...time code signals which has been released to users It can be used to record the operator number or other such information The alphanumerics which can be used for the user s bit are the numbers 0 to 9 and the letters A B D E and F Setting the time code from the menu Set the VTR to the menu mode This is done by setting the LOCAL MENU REMOTE switch to the MENU position 1 Set menu item No 507 TC SOURC...

Страница 21: ...Playing back the time code and user s bit Set the unit to the STOP mode 1 Set the COUNTER button to TC or UB TC The time code is displayed UB The user s bit is displayed 2 Press the PLAY button Playback commences and the time code appears on the display When CMPST has been selected as the menu item No 005 SUPER setting the time code value is superimposed onto the video signals which are output fro...

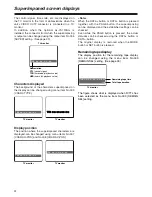
Страница 22: ...nitor In addition when the optional AJ YA120AG is installed the connector from which the superimposing is output can be changed using the menu item No 005 SUPER setting See page 33 Characters displayed The background of the characters superimposed on the display can be changed using menu item No 009 CHARA TYPE TCR 22 22 22 22 TV monitor T TC CR R 2 22 2 2 22 2 2 22 2 2 22 2 TV monitor Remaining ta...

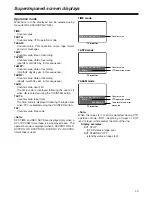
Страница 23: ...ng month 5 day 5 year in this sequence T DMY Counter value date of recording day 5 month 5 year in this sequence T UB Counter value user s bit The time code is displayed following the user s bit when UB is selected using the COUNTER button T CTL Counter value tape timer The time code is displayed following the tape timer when CTL is selected using the COUNTER button T T Counter value time code Not...

Страница 24: ...completes the menu setting procedure 7 Press the SET button to enter the setting To make changes to any other items repeat steps 4 5 and 6 Note The setting can be canceled by pressing the MODE button To change another item without entering the setting press the MODE button and then repeat steps 4 5 and 6 6 Press the MENU UP button or MENU DOWN button to move the cursor 2 to the menu where changes ...

Страница 25: ... position This completes the menu setting procedure 7 SET UP MENU SAVE 2 NO USER ALL USER NOT SYSTEM Press the MENU UP button or MENU DOWN button to move the cursor to the SAVE position and press the SET button The unit is set to the SAVE mode and the SAVE screen appears on the video monitor 4 SAVE OK 2 NO YES The screen prompting the user to confirm whether the settings are to be saved now appear...

Страница 26: ...lay returns to the menu screen without changing to the user settings stored in the memory 4 Set the LOCAL MENU REMOTE switch to the LOCAL or REMOTE position This completes the menu setting procedure 5 Menu protection Set the LOCAL MENU REMOTE switch to the MENU position The unit is set to the menu setting mode and the menu screen appears on the video monitor 1 By setting the unit to the menu prote...

Страница 27: ...onitor 1 2 MENU PROTECT OK 2 NO YES Perform steps 2 and 3 of the menu protection procedure described above The screen prompting the user to confirm whether to initiate menu protection appears on the video monitor Displaying the DIAG menu Set the LOCAL MENU REMOTE switch to the MENU position while holding down the EJECT button The unit is set to the DIAG display mode and the hour meter and deck ser...

Страница 28: ...EQ 25 No HD SYS H ADV 26 No No No No No No No No No No No LOCAL ENA 001 TAPE TIMER 002 No No No No No No REMAIN SEL 003 SUPER 005 DISPLAY SEL 006 CHARA H POS 007 CHARA V POS 008 CHARA TYPE 009 SYS FORMAT 020 No No No No No No No No No No PB FORMAT 022 FORMAT SEL 023 HD FREQUENCY 030 No No No No No No No No No OUT REF 031 No No No No No SHTL MAX 101 FF REW MAX 102 No REF ALARM 104 No No No EJECT EE...

Страница 29: ... 530 No No No No No No No No UB PRESET 531 No No No No No No No No VIDEO IN SEL 600 No No No No No No No No No No VIDEO INT SG 601 No No No No No No No No No No SDI IN MODE 602 No No No No No No No No No V MUTE SEL 603 FREEZE SEL 604 V OUT SEL 615 No No No No OUT MATRIX 616 No No DOWNCON MODE 620 No No No UPCON V MODE 621 No No No No No No No D C ENH H 626 No No D C ENH V 627 No No No U C ENH H 62...

Страница 30: ...T LV 706 CH2 OUT LV 707 CH3 L OUT LV 708 CH4 R OUT LV 709 No REC CUE 730 No No No No No No No PB FADE 731 No EMBEDDED AUD 732 No No No DV PB ATT 759 REC PT MUTE 760 AUD RATE CON 762 CUE OUT SEL 765 MONI SEL 769 MONITOR MIX 770 H PHONE MIX 771 AUD OUT SEL 780 No IN IMP SEL 781 No No No No No No No No DIF SPEED 880 No No No No No No No No No No DIF IN CH 882 No No No No No No No No No No DIF OUT CH ...

Страница 31: ...adjusting the SCH sub carrier to horizontal phase of the VIDEO output signals variable range of over 45 degrees The SC phase changes and the H phase remains unchanged A range of 180 degrees is covered by using this setting in combination with item No 18 SCH COAR SD 20 AV PHASE 0000 0100 0200 100 0 100 For adjusting the phase of the AUDIO output signals in relation to the VIDEO output signals in 20...

Страница 32: ...tting only causes the menu item to flash and the setting itself is not reflected in the unit To reflect a new setting in the unit turn off the power and then turn it back on 26 HD SYS H ADV 0000 0001 0H 90H For selecting the output whose HD output phase is to be advanced by 90H in relation to the SD output 0 Both the HD and SD signals are output in phase with the HD and SD REF output signals 1 The...

Страница 33: ...etting O The remaining tape time will not be displayed when R TTL is set and TIME is selected as the menu item No 006 DISPLAY SEL setting 005 SUPER 0000 0001 0002 20003 20004 20005 20006 OFF CMPST CMPNT 2SDSDI 2HDSDI 2CPS SD 2CPN HD For setting the superimposing of the displays onto various connectors 0 The displays are superimposed onto none of the output connectors 1 The displays are superimpose...

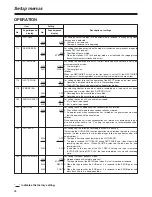
Страница 34: ... setting what the information to be superimposed 0 Only the data is displayed Data refers to the CTL TC or UB value selected by the COUNTER button 1 The data and operation status are displayed 2 The data operation status and mode are displayed 3 The data and REC TIME are displayed 4 The data and REC DATE year month day are displayed 5 The data and REC DATE month day year are displayed 6 The data a...

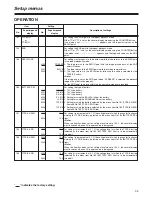
Страница 35: ... used Note When 1394 is selected as the menu item No 600 VIDEO IN SEL setting the output picture in the E E mode or output picture during recording may be disturbed in the vertical direction even when this item is set However there will be no problem with the pictures which are recorded on the tape 023 FORMAT SEL 0000 0001 0002 0003 0004 0005 0006 HD LP HD SP 422 411 420p DV DVCAM For selecting th...

Страница 36: ...720p 50M DVCPRO50 422 25M DVCPRO 411 50Mp DVCPROP 420p DV DV DVCAM If AUTO is selected as the menu item No 022 PB FORMAT setting the format applying when the format is not yet detected when the tape inserted follows the menu item No 023 FORMAL SEL setting However if DV or DVCAM is selected operation proceeds as if HD LP is selected DVCAM DVCPRO HD LP 1080i 720p DVCPRO HD 1080i 720p DVCPRO50 422 DV...

Страница 37: ... E E mode TAPE BLACK is output for the video and the audio is muted 2 The output status differs according to the position of the TAPE EE switch EE The signals are output in the E E mode TAPE GRAY is output for the video and the audio is muted Note The EE pictures will be all black when the AJ YA120AG optional accessory or AJ YAD120AG optional accessory is not installed OPERATION Item Setting No Su...

Страница 38: ...h no disruptions 0 The tape is not rewound automatically no AUTO BACK 1 The tape is rewound AUTO BACK during REC PAUSE and it then stops in the recording standby status When PAUSE is released the tape runs up and recording starts 2 In addition to the function of the 0001 REC P setting the tape is rewound AUTO BACK during REC PLAY the tape immediately runs up and recording starts 160 MEMORY MODE 00...

Страница 39: ...10 6 15 0 For setting in increments of 0 1 V the voltage level at which the counter flashes as warning for TYPE A battery selected as the menu item No 180 BATTERY SEL item Note When this item has been set to a voltage level close to 15 0 V the counter display may flash even when an AC power source is being used 182 TYPE A END 0000 0034 10 6 14 0 For setting in increments of 0 1 V the voltage level...

Страница 40: ...left standing in the STOP status 0 STEP FWD 1 Standby OFF half loading Note When STEP FWD is selected the unit is automatically transferred to the standby OFF half loading mode when the unit is left standing in the STOP mode for a total of 30 minutes or 1 minute for DV or DVCAM tape 402 DRUM STDBY 0000 0001 OFF ON For setting the cylinder operation in the standby OFF half loading mode 0 The cylind...

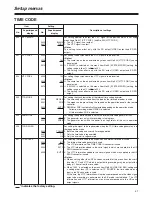
Страница 41: ...lected 504 RUN MODE 0000 0001 REC FREE For setting the operation mode in which the internal time code generator runs 0 The generator runs only while recording is in progress 1 The generator runs while the power is on regardless of the unit s operation mode 505 TCG REGEN 0000 0001 0002 TC UB TC UB For setting the signal to be regenerated when the TCG time code generator is in the regeneration mode ...

Страница 42: ...es are recorded O When 23 24 25 HD or 25 SD is selected as the menu item No 25 SYSTEM FREQ setting and VAUX is selected as the VITC OUT setting the time code which is output may not be continuous 514 HD EMBD VITC 0000 0001 OFF ON For selecting whether to superimpose the VITC information onto the HD serial output 0 The VITC information is not superimposed 1 The VITC information is superimposed 515 ...

Страница 43: ...ts have been rounded off are recorded 1 The dynamically rounded 8 higher bit signal is recorded 604 FREEZE SEL 0000 0001 FIELD FRAME For selecting the freeze mode of the still pictures and the slow play mode 0 Field freeze field slow 1 Frame freeze frame slow 615 V OUT SEL 0000 0001 CMPNT CMPST For selecting what signals are to be output from the VIDEO OUT1 output connector 0 The HD component sign...

Страница 44: ... Forced blanking 1 No blanking 682 VO SETUP HD 2UP 0000 0001 0002 0003 THRU ADD22L ADD21L ADD20L This selects the composite output signal in HD mode 0 The signal is output with no setup added 1 The signal is output from line 22 with a 7 5 setup added 2 The signal is output from line 21 with a 7 5 setup added 3 The signal is output from line 20 with a 7 5 setup added 683 VO SETUP SD 2DW 0000 0001 0...

Страница 45: ... With SD output SD tape playback or down converted output 684 EDH SD 2DW 0000 0001 OFF ON For setting whether to superimpose EDH onto the SD SDI output 0 EDH is not superimposed 1 EDH is superimposed 685 ESR MODE SD 2DW 0000 0001 OFF AUTO For selecting the mode of the edge subcarrier reduction ESR operation in the playback circuit 0 ESR is forcibly turned off 1 ESR is automatically set to ON or OF...

Страница 46: ...e level of the analog audio input CH1 702 CH2 IN LV 0000 0001 0002 0003 4dB 0dB 20dB 60dB For setting the reference level of the analog audio input CH2 703 CH3 IN LV 0000 0001 0002 0003 4dB 0dB 20dB 60dB For setting the reference level of the analog audio input CH3 704 CH4 IN LV 0000 0001 0002 0003 4dB 0dB 20dB 60dB For setting the reference level of the analog audio input CH4 706 CH1 OUT LV 0000 ...

Страница 47: ... same time Separate settings cannot be performed on a channel by channel basis 760 REC PT MUTE 0000 0001 OFF ON For selecting whether to mute the sound at the joins in the recording during DV or DVCAM format playback 0 The sound is not muted 1 The sound is muted 769 MONI SEL 0000 0001 PLY PCM PLY CUE For setting the monitor output sound during playback 0 PCM sound is output 1 CUE sound is output 7...

Страница 48: ...For setting the sound to be output from the analog audio output connectors 0 All the output connectors are used as the main line output CH1 connector CH1 sound CH2 connector CH2 sound CH3 connector CH3 sound CH4 connector CH4 sound 1 The CH1 and CH2 output connectors are used as the main line output and the CH3 and CH4 output connectors are used as the monitor output connectors CH1 connector CH1 s...

Страница 49: ...e output in the DV format 0 Normal setting the signals simply pass through 1 Forcible conversion to the LOCK mode no frequency conversion 2 Forcible conversion to 48kHz 2CH LOCK 894 HD DIF OUT 0000 0001 0002 HD 50M DV For setting the format of the signals to be output from the digital video interface when a DVCPRO HD tape is played back or the E E mode is established while the AJ YA120AG board is ...

Страница 50: ...VTR continues to operate The information of the active frame first frame where the frame image is switched is recorded on tapes which have been recorded using a variable frame rate camera When playing back these tapes in the unit frame 0 of the time code must be detected at the active frame position E 00 SERVO NOT LOCKED This appears when the servo is not locked for 3 or more seconds during playba...

Страница 51: ...tes abnormally quickly E 67 T REEL TOO FAST This appears when the take up reel motor rotates abnormally quickly E 69 T REEL TORQUE ERR This appears when an abnormal level of torque has been detected as having been applied to the take up reel motor E 6A This appears on the front panel s counter display when a communication error between the IF microcomputer and front microcomputer has occurred At t...

Страница 52: ...the system format which is set by the AJ HD1200A Operation performed by AJ HD1200A Operation is continued 21 E 16 INVALID VIDEO SIG This appears when the video signals supplied to the digital video interface are not the correct ones Operation performed by AJ HD1200A Operation is continued 21 E 17 INVALID AUDIO SIG This appears when the audio signals supplied to the digital video interface are not ...

Страница 53: ...d plastic gear A and turn it counterclockwise while keeping it pushed in The mechanism that winds up the tape is activated by this and it makes a latching sound Ignore the sound and turn the gear through about 10 revolutions Note Turning the gear more than necessary will strain the cassette possibly resulting in tape damage Procedure to ejecting the tape manually in an emergency If the cassette ta...

Страница 54: ...using AJ HP92ELG VIDEO Digital video Sampling frequency Y 74 25 MHz PB PR 37 125 MHz Quantizing 8 bits Video compression system DCT variable length code Video compression ratio 1 6 7 Error correction Reed Solomon product code Video recording bit rate 100 Mbps Video input connectors21 HD serial digital input BNC k1 compliant with SMPTE 292M 296M 299M standards Reference input Black burst HD tri lev...

Страница 55: ...ntrol command Compliant with AV C command set General Ver 3 0 VCR Subunit Ver 2 01 HD SDI input output SD SDI output board AJ YA120AG Digital video input output board AJ YAD120AG Specifications Audio output connectors Analog output CH1 CH2 CH3 CH4 XLR k4 low impedance 4 0 20 dBm with 600 Ω load switchable Monitor output L or R switchable for CH3 CH4 output HD serial digital output21 BNC k2 75 Ω co...

Страница 56: ...nt 52 West Gude Drive Rockville MD 20850 301 738 3840 Broadcast PARTS INFORMATION ORDERING 9 00 a m 5 00 p m EST 800 334 4881 24 Hr Fax 800 334 4880 Emergency after hour parts orders 800 334 4881 TECHNICAL SUPPORT Emergency 24 Hour Service 800 222 0741 Panasonic Canada Inc 5770 Ambler Drive Mississauga Ontario L4W 2T3 905 624 5010 Panasonic de Mexico S A de C V Av angel Urraza Num 1209 Col de Vall...

Отзывы: