background image

50

601

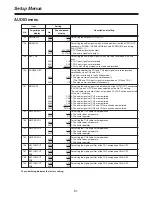
V-MUTE SEL

0000
0001

N-MUTE
LOW RF

For setting whether to mute the video signals when LOW RF or NO RF has
occurred during playback.
0: The video signals are not muted (the picture is frozen).
1: The video signal picture is muted (the screen turns gray).

VIDEO menu

Item

Setting

No.

Superimposed

display

No.

Superimposed

display

Description of setting

The underlining indicates the factory setting.

Setup Menus

608

SET UP 25

..

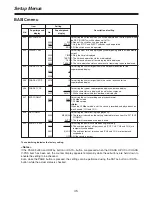
For setting the setup processing for the composite IN/OUT and component
IN signals when the 25 Mbps mode is selected.

00

CMPST IN

0000
0001

THRU

CUT

For setting the setup processing for the composite input signals.
0: The original signals are input as they stand.
1: The 7.5 % setup is eliminated from the input signals, which are then

input.

01

CMPST OUT

0000
0001

THRU

ADD

For setting the setup processing for the composite output signals.
0: The original signals are output as they stand.
1: The 7.5 % setup is added to the output signals, which are then output.

02

CMPNT IN

0000
0001

THRU

CUT

For setting the setup processing for the component input signals.
0: The original signals are input as they stand.
1: The 7.5 % setup is eliminated from the input signals, which are then

input.
609

SET UP 50

..

For setting the setup processing for the composite IN/OUT and component
IN signals when the 50 Mbps mode is selected.

00

CMPST IN

0000
0001

THRU

CUT

For setting the setup processing for the composite input signals.
0: The original signals are input as they stand.
1: The 7.5 % setup is eliminated from the input signals, which are then

input.
01

CMPST OUT

0000
0001

THRU

ADD

For setting the setup processing for the composite output signals.
0: The original signals are output as they stand.
1: The 7.5 % setup is added to the output signals, which are then output.

02

CMPNT IN

0000
0001

THRU

CUT

For setting the setup processing for the component input signals.
0: The original signals are input as they stand.
1: The 7.5 % setup is eliminated from the input signals, which are then

input.
Содержание AJ-D92P

Страница 1: ...AJ P Digital Video Cassette Recorder Operating Instructions F1099W Printed in Japan VQT8368 P ...

Страница 2: ...ce service instructions in the literature accompanying the appliance WARNING TO REDUCE THE RISK OF FIRE OR SHOCK HAZARD DO NOT EXPOSE THIS EQUIPMENT TO RAIN OR MOISTURE CAUTION TO REDUCE THE RISK OF FIRE OR SHOCK HAZARD REFER CHANGE OF SWITCH SETTING INSIDE THE UNIT TO QUALIFIED SERVICE PERSONNEL FCC Note This device complies with Part 15 of the FCC Rules To assure continued compliance follow the ...

Страница 3: ...for playback 33 1 Selecting the sound to be monitored 33 2 Playback in synchronization with the external signals 33 Playback operations 34 1 Regular speed playback and still picture playback 34 2 Cue playback and review playback 35 3 Linear 0 3a speed playback 36 4 Variable speed playback 36 5 Reading and displaying the time data 37 Superimposed Screens 38 Setup Initial Settings 40 Setting method ...

Страница 4: ...tinuity function By using the REC button and PAUSE button together a combination which activates the auto back function pictures can be joined smoothly with no disturbances Safety check function The status of the video input signals can be checked on the signal level display window by pressing the METER button This helps to prevent errors in input signal switching operations and mistakes in record...

Страница 5: ...output signals a3 channels composite Audio output signals a5 channels Video monitor Earphones Control signal a1 channel Headphones Editor Stereo amplifier Speakers Remote controller AJ A95 or VTR FPU or other unit Component signals Composite signals Switching Video input signals VTR or other unit AC adapter AJ B75 AJ D92 ...

Страница 6: ...VAR ON OFF CH 4 CASSETTE IN METER LIGHT WARNING CH4 CH3 CH2 SHIFT REC REVIEW CH1 PB LEVEL CH1 CH2 CH3 CH4 POWER 25 50 CTL F RUN SET R RUN MENU DATA EJECT M cassette Caution Do not insert S cassette or with adaptor OFF SET MENU RESET TC UB KEY INHIBIT PAUSE STILL REC PLAY STOP SEARCH REW PAGE DOWN MODE SET UP FF ON OFF UNI VAR CH 1 Digital Video Cassette Recorder AJ UNI VAR CH 2 UNI VAR CH 3 UNI VA...

Страница 7: ...travel The tape drum continues to rotate even in the stop mode and the tape remains in close contact with the drum When the stop mode continues beyond the prescribed period of time the unit is automatically set to the standby OFF half loading mode in order to protect the tape The stop mode is established immediately after a cassette has been inserted into the unit This button functions as the MODE...

Страница 8: ...ar 0 3a playback this is normal and not indicative of malfunctioning The button s lamp lights during fast forwarding cue and forward linear 0 3a playback When the respective operations are completed the lamp goes off and the operation concerned is stopped The button functions as the MENU DOWN button when performing the on screen menu setting SEARCH button and lamp This button is pressed to initiat...

Страница 9: ...e tape wind up operation Operating status displays These indicate the unit s operating status DF This indicates that the drop frame mode is established SLAVE This indicates that the time code is locked to the external time code TCG This indicates that the time code generator s signal is being output WIDE This indicates that the wide mode is established Remaining tape display This indicates the rem...

Страница 10: ...layed is determined in two stages first by the position selected by the TCG selector switch and second by the position of the DISPLAY switch 425 Mbps and 50 Mbps mode lamps In the 25 Mbps mode the bottom lamp lights In the 50 Mbps mode the top and bottom lamps light 5WARNING lamp This lights or flashes when the remaining tape time is less than 2 minutes when the battery had discharged or when a pr...

Страница 11: ...indicate the playback signal status 2Recording level controls and UNI VAR switch These four controls are used to adjust the recording levels of the four audio channel CH1 CH4 signals while monitoring the audio level display UNITY or VARIABLE can be selected using the UNI VAR switch for the recording level of each control UNI The input signals are recorded with their levels unchanged The levels can...

Страница 12: ...flash when the time code or user s bit is to be set It becomes operational when the TCG selector switch has been set to the SET position 3 button This is used to increase by 1 the figure for the setting digit when the time code or user s bit is to be set 4 button This is used to decrease by 1 the figure for the setting digit when the time code or user s bit is to be set 5MENU switch This is set to...

Страница 13: ...ADPHONES EARPHONE VIDEO IN REMOTE DC OUT 12V 200mA SUPER IMPOSE OFF ON PHONE LEVEL PHONE SELECT TC IN OUT VIDEO OUT VIDEO OUT 1 2 AUDIO OUT CH1 2 CH1 BREAKER DC IN A U D I O I N A U D I O O U T CAMERA DC 12V 3A COMPO NENT MIC POWER OFF CAM LINE 60 4dB ON CH2 MIC POWER OFF CAM LINE 60 4dB ON CH3 MIC POWER OFF CAM LINE 60 4dB ON CH4 MIC POWER OFF CAM LINE 60 4dB ON COMPO SITE CH3 4 CH 1 CH 2 CH 3 CH...

Страница 14: ...e power 48V for the phantom microphones ON or OFF The power can be switched to 12V using an internal switch For further details consult your dealer 7Audio input selector switches These are used to switch the audio inputs of the four audio channels CH1 CH4 individually CAM Sound which is input from the CAMERA connector LINE Sound which is input from the AUDIO IN connectors 8Audio input level switch...

Страница 15: ...l then be synchronized with the input signals 5VIDEO OUT 1 2 connectors BNC The composite video signals are output from these connectors When the SUPER IMPOSE switch is set to the ON position the VTR s operating status or time code will be superimposed onto the video signals which are output from the VIDEO OUT 2 connector 6SUPER IMPOSE switch When this is set to ON the VTR s operating status or ti...

Страница 16: ... available as an optional accessory 4BREAKER button This shuts off the power when a problem has occurred As soon as the power is shut off the BREAKER button pops out After checking the power connections equipment connections and battery push the BREAKER button back in Power will be supplied if the problem no longer exists If the power fails to be supplied even after the BREAKER button has been pus...

Страница 17: ... a level surface or upright for use It may not work properly if placed in any other position Flat Upright 1 When using an AC adapter Connect the AC adapter s DC cable to the DC IN socket on the unit 1 Connect the AC adapter s power cord and set its power switch to the ON position 2 Set the POWER switch on the unit s front panel to ON 3 Preparing to supply power DC IN connector Power switch AC adap...

Страница 18: ...ry charge in segments OWhen all 7 segments light up it means that the battery has a full charge OAs the battery continues to discharge the segments go off one by one in sequence OWhen the segment at the E empty end starts flashing the WARNING lamp also flashes and the warning alarm sounds intermittently it means that the battery will soon be fully discharged OWhen all 7 segments flash the WARNING ...

Страница 19: ...d Do not insert them into the unit Types of tapes and their recording times M size cassettes O50 Mbps mode Tapes with a recording playback length of up to 33 minutes O25 Mbps mode Tapes with a recording playback length of up to 66 minutes L size cassettes O50 Mbps mode Tapes with a recording playback length of up to 92 minutes O25 Mbps mode Tapes with a recording playback length of up to 184 minut...

Страница 20: ...splay This indicates the remaining tape time in segments OWhen all 7 segments light up it means that there is more than 21 minutes of tape remaining This can be changed to more than 30 minutes using setup menu item No 905 OWhen the segment at the E empty end lights up it means that 3 minutes of the tape are left This can be changed to 5 minutes using the setup menu item No 905 OWhen the segment at...

Страница 21: ... has been turned on 1 Press the cassette insertion slot cover to open it 2 Press the EJECT button The cassette tape is now ejected 3 EJECT button Take out the cassette tape and close the cassette insertion slot cover 4 M cassette Caution Do not insert S cassette or with adaptor ...

Страница 22: ... CH4 MIC POWER OFF CAM LINE 60 4dB ON COMPO SITE CH3 4 CH 1 CH 2 CH 3 CH 4 CH 1 CH 2 CH 3 CH 4 PUSH PUSH PUSH PUSH 22 Recording Preparing to record 1 Connecting the equipment Connect the camera VTR video monitor and other external devices Color video camera with component output or composite output VTR camera or other unit with composite output Video monitor VTR or other unit with composite input ...

Страница 23: ...ed on the level meter of the signal level display window Note Check the video input level using 75 SMPTE color bar signals The level will not be displayed properly if other video signals are used Note The camera s component signals are set to the Betacam component level To set them to the MII level first consult your dealer and then set SW1 on the VIDEO JACK circuit board located inside the connec...

Страница 24: ... Y level is displayed When signals are input to the VIDEO IN connector The video signal level is displayed Y CH CONDI EMPHASIS dB 40 30 0 10 PB PR 20 20 dB 40 30 0 10 Y CH CONDI EMPHASIS dB 40 30 0 10 20 20 dB 40 30 0 10 CH CONDI EMPHASIS dB 40 30 0 10 VIDEO 20 20 dB 40 30 0 10 Notes The level displays above are indicated when 75 SMPTE color bar signals are supplied as the input signals and the PB...

Страница 25: ...l selector switch to a setting 60 dBu or 4 dBu that corresponds with the input level 2 Set the unit s POWER switch to ON and insert a cassette tape on which signals can be recorded The level meter now appears on the signal level display window 1 Set the UNI VAR switch for the audio channel to be adjusted to the UNI position The audio input level is displayed as it stands 3 Set the UNI VAR switch f...

Страница 26: ...ode is to be advanced in the non drop frame mode 3 Set the time code using the SHIFT button as well as the and buttons SHIFT button This causes the digit to be set to flash Each time it is pressed the flashing digit moves to the right button This increases the flashing digit by 1 button This decreases the flashing digit by 1 4 Set the TCG selector switch to the F RUN or R RUN position F RUN When t...

Страница 27: ...PLAY switch to the UB position 1 Set the TCG selector switch to the SET position 2 Select USER as the setup menu item No 530 UB MODE setting 3 Set the user s bit using the SHIFT button as well as the and buttons SHIFT button This causes the digit to be set to flash Each time it is pressed the flashing digit moves to the right button This increases the flashing digit by 1 button This decreases the ...

Страница 28: ...o lock the user s bit to the user s bit of the time code supplied from the external source set it to the EXT mode which is set using setup menu item No 530 To release the time code from being locked to the external time code First stop supplying the external time code and then set the TCG selector switch to the R RUN position When switching the power supply from the battery to AC adaptor while the...

Страница 29: ... locked to an external time code generator Example of connections used for locking to an external time code Time code generator Reference signal REF IN TC IN TC OUT TC IN TC OUT TC IN REF OUT First AJ D92 unit Second AJ D92 unit Third AJ D92 unit GENLOCK IN GENLOCK IN GENLOCK IN Camera Camera Camera ...

Страница 30: ...unit is set to the REC PAUSE mode also when the signals are interrupted during recording When the signals are restored recording will automatically recommence When the detector circuit is activated in the above way and the REC PAUSE mode is established error code E A0 and the time data will be displayed alternately in the status display window However recording will only be continued if ON has bee...

Страница 31: ... in the status display window Press the unit s STOP button when recording is to be ended 3 3 To stop the recording temporarily Press the unit s PAUSE STILL button or camera s VTR start stop button The unit is set to the REC PAUSE mode and the PAUSE STILL lamp flashes 1 Notes OWhen recording was commenced using the camera s VTR start stop button the operation cannot be temporarily stopped using the...

Страница 32: ...me continuity after a break has been searched for in the playback mode Note It is recommended that REC be selected as the setup menu item No 105 setting to transfer to the recording mode more quickly 1 3 2 Press the REC REVIEW button in the REC PAUSE mode The tape is rewound at approximately 1a normal speed while the REC REVIEW button is held down The tape is rewound for a minimum of 2 or so secon...

Страница 33: ...l signals Connect the external signal to which playback is to be synchronized to the VIDEO IN connector and set the video input selector switch to the VIDEO IN position Playback is now initiated in synchronization with the signal which is connected to the VIDEO IN connector Notes OIf the VIDEO IN connector s signal is disconnected and re connected during playback the playback picture may be distur...

Страница 34: ...ape and the STILL mode is established again When the STILL mode has continued for over 30 minutes the standby OFF half loading mode is automatically established in order to protect the tape Notes OThe PLAY PAUSE mode retention time can be set using setup menu item No 400 When HALF has been selected as the setup menu item No 401 setting the tape is unloaded and the standby OFF half loading mode is ...

Страница 35: ... is resumed Transfer of VTR operation VTR operating mode Function button SEARCH Search still FF or REW FF or REW PLAY or STOP PLAY PLAY STOP STOP Any mode PLAY or STOP PLAY or STOP SEARCH FWD search cue playback FF PLAY or STOP PLAY or STOP SEARCH REV search review playback REW PAUSE STILL SEARCH or FF FWD search cue playback REW REV search review playback FWD search still PAUSE STILL SEARCH or RE...

Страница 36: ...k is enabled by operating the search dial on the AJ A95 Notes ONoise appears on the screen during playback at any tape speed except the normal tape speed 1a ODuring variable speed playback the sound recorded on the analog cue track is played back Transfer of VTR operation VTR operating mode Function button PAUSE STILL PLAY PAUSE PLAY PLAY PLAY STOP STOP Any mode STOP FF FF STOP REW REW Any mode PA...

Страница 37: ...and second by the position of the DISPLAY switch Status display window TCG selector switch DISPLAY switch Displaying the time data on the monitor screen When the time data is displayed in the status display window connect the monitor s input connector to the VIDEO OUT 2 connector and set the SUPER IMPOSE switch to ON The time data will now be displayed on the monitor screen Outputting the playback...

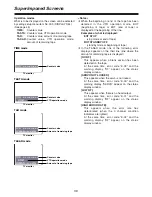
Страница 38: ...of the superimposed display characters can be changed by setting setup menu item No 006 CHARA TYPE See page 45 TV monitor TV monitor TV monitor TV monitor TV monitor Abbreviations CTL control signal TCG time code generator value TCR playback value of time code UBG user s bit generator value UBR playback value of user s bit No display Normally no display P Flashes when the DC supply voltage has dro...

Страница 39: ...e status display window LOW RF This appears when there is no head output At the same time error code E 01 and the warning display RF appear on the status display window HIGH ERROR RATE This appears when the error rate has deteriorated when the 3 channel condition indicators are lighted At the same time error code E 02 and the warning display RF appear on the status display window Operation modes W...

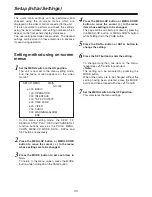
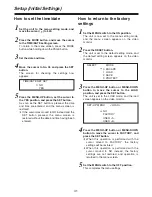
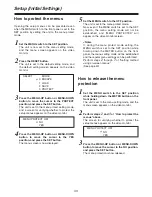
Страница 40: ...ing down the PAGE button 4 Press the DATA button or DATA button to change the setting 5 Set the MENU switch to the OFF position This completes the menu settings 7 Press the SET button to enter the setting To change more than one item on the menu repeat steps 4 5 and 6 for each item Note The setting can be canceled by pressing the MODE button When other items are to be changed without the setting h...

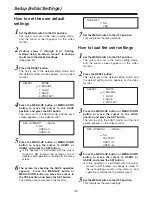
Страница 41: ...ess the MENU UP button set the cursor to the YES position and press the SET button As soon as the SET button is pressed the date and time are entered and the menu screen is restored OIf the cursor was moved to NO instead and the SET button pressed the menu screen is restored without the date and time having been entered 5 Move the cursor to No 05 and press the SET button The screen for checking th...

Страница 42: ...ton to move the cursor to USER1 or USER2 and press the SET button OIf this operation is performed with the cursor moved to NO instead the settings are not updated and operation is returned to the menu screen 5 Set the MENU switch to the OFF position This completes the menu settings 7 SET UP MENU SAVE NO USER 1 USER 2 Press the MENU UP button or MENU DOWN button to move the cursor to the SAVE posit...

Страница 43: ...ears on the video monitor Set the MENU switch to the OFF position The unit is set to the menu protect mode Now even if the MENU switch is set to the SET position the menu setting mode will not be established and MENU PROTECTED will appear on the video monitor screen Note If during the menu protect mode setting the MENU switch is set to the SET position while holding down the METER button on the fr...

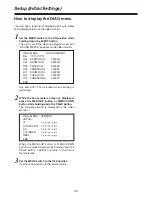
Страница 44: ... THREADING r 00000T END While the hours meters screen is displayed press the MENU UP button or MENU DOWN button while holding down the PAGE button The software version is displayed on the video monitor 2 When the MENU UP button or MENU DOWN button is pressed again while holding down the PAGE button operation returns to the hours meter display DIAG MENU VERSION NTSC IF 1 AV SYSCON 1 DV 1 CYLINDER 1...

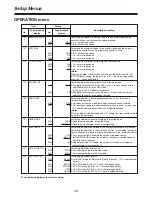
Страница 45: ... character position in the horizontal direction for the superimposed display 005 CHARA V POS 0013 0022 13 22 For setting the character position in the vertical direction for the superimposed display 006 CHARA TYPE 0000 0001 WHITE W OUT For setting the type of superimposed display and menu display 0 White characters are displayed on a black background 1 White characters with black borders are displ...

Страница 46: ...formed in the 4 3 normal mode 102 FF REW MAX 0000 0001 0002 X16 X32 X60 For setting the maximum fast forward and rewind speed 1 16a normal tape speed 2 32a normal tape speed 3 60a normal tape speed Note When the 50 Mbps mode has been selected as the menu item No 007 SYS FORMAT setting the tape will run at 32a the normal tape speed even if 60a has been selected OPERATION menu Item Setting No Superi...

Страница 47: ... of the VTR mode 1 The REC command is acknowledged only when the REC PAUSE mode is established 128 BATT WARNING 0000 0001 AUTO MANUAL For setting the voltage at which a warning is given when the battery is nearly discharged 0 The voltage is set by the battery which was set in setup menu item No 113 BATTERY SEL AU BP402 11 4 V BP H90 11 0 V BP H100 11 6 V HP 90 12 0 V HP 90A 11 4 V 1 The voltage se...

Страница 48: ... when the unit has been left standing in the stop mode 0 STEP FWD 1 STANDBY OFF HALF LOADING Note If STEP FWD has been selected the unit is automatically transferred to the STANDBY OFF HALF LOADING mode when the total length of time it has been left standing in the still mode reaches 30 minutes 402 DRUM STDBY 0000 0001 OFF ON For setting the drum operation in the STANDBY OFF HALF LOADING mode 0 Th...

Страница 49: ...the TCG setting operable when recording is to be performed after the TCG is set the power is turned off and back on again 0 Recording is performed according to the FIRST REC TC setting in No 532 1 The TCG setting is made operable and recording starts from the value of the TCG displayed 532 FIRST REC TC 0000 0001 REGEN PRESET For setting whether to record in the regeneration mode when recording for...

Страница 50: ...put as they stand 1 The 7 5 setup is added to the output signals which are then output 02 CMPNT IN 0000 0001 THRU CUT For setting the setup processing for the component input signals 0 The original signals are input as they stand 1 The 7 5 setup is eliminated from the input signals which are then input 609 SET UP 50 For setting the setup processing for the composite IN OUT and component IN signals...

Страница 51: ...orded on the cue track 0 CH1 input signals are recorded 1 CH2 input signals are recorded 2 CH1 and CH2 input signals are mixed and recorded 731 MONI OUT 0000 0001 0002 0003 0004 0005 CH1 CH2 CH3 CH4 CH1 2 CH3 4 AUDIO menu Item Setting No Superimposed display No Superimposed display Description of setting The underlining indicates the factory setting Setup Menus For setting whether the CH1 and CH2 ...

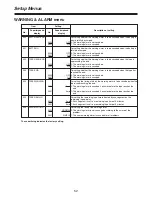
Страница 52: ...is sounded 903 TAPE END 0000 0001 OFF ON For setting whether the warning alarm is to be sounded when the tape has reached the end 0 The warning alarm is not sounded 1 The warning alarm is sounded 904 TAPE WARNING 0000 0001 2min 3min For setting the timing at which the warning alarm is to be sounded when the tape is approaching the end 0 The warning alarm is sounded 2 minutes before the tape reache...

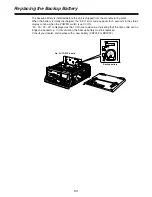
Страница 53: ...de appears for 3 seconds in the status display window when the POWER switch is set to ON 00 00 00 00 is displayed as the TCG time code value indicating that the time code can no longer be backed up In this situation the backup battery must be replaced Consult your dealer and replace with a new battery CR2032 or BR2032 No 5 VTR SYS board Backup battery Panasonic CR2032 VTR SYS ...

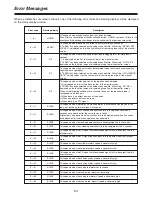
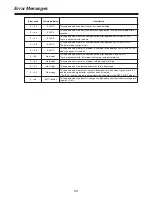
Страница 54: ... up reel motor has locked up SLACK E 63 This appears when the supply reel motor s speed is abnormally high SLACK E 64 This appears when the take up reel motor s speed is abnormally high SLACK SLACK RF This appears when the servo has failed to lock for more than 3 seconds If T S R has been selected as the setup menu item No 003 setting SERVO NOT LOCKED is displayed on the third line amount of remai...

Страница 55: ...ay E 90 This appears when the backup battery has totally discharged No display E A0 This appears when there is no input of video signals or when video signals are cut off and the mismatching detector circuit has been activated The E A0 and the time data will be displayed alternately in the REC PAUSE mode No display E bA This appears when the input DC voltage has dropped to near the undercut voltag...

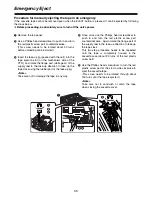
Страница 56: ...oved even when the EJECT button is pressed it can be ejected by following the steps below OBefore proceeding be absolutely sure to turn off the unit s power 2 3 4 34 1 5 4 Once more use the Phillips head screwdriver to push in and turn the red plastic screw part counterclockwise Again rotate the flange part of the supply reel in the take up direction to take up the tape slack This two step procedu...

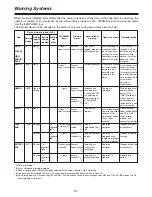
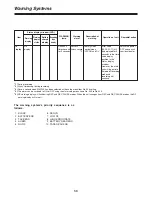
Страница 57: ... it may not be possible to play back the tape properly in this status Turn off the power and contact your dealer The lamp may flash for a moment and then go off when the tape starts traveling this is normal and not indicative of malfunctioning SERVO Lights SLACK Flashes 4 times a second Sounds continuously Tape take up problem An error code appears where the time code is displayed on the status di...

Страница 58: ...error between SYSCON and DV Switch the power OFF and consult your local dealer No display 1 During recording 2 At any time except during recording 3 Once a second when SIMPLE has been selected as the setup menu item No 906 setting 4 The alarm can be switched to ON or OFF using the alarm setup menu items No 900 to No 903 5 RF warning display will flash during REC and REC PAUSE modes When the unit c...

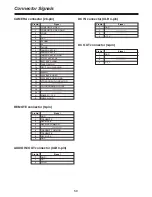
Страница 59: ... RECEIVE B 4 RECEIVE COMMON 5 6 TRANSMIT COMMON 7 TRANSMIT B 8 RECEIVE A 9 GND CAMERA connector 26 pin Pin No Signal 1 COMPOSITE VIDEO 2 COMPOSITE VIDEO GND 3 Y GND 4 Y 5 PR C 6 PR GND 7 PB 8 PB GND 9 CAMERA MIC X 10 CAMERA MIC Y 11 CAMERA MIC G GND 12 VTR START STOP 13 BATTERY ALARM 14 TAPE REMAIN 15 REC TALLY WARNING 16 17 SHIELD 18 PLAYBACK VIDEO 19 PLAYBACK VIDEO GND 20 VTR SAVE AUDIO MONITOR ...

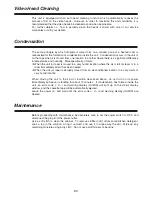
Страница 60: ...ne The same principle by which droplets of water form on a window pane of a heated room is responsible for the formation of condensation inside the unit Condensation occurs in the unit or on the tape when it is moved from one location to another where there is a significant difference in temperature and humidity More specifically it forms OWhen the unit or tape is moved to a very humid location wh...

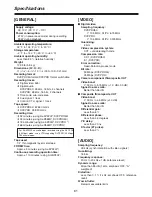
Страница 61: ...LP Continuous recording operation time Approx 110 minutes using AU BP402 AUDIO Sampling frequency 48 kHz synchronization with video signals Quantizing 16 bits Frequency response 20 Hz to 20 kHz 1 dB reference level Dynamic range More than 85 dB 1 kHz emphasis OFF A weighted Distortion Less than 0 1 1 kHz emphasis OFF reference level Wow flutter Below measurable limits Digital video Sampling freque...

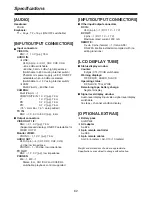
Страница 62: ...w impedance PHONES M6 a1 M3 a1 Stereo 8 Ω CH1 CH2 and CH3 CH4 switchable playback control supported OPTIONAL EXTRAS OBattery pack AU BP402 OAC adapter AJ B75 O9 pin remote controller AJ A95 O9 pin remote cables AU C5 5 meters AU C10 10 meters Specifications LCD DISPLAY TUBE Status display window Counter 8 digits CTL TC UB switchable Warning displays RF SERVO HUMID SLACK Operating status DF SLAVE T...

Страница 63: ......

Страница 64: ...ESTERN ZONE 3330 Cahuenga Blvd W Los Angeles CA 90068 323 436 3500 Dallas Region 6226 Abington Way Houston TX 77008 713 802 2726 No CA Northwest Region 5870 Stoneridge 3 Pleasanton CA 94588 925 416 5108 Government Marketing Department 52 West Gude Drive Rockville MD 20850 301 738 3840 PARTS INFORMATION ORDERING 9 00 a m 5 00 p m EST 800 334 4881 24 Hr Fax 800 334 4880 TECHNICAL SUPPORT Emergency 2...

Отзывы: