background image

26

Chapter

 4  Oper

ating En

vironment Setting

The following describes the settings for the whole system.

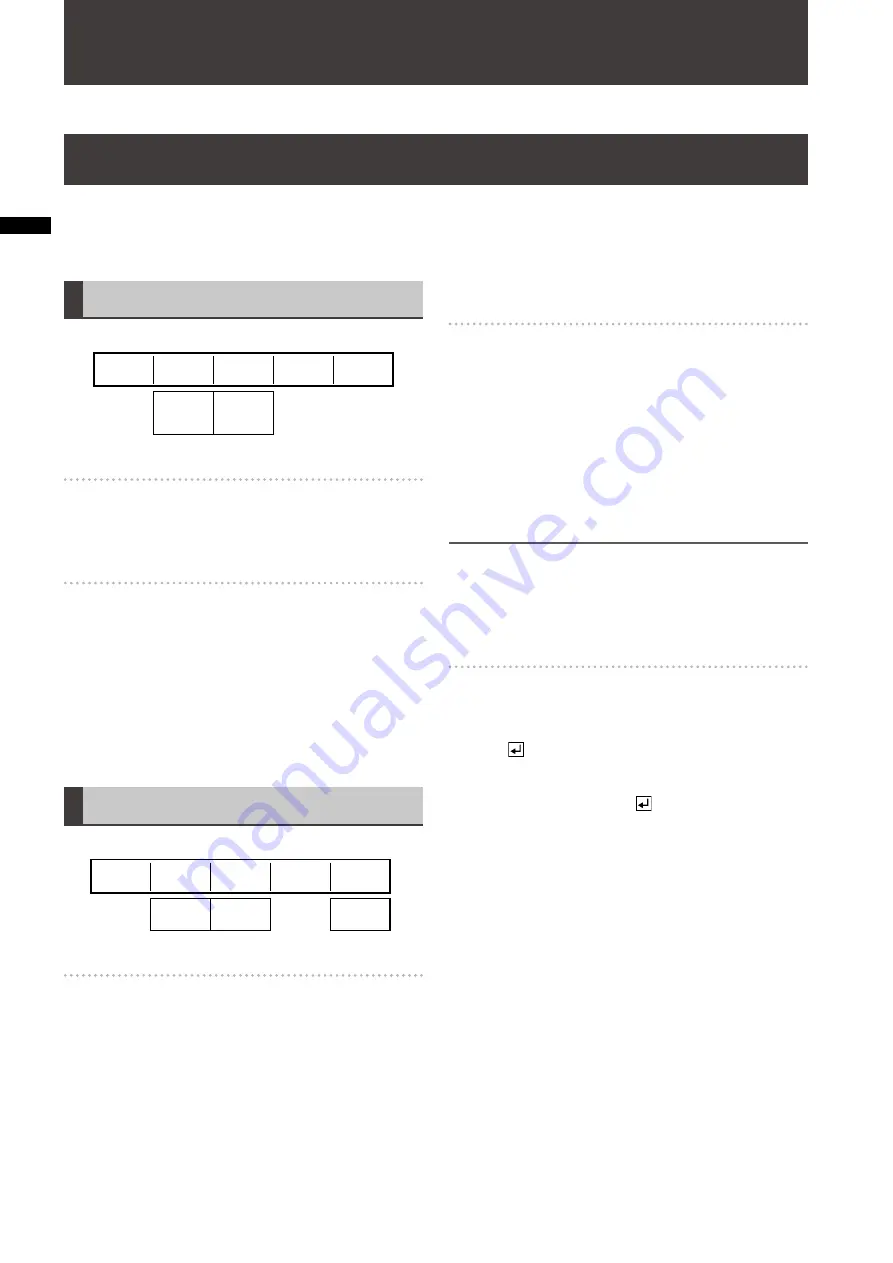
The [SYSTEM1] and [SYSTEM2] submenus of the [SETUP] 
menu are used.

Setting [SYSTEM1]

Rotary 1

Rotary 2

Rotary 3

Rotary 4

Rotary 5

ME

DSK

FADE

SEC

FRAME

TIME

SEC

ME

GPI

SYSTEM1

To set the time display

Set [TIME] to [SEC] (s frames) or [FRAME] 
(frames only) using the rotary 2 control.
The factory default setting is [SEC].

To select the video effect for GPI control

The GPI trigger signal can be input to the GPI input 
connector to externally control one of the video effects: key/
transition, downstream key, and fade. The system goes 
standby on the trailing edge of the GPI trigger signal, and 
executes the effect three frames later.

Set [GPI] to [ME] (key/transition), [DSK] or [FADE] using the 
rotary 3 control.  
The factory default setting is [ME].

Setting [SYSTEM2]

Rotary 1

Rotary 2

Rotary 3

Rotary 4

Rotary 5

OFF

10-60

OFF

ON

OFF

ON

P.SAVE

SYSTEM2 

OFF

OFF

OFF

SCR SAVE

HOURS M.

To set the power management mode

Set [P.SAVE] to [ON] using the rotary 2 control. 

If this unit is not operated for more than four hours, the 
power is automatically turned off.  
To restart the unit, turn on the POWER button.

In one of the following cases, the time counter is reset and 
immediately restarted.

A button has been operated on the operation panel.

• 

This unit has been externally operated through RS-232C 

• 

or GPI control.
Video signal is being input to a connector of this unit.

• 

To set the time until the screen saver is 
executed

Operate the rotary 3 control to select the time until the 
screen saver is executed to protect the LCD. 
The time can be set in the range of 10 to 60 in units of 10 
minutes. If [SCRN SAVE] is set to [OFF], the screen saver is 
not displayed.
The factory default setting is [10].

The screen saver is disabled when any part on the 
operation panel or the external controller is operated.

 NOTE

In 3D mode, unnecessary buttons including those for 
operating patterns and events are disabled. Even if any of 
those buttons is pressed, the screen saver is not disabled. 
To disable the screen saver, operate a button available in 3D 
mode including source selector buttons.

To display the hours meter on a new 
screen

Set [HOURS M.] to [ON] using the rotary 5 control, and 
press the   key.
The accumulated value of the energization time is 
displayed.  
The screen is closed when the   key is pressed again.

Chapter 4 

Operating Environment Setting

This chapter describes the settings for the operating environment of this unit, external synchronization, and external 
equipment.

Setting the System

Содержание AG-HMX100

Страница 1: ...that Operating Instructions Vol 2 describes advanced operations of the digital AV mixer For instructions on basic operations of the digital AV mixer refer to Operating Instructions Vol 1 printed docu...

Страница 2: ...Event Memory 21 Chapter 3 Switching 3D Video Example Connections with 3D Camera 22 System for Monitoring Program Output as L channel and Multi view Output as R Channel Simultaneous Display of L and R...

Страница 3: ...the patterns shown as Basic in List of Transition Patterns at the back of this document and their related patterns Rotary 1 Rotary 2 Rotary 3 Rotary 4 Rotary 5 OFF COMP SLIDE MULTI BLINDS MODIFY OFF S...

Страница 4: ...shadow to the pattern TRAIL Leaves trails of the moving pattern Select OFF to apply no effect Rotary 1 Rotary 2 Rotary 3 Rotary 4 Rotary 5 OFF SHADOW TRAIL EFFECTS OFF If SHADOW is selected Rotary 1 R...

Страница 5: ...r the setting value the higher the transparency When 0 is set the key disappears entirely becomes transparent The key registered in the direct patterns can be individually set for each pattern CROP fo...

Страница 6: ...in the menu appears when the color is not stored The color can be stored any number of times by pressing the key However the color data is overwritten each time it is stored To cancel the stored colo...

Страница 7: ...NCE KEY External Key EXT KEY Luminance keying is a function for creating a key with the specific brightness luminance of one image as the reference and keying to another image External keying is a fun...

Страница 8: ...gs can be made in the same way as in the EFFECTS submenu of the TRANSITION menu page 4 BORDER Settings can be made in the same way as in the BORDER submenu of the CHROMA KEY menu page 7 Setting the Ti...

Страница 9: ...r the selected pattern the message OK appears In this case press the key again to display the Key Learn Editing screen NOTE When key learn that is already registered in a pattern is edited the setting...

Страница 10: ...essage OK appears press the key again To cancel the pattern deletion press the key while holding down the SHIFT key When CLR is selected the currently selected key learn pattern is deleted When ALL CL...

Страница 11: ...VI I and TITLE still picture saved in title memory To select the key fill video Use the rotary 3 control BODMAT border matte can also be selected as well as SDI1 to SDI4 HDMI1 HDMI2 VIDEO1 VIDEO2 DVI...

Страница 12: ...tton The factory default setting is OFF Operate the rotary 3 control to set the direction of the slide in operation when DSK is ON The factory default setting is OFF Operate the rotary 4 control to se...

Страница 13: ...t that time the joystick rotary Z control settings and 3D display area of the setting screen page Vol 1 20 shows the PB PR and C GAIN values To set the color saturation to 0 temporarily Press the CENT...

Страница 14: ...nd 202 patterns DEFOCUS The video effect of purposely displacing the focus can be set to perform fantastical rendering or get the attention of viewers The following diagram shows an example of the def...

Страница 15: ...he factory default setting is 1 A numeric value such as 4 is set to specify the number of screens into which the screen is divided for strobe image display When is given to a numeric value The strobe...

Страница 16: ...2 control The factory default setting is OFF Set LEVEL in the range of 0 to 7 using the rotary 3 control The factory default setting is 4 This level setting is applied to No 1034 211 transition patter...

Страница 17: ...e channel to be emphasized L Left channel R Right channel L R Both left and right channels The factory default setting is L Set BALANCE in the range of L7 to 0 and 0 to R7 using the rotary 5 control B...

Страница 18: ...ault setting is OFF Select UP or DOWN for PITCH to specify whether to increase or decrease the sound pitch using the rotary 4 control The factory default setting is UP Set LEVEL in the range of 0 to 1...

Страница 19: ...VE RECALL ALL CLR EMPTY FILE 1 SAVE To select a file to operate Select the file number from 1 to 8 using the rotary 2 control When the file of the selected number is null EMPTY is shown When the file...

Страница 20: ...decrement the value using the or key respectively 3 To call the settings press the key The EVENT RECALL button goes off The selected event is called and the settings of the setting screen are changed...

Страница 21: ...Settings and Effects Clearing All the Event Memory 1 Press the EVENT RECALL button The button is lighted 2 Press the period key twice is displayed instead of an event number 3 Press the key while hol...

Страница 22: ...the input sources to two units of AG HMX100P HMX100E NOTE The 3D video production systems shown below cannot perform preview output AUX output can be used only for input source check Of the video swit...

Страница 23: ...ignals in the horizontal direction Program output and multi view output are the same signal 3D mode is set to MODE2 page 25 DVI D OUT PGM DVI D OUT MULTI VIEW SDI IN 1 L R SDI IN 2 SDI IN 3 SDI IN 4 A...

Страница 24: ...audio output from the master unit In order to synchronize two units of AG HMX100P HMX100E be sure to connect a signal generator and input the same synch signal SDI IN 2 DVI D OUT PGM RS 232C RS 232C G...

Страница 25: ...lave Setting Screen in 3D Mode If the 3D mode is set to other than OFF 3D appears in the Joystick Rotary Z Control Settings and 3D Display Area The same content as in 2D mode is displayed in the area...

Страница 26: ...In one of the following cases the time counter is reset and immediately restarted A button has been operated on the operation panel This unit has been externally operated through RS 232C or GPI contr...

Страница 27: ...vely 2 Press the key with displayed The message OK appears 3 Press the key again to fix the change To cancel the change press the key while holding down the SHIFT key If other menu screen is displayed...

Страница 28: ...y 5 0 60 0 300 1 0 20 0 31 1200 1500 2 1500 1800 3 1500 1800 4 HPOSI PC2 30 1000 CLOCK VPOSI 10 PHASE 16 1 When PC1 is 1080 50 or 1080 60 2 When PC1 is XGA 3 When PC1 is WXGA 4 When PC1 is SXGA Set H...

Страница 29: ...llowing speeds can be selected Setting Baud Rate 9 6 k 9600 bps 19 2 k 19200 bps 38 4 k 38400 bps 115 2 k 115200 bps The factory default setting is 9 6 k To set the data length Set DATA L to 8BITS or...

Страница 30: ...e output from the PGM connector of the SDI and DVI D connectors to projectors without shutter function NOTE If the communication is interrupted during control of the projector operational consistency...

Страница 31: ...s 5 Key Learn 5 Pattern edge 5 BASIC PATTERN KEY menu 5 BORDER 7 8 9 B PRESET bus source selector buttons 14 24 INT button 14 SHIFT button 14 SOURCE 1 5 2 6 3 7 4 8 buttons 14 B PRESET selector button...

Страница 32: ...9 G GEN LOCK 28 G L connector 15 16 18 24 28 GND terminal 15 GPI connector 15 26 GPI control of video effects 26 Gradation 29 H HDMI IN 1 2 connectors 15 17 18 HD video processing system configuration...

Страница 33: ...een 20 Setup 22 Operation screen 22 SETUP button 13 22 SETUP menu 22 26 Shadow SHADOW 4 SHIFT key 14 27 28 30 32 33 4 9 10 13 15 SOURCE 1 5 2 6 3 7 4 8 faders 14 27 Startup mode 22 Still 15 STILL butt...

Страница 34: ...R O R O R O R O R O R O R O R O R O R O R O R O R O R O R O R O R O R O R O R O R O R O R O R O R O R O R O R O R O R O R A O R XY A O R XY A O R XY A O R XY A O R XY A O R XY O R O R O R O R O R O R...

Страница 35: ...us H Mirror V Mirror 206 1023 207 1030 208 1031 HV Mirror Nega YC Nega Y 209 1032 210 1033 211 1034 Nega C Mono Paint Shutter 1 4 STILL STILL STILL STILL 223 1091 224 1092 225 1093 226 1094 O R O R O...

Страница 36: ...000 9001 9002 Key Learn1 Key Learn2 Key Learn3 9003 9004 9005 Key Learn4 Key Learn5 Key Learn6 9006 9007 9008 Key Learn7 Key Learn8 Key Learn9 9009 Key Learn10 9010 9011 9012 Key Learn11 Key Learn12 K...

Страница 37: ...waste in accordance with national legislation For business users in the European Union If you wish to discard electrical and electronic equipment please contact your dealer or supplier for further in...

Отзывы: