


ELE-22
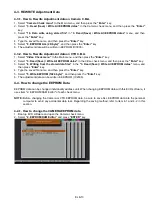
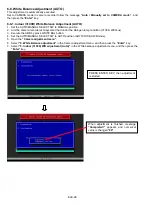
6-5. OISu Adjustment (AUTO)
This adjustment is automatically executed.
1. Open the
“Camera adjustment menu”
.
2. Select
“6. OISu adjustment (Auto)”
in the Camera adjustment menu, and then press the
“Enter”
key.
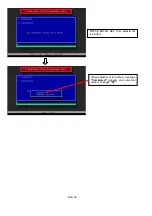
3. Set to CAMERA mode in camera recorder follow the message
“Auto / Manually set to CAMERA mode.”
, and
then press the
“Enter”
key.
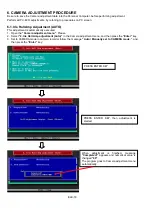
PRESS ENTER KEY.
PRESS ENTER KEY, then adjustment is
started.
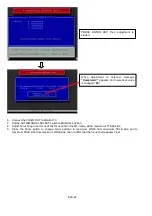
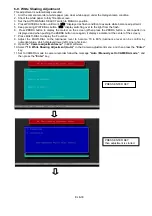
When adjustment is finished, message
“Completed!”
appears and numerical value
is changed
“00”
.
The program goes to Camera adjustment
menu automatically.
6.
6.
6.
NOTE:
You will hear a tapping sound, this is
OK.
Содержание AG-DVC30P
Страница 2: ...folder Go to Appendix List 2 ...
Страница 3: ...3 ...
Страница 4: ...4 ...
Страница 9: ...9 ...
Страница 31: ... 3 ...
Страница 32: ... 4 AG DVC30E ...
Страница 33: ... 5 ...
Страница 34: ... 6 AG MYA30G ...
Страница 36: ... 8 AG DVC30P ...
Страница 37: ... 9 AG DVC30E ...
Страница 38: ... 10 ...
Страница 39: ... 11 AG MYA30G ...
Страница 40: ...FCD0403NMHK141E480 ...
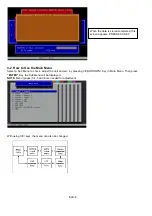
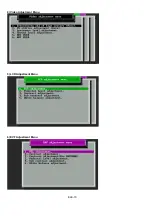
Страница 93: ...ELE 9 3 3 Introduction of the Sub Menu 1 Camera Check Menu 2 Video Check Menu 3 Camera Adjustment Menu ...
Страница 94: ...ELE 10 4 Video Adjustment Menu 5 LCD Adjustment Menu 6 EVF Adjustment Menu ...
Страница 155: ...LCD PARTS ASSEMBLY MPL 5 1 2 4 3 101 104 101 102 102 6 7 8 9 5 E23 9 3 9 2 9 4 9 1 103 ...
Страница 230: ...ELE 9 3 3 Introduction of the Sub Menu 1 Camera Check Menu 2 Video Check Menu 3 Camera Adjustment Menu ...
Страница 231: ...ELE 10 4 Video Adjustment Menu 5 LCD Adjustment Menu 6 EVF Adjustment Menu ...
Страница 276: ...SCHEMATIC DIAGRAMS NOTE BE SURE TO MAKE YOUR ORDERS OF REPLACEMENT PARTS ACCORDING TO PARTS LIST SECTION8 ...
Страница 335: ...LCD PARTS ASSEMBLY MPL 5 1 2 4 3 101 104 101 102 102 6 7 8 9 5 E23 9 3 9 2 9 4 9 1 103 ...


