background image

72

VM-Series 

Deployment

 Guide

Create Policies

  Set Up a VM-Series NSX Edition Firewall

Define Policies on the NSX Manager

In order for the VM-Series firewall to secure the traffic, you must complete the following tasks: 

Set Up Security Groups on the NSX Manager

Define Policies to Redirect Traffic to the VM-Series Firewall

Apply the Redirection Policies on the NSX Manager

Set Up Security Groups on the NSX Manager

A security group is a logical container that assembles guests across multiple ESXi hosts in the cluster. Creating 
security groups makes it easier to manage and secure the guests; to understand how security groups enable 
policy enforcement, see 

Policy Enforcement using Dynamic Address Groups

Before you apply the redirection policy, make sure to create policies on Panorama 
and push them to the VM-Series firewall, see 

Apply Policies to the VM-Series 

Firewall

.

The default policy on the VM-Series firewall is set to 

deny all 

traffic, which means 

that all traffic redirected to the VM-Series firewall will be dropped.

Set up Security Groups on the NSX Manager

Step 1

Select 

Networking and Security > Service Composer > Security Groups

, and add a 

New Security Group

.

Step 2

Add a 

Name

 and 

Description

. This name will display in the match criteria list when defining Dynamic Address 

Groups on Panorama. 

Step 3

Select the guests that constitute the security group. You can either add members dynamically using 

Define 

Dynamic Membership

 or statically using 

Select the Objects to Include

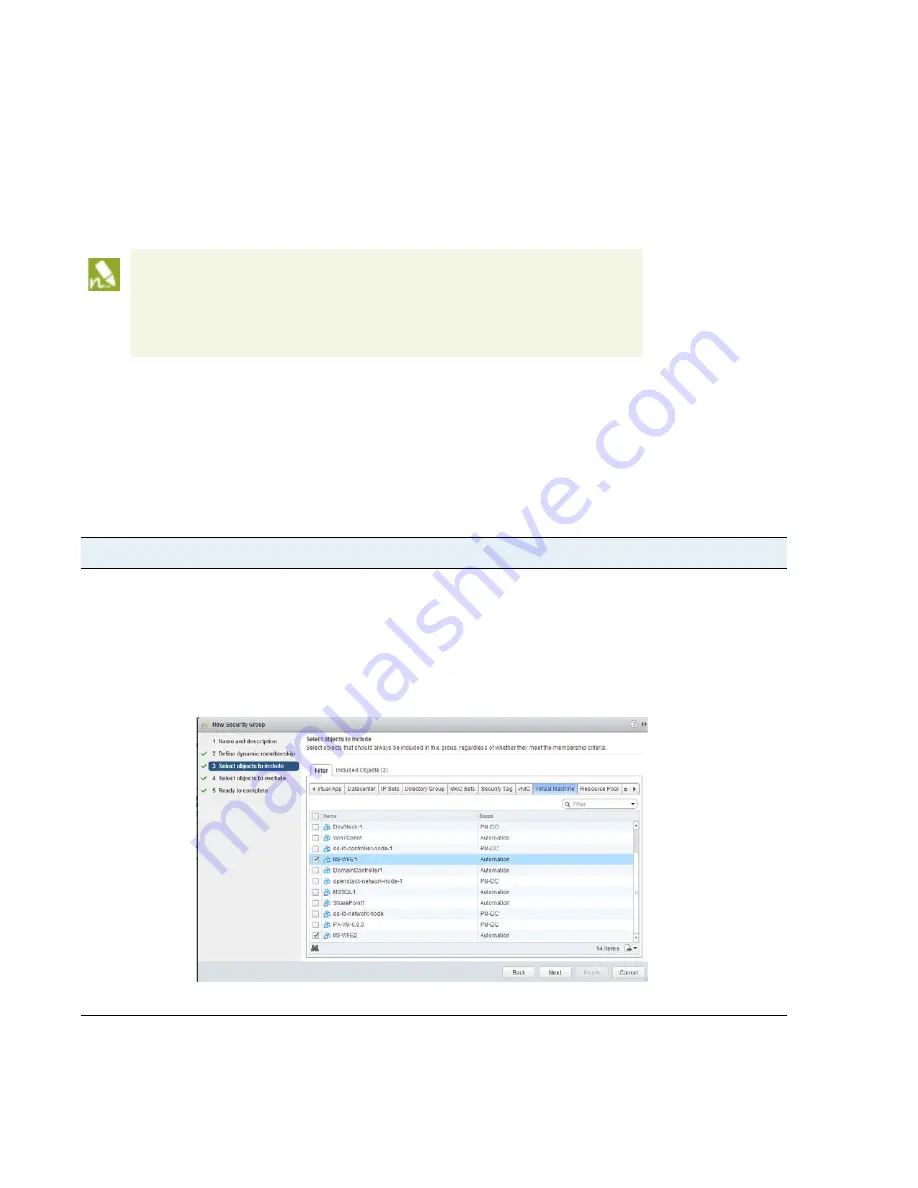
. In the following screenshot, the guests 

that belong to the security group are selected using the 

Select objects to include

 > 

Virtual Machine

 option.

Step 4

Review the details and click 

OK

 to create the security group.

Содержание VM series

Страница 1: ...Palo Alto Networks VM Series Deployment Guide PAN OS 6 0 ...

Страница 2: ...orks com documentation for access to the knowledge base complete documentation set discussion forums and videos https support paloaltonetworks com for contacting support for information on the support programs or to manage your account or devices For the latest release notes go to the software downloads page at https support paloaltonetworks com Updates SoftwareUpdates To provide feedback on the d...

Страница 3: ...mitations 11 Requirements 11 Limitations 12 Install a VM Series firewall on VMware vSphere Hypervisor ESXi 13 Provision the VM Series Firewall on an ESXi Server 13 Perform Initial Configuration on the VM Series on ESXi 16 Troubleshoot ESXi Deployments 17 Basic Troubleshooting 17 Installation Issues 17 Licensing Issues 19 Connectivity Issues 20 Set Up a VM Series Firewall on the Citrix SDX Server 2...

Страница 4: ... Components in the NSX Edition Solution Work Together 49 What are the Benefits of the NSX Edition Solution 55 VM Series NSX Edition Firewall Deployment Checklist 56 Create a Device Group and Template on Panorama 58 Register the VM Series Firewall as a Service on the NSX Manager 59 Deploy the VM Series Firewall 61 Enable SpoofGuard 62 Define an IP Address Pool 64 Specify the Port Groups from Which ...

Страница 5: ...virtualized form of the Palo Alto Networks next generation firewall It is positioned for use in a virtualized or cloud environment where it can protect and secure east west and north south traffic VM Series Models VM Series Deployments License the VM Series Firewall Monitor Changes in the Virtual Environment ...

Страница 6: ... Series firewall The Enterprise version is available in multiples of 25 For example the orderable SKU PAN VM 100 ENT has a single auth code that allows you to register 25 instances of the VM 100 Each model of the VM Series firewall is licensed for a maximum capacity Capacity is defined in terms of the number of sessions rules security zones address objects IPSec VPN tunnels and SSL VPN tunnels tha...

Страница 7: ... Series Firewall on an ESXi Server VM Series for VMware NSX The VM 1000 HV is deployed as a network introspection service with VMware NSX and Panorama This deployment is ideal for east west traffic inspection and it also can secure north south traffic For details see Set Up a VM Series NSX Edition Firewall VM Series for Citrix SDX VM 100 VM 200 VM 300 or VM 1000 HV is deployed as guest virtual mac...

Страница 8: ...hout VMware NSX 5 0 5 1 and 5 5 PAN OS for VM Series Base Images For example the download able image name reads as PA VM 6 0 0 zip VM 100 VM 200 VM 300 VM 1000 HV VM Series for VMware NSX vSphere with VMware NSX and Panorama 5 5 PAN OS for VM Series NSX Base Images For example the download able image name reads as PA VM NSX 6 0 0 zip VM 1000 HV VM Series for Citrix SDX SDX version XenServer versio...

Страница 9: ...you do not have an existing support account you must provide your sales order number or customer ID and the capacity auth code to register and create an account on the support portal After your account is verified and the registration is complete you will be able to log in and download the software package required to install the VM Series firewall For details on activating the license for your de...

Страница 10: ...ied and the registration is complete you will be able to log in and download the software package required to install the VM Series firewall Register the VM Series Firewall 1 Log in to https support paloaltonetworks com with your account credentials 2 Select Assets and click Add VM Series Auth Codes 3 In the Add VM Series Auth Code field enter the capacity auth code you received by email and click...

Страница 11: ... environment use a unique name when redeploying the firewall Using a unique name ensures that the UUID assigned to the firewall is not the same as that assigned to the deleted instance of the firewall A unique UUID is required to complete the licensing process without any problems Activate the License for the VM Series Firewall Standalone Version Activate the License for the VM Series NSX Edition ...

Страница 12: ...et access 1 Select Device Licenses and click the Activate Feature using Auth Code link 2 Click Download Authorization File and download the authorizationfile txt on the client machine 3 Copy the authorizationfile txt to a computer that has access to the Internet and log in to the support portal Click My VM Series Auth Codes link and select the applicable auth code from the list and click the Regis...

Страница 13: ... license is mapped to a specific instance of the VM Series firewall and cannot be modified In order to apply a new capacity license to a firewall that has been previously licensed you need to clone the existing fully configured VM Series firewall During the cloning process the firewall is assigned a unique UUID and you can therefore apply a new license to the cloned instance of the firewall Use th...

Страница 14: ...ndicate that you are copying and not moving the firewall Step 3 Power on the new instance of the VM Series firewall 1 Launch the serial console of the firewall on the vSphere SDX web interface and enter the following command show system info 2 Verify that the serial number is unknown the firewall has no licenses the configuration is intact Step 4 Register the new auth code on the support portal Se...

Страница 15: ... on a VMware Source Enable VM Monitoring to Track Changes on the Virtual Network VM Information sources provides an automated way to gather information on the Virtual Machine VM inventory on each monitored source host the sources that the firewall can monitor include VMware ESXi and vCenter Server As new virtual machines guests are deployed the firewall monitors 16 metadata elements in the VMware ...

Страница 16: ...ng Select the Type to indicate whether the source is a VMware ESX i server or a VMware vCenter server Add the credentials Username and Password to authenticate to the server specified above Use the credentials of an administrative user to enable access Optional Modify the Update interval to a value between 5 600 seconds By default the firewall polls every 5 seconds The API calls are queued and ret...

Страница 17: ...ust however be used in policy and the policy must be committed on the device The IP address and associated tags for an entity can be dynamically registered on the firewall using the XML API or the VM Monitoring agent on the firewall each registered IP address can have up to 32 tags Within 60 seconds of the API call the firewall registers the IP address and associated tags and automatically updates...

Страница 18: ...group are populated on the firewall Use dynamic address groups in policy This example uses two different security policies A security policy for all Linux servers that are deployed as FTP servers this rule matches on dynamically registered tags A security policy for all Linux servers that are deployed as web servers this rule matches on a dynamic address group that uses static and dynamic tags Val...

Страница 19: ... ftp_server matches on the guest operating system Linux 64 bit and annotated as ftp guestos Ubuntu Linux 64 bit and annotation ftp web servers matches on two criteria the tag black or if the guest operating system is Linux 64 bit and the name of the server us Web_server_Corp guestos Ubuntu Linux 64 bit and vmname WebServer_Corp or black Step 3 Use dynamic address groups in policy View the tutorial...

Страница 20: ...amic address group are populated on the firewall 1 Select Policies Security and select the rule 2 Select the drop down arrow next to the address group link and select Inspect You can also verify that the match criteria is accurate 3 Click the more link and verify that the list of registered IP addresses is displayed Policy will be enforced for all IP addresses that belong to this address group and...

Страница 21: ...itor VM Information Sources the following metadata elements or attributes are monitored on each VMware source UUID Name Guest OS VM State the power state can be poweredOff poweredOn standBy and unknown Annotation Version Network Virtual Switch Name Port Group Name and VLAN ID Container Name vCenter Name Data Center Object Name Resource Pool Name Cluster Name Host Host IP address ...

Страница 22: ...18 VM Series Deployment Guide Monitor Changes in the Virtual Environment About the VM Series Firewall ...

Страница 23: ...i host setup and configuration and virtual machine guest deployment If you would like to automate the process of deploying a VM Series firewall you can create a gold standard template with the optimal configuration and policies and use the vSphere API and the PAN OS XML API to rapidly deploy new VM Series firewalls in your network For more information see the article VM Series DataCenter Automatio...

Страница 24: ...virtual network If you have designed your network such that one or more ESXi hosts has a group of virtual machines that belong to the internal network a group that belongs to the external network and some others to the DMZ you can deploy a VM Series firewall to safeguard the servers in each group If a group or virtual network does not share a virtual switch or port group with any other virtual net...

Страница 25: ...p to eight more vmNICs for data traffic For additional interfaces use VLAN Guest Tagging VGT on the ESXi server or configure subinterfaces on the firewall If you are deploying the VM Series firewall using layer 2 virtual wire or tap interfaces you must enable promiscuous mode on the port group of the virtual switch to which the data interfaces on the firewall are attached If promiscuous mode is no...

Страница 26: ... with no stateful failover High Availability HA Link Monitoring is not supported on VM Series firewalls on ESXi Use Path Monitoring to verify connectivity to a target IP address or to the next hop IP address Up to 10 total ports can be configured this is a VMware limitation One port will be used for management traffic and up to 9 can be used for data traffic Only the vmxnet3 driver is supported Vi...

Страница 27: ...ension is for the virtual disk image file that contains the virtualized version of the firewall Provision the VM Series Firewall on an ESXi Server Perform Initial Configuration on the VM Series on ESXi Provision the VM Series Firewall on an ESXi Server Use these instruction to deploy the VM Series firewall on a standalone ESXi server For deploying the VM Series NSX edition firewall see Set Up a VM...

Страница 28: ...tual standard switch from the vSphere Client by navigating to Home Inventory Hosts and Clusters 2 Click the Configuration tab and under Hardware click Networking For each VM Series firewall attached virtual switch click on Properties 3 Highlight the virtual switch and click Edit In the vSwitch properties click the Security tab and set Promiscuous Mode MAC Address Changes and Forged Transmits to Ac...

Страница 29: ...ownloaded in Step 1 select the file and then click Next Review the templates details window and then click Next again 4 Name the VM Series firewall instance and in the Inventory Location window select a Data Center and Folder and click Next 5 Select an ESXi host for the VM Series firewall and click Next 6 Select the datastore to use for the VM Series firewall and click Next 7 Leave the default set...

Страница 30: ... netmask netmask default gateway gateway IP dns setting servers primary DNS IP where Firewall IP is the IP address you want to assign to the management interface netmask is the subnet mask gateway IP is the IP address of the network gateway and DNS IP is the IP address of the DNS server Step 4 Commit your changes and exit the configuration mode Enter commit Enter exit Step 5 Verify network access ...

Страница 31: ...resource consumption over time Installation Issues Issues with deploying the OVF The VM Series is delivered as a downloadable Open Virtualization Format OVF file The OVF is downloaded as a zip archive that is expanded into three files If you are having trouble deploying the OVF make sure the three files are unpacked and present and if necessary download and extract the OVF again The ovf extension ...

Страница 32: ...wall Also verify that the interface is VMXnet3 setting the interface type to any other format will cause the firewall to boot into maintenance mode How do I modify the base image file for the VM 1000 HV license If you have purchased the VM 1000 HV license and are deploying the VM Series firewall in standalone mode on a VMware ESXi server or on a Citrix SDX server use these instructions to modify t...

Страница 33: ...VM Series firewall will result in a new firewall with an invalid license You will need a new auth code to activate the license on the newly deployed firewall You must apply the capacity auth code and a new support license in order to obtain full functionality support and software upgrades on the VM Series firewall Step 3 Change the number of virtual CPU cores allotted from 2 to 4 or 8 as desired f...

Страница 34: ...e sure that the interfaces are mapped correctly Network adapter 1 management Network adapter 2 Ethernet1 1 Network adapter 3 Ethernet1 2 For each virtual machine check the settings to verify the interface is mapped to the correct port group Verify that promiscuous mode is enabled for each port group or for the entire switch Since the dataplane PAN OS MAC addresses are different than the VMNIC MAC ...

Страница 35: ...oying the VM Series firewall in conjunction with the NetScaler VPX secures application delivery along with network security availability performance and visibility About the VM Series Firewall on the SDX Server System Requirements and Limitations Supported Deployments VM Series Firewall on Citrix SDX Install the VM Series Firewall on the SDX Server Secure North South Traffic with the VM Series Fir...

Страница 36: ... assumes that you are familiar with the networking and configuration on the NetScaler VPX In order to provide context for the terms used in this section here is a brief refresher on the NetScaler owned IP addresses that are referred to in this document NetScaler IP address NSIP The NSIP is the IP address for management and general system access to the NetScaler itself and for HA communication Mapp...

Страница 37: ...ing initial deployment because adding or removing interfaces to the VM Series firewall after initial deployment will cause the data interfaces Eth 1 1 and Eth 1 2 on the VM Series firewall to re map to the adapters on the SDX server Each data interface sequentially maps to the adapter with the lowest numerical value and this remapping can cause a configuration mismatch on the firewall Two vCPUs pe...

Страница 38: ...r has the following limitations Up to 24 total ports can be configured One port will be used for management traffic and up to 23 can be used for data traffic Jumbo frames are not supported Link aggregation is not supported For the supported deployments see Supported Deployments VM Series Firewall on Citrix SDX To deploy the firewall see Install the VM Series Firewall on the SDX Server ...

Страница 39: ...ure North South Traffic To secure north south traffic using a VM Series firewall on an SDX server you have the following options VM Series Firewall Between the NetScaler VPX and the Servers VM Series Firewall Before the NetScaler VPX VM Series Firewall Between the NetScaler VPX and the Servers The perimeter firewall gates all traffic in to the network All traffic permitted into the network flows t...

Страница 40: ...s the subnets SNIP 192 168 1 1 and 192 168 2 1 Based on your network configuration and default routes the routing on servers might need to be changed When you set up the VM Series firewall you must add a data interface for example eth1 1 and assign two IP addresses to the interface One IP address must be on the same subnet as the VIP and the other must be on the same subnet as the servers In this ...

Страница 41: ... enforce policy on traffic destined to the servers In this approach two data interfaces are created on the firewall and each belongs to a distinct zone The security policy is defined to allow traffic between the source and destination zones For details see Deploy the VM Series Firewall Using Layer 2 L2 or Virtual Wire Interfaces Topology After Adding the VM Series Firewall with L2 or Virtual Wire ...

Страница 42: ...er VPX Scenario 2 Secure East West Traffic VM Series Firewall on Citrix SDX The VM Series firewall is deployed along with two NetScaler VPX systems that service different server segments on your network or operate as termination points for SSL tunnels In this scenario the perimeter firewall secures incoming traffic Then the traffic destined to the DMZ servers flows to a NetScaler VPX that load bal...

Страница 43: ...l on the SDX Server Upload the Image to the SDX Server To provision the VM Series firewall you need to obtain the xva image file and upload it to the SDX server Upload the XVA Image to the SDX Server Step 1 Download and extract the base image zip file to a local computer 1 Go to https support paloaltonetworks com and download the VM Series Citrix SDX Base Image zip file 2 Unzip the base image zip ...

Страница 44: ...Configuration Palo Alto VM Series Instances 2 Click Add 3 Enter a name for the VM Series firewall 4 Select the xva image that you uploaded earlier This image is required to provision the firewall 5 Allocate the memory additional disk space and the virtual CPUs for the VM Series firewall To verify resource allocation recommendations see Requirements 6 Select the network interfaces Use the managemen...

Страница 45: ... the VM Series Firewall Using L3 Interfaces Deploy the VM Series Firewall Using Layer 2 L2 or Virtual Wire Interfaces Deploy the VM Series Firewall Before the NetScaler VPX Using Virtual Wire Interfaces Deploy the VM Series Firewall Using L3 Interfaces To secure north south traffic this scenario shows you how to deploy the VM Series firewall as a L3 deployment the VM Series firewall is placed to s...

Страница 46: ...ing the VM Series Firewall The following table includes the tasks you must perform to deploy the VM Series firewall For firewall configuration instructions refer to the PAN OS Documentation The workflow and configuration on the NetScaler VPX is beyond the scope of this document for details on configuring the NetScaler VPX refer to the Citrix documentation ...

Страница 47: ...t Hop The static route defined here will be used to route traffic from the firewall to the NetScaler VPX 3 Select Network Interfaces Ethernet and then select the interface you want to configure 4 Select the Interface Type Although your choice here depends on your network topology this example uses Layer3 5 On the Config tab in the Virtual Router drop down select default 6 Select New Zone from the ...

Страница 48: ...caler VPX In this example this IP address is the source for all requests to the servers 5 In the Destination tab select Add in the Destination Address section and select the New Address link 6 Create a new address object that specifies the subnet of the web servers In this example this subnet hosts all the web servers that service the requests 7 In the Application tab select web browsing 8 In the ...

Страница 49: ...e it is sent back to the client For the topology before adding the VM Series firewall see Topology Before Adding the VM Series Firewall The following table includes the basic configuration tasks you must perform to deploy the VM Series firewall For firewall configuration instructions refer to the PAN OS documentation The workflow and configuration on the NetScaler VPX is beyond the scope of this d...

Страница 50: ...erface of the firewall 2 Select Network Interfaces Ethernet 3 Click the link for an interface for example ethernet 1 1 and select the Interface Type as Layer2 or Virtual Wire Virtual Wire Configuration Each virtual wire interface ethernet 1 1 and ethernet 1 2 must be connected to a security zone and a virtual wire To configure these settings select the Config tab and complete the following tasks a...

Страница 51: ...riptive name in the General tab 3 In the Source tab set the Source Zone to the client side zone you defined In this example select client 4 In the Destination tab set the Destination Zone to the server side zone you defined In this example select server 5 In the Application tab click Add to select the applications to which you want to allow access 6 In the Actions tab complete these tasks a Set th...

Страница 52: ...e client connection requests are destined to the VIP on the NetScaler VPX Note that you can deploy the VM Series firewall using L2 or L3 interfaces based on your specific needs Topology Before Adding the VM Series Firewall Topology after adding the VM Series firewall The following table includes the basic configuration tasks you must perform on the VM Series firewall For firewall configuration ins...

Страница 53: ...refore before you configure the data interfaces the VM Series you must remove the cable from the interface that connects the VPX to the client side traffic and attach it to the firewall so that all incoming traffic is processed by the firewall Step 3 Configure the data interfaces 1 Launch the web interface of the firewall 2 Select Network Interfaces Ethernet 3 Click the link for an interface for e...

Страница 54: ...a descriptive name in the General tab 3 In the Source tab set the Source Zone to the client side zone you defined In this example select client 4 In the Destination tab set the Destination Zone to the server side zone you defined In this example select server 5 In the Application tab click Add to select the applications to which you want to allow access 6 In the Actions tab complete these tasks a ...

Страница 55: ... When the VM Series firewall is deployed this example uses L3 interfaces the flow of traffic is as follows All incoming requests are authenticated and the SSL connection is terminated on the first instance of the NetScaler VPX For content that resides in the DMZ the NetScaler VPX initiates a new connection to the server to fetch the requested content Note that the north south traffic destined to t...

Страница 56: ... activity on your network because all requests are initiated from the NetScaler VPX you must enable HTTP Header insertion or the TCP Option for IP Insertion on the first instance of the NetScaler VPX Set up the VM Series Firewall to Secure East West Traffic Step 1 Install the VM Series Firewall on the SDX Server If you plan to deploy the VM Series firewall using virtual wire or L2 interfaces make ...

Страница 57: ...ve visibility and safe application enablement of all datacenter traffic including intra host virtual machine communications The following topics provide information about the VM Series NSX edition firewall VM Series NSX Edition Firewall Overview VM Series NSX Edition Firewall Deployment Checklist Create a Device Group and Template on Panorama Register the VM Series Firewall as a Service on the NSX...

Страница 58: ... a datacenter where infrastructure compute resources network and storage is virtualized using VMware NSX To keep pace with the changes in the agile SDDC the NSX edition of the VM Series firewall simplifies the process of deploying a Palo Alto Networks next generation firewall and continually enforcing security and compliance for the east west traffic in the SDDC For details on the VM Series NSX ed...

Страница 59: ... installed and registered with the vCenter server The NSX Manager is required to deploy the VM Series NSX edition firewall on the ESXi hosts within a ESXi cluster ESXi Server 5 5 ESXi is a hypervisor that enables compute virtualization Component Minimum Version Description PAN OS 6 0 The VM Series base image PA VM NSX 6 0 0 zip used for deploying the VM Series NSX edition firewall is PAN OS versio...

Страница 60: ...o connect to the NSX Manager the vCenter server the VM Series firewalls and the Palo Alto Networks update server The minimum system requirement for Panorama is as follows Two 8 Core vCPUs 2 2GHz use 3GHz if you have 10 or more firewalls 4GB RAM 16GB recommended if have 10 or more firewalls 40GB disk space To expand log capacity you must add a virtual disk or set up access to an NFS datastore For d...

Страница 61: ...eries firewall called the Palo Alto Networks NGFW service on the NSX Manager Panorama Panorama is used to register the NSX edition of the VM Series firewall as the Palo Alto Networks NGFW service on the NSX Manager Registering the Palo Alto Networks NGFW service on the NSX Manager allows the NSX Manager to deploy the NSX edition of the VM Series firewall on each ESXi host in the ESXi cluster Panor...

Страница 62: ...es no change to the virtual network topology The VM Series NSX edition only supports virtual wire interfaces In this edition ethernet 1 1 and ethernet 1 2 are bound together through a virtual wire and use the NetX dataplane API to communicate with the hypervisor Layer 2 or Layer 3 interfaces are neither required nor supported on the VM Series NSX edition and therefore no switching or routing actio...

Страница 63: ...n the NSX Manager The configuration includes the URL for accessing the VM Series base image that is required to deploy the VM Series NSX edition firewall the authorization code for retrieving the license and the device group to which the VM Series firewalls will belong The NSX manager uses this management plane connection to share updates on the changes in the virtual environment with Panorama 2 D...

Страница 64: ...l be steered to the VM Series firewall See Integrated Policy Rules for details 6 Receive real time updates from NSX Manager The NSX Manager sends real time updates on the changes in the virtual environment to Panorama These updates include information on the security groups and IP addresses of guests that are part of the security group from which traffic is redirected to the VM Series firewall See...

Страница 65: ...for enabling it safely on your network Rules defined on the NSX Firewall The rules for directing traffic from the guests on each ESXi host are configured on the NSX Manager The Service Composer on the NSX Manager allows you to define what kind of security protection such as firewall rules to be applied to the guests in the ESXi cluster To define the rules on the NSX Firewall you must first aggrega...

Страница 66: ...all consistently enforces policy see Policy Enforcement using Dynamic Address Groups Policy Enforcement using Dynamic Address Groups Unlike the other versions of the VM Series firewall the NSX edition does not use security zones as the primary traffic segmentation mechanism because both virtual wire interfaces belong to the same zone Instead the NSX edition uses Dynamic Address Groups to segment t...

Страница 67: ...ebFrontEnd Then in security policy you can use the Dynamic Address Groups as source or destination objects define the applications that are permitted to traverse these servers and push the rules to the VM Series firewalls Each time a guest is added or modified in the ESXi cluster or a security group is updated or created the NSX Manager uses the PAN OS REST based XML API to update Panorama with th...

Страница 68: ...notifies device groups in the service manager configuration on Panorama On each firewall all policy rules that reference these Dynamic Address Groups are updated at runtime Because the firewall matches on the security group tag to determine the members of a Dynamic Address Group you do not need to modify or update the policy when you make changes in the virtual environment The firewall matches the...

Страница 69: ...ch ESXi host has an instance of the firewall the traffic does not need to traverse the network or be backhauled for inspection and consistent enforcement of policies Tighter Integration Between Virtual Environment and Security Enforcement for Dynamic Security Dynamic Address Groups maintain awareness of changes in the virtual machines applications and ensure that security policy stays in tandem wi...

Страница 70: ...th your support account on the Support Portal For details see License the VM Series Firewall Step 2 Register Configure Panorama to Register the VM Series Firewall as a Service on the NSX Manager When registered the VM Series firewall is added to the list of network services that can be transparently deployed as a service by the NSX Manager The connection between Panorama and the NSX Manager is als...

Страница 71: ...with potential security impact and translate them into secure application enablement policies Refer to the Panorama Administrator s Guide for more information Step 5 Upgrade the software version When upgrading the VM Series NSX edition firewalls you must first upgrade Panorama before upgrading the firewalls To upgrade the firewalls see Upgrade the PAN OS Software Version NSX Edition The network in...

Страница 72: ...strator s Guide for instructions on setting up Panorama Create a Device Group and a Template on Panorama Step 1 Log in to the Panorama web interface Using a secure connection https from a web browser log in using the IP address and password you assigned during initial configuration https IP address Step 2 Add a device group 1 Select Panorama Device Groups and click Add 2 Enter a unique Name and a ...

Страница 73: ...s the VM Series firewall as a service 4 Enter the NSX Manager URL IP address or FQDN at which to access the NSX Manager 5 Enter the NSX Manager Login credentials username and password so that Panorama can authenticate to the NSX Manager Step 3 Specify the location of the web server that hosts the OVF file Extract and save both the ovf and vmdk files to the same directory Both the files are require...

Страница 74: ...the Device Group that the firewalls belong to All the firewalls that are deployed using the authorization code defined in Step 4 belong to the specified Template and Device Group during initial deployment If you would like to reassign the firewalls you must manually move the firewall into a separate template or device group after they are deployed Step 6 Set up notification to different device gro...

Страница 75: ...twork connection to the NSX Manager Not authorized The access credentials username and or password are incorrect Not registered The service service manager or service profile is unavailable or was deleted on the NSX Manager Out of sync The configuration settings defined on Panorama are different from what is defined on the NSX Manager No service No service profile Indicates an incomplete configura...

Страница 76: ...ter registering the VM Series firewall as a service Palo Alto Networks NGFW on the NSX Manager complete the following tasks on the NSX Manager Enable SpoofGuard Define an IP Address Pool Specify the Port Groups from Which to Redirect Traffic Prepare the ESXi Host for the VM Series Firewall Deploy the Palo Alto Networks NGFW Service ...

Страница 77: ...virtual machine will be blocked until you inspect and approve the change in IP address in the NSX SpoofGaurd interface Configure the NSX firewall rules to block non IP L2 traffic that cannot be steered to the VM Series firewall vCenter uses VMware Tools to learn the IP address es of each guest If VMware Tools is not installed on some of your guests see Steer Traffic from Guests that are not Runnin...

Страница 78: ... Up a VM Series NSX Edition Firewall Step 2 Select the IP protocols to allow 1 Select Networking and Security Firewall Ethernet 2 Add a rule that allows ARP IPv4 and IPv6 traffic 3 Add a rule that blocks everything else Enable SpoofGuard and Block Non IP L2 Traffic ...

Страница 79: ...ewall the first available IP address from this range is assigned to the management interface of the firewall Define an IP Address Pool Step 1 In the Networking Security Inventory select the NSX Manager and double click to open the configuration details of the NSX Manager Step 2 Select Manage Grouping Objects IP Pools Step 3 Click Add IP Pool and specify the network access details requested in the ...

Страница 80: ...ch occurs for the traffic the traffic is redirected to the VM Series firewall Select the Port Groups from which to Redirect Traffic to the Palo Alto Networks NGFW Step 1 Select Networking and Security Service Definitions and double click the Palo Alto Networks NGFW service Step 2 Click the Palo Alto NetworksNGFW GlobalInstance link to view the profile for the service instance Step 3 Click the Palo...

Страница 81: ...eploy the VM Series firewall Prepare the ESXi Hosts for the VM Series Firewall 1 On the NSX Manager select Networking and Security Installation Host Preparation 2 Click Install and verify that the installation status is successful As new ESXi hosts are added to a cluster this process is automated and the necessary NSX components are automatically installed on each guest on the ESXi host 3 If the I...

Страница 82: ...t the Datacenter and the cluster s on which the service will be deployed One instance of the firewall will be deployed on each host in the selected cluster s Step 4 Select the datastore from which to allocate disk space for the firewall Select one of the following options depending on your deployment If you have allocated shared storage for the cluster select an available shared datatore If you ha...

Страница 83: ...a while click the More tasks link on vCenter to monitor the progress of the installation If the installation of VM Series fails the error message is displayed on the Installation Status column You can also use the Tasks tab and the Log Browser on the NSX Manager to view the details for the failure and refer to the VMware documentation for troubleshooting steps 4 Verify that the firewall is success...

Страница 84: ...vice Group will display the list of devices the devices will not display in Panorama Managed Devices Step 10 Verify that the capacity license is applied and apply any additional licenses that you have purchased At a minimum you must activate the support license on each firewall 1 Select Panorama Device Deployment Licenses to verify that the VM Series capacity license is applied 2 To apply addition...

Страница 85: ...how to create policies on the NSX Manager to redirect traffic to the VM Series firewall and how to create policies on Panorama and apply them on the VM Series firewall so that the VM Series firewall can enforce policy on the traffic that is redirected to it Define Policies on the NSX Manager Apply Policies to the VM Series Firewall ...

Страница 86: ...ke sure to create policies on Panorama and push them to the VM Series firewall see Apply Policies to the VM Series Firewall The default policy on the VM Series firewall is set to deny all traffic which means that all traffic redirected to the VM Series firewall will be dropped Set up Security Groups on the NSX Manager Step 1 Select Networking and Security Service Composer Security Groups and add a...

Страница 87: ... created earlier Palo Alto Networks profile 1 in this workflow This profile specifies the networks port groups from which the firewall receives data traffic It will perform network introspection services on the port specified in the profile Step 6 Use the Change link under Source and Destination to specify the direction of flow of traffic that requires network introspection Either the source or de...

Страница 88: ...ger as well as on the VM Series firewall and Panorama The default policy on the VM Series firewall is set to deny all traffic which means that all traffic redirected to the VM Series firewall will be dropped To create policies on Panorama and push them to the VM Series firewall see Apply Policies to the VM Series Firewall To apply the redirection policies see Apply the Security Policies on the NSX...

Страница 89: ...policies on the VM Series firewalls To manage centralized policy you must first create Dynamic Address Group s that match on the name of the security group s you defined on the NSX Manager Then you attach the Dynamic Address Group as a source or destination address in security policy and push it to the firewalls the firewalls can dynamically retrieve the IP addresses of the virtual machines that a...

Страница 90: ...escription for the address group 5 Select Type as Dynamic 6 Click Add Match Criteria Select the And or Or operator and select the next to the security group name s to match against The security groups that display in the match criteria dialog are derived from the groups you defined in the Service Composer on the NSX Manager Only the security groups that are referenced in the security policies and ...

Страница 91: ...n this example we select an address group the Dynamic address group you created in Step 1 above 5 Select the Application to allow In this example we create an Application Group that includes a static group of specific applications that are grouped together a Click Add and select New Application Group b Click Add to select the application to include in the group In this example we select the follow...

Страница 92: ...at enforces policy 1 From Panorama switch device context to launch the web interface of a firewall to which you pushed policies 2 On the VM Series firewall select Policies Security and select a rule 3 Select the drop down arrow next to the address group link and select Inspect You can also verify that the match criteria is accurate 4 Click the more link and verify that the list of registered IP ad...

Страница 93: ...rewall is to apply the redirection policies to the security groups on the NSX Manager Apply the Security Policies on the NSX Manager 1 Select Networking and Security Service Composer Security Policies 2 Select the security policy and click Apply Security Policy and select the security groups to which the rules must be pushed The rules are applied to each ESXi host included in the selected security...

Страница 94: ...nation object in an NSX distributed firewall rule in Step 4 below 1 Select NSX Managers Manage Grouping Objects IP Sets 2 Click Add and enter the IP address of each guest that does not have VMware tools installed and needs to be secured by the VM Series firewall Use commas to separate individual IP addresses IP ranges or subnets are not valid Step 2 Verify that SpoofGaurd is enabled If not enabled...

Отзывы: