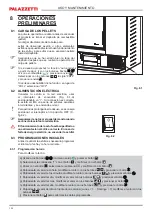
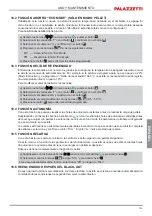
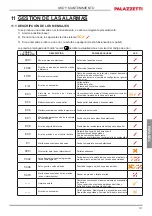
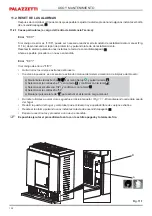
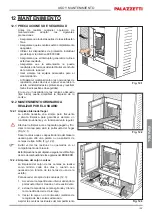
background image

129

ESP

AÑOL

USO Y MANTENIMIENTO

7.2 PARÁMETROS 

DE 

FUNCIONAMIENTO

El funcionamiento de la estufa depende de los parámetros de Potencia, Ventilación y Temperatura programados 
por el usuario.

7.2.1  MODIFICACIÓN DE LA POTENCIA

/DSRWHQFLDGH¿QHODFDQWLGDGGHFDORUSURGXFLGDSRUODHVWXID\SRUORWDQWRLQFLGHGLUHFWDPHQWHWDPELpQHQ

los consumos.

3DUDPRGL¿FDUODSRWHQFLD

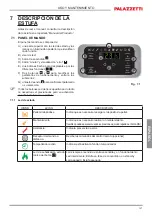
a) Usando los botones 


 ir al menú potencia   y pulsar el botón 

;

b) 

3DUSDGHDUiHOYDORUGHSRWHQFLDPRGL¿FDUHOYDORUFRQORVERWRQHV


 (1 mínimo,...,5 máximo). 

c)  Presionar el botón 

SDUDFRQ¿UPDUORVGDWRVSURJUDPDGRV

7.2.2 

0RGL¿FDFLyQGHODYHQWLODFLyQ

3DUDPRGL¿FDUORVYHORFLGDGGHODYHQWLODFLyQ

a) Usando los botones 


 ir al menú ventilación 

 y pulsar el botón 

 ;

b) 

&XDQGRHOYDORUGHYHQWLODFLyQSDUSDGHDUiPRGL¿FDUHOYDORUFRQORVERWRQHV


 ; 

‡

OFF “= exclue totalmente la turbina de aire y la estufa sólo funcionará por convección natural (sólo para 
los modelos que lo tienen);

‡

“1” mínima ,...,”5” máxima;

‡

“Auto” = funcionamiento automático (la estufa seleccionará en modo autónomo la velocidad del ventilador 
y la potencia de la estufa en base a la temperatura del ambiente);

‡

“Hi” = funcionamiento ultra rápido (el cual utilizar solo si hay necesidad de rescaldar rápidamente un 
ambiente);

c) Pinchar el botón 

SDUDFRQ¿UPDUORVGDWRVPRGL¿FDGRV

7.2.3 

0RGL¿FDFLyQGHODWHPSHUDWXUDDPELHQWH

0RGL¿FDQGRGLFKRYDORUVHGH¿QHODWHPSHUDWXUDTXHVHGHVHDDOFDQ]DUHQHODPELHQWHOHtGDGLUHFWDPHQWHSRU

una sonda situada en la estufa.

3DUDPRGL¿FDUHOYDORUGHODWHPSHUDWXUDGHVHDGD

a) Usando los botones 


 ir al menú temperatura 

 y pulsar el botón 

 ;

b) 

3DUSDGHDUiHOYDORUDFWXDOPRGL¿FDUORFRQORVERWRQHV


 ;

c)  Presionar el botón 

SDUDFRQ¿UPDUHOGDWRSURJUDPDGR

3XHGHFDPELDUHVWHYDORUVyORVLODHVWXIDVHKDLQVWDODGRHQODFRQ¿JXUDFLyQHVGHFLUVLQWHUPRVWDWRH[WHUQR

Содержание MULTIFIRE BIO 14

Страница 1: ...tion Wartung und Verwendung dieAnleitungen stets aufmerksam durchlesen Le présent manuel fait partie intégrante du produit Il est conseillé de lire attentivement les consignes avant l installation l entretien ou l utilisation du produit Este manual es parte integrante del producto Se recomienda leer detenidamente las instrucciones antes de la instalación el mantenimiento y el uso del producto IT M...

Страница 2: ...nous avez accordée en achetant notre produit et vous félicitions pour votre choix Q GH YRXV SHUPHWWUH GH SUR WHU DX PLHX GH YRWUH QRXYHDX SRrOH QRXV YRXV LQYLWRQV j suivre attentivement les instructions reportées dans cette notice Estimado Cliente Deseamos agradecerle por la preferencia que nos ha otorgado adquiriendo nuestro producto y lo felicitamos por su elección Para el mejor uso de su nueva ...

Страница 3: ...ELLAMENTO DELLA STUFA 6 2 ALLACCIAMENTO AGLI IMPIANTI 6 3 CONFIGURAZIONE INIZIALE 7 DESCRIZIONE DELLA STUFA 7 1 PANNELLO COMANDI 7 2 USO DEL PANNELLO COMANDI 7 3 PARAMETRI DI FUNZIONAMENTO 8 OPERAZIONI PRELIMINARI 8 1 CARICAMENTO PELLET 8 2 ALIMENTAZIONE ELETTRICA 8 3 IMPOSTAZIONI INIZIALI 9 UTILIZZO DELLA STUFA 9 1 PREMESSA 9 2 ACCENSIONE 9 3 MODIFICA DEI PARAMETRI 9 4 CAMBIO COMBUSTIBILE 9 5 SPE...

Страница 4: ...uite e collaudate seguendo le prescrizioni di sicurezza indicate nelle direttive europee di riferimento Questo manuale è indirizzato ai proprietari della stufa agli installatori utilizzatori e manutentori ed è parte integrante del prodotto In caso di dubbi sul contenuto e per ogni chiarimento contattare il costruttore o il servizio di assistenza tecnica autorizzato citando il numero del paragrafo ...

Страница 5: ...ETTI declina ogni responsabilità sia civile che penale diretta o indiretta dovuta a LQVWDOOD LRQH QRQ FRQIRUPH DOOH QRUPDWLYH vigenti nel paese ed alle direttive di sicurezza LQRVVHUYDQ D SDU LDOH R WRWDOH GHOOH LVWUX LRQL contenute nel manuale LQVWDOOD LRQH GD SDUWH GL SHUVRQDOH QRQ TXDOL FDWR H QRQ DGGHVWUDWR XVR QRQ FRQIRUPH DOOH GLUHWWLYH GL VLFXUH D PRGL FKH H ULSDUD LRQL QRQ DXWRUL DWH GDO C...

Страница 6: ...ti elettriche elettroniche e connettori 2 3 AVVERTENZE PER L UTILIZZATORE Predisporre il luogo d installazione della stufa secondoiregolamentilocali nazionaleedeuropei D VWXID HVVHQGR XQ SURGRWWR GD ULVFDOGDPHQWR SUHVHQWD GHOOH VXSHU FL HVWHUQH SDUWLFRODUPHQWH calde Per questo motivo si raccomanda la massima cautela durante il funzionamento in particolare Non toccare e non avvicinarsi al vetro del...

Страница 7: ... tipo di legna possiede carat WHULVWLFKH GLYHUVH FKH LQÀXHQ DQR DQFKH LO UHQGL mento della combustione L uso delle conifere pino abete è sconsigliato contengono elevate quantità di sostanze resinose che intasano velocemente la canna fumaria Non possono essere bruciati cascami corteccia legna trattata con vernici pannelli carbone ma teriali plastici in questi casi decade la garanzia dell apparecchi...

Страница 8: ...SVLFR VLFKH H GHYH YHUL FDUH FKH L GLVSRVLWLYL DQWLQIRUWXQLVWLFL individuali e personali siano integri e perfettamente funzionanti C deve indossare i guanti antinfortunistici D deve indossare scarpe antinfortunistiche E deve usufruire di utensili muniti di isolamento elettrico F deve accertarsi che l area interessata alle fasi di montaggio e di smontaggio sia libera da ostacoli 5 3 LUOGO DI INSTAL...

Страница 9: ...ta attraverso una SUHVD G DULD HVWHUQD DO ORFDOH VWHVVR J Se la parete posteriore della stufa è una parete esterna realizzare un foro per l aspirazione dell aria comburente ad una altezza dal suolo di circa 20 30 cm rispettando le indicazioni dimensionali riportate nella scheda tecnica del prodotto Esternamente deve essere messa una griglia di aerazione permanente non richiudibile in zone particol...

Страница 10: ...da fumo in proiezione orizzontale non maggiore di 2 metri Utilizzare sempre un raccordo con tappo di ispezione ad ogni variazione orizzontale e verticale del percorso di scarico fumi Ancorare le tubazioni con appositi collari alla parete Il raccordo di scarico dei fumi NON DEVE ESSERE collegato ad un camino utilizzato da altri generatori caldaie stufe caminetti ecc D VLVWHPL GL HVWUD LRQH G DULD F...

Страница 11: ... 1 1 Messa a terra È obbligatorio che l impianto sia provvisto di messa a terra e di interruttore differenziale in ottemperanza alle leggi vigenti Fig 6 2 Il condotto di scarico fumi deve essere dotato di proprio collegamento a terra 6 2 2 Installazione del pannello di controllo Il pannello di controllo del focolare può essere applicato su una parete in cartongesso predisponendo un foro 105x60mm e...

Страница 12: ...razione si rende necessaria anche nell eventualità che ci sia una interruzione di alimentazione elettrica o qualora l apparecchio venga spento manualmente Onde evitare sovrapposizioni di fasce orarie di funzionamento si consiglia di disattivare impostare su OFF il timer dell apparecchio 6 2 4 Canalizzazione dell aria calda L apparecchio è dotato di due collari ai quali collegare i tubi per la cana...

Страница 13: ...nfermare RSR DYHU PRGL FDWR OD FRQ JXUD LRQH SRWUHEEH DSSDULUH XQ PHVVDJJLR GL HUURUH GL FRPXQLFD LRQH SHU qualche secondo Ignorarlo e spegnere l apparecchio dall interruttore di sicurezza attendere qualche secondo e riaccenderla E POSSIBILE IMPOSTARE DUE DIVERSE CONFIGURAZIONI CONFIGURAZIONE 1 default PSRVWDUH WDOH FRQ JXUD LRQH SHU DFFHQGHUH H VSHJQHUH OD VWXID PDQXDOPHQWH R LQ PRGR SURJUDPPDWR ...

Страница 14: ...14 USO E MANUTENZIONE USO E MANUTENZIONE ...

Страница 15: ...la conferma del parametro o della selezione 7XWWL L WDVWL VRQR GL WLSR FDSDFLWLYR SHUWDQWR QRQ QHFHVVLWDQR GL XQD SUHVVLRQH SHU HVVHUH DWWLYDWL ma q VXI FLHQWH V RUDUQH OD VXSHU FLH 7 1 1 Led di stato ICONA AVVISO DESCRIZIONE Pellet in esaurimento Indica che è necessario ricaricare il serbatoio di pellet Manutenzione Indica la necessità di effettuare una manutenzione può apparire anche quando c è ...

Страница 16: ...ella quale la stufa si riaccende solo in FRQ JXUD LRQH 0 5 5 0 C 9 Temperatura antigelo Temperatura minima al di sotto della quale la stufa si DFFHQGH VROR LQ FRQ JXUD LRQH OFF 3 20 C 10 Blocco tastiera Imposta la modalità di blocco dei tasti OFF Lo Hi 11 Luminosità display Imposta il grado di luminosità del display OFF 1 5 12 Modalità display Imposta la modalità di visualizzazione dei dati OFF 1 ...

Страница 17: ...ORUH FRQ L WDVWL OFF esclude completamente la ventilazione e la stufa funzionerà solo a convezione naturale solo nei modelli dove previsto 1 minimo 5 massimo Auto funzionamento automatico la stufa imposterà la velocità in funzione della temperatura ambiente Hi funzionamento ultra veloce da utilizzare solo se c è la necessità di riscaldare velocemente un ambiente c Premere il tasto per confermare i...

Страница 18: ...unghi periodi di inutilizzo si consiglia di posizionare l interruttore in posizione di OFF 0 Fig 8 2 Assicurarsidinontoccareilpannellodicomandonel momento in cui viene data alimentazione alla stufa Il funzionamento della stufa è subordinato ad una corretta alimentazione elettrica In caso di mancanza di energia elettrica non accendere la stufa 8 3 IMPOSTAZIONI INIZIALI Prima di utilizzare la stufa ...

Страница 19: ...o 2 Viene visualizzata la temperatura letta dalla sonda ambiente 3 Viene visualizzata l ora corrente 4 Viene visualizzata l autonomia in ore prima di dover ricaricare il serbatoio se la funzione rifornimento è stata abilitata oppure viene visualizzato il simbolo se si è in funzionamento a legna e Premere il tasto per confermare i dati impostati 8 3 4 Impostazione volume E possibile impostare il li...

Страница 20: ... caricamento del pellet 3 accendere la legna 4 richiudere la portina La stufa regola automaticamente il fabbisogno di aria comburente PERICOLO Per accendere il fuoco non usare mai alcool benzina cherosene o altri combustibili liquidi Tenere gli stessi lontano dal fuoco Non usare zollette accendi fuoco derivanti dal petrolio o di origine chimica Utilizzare esclusivamente zollette accendi fuoco di t...

Страница 21: ...ustione della legna la stufa effettuerà un ciclo automatico di pulizia del braciere Per effettuare una nuova accensione si consiglia di attendere che la stufa si sia completamente raffreddata 9 5 2 Spegnimento a pellet Per spegnere la stufa quando è nello stato di funzionamento a pellet tenere premuto il tasto per qualche VHFRQGR O LFRQD D IRUPD GL DPPD VL VSHJQHUj Al termine della combustione la ...

Страница 22: ...mere il tasto i DPSHJJHUj LO YDORUH GHOOD WHPSHUDWXUD GHVLGHUDWD PRGL FDUQH LO YDORUH FRQ L WDVWL e j Premere il tasto per confermare i dati impostati 10 1 2 Assegnare i programmi ai giorni RQ TXHVWD IXQ LRQH q SRVVLELOH DVVHJQDUH QR D WUH SURJUDPPL GLYHUVL DG XQ GHWHUPLQDWR JLRUQR a Agendo sui tasti freccia portarsi sul menu setup e premere il tasto b Selezionare la password 7 con il tasto e conf...

Страница 23: ...sword 7 con il tasto e confermare con il tasto c Selezionare il sottomenu 8 e confermare con il tasto d DPSHJJHUj LO YDORUH PRGL FDUOR FRQ L WDVWL e 0 5 5 0 C e Premere il tasto per confermare il dato impostato 10 4 FUNZIONE AUTONOMIA Con questa funzione è possibile visualizzare le ore di autonomia rimanenti prima di dover rifare il carico di pellet Spostandosi con i tasti freccia sul simbolo il d...

Страница 24: ...re il tasto per confermare il dato impostato 10 9 ATTIVAZIONE MANUALE DEL SISTEMA DI CARICAMENTO PELLET All atto della prima accensione o qualora il serbatoio risulti completamente vuoto è possibile una volta caricato il pellet nel serbatoio attivare manualmente il sistema di caricamento in modo che il pellet ne riempia correttamente il circuito a Agendo sui tasti freccia portarsi sul menu setup e...

Страница 25: ... E105 Allarme sonda pellet Sonda pellet scollegata o difettosa E106 Malfunzionamento sonda di temperatura Sonda aria difettosa E107 Malfunzionamento sonda camera di combustione Sonda difettosa E108 Errore di sicurezza termica Problemi di surriscaldamento del serbatoio pellet E109 Errore di pressione o sul controllo dell aria Sistema di evacuazione fumi sporco Guarnizioni di tenuta logorate ULD FRP...

Страница 26: ... FRUSL HVWUDQHL GDO EUDFLHUH 6H TXHVWL VRQR ULPDVWL EORFFDWL q QHFHVVDULR SURFHGHUH FRQ O WWLYD LRQH 0DQXDOH GHO 6LVWHPD 0HFFDQLFR GL SXOL LD GHO UDFLHUH a Agendo sui tasti freccia portarsi sul menu setup e premere il tasto b Selezionare la password 7 con il tasto e confermare con il tasto c Selezionare il sottomenu 32 e confermare con il tasto d Selezionare la password 54 e Premere il tasto per a...

Страница 27: ...A ALL UTILIZZATORE 12 2 1 Pulizia interna del focolare La stufa necessita di una semplice ma frequente ed accurata pulizia per poter garantire sempre XQ HI FLHQWH UHQGLPHQWR HG XQ UHJRODUH funzionamento Eseguire la pulizia con la stufa spenta e fredda Agire sulla maniglia per aprire la portina del focolare Fig 12 1 Asportare la cenere che si deposita all interno del braciere servendosi di una pale...

Страница 28: ...r vetri di stufe Non pulire il vetro durante il funzionamento della stufa e non utilizzare spugne abrasive Non inumidire la guarnizione della portina perché potrebbe deteriorarsi 12 2 4 Pulizia della canna fumaria Da effettuarsi almeno due volte all anno inizio e metà stagione invernale e comunque ogni volta sia necessario Fig 12 8 Se esistono dei tratti RUL RQWDOL q QHFHVVDULR YHUL FDUH H DVSRUWD...

Страница 29: ... braciere X Condotto di evacuazione fumi X Ventilatori X a cura del centro di Assistenza Tecnica Autorizzato 13 DEMOLIZIONE E SMALTIMENTO La demolizione e lo smaltimento della stufa sono ad esclusivo carico e responsabilità del proprietario che dovrà agire in osservanza delle leggi vigenti nel proprio Paese in materia di sicurezza rispetto e tutela dell ambiente 6PDQWHOODPHQWR H VPDOWLPHQWR SRVVRQ...

Страница 30: ......

Страница 31: ...M CONNECTIONS 6 3 INITIAL CONFIGURATION 7 STOVE DESCRIPTION 7 1 CONTROL PANEL 7 2 USING THE CONTROL PANEL 7 3 OPERATING PARAMETERS 8 PRELIMINARY OPERATIONS 8 1 LOADING THE PELLETS 8 2 POWER SUPPLY 8 3 INITIAL SETTINGS 9 STOVE OPERATION 9 1 PREAMBLE 9 2 STARTING THE STOVE 9 3 MODIFYING THE PARAMETERS 9 4 CHANGING FUEL 9 5 SWITCHING OFF 9 6 OPERATION WITH ROOM THERMOSTAT PELLET OPERATION ONLY 9 7 OP...

Страница 32: ...ed in accordance with the safety requirements VSHFL HG E WKH UHOHYDQW XURSHDQ GLUHFWLYHV This manual is intended for owners installers users and maintenance personnel and is an integral part of the product If there are any doubts regarding the contents of this manual or for any other explanations please contact the manufacturer or an authorised service centre quoting the paragraph number in questi...

Страница 33: ... By providing this manual PALAZZETTI declines all liability both civil and criminal direct or indirect deriving from installation not in compliance with the standards in force in the country concerned and with safety directives partial or total failure to follow the instructions provided in this manual LQVWDOODWLRQ E XQTXDOL HG DQG XQWUDLQHG personnel use not in compliance with safety directives P...

Страница 34: ...NGS FOR THE USER Prepare the stove installation site in accordance with local national and European regulations As the stove is a heating appliance it has very hot outside surfaces For this reason maximum FDUH PXVW EH SDLG GXULQJ RSHUDWLRQ VSHFL FDOO do not touch or get too close to the glass door to avoid getting burned GR QRW WRXFK WKH ÀXH do not perform any type of cleaning do not remove the as...

Страница 35: ...usually contains high quantities of resinous VXEVWDQFHV WKDW TXLFNO EORFN WKH ÀXH The following cannot be burned wood scrap bark painted wood panels charcoal plastics in these cases the warranty on the appliance will be void IMPORTANT continuous and extended use of wood with a considerable aromatic oil content e g eucalyptus myrtle etc will cause a sudden deterioration in the internal components m...

Страница 36: ...sure that personal protective equipment is in perfectly working order C always wear safety gloves D always wear safety shoes E always use electrically insulated tools F make sure that the area being used for assembly and dismantling is clear of any obstacles 5 3 STOVE INSTALLATION SITE The enclosed Product technical details show the minimum clearances from combustible materials and objects express...

Страница 37: ...n opening to the outside from the room J If the wall behind of the stove is an outside wall make an opening for drawing in combustion air DURXQG FP DERYH WKH ÀRRU REVHUYLQJ WKH dimensions shown on the product data sheet A permanent non closable vent cover must be placed on the outside of the opening in especially windy areas or places exposed to bad weather install rain and wind protection element...

Страница 38: ...WR WKH ZDOO XVLQJ VSHFLDO FROODUV 7KH ÀXH JDV H KDXVW DWWDFKPHQW 0867 127 connected to a chimney used by other heat generators ERLOHUV VWRYHV UHSODFHV HWF air exhaust systems range hoods vents etc even if these are ducted Shut off or draught valves must not be used Combustion byproducts must be discharged through the roof 5 6 1 Discharge through roof using a traditional chimney 7KH FKLPQH XVHG WR ...

Страница 39: ...ced E WKH WHFKQLFDO VHUYLFH RU D TXDOL HG WHFKQLFLDQ to prevent any kind of risk 6 2 1 1 Earth 7KH V VWHP PXVW EH HDUWKHG DQG WWHG ZLWK D residual current circuit breaker in accordance with legislation in force Fig 6 2 7KH ÀXH PXVW KDYH LWV RZQ HDUWK FRQQHFWLRQ 6 2 2 Installing the control panel The stove s control panel can be mounted into a plasterboard wall by cutting a hole 105x60mm DQG WWLQJ ...

Страница 40: ...LQJ WKH WLPHU WKHUPRVWDW WKH VWRYH needs to be switched on manually while the timer thermostat is in call status This operation is also required in the event of power failures or if the stove is switched off manually To avoid overlapping the working time bands it s recommend to disable set to OFF the stove s timer 6 2 4 Ducting hot air The unit is equipped with two collars to which connect the pip...

Страница 41: ...WLRQ D FRPPXQLFDWLRQ HUURU PHVVDJH PD EH GLVSOD HG IRU D IHZ seconds Ignore this and switch the stove off using the safety switch wait a few seconds and switch it back on TWO DIFFERENT CONFIGURATIONS ARE AVAILABLE CONFIGURATION 1 default 6HW WKLV FRQ JXUDWLRQ WR VZLWFK WKH VWRYH RQ RU RII PDQXDOO RU LQ SURJUDPPHG PRGH The stove will module its power according to the room temperature read by the pr...

Страница 42: ...42 USE AND MAINTENANCE USE AND MAINTENANCE ...

Страница 43: ...the settings All the buttons are capacitive therefore the functions are activated without needing to press hard on the buttons rather by just touching the surface 7 1 1 Status leds ICON WARNING DESCRIPTION Pellets running out QGLFDWHV WKDW WKH SHOOHW KRSSHU QHHGV WR EH UH OOHG Maintenance Indicates the need to perform maintenance this may also be displayed when repeatedly pressing the ON button Se...

Страница 44: ... Difference in degrees from room temperature below which WKH VWRYH VZLWFKHV RQ DJDLQ RQO LQ FRQ JXUDWLRQ 0 5 5 0 C 9 Frost protection temperature Minimum temperature below which the stove switches on RQO LQ FRQ JXUDWLRQ OFF 3 20 C 10 Lock keypad Disables the buttons on the keypad OFF Lo Hi 11 Display brightness Sets display brightness OFF 1 5 12 Display mode Sets how the data is displayed OFF 1 4 ...

Страница 45: ... the value by pressing OFF the fan is completely excluded and the stove will work with natural convection only only on models where featured 1 minimun 5 maximum Auto automatic functioning the stove will set automatically the fan speed and the stove power according to the room temperature Hi ultrarapid functioning to use only in the case you need to quickly heat the room c press the button WR FRQ U...

Страница 46: ...sure not to touch the control panel while plugging the stove into the power supply If not using the appliance for an extended period the switch should be moved to position OFF 0 J The stove will only operate properly if it has the proper electrical power supply Do not operate the stove without electrical power 8 3 INITIAL SETTINGS The language current date and time need to be set before using the ...

Страница 47: ...ayed cyclically 2 The room probe temperature is shown 3 The current time is shown 4 7KH RSHUDWLQJ DXWRQRP LQ KRXUV EHIRUH KDYLQJ WR UH OO WKH KRSSHU LV VKRZQ If the function OOLQJ KDV EHHQ DFWLYDWHG LQ ZRRG UHG RSHUDWLRQ WKH symbol will be displayed e Press WR FRQ UP WKH VHWWLQJV 8 3 4 Setting the volume The volume of the buzzer can be set based on requirements a Use the arrow buttons to go to the...

Страница 48: ...be 3 ignite the wood 4 close the door again The stove automatically adjusts the combustion air intake DANGER 1HYHU XVH DOFRKRO SHWURO NHURVHQH RU RWKHU OLTXLG IXHOV WR LJQLWH WKH UH HHS VXFK VXEVWDQFHV DZD IURP WKH UH 1HYHU XVH SHWUROHXP RU FKHPLFDO EDVHG UH VWDUWHU EORFNV 2QH H FOXVLYHO HFRORJLFDO UH VWDUWHU EORFNV I D SHOOHW LJQLWLRQ SURJUDP KDV EHHQ VHW GXULQJ ZRRG UHG RSHUDWLRQ mode the stove ...

Страница 49: ...FOH Wait until the stove has completely cooled down before starting it again 9 5 2 Switching off in pellet mode To switch the stove off in pellet operating mode hold the EXWWRQ IRU D IHZ VHFRQGV WKH ÀDPH LFRQ ZLOO VZLWFK off KHQ WKH SHOOHWV KDYH QLVKHG EXUQLQJ WKH VWRYH ZLOO SHUIRUP DQ DXWRPDWLF EXUQ SRW FOHDQLQJ F FOH Wait until the stove has completely cooled down before starting it again The st...

Страница 50: ... WHPSHUDWXUH YDOXH ZLOO ÀDVK VHW WKH YDOXH XVLQJ WKH buttons and press j Press WR FRQ UP WKH VHWWLQJV 10 1 2 VVLJQLQJ WKH SURJUDPV WR VSHFL F GD V This function can be used to assign up to three different programs to a certain day a Use the arrow buttons to go to the setup menu and then press b Use the button to select the password 7 and then press WR FRQ UP c Select submenu 1 DQG FRQ UP E SUHVVLQ...

Страница 51: ...enu and then press b Use the button to select the password 7 and then press WR FRQ UP c Select submenu 8 and press WR FRQ UP d 7KH YDOXH ZLOO ÀDVK FKDQJH LW XVLQJ WKH and buttons 0 5 5 0 C e Press the EXWWRQ WR FRQ UP WKH VHW YDOXH 10 4 AUTONOMY FUNCTION 7KLV IXQFWLRQ LV XVHG WR GLVSOD WKH QXPEHU RI KRXUV RI RSHUDWLQJ DXWRQRP UHPDLQLQJ EHIRUH KDYLQJ WR UH OO with pellets Use the arrow buttons to m...

Страница 52: ...t submenu 9 DQG FRQ UP E SUHVVLQJ d 7KH YDOXH ZLOO ÀDVK FKDQJH LW XVLQJ WKH buttons OFF 3 20 C e Press WR FRQ UP WKH VHWWLQJV 10 9 MANUAL ACTIVATION OF THE PELLET LOADING SYSTEM KHQ RX UVW VWDUW XS WKH VWRYH RU LI WKH WDQN LV FRPSOHWHO HPSW UVW ORDG SHOOHWV LQWR WKH WDQN WKHQ PDQXDOO activate the loading system to charge the circuit with pellets a Use the arrow keys to enter the setup menu and pre...

Страница 53: ... is stopping the brazier cleaning system from operating E105 Pellet probe malfunction Pellet probe disconnected or faulty E106 Temperature probe malfunction Faulty air temperature probe E107 Combustion chamber probe malfunction Faulty combustion chamber probe E108 Thermal cutout error Pellet tank overheating E109 Pressure error or air control error Flue system dirty Seals worn QVXI FLHQW FRPEXVWLR...

Страница 54: ...s Remove any foreign bodies inside the brazier If this is not possible run the manual mechanical brazier cleaning procedure a Use the arrow keys to enter the setup menu and press key b Enter the password 7 with key DQG FRQ UP ZLWK NH c Select submenu 32 DQG FRQ UP ZLWK NH d Enter password 54 e Hold down key to start the manual loading system KLOH FOHDQLQJ LV LQ SURJUHVV KROG WKH PLFURVZLWFK LJ GRZ...

Страница 55: ...stove requires simple yet frequent and thorough FOHDQLQJ LQ RUGHU WR JXDUDQWHH HI FLHQW DQG FRUUHFW operation at all times Clean the stove only when it s off and has cooled down 8VH WKH KDQGOH WR RSHQ WKH UHER GRRU Fig 12 1 Use a dustpan or ash vacuum cleaner canister to remove the ash that forms inside the burn pot Fig 12 2 Avoid brushing unburned residues into the burn pot compartment 7KLV KDV W...

Страница 56: ...g and never use abrasive sponges Do not wet the door gasket as this may be damaged 12 2 4 Cleaning WKH ÀXH This should be performed at least twice a year at the start of and half way through winter and in any case whenever necessary Fig 12 8 If there are horizontal sections check for and remove any accumulated ash and soot before WKHVH EORFN WKH ÀRZ RI ÀXH JDV If not cleaned correctly the stove ma...

Страница 57: ...e Centre 13 DECOMMISSIONING AND DISPOSAL Decommissioning and disposal of the stove are the exclusive responsibility of the owner who must act in accordance with the laws in force in the country where the stove is installed with regards to safety and environmental protection The stove may also be dismantled and disposed of by companies authorised to recover and dispose of the materials in question ...

Страница 58: ......

Страница 59: ... ANSCHLUSS AN DIE ANLAGEN 6 3 ANFÄNGLICHE KONFIGURATION 7 BESCHREIBUNG DES OFENS 7 1 BEDIENPANEL 7 2 BENUTZUNG DES BEDIENPANELS 7 3 BETRIEBSPARAMETER 8 ERSTE SCHRITTE 8 1 PELLETZUFÜHRUNG 8 2 STROMVERSORGUNG 8 3 ANFÄNGLICHE EINSTELLUNGEN 9 GEBRAUCH DES OFENS 9 1 VORWORT 9 2 EINSCHALTUNG 9 3 ÄNDERUNG DER PARAMETER 9 4 WECHSEL DES BRENNSTOFFS 9 5 AUSSCHALTUNG 9 6 BETRIEB MIT RAUMTHERMOSTAT NUR BEI PE...

Страница 60: ...ODWLRQVODQG GHV 2IHQV J OWLJHQ HVHW HQ YRUJHVFKULHEHQHQ Sicherheitsbestimmungen benutzt werden 1 ALLGEMEINES VORWORT Die Heizgeräte von PALAZZETTI werden unter HIROJXQJ GHU LQ GHQ HXURSlLVFKHQ H XJVULFKWOLQLHQ JHQDQQWHQ 6LFKHUKHLWVYRUVFKULIWHQ JHEDXW XQG JHSU IW Dieses Handbuch ist wesentlicher Bestandteil GHV 3URGXNWV XQG I U GLH LJHQW PHU GHV 2IHQV VRZLH I U GLH QVWDOODWLRQVWHFKQLNHU HWUHLEHU XQ...

Страница 61: ...GHQ lOOH DXVJHVFKORVVHQ Installation in Abweichung von den im Installationsland geltenden Bestimmungen und YRQ GHQ 6LFKHUKHLWVYRUVFKULIWHQ Teilweise oder gänzliche Missachtung der in diesem Handbuch enthaltenen Anleitungen QVWDOODWLRQ GXUFK QLFKW TXDOL LHUWHV XQG QLFKW geschultes Personal von den Sicherheitsrichtlinien abweichender Gebrauch QLFKW YRP HUVWHOOHU JHQHKPLJWH DP 2IHQ vorgenommene Umbau...

Страница 62: ...HU 6WHFNYHUELQGHUQ GLH 6SDQQXQJV XIXKU unterbrechen 2 3 HINWEISE FÜR DEN BENUTZER HUHLWHQ 6LH GHQ XIVWHOOXQJVRUW GHV 2IHQV JHPl GHQ ORNDOHQ QDWLRQDOHQ XQG HXURSlLVFKHQ Bestimmungen vor D GHU 2IHQ DOV HL JHUlW GLHQW ZHUGHQ VHLQH X HQÀlFKHQ EHVRQGHUV KHL HVKDOE LVW ZlKUHQG GHV HWULHEV PD LPDOH 9RUVLFKW JHERWHQ LQVEHVRQGHUH LH ODVVFKHLEH GHU 7 U QLFKW EHU KUHQ XQG LKU QLFKW X QDKH NRPPHQ HV EHVWHKW 9...

Страница 63: ...en Jede Holzart weist unterschiedli FKH LJHQVFKDIWHQ DXI GLH DXFK GLH UHQQOHLVWXQJ EHHLQÀXVVHQ 9RQ GHU 9HUZHQGXQJ YRQ 1DGHOK O HUQ LHIHU 7DQQH ZLUG DEJHUDWHQ VLH HQWKDOWHQ JUR H 0HQ JHQ DQ DU ZRGXUFK GHU 6FKRUQVWHLQ VFKQHOO YHUVWRSIW V G UIHQ QLFKW YHUEUDQQW ZHUGHQ EIlOOH 5LQ GH PLW DFNHQ EHKDQGHOWH O HU 3ODWWHQ RKOH XQVWVWRIIH LQ GLHVHQ lOOHQ HUOLVFKW GLH DUDQWLH des Gerätes 7 GHU NRQWLQXLHUOLFKH...

Страница 64: ...UIDVVXQJ VHLQ XQG VLFK YHUJHZLVVHUQ GDVV GLH SHUV QOLFKHQ 6FKXW DXVU VWXQJHQ YROOVWlQGLJ XQG IXQNWLRQVW FKWLJ VLQG C muss er Schutzhandschuhe tragen D muss er Sicherheitsschuhe tragen E muss er elektrisch isoliertes Werkzeug benutzen F PXVV HU VLFKHUVWHOOHQ GDVV GHU HUHLFK LQ dem die Montage und Demontagearbeiten DXVJHI KUW ZHUGHQ IUHL YRQ LQGHUQLVVHQ LVW 5 3 AUFSTELLUNGSORT DES OFENS P EHLJHOHJWH...

Страница 65: ...GHQ EE HQQ GLH DQG KLQWHU GHP 2IHQ HLQH X HQZDQG LVW PXVV HWZD FP EHU GHP RGHQ HLQH gIIQXQJ XP QVDXJHQ GHU 9HUEUHQQXQJVOXIW angebracht werden dabei die Maßangaben im technischen Datenblatt des Produkts X HQ PXVV HLQ EOHLEHQGHV QLFKW YHUVFKOLH EDUHV IWXQJVJLWWHU DQJHEUDFKW ZHUGHQ DQ EHVRQGHUV windigen und der Witterung ausgesetzten Stellen ist ein Regen und Windschutz vorzusehen 6LFKHUVWHOOHQ GDVV ...

Страница 66: ...ungen mit Rohrschellen an der Wand EHIHVWLJHQ Der Rauchstutzen DARF NICHT angeschlossen ZHUGHQ DQ HLQHQ 6FKRUQVWHLQ GHU DXFK YRQ DQGHUHQ lUPHHU HXJHUQ HL NHVVHO gIHQ DPLQH usw genutzt wird DQ QWO IWXQJVV VWHPH XQVWDE XJVKDXEHQ QWO IWHU XVZ DXFK ZHQQ ÄYHUURKUW Die Installation von Absperrventilen und XIWUHJHONODSSHQ LVW YHUERWHQ LH 9HUEUHQQXQJVSURGXNWH P VVHQ EHU GDV DFK DEJHI KUW ZHUGHQ 5 6 1 Abfü...

Страница 67: ...Q 7HFKQLNHU DXVZHFKVHOQ XP MHGHV Risiko auszuschließen UGXQJ Die Anlage muss obligatorisch geerdet und gemäß den geltenden Gesetzen mit einem Fehlerstromschutzschalter ausgestattet sein Abb 6 2 Die Rauchabzugleitung muss mit einer eigenen Erdung versehen sein 6 2 2 Installation der Steuerung LH 6WHXHUXQJ GHV HL RIHQV NDQQ DQ HLQHU Gipswand mit einer Aussparung 105x60 mm EHIHVWLJW ZHUGHQ LQGHP GHU ...

Страница 68: ...DWLRQ GHV 8KUHQWKHUPRVWDWV PXVV GHU 2IHQ YRQ DQG HLQJHVFKDOWHW ZHUGHQ ZlKUHQG GHU 8KUHQWKHUPRVWDW DXI GHQ 6WDWXV Ä QIUDJH HLQJHVWHOOW LVW LHVHU 9RUJDQJ LVW DXFK GDQQ HUIRUGHUOLFK ZHQQ HLQ 6WURPDXVIDOO DXIJHWUHWHQ LVW RGHU GHU 2IHQ YRQ DQG DXVJHVFKDOWHW ZXUGH DPLW VLFK NHLQH HWULHEV HLWHQ EHUVFKQHLGHQ ZLUG HPSIRKOHQ GHQ 7LPHU GHV 2IHQV X GHDNWLYLHUHQ DXI 2 HLQVWHOOHQ 6 2 4 Kanalisierung heiß HU 2IH...

Страница 69: ...nden ein paar Sekunden lang eine Kommunikations Fehlermeldung Meldung ignorieren und den Ofen mit dem Sicherheitsschalter aus und nach ein paar Sekunden wieder einschalten ES KÖNNEN ZWEI VERSCHIEDENE KONFIGURATIONEN EINGESTELLT WERDEN KONFIGURATION 1 Voreinstellung LHVH RQ JXUDWLRQ ZLUG JHZlKOW XP GHU 2IHQ YRQ DQG RGHU SURJUDPPLHUW HLQ DXV XVFKDOWHQ HU 2IHQ UHJHOW GLH lUPHOHLVWXQJ DQKDQG GHU 5DXP ...

Страница 70: ...70 VERWENDUNG UND WARTUNG BEDIENUNGS UND WARTUNGSANLEITUNG ...

Страница 71: ...PHQ V G eine Eingabetaste U GLH HVWlWLJXQJ GHV Parameters oder der Auswahl OOH 7DVWHQ VLQG NDSD LWLY G K XU NWLYLHUXQJ P VVHQ VLH QLFKW JHGU FNW VRQGHUQ OHGLJOLFK EHU KUW ZHUGHQ 7 1 1 Status led SYMBOL MELDUNG BESCHREIBUNG 3HOOHWV IDVW OHHU HU 3HOOHWEHKlOWHU PXVV JHI OOW ZHUGHQ Wartung LQ DUWXQJVHLQJULII PXVV GXUFKJHI KUW ZHUGHQ NDQQ DXFK GDQQ HUVFKHLQHQ ZHQQ GLH 7DVWH 21 ZLHGHUKROW JHGU FNW ZLUG ...

Страница 72: ...UDWXU EHL GHUHQ 8QWHUVFKUHLWXQJ GHU 2IHQ ZLHGHU HLQJHVFKDOWHW ZLUG QXU LQ GHU RQ JXUDWLRQ 9 Frostschutztemperatur 0LQGHVWWHPSHUDWXU EHL GHUHQ 8QWHUVFKUHLWXQJ GHU 2IHQ HLQJHVFKDOWHW ZLUG QXU LQ GHU RQ JXUDWLRQ 2 10 Tastatursperre Modus Tastatursperre einstellen OFF Lo Hi 11 Displayhelligkeit Helligkeitsgrad des Displays einstellen OFF 1 5 12 Displaymodus Anzeigemodus der Daten einstellen OFF 1 4 13...

Страница 73: ...HQ ZLUG PLW QDW UOLFKHU RQYHNWLRQ IXQNWLRQLHUHQ QXU EHL 0RGHOOHQ EHL GHQHQ GLHV YRUJHVHKHQ LVW 0LQLPXP 0D LPXP XWR DXWRPDWLVFKHV HWULHE GHU 2IHQ ZLUG GLH HVFKZLQGLJNHLW GHV 5DXPOXIWJHEOlVH DQKDQG GHU Raumtemperatur einstellen L XOWUDVFKQHOOHV HWULHE GLHVH XQNWLRQ VROOWHQ 6LH OHGLJOLFK EHQXW HQ IDOOV 6LH GDV 5DXP VFKQHOO heizen möchten c Die gewählte Daten mit der Taste bestätigen 7 3 3 Änderung de...

Страница 74: ...GHQ 6FKDOWHU DQ GHU 2IHQU FNVHLWH DXI 2 0 Abb 8 2 zu stellen 9HUJHZLVVHUQ 6LH VLFK GDVV 6LH GHU LQVFKDOWHU QLFKW EHU KHQ ZHQQ 6LH GHQ 2IHQ DQ GDV 6WURPQHW anschließen LH XQNWLRQVW FKWLJNHLW GHV 2IHQV KlQJW YRQ HLQHU NRUUHNWHQ 6WURP XIXKU DE P DOO HLQHV 6WURPDXVIDOOV GDUI GHU 2IHQ QLFKW HLQJHVFKDOWHW ZHUGHQ 8 3 ANFÄNGLICHE EINSTELLUNGEN 9RU GHP HEUDXFK GHV 2IHQV P VVHQ GLH 6SUDFKH das Datum und die...

Страница 75: ...ratur wird gezeigt Raum von der Raum Sonde abgelesen 3 Die aktuelle Zeit wird gezeigt 4 LH HWULHEVDXWRQRPLH ZLUG JH HLJW ZHOFKH DXI GLH IHKOHQGHQ 6WXQGHQ YRU GHU LHGHUI OOXQJ vom Pelletsbehaelter hinweist 2E GLH XQNWLRQ 1DFKI OOXQJ HLQJHVWHOOW LVW HL RO EHWULHE wird das Symbol angezeigt e Die eingegebenen Daten mit der Taste bestätigen 8 3 4 Summerlautstärke einstellen LH DXWVWlUNH GHV 6LJQDOWRQV ...

Страница 76: ...FNXQJVNDQDO GHU 3HOOHWV QLFKW YHUVWRSIW ZLUG 3 GDV RO DQ QGHQ 4 GLH 7 U ZLHGHU VFKOLH HQ HU 2IHQ UHJHOW GHQ 9HUEUHQQXQJVOXIWEHGDUI DXWRPDWLVFK GEFAHR XP Q QGHQ GHV HXHUV QLH ONRKRO HQ LQ HURVLQ RGHU VRQVWLJH À VVLJH UHQQVWRIIH YHUZHQGHQ Diese sind vom Feuer fern zu halten Keine Feueranzünder verwenden die aus Petroleum oder chemisch hergestellt sind Ausschließlich umweltfreundliche Feueranzünder v...

Страница 77: ...SI DXWRPDWLVFK HYRU GHU 2IHQ HUQHXW HLQJHVFKDOWHW ZLUG VROOWH JHZDUWHW ZHUGHQ ELV HU YROOVWlQGLJ DEJHN KOW LVW 9 5 2 Ausschaltung bei Pelletbetrieb XP XVVFKDOWHQ GHV 2IHQV LP 3HOOHWEHWULHE GLH 7DVWH HLQ SDDU 6HNXQGHQ ODQJ JHGU FNW KDOWHQ GDV Flammensymbol erlischt 1DFK GHU 9HUEUHQQXQJ UHLQLJW GHU 2IHQ GHQ UHQQWRSI DXWRPDWLVFK HYRU GHU 2IHQ HUQHXW HLQJHVFKDOWHW ZLUG VROOWH JHZDUWHW ZHUGHQ ELV HU YR...

Страница 78: ...e Taste antippen i HU HUW GHU JHZ QVFKWHQ 7HPSHUDWXU EOLQNW GHQ HUW PLW GHQ 7DVWHQ und ändern j Die eingegebenen Daten mit der Taste bestätigen 10 1 2 Zuordnen der programme an die tage Mit dieser Funktion können einem bestimmten Tag bis zu drei verschiedene Programme zugewiesen werden a Mit den Tasten GDV 0HQ 6HWXS DXIUXIHQ XQG GLH 7DVWH GU FNHQ b Mit der Taste das Passwort 7 anwählen und mit der...

Страница 79: ...t der Taste bestätigen c DV 8QWHUPHQ 8 anwählen und mit der Taste bestätigen d Der Wert blinkt den Wert mit den Tasten und ändern 0 5 5 0 C e Die Taste GU FNHQ XP GHQ HLQJHJHEHQHQ HUW X EHVWlWLJHQ 10 4 FUNKTION BETRIEBSDAUER 0LW GLHVHU XQNWLRQ NDQQ DQJH HLJW ZHUGHQ ZLH YLHOH HWULHEVVWXQGHQ QRFK YHUEOHLEHQ ELV 3HOOHWV QDFKJHI OOW ZHUGHQ P VVHQ HQQ GHU XUVRU PLW GHQ 3IHLOWDVWHQ DXI GDV 6 PERO JHVHW ...

Страница 80: ...E AKTIVIERUNG DES PELLETNACHFÜLLSYSTEMS HLP HUVWPDOLJHQ LQVFKDOWHQ RGHU ZHQQ GHU HKlOWHU YROOVWlQGLJ OHHU LVW EHVWHKW GLH 0 JOLFKNHLW QDFK GHP HI OOHQ GHV HKlOWQLVVHV PLW 3HOOHWV GDV 1DFKI OOV VWHP PDQXHOO X DNWLYLHUHQ VRGDVV GLH 3HOOHWV NRUUHNW LQ GHQ UHLVODXI JHODQJHQ a 5XIHQ 6LH EHU GLH 3IHLOWDVWHQ GDV LQVWHOOXQJVPHQ DXI XQG GU FNHQ 6LH GLH 7DVWH b Geben Sie mit der Taste das Passwort 7 ein und...

Страница 81: ... GLH XQNWLRQVW FKWLJNHLW GHV Reinigungssystems des Kohlenbeckens E105 Pellet Sonde Fehler 3HOOHW 6RQGH QLFKW DQJHVFKORVVHQ RGHU GHIHNW E106 HKOEHWULHE GHV 7HPSHUDWXUI KOHUV XIWWHPSHUDWXUI KOHU GHIHNW E107 HKOIXQNWLRQ 6RQGH LP UHQQUDXP 6HQVRU GHIHNW E108 7KHUPLVFKHU 6LFKHUKHLWVIHKOHU Überhitzung des Pelletbehälters E109 UXFN RGHU XIWNRQWUROOIHKOHU Rauchabzugssystem verschmutzt Dichtungen verschliss...

Страница 82: ...VH QLFKW X HQWIHUQHQ VLQG IDKUHQ 6LH PLW GHU PDQXHOOHQ NWLYLHUXQJ GHV PHFKDQLVFKHQ RKOHQEHFNHQUHLQLJXQJVV VWHPV IRUW a 5XIHQ 6LH EHU GLH 3IHLOWDVWHQ GDV LQVWHOOXQJVPHQ DXI XQG GU FNHQ 6LH GLH Taste b Geben Sie mit der Taste das Passwort 7 ein und bestätigen Sie mit der Taste c lKOHQ 6LH GDV 8QWHUPHQ 32 und bestätigen Sie mit der Taste d Geben Sie das Passwort 54 ein e Halten Sie die Taste JHGU FNW...

Страница 83: ... WARTUNG 12 2 1 Reinigung des feuerraums Um immer eine optimale Leistung und einen HLQZDQGIUHLHQ HWULHE X JHZlKUOHLVWHQ LVW HLQH HLQIDFKH DEHU KlX JH XQG VRUJIlOWLJH 5HLQLJXQJ GHV 2IHQV HUIRUGHUOLFK Die Reinigung nur am ausgeschalteten und kalten 2IHQ GXUFKI KUHQ HQ ULII E Z EHWlWLJHQ XP GLH 7 U GHV HXHUUDXPV X IIQHQ EE LH VFKH GLH VLFK LP UHQQWRSI DEODJHUW PLW HLQHU 6FKDXIHO RGHU HLQHP VFKHVDXJHU...

Страница 84: ...gIHQ YHUZHQGHW ZHUGHQ DV ODV QLFKW UHLQLJHQ VRODQJH GHU 2IHQ LQ HWULHE LVW HLQH 6FKHXHUVFKZlPPH EHQXW HQ LH LFKWXQJ GHU 7 U QLFKW DQIHXFKWHQ sie könnte beschädigt werden 12 2 4 Reinigung des Schornsteinrohrs LHVH LVW PLQGHVWHQV ZHL 0DO MlKUOLFK XQG ZDU DP QIDQJ XQG JHJHQ 0LWWH GHU HL VDLVRQ E Z MHGHV 0DO ZHQQ HV VLFK DOV QRWZHQGLJ HUZHLVW GXUFK XI KUHQ EE HQQ ZDDJHUHFKWH EVFKQLWWH YRUKDQGHQ VLQG P...

Страница 85: ...undendienst 13 VERSCHROTTUNG UND ENTSORGUNG LH 9HUVFKURWWXQJ XQG QWVRUJXQJ GHV 2IHQV VLQG DXVVFKOLH OLFK YRP LJHQW PHU XQG DXI GHVVHQ 9HUDQWZRUWXQJ GXUFK XI KUHQ GHU XQWHU HIROJXQJ GHU LQ VHLQHP DQG JHOWHQGHQ HVHW H EHU 6LFKHUKHLW XQG 8PZHOWVFKXW vorgehen muss 0LW GHP EEDX XQG GHU QWVRUJXQJ N QQHQ DXFK ULWWH EHWUDXW ZHUGHQ YRUDXVJHVHW W HV ZHUGHQ LPPHU 8QWHUQHKPHQ EHDXIWUDJW GLH XU 6DPPOXQJ XQG HV...

Страница 86: ......

Страница 87: ...HEMENTS 6 3 CONFIGURATION INITIALE 7 DESCRIPTION DU POELE 7 1 CLAVIER DE COMMANDE 7 2 UTILISATION DU CLAVIER DE COMMANDE 7 3 PARAMÈTRES DE FONCTIONNEMENT 8 OPERATIONS PRELIMINAIRES 8 1 REMPLISSAGE DES PELLETS 8 2 ALIMENTATION ELECTRIQUE 8 3 PARAMÉTRAGES PRÉLIMINAIRES 9 UTILISATION DU POÊLE 9 1 PRÉAMBULE 9 2 ALLUMAGE 9 3 MODIFICATION DES PARAMÈTRES 9 4 CHANGEMENT TYPE DE COMBUSTIBLE 9 5 ARRÊT 9 6 F...

Страница 88: ...ge de PALAZZETTI 6HXO O LQVWDOODWHXU HVW FKDUJp G HIIHFWXHU OHV contrôles sur l existence d une entrée d air de 1 PRÉAMBULE Les appareils de chauffage dénommés ci après poêles à granulés PALAZZETTI Lélio S p A ci dessous PALAZZETTI de la gamme ECOFIRE sont construits et assemblés suivant les prescriptions de sécurité indiquées dans les directives européennes de référence Ce manuel est destiné à l ...

Страница 89: ... les compétences nécessaires à cet effet Lenonrespectdesinstructionsetrecommandations des exigences contenues dans ce manuel a pour effet d annuler immédiatement la garantie 1 9 LIMITES DE RESPONSABILITÉ DU FABRICANT Le fabricant est déchargé de toute responsabilité civile et pénale directement ou indirectement dans les cas suivants Installation non conforme aux normes et à la réglementation en vi...

Страница 90: ...SIGNES DESTINEES A L UTILISATEUR 3UpYRLU XQ OLHX G LQVWDOODWLRQ GX SRrOH FRQIRUPH j OD législation locale nationale et européenne S agissant d un appareil de chauffage les surfaces externes du poêle sont particulièrement chaudes La prudence maximale est recommandée pendant son fonctionnement notamment ne pas toucher et ne pas s approcher de la vitre de la porte au risque de se brûler ne pas touche...

Страница 91: ...de hêtre ou de bouleau bien sec Chaque type de bois possède des caractéris tiques différentes y compris dans le rendement de la combustion L utilisation de conifères pin sapin est décon seillée ils contiennent des quantités élevées de substances résineuses qui encrassent rapide ment le conduit de cheminée Il ne faut pas brûler déchets écorces bois trai tés et peints panneaux charbon matières plas ...

Страница 92: ...minimales en centimètres à respecter lors de l installation du poêle par rapport aux cloisons HW DX REMHWV LQÀDPPDEOHV Q FDV GH FORLVRQV REMHWV LQLQÀDPPDEOHV FHV GLPHQVLRQV SHXYHQW rWUH divisées par deux Protéger contre le rayonnement de la chaleur et le risque d incendie toutes les structures qui pourraient prendre feu si elles sont exposées à trop de chaleur Les planchers en bois ou en matières ...

Страница 93: ...e Départemental Type RSDT au 23 1 VSpFL H OHV FRQGLWLRQV G HQWUpH G DLU GDQV OHV logements et signale que les entrées d air ne doivent pas être obstruées par l usager Si il y a d autres appareils de chauffage il faut dans chaque locaux une prise d air de combustion pour assurer le volume d air nécessaire au bon fonctionnement de tous les dispositifs Lorsque dans la pièce où se trouve le poêle est ...

Страница 94: ...s de tirage 5 6 1 Evacuation par le toit à travers un conduit traditionnel Le conduit de cheminée pour les gaz G pFKDSSHPHQW GRLW rWUH FHUWL p VHORQ OHV QRUPHV EN 1856 1 2 EN 1857 EN 1443 EN 13384 1 3 EN 12391 1 en ce qui concerne la taille et les matériaux utilisés dans la construction Les cheminées en ruine construites avec des matériaux inadaptés ciment acier galvanisé etc rugueuses ou poreuses...

Страница 95: ...tion du poêle et doit rester visible Si le cordon d alimentation est endommagé il doit rWUH UHPSODFp SDU XQ WHFKQLFLHQ TXDOL p D Q G pYLWHU tout risque 6 2 1 1 Mise à la terre Il est impératif que l installation soit équipée d une prise de terre et d un disjoncteur en conformité avec les normes en vigueur Fig 6 2 Le conduit de fumée métallique doit être équipé de sa propre connexion à la terre 6 2...

Страница 96: ...KH RQ JXUDWLRQ initiale Après avoir installé le chrono thermostat le premier allumage du poêle doit s effectuer manuellement pendant que le chrono thermostat est en mode appel Procéder de même après une coupure de courant ainsi qu après une extinction manuelle du poêle Pour ne pas le superposer à des tranches horaires de fonctionnement il est conseillé de désactiver programmer sur OFF le timer du ...

Страница 97: ...U FRQ UPHU O HVW SRVVLEOH TX XQ PHVVDJH G DODUPH V DI FKH SHQGDQW TXHOTXHV VHFRQGHV DSUqV DYRLU PRGL p OD FRQ JXUDWLRQ LJQRUHU HW pWHLQGUH OH SRrOH HQ DSSX DQW VXU O LQWHUUXSWHXU WWHQGUH TXHOTXHV VHFRQGHV puis le rallumer DEUX CONFIGURATIONS DIFFÉRENTES SONT PROGRAMMABLES CONFIGURATION 1 par défaut HWWH FRQ JXUDWLRQ FRQYLHQW DXVVL SRXU DOOXPHU HW pWHLQGUH OH SRrOH PDQXHOOHPHQW RX GH IDoRQ SURJUDPP...

Страница 98: ...98 EMPLOI ENTRETIEN USE AND MAINTENANCE ...

Страница 99: ...WUH ou la sélection 6 DJLVVDQW G XQ FODYLHU FDSDFLWLI WDFWLOH LO VXI W MXVWH d appuyer les touches pour les activer 7 1 1 Leds d état ICONE MESSAGE DESCRIPTION Pellets en cours d épuisement Elle signale qu il faut remplir la trémie de pellets Entretien Elle signale qu il faut effectuer une opération d entretien SHXW V DI FKHU pJDOHPHQW HQ FDV GH SUHVVLRQ UpSpWpH GH OD WRXFKH 21 Assistance Elle sig...

Страница 100: ...le le poêle se rallume XQLTXHPHQW HQ FRQ JXUDWLRQ 0 5 5 0 C 9 Température hors gel Température minimum en dessous de laquelle le poêle s allume XQLTXHPHQW HQ FRQ JXUDWLRQ OFF 3 20 C 10 Verrouillage clavier RQ JXUDWLRQ YHUURXLOODJH GHV WRXFKHV OFF Lo Hi 11 Luminosité écran Règle le degré de luminosité de l écran OFF 1 5 12 0RGH DI FKDJH RQ JXUDWLRQ GH O DI FKDJH GHV GRQQpHV OFF 1 4 13 Volume averti...

Страница 101: ... complètement exclu et le poêle ne fonctionne qu avec la convection naturelle uniquement sur certains modèles 1 Minimum 5 maximum Auto fonctionnement automatique le poêle mets en place de manière autonome la vitesse du ventilateur et la puissance du poêle par rapport à la température ambiante Hi Fonctionnement ultrarapide à utiliser seulement s il y la nécessité de réchauffer rapidement une pièce ...

Страница 102: ...l interrupteur sur OFF J En branchant le poêle à une prise de courant s assurer de ne pas toucher le panneaux de commande Le fonctionnement du poêle nécessite une alimentation électrique correcte En l absence de courant ne pas allumer le poêle 8 3 PARAMÉTRAGES PRÉLIMINAIRES Avant d utiliser le poêle il faut programmer la langue la date et l heure en cours 8 3 1 Paramétrage de l heure et de la date...

Страница 103: ...ramètres 2 Vous allez visualiser la température lue par la sonde ambiante 3 Vous allez visualiser l heure actuelle 4 Vous allez visualiser les heures d autonomie avant de recharger le réservoir d alimentation silafonction ravitaillement aétévalidé lesymbole V DI FKH SHQGDQW OH IRQFWLRQQHPHQW à bois e Appuyer la touche SRXU FRQ UPHU OD PLVH DX SRLQW 8 3 4 Mise au point du volume de l avertisseur so...

Страница 104: ...la porte Le poêle règle automatiquement les besoins en air comburant DANGER Pour allumer le feu ne jamais utiliser d alcool d essence de kérosène ou autres combustibles liquides Stocker ceux ci loin du poêle Ne pas utiliser d allume feux à base de produits pétroliers ou d origine chimique Utiliser exclusivement des allume feux d origine naturelle Si lors du fonctionnement à bûches état un programm...

Страница 105: ...nt refroidi 9 5 2 Arrêt lors du fonctionnement à granulés Pour éteindre le poêle quand il est en fonctionnement à granulés appuyer sur la touche pendant quelques VHFRQGHV O LF QH HQ IRUPH GH ÀDPPH V pWHLQW OD Q GH OD FRPEXVWLRQ OH SRrOH HIIHFWXHUD XQ F FOH DXWRPDWLTXH GH QHWWR DJH GX EUDVLHU Avant de rallumer le poêle il est conseillé d attendre qu il soit complètement refroidi Il est recommandé d...

Страница 106: ...QRWHU PRGL HU OH SDUDPqWUH DYHF OHV WRXFKHV puis appuyer la touche i H SDUDPqWUH GH OD WHPSpUDWXUH VRXKDLWpH VH PHW j FOLJQRWHU PRGL HU OH SDUDPqWUH DYHF OHV WRXFKHV puis appuyer la touche j Appuyer la touche SRXU FRQ UPHU OD PLVH DX SRLQW 10 1 2 Assignation des programmes aux jours de la semaine Cette fonction permet d assigner jusqu à 3 programmes différents à un jour déterminé a A l aide des to...

Страница 107: ...onner le mot de passe 7 avec la touche HW FRQ UPHU DYHF OD WRXFKH c Sélectionner le sous menu 8 HW FRQ UPHU DYHF OD WRXFKH d H SDUDPqWUH VH PHW j FOLJQRWHU OH PRGL HU DYHF OHV WRXFKHV et 0 5 5 0 C e Appuyer sur la touche SRXU FRQ UPHU 10 4 FONCTION AUTONOMIE HWWH IRQFWLRQ SHUPHW G DI FKHU OHV KHXUHV G DXWRQRPLH UHVWDQWHV DYDQW GH GHYRLU IDLUH OH UDYLWDLOOHPHQW HQ SHOOHWV O DLGH GHV WRXFKHV ÀqFKH V...

Страница 108: ...FF 3 20 C e Appuyer la touche SRXU FRQ UPHU OD PLVH DX SRLQW 10 9 ACTIVATION MANUELLE DU SYSTEME DE CHARGEMENT DE PELLETS Au premier allumage ou si le réservoir est totalement vide il est possible après avoir chargé les pellets dans le réservoir d activer manuellement le système de charge de sorte que les pellets remplissent correctement le circuit a 8WLOLVHU OHV ÀqFKHV SRXU DWWHLQGUH OH PHQX GH F...

Страница 109: ... Dysfonctionnement sonde de température Sonde air défectueuse E107 Dysfonctionnement de la sonde dans la chambre de combustion Sonde dans la chambre de combustion défectueuse E108 Erreur de sécurité thermique Problèmes de surchauffe du réservoir à pellets E109 Erreur de pression ou de contrôle de l air Système d évacuation des fumées sales Joints d étanchéité endommagés LU FRPEXUDQW LQVXI VDQW Pro...

Страница 110: ...HQWXHOV GX FROOHFWHXU GH FHQGUHV Q FDV GH EORFDJH SURFpGHU j O DFWLYDWLRQ PDQXHOOH GX V VWqPH PpFDQLTXH GH QHWWR DJH GX FROOHFWHXU GH cendres a 8WLOLVHU OHV ÀqFKHV SRXU DWWHLQGUH OH PHQX GH FRQ JXUDWLRQ et appuyer sur la touche b Sélectionner l option 7 avec la touche et valider avec la touche c Sélectionner le sous menu 32 HW FRQ UPHU DYHF OD WRXFKH d Sélectionner l option 54 e Maintenir la touch...

Страница 111: ...r Le poêle requiert un nettoyage simple mais fréquent pour pouvoir assurer un rendement HI FDFH HW XQ IRQFWLRQQHPHQW UpJXOLHU Ce nettoyage doit s effectuer avec le poêle éteint et froid Agir sur la poignée pour ouvrir la porte du foyer Fig 12 1 Retirer la cendre qui se dépose à l intérieur du foyer à l aide d une pelle ou d un aspirateur de cendres Fig 12 2 Éviter de verser les résidus imbrûlés da...

Страница 112: ...e vitrée pendant la marche du poêle et ne pas utiliser d éponges abrasives 1H SDV KXPLGL HU OH MRLQW GH OD SRUWH FDU FHOD accélérerait son usure 12 2 4 Nettoyage du conduit de fumée Le conduit de fumée doit être nettoyé au moins deux fois par an au début et à la moitié de la saison hivernale et chaque fois que nécessaire Fig 12 8 En présence de parcours horizontaux LO IDXW YpUL HU HW pOLPLQHU OHV ...

Страница 113: ...ctuer par un centre SAV agréé 13 DESTRUCTION ET MISE AU REBUT Le désossement et la mise au rebut du poêle sont à la charge et sous la responsabilité exclusive du propriétaire qui devra agir dans l observance de la législation en vigueur dans son pays en matière de sécurité et de préservation de l environnement H GpVRVVHPHQW HW OD PLVH DX UHEXW GX SRrOH SHXYHQW rWUH FRQ pV j GHV WLHUV j FRQGLWLRQ T...

Страница 114: ......

Страница 115: ...CIÓN DE LA ESTUFA 6 2 CONEXIÓN A LAS INSTALACIONES 6 3 CONFIGURACIÓN INICIAL 7 DESCRIPCIÓN DE LA ESTUFA 7 1 PANEL DE MANDO 7 2 PARÁMETROS DE FUNCIONAMIENTO 8 OPERACIONES PRELIMINARES 8 1 CARGA DE LOS PELLETS 8 2 ALIMENTACIÓN ELÉCTRICA 8 3 PROGRAMACIONES INICIALES 9 USO DE LA ESTUFA 9 1 PREMISA 9 2 ENCENDIDO 9 3 MODIFICACIÓN DE LOS PARÁMETROS 9 4 CAMBIO DE COMBUSTIBLE 9 5 APAGADO 9 6 FUNCIONAMIENTO...

Страница 116: ... se instala 1 PREMISA GENERAL Los aparatos de calefacción PALAZZETTI se fabrican y prueban siguiendo las indicaciones de seguridad de las directivas europeas de referencia Este manual está dirigido a los propietarios de la estufa a los instaladores los usuarios y los encargados del mantenimiento de las estufas y es parte del producto En caso de dudas sobre el contenido y para cualquier aclaración ...

Страница 117: ...resente manual PALAZZETTI declina cualquier responsabilidad civil o penal directa o indirecta debida a Instalación no conforme con las normativas vigentes en el país y con las directivas de seguridad Incumplimientoparcialototaldelasinstrucciones contenidas en el manual QVWDODFLyQ SRU SDUWH GH SHUVRQDO QR FXDOL FDGR y no capacitado Uso no conforme con las directivas de seguridad 0RGL FDFLRQHV UHSDU...

Страница 118: ...nectar la alimentación eléctrica antes de intervenir en las partes eléctricas electrónicas y conectores 2 3 ADVERTENCIAS PARA EL USUARIO Preparar el lugar de instalación de la estufa según los reglamentos locales nacionales y europeos La estufa siendo un producto de calefacción SUHVHQWD VXSHU FLHV H WHUQDV HVSHFLDOPHQWH calientes Por este motivo se recomienda el máximo cuidado durante el funcionam...

Страница 119: ...a de haya abedul bien seca Cada tipo de leña posee características dis WLQWDV TXH WDPELpQ LQÀX HQ HQ HO UHQGLPLHQWR GH OD combustión No se recomienda el uso de coníferas pino abe to contienen elevadas cantidades de sustancias resinosas que obstruyen rápidamente el cañón de chimenea No se pueden quemar desperdicios corteza leña tratada con barnices paneles carbón materiales plásticos en dichos caso...

Страница 120: ...ar que los dispositivos de prevención de accidentes individuales y personales estén en buen estado y en perfectas condiciones de funcionamiento C Debe llevar los guantes de protección D Debe llevar calzado de protección E Debe usar herramientas con aislamiento eléctrico F Debe asegurarse que el área destinada a las fases de montaje y desmontaje estén libres de obstáculos 5 3 LUGAR DE INSTALACIÓN D...

Страница 121: ...de una toma de aire externa al local Fig 5 2 Si la pared posterior de la estufa es una pared H WHUQD UHDOL DU XQ RUL FLR SDUD OD DVSLUDFLyQ GHO DLUH comburente a una altura del suelo de aprox 20 30 cm respetando las indicaciones de medidas de la FKD WpFQLFD GHO SURGXFWR En la parte externa debe colocarse una rejilla de aireación permanente que no se cierre en zonas especialmente ventosas y expuest...

Страница 122: ...jar las tuberías a la pared utilizando abrazaderas HVSHFt FDV El acople de la salida de humos NO DEBE ESTAR conectado Con una chimenea utilizada por otros generadores calderas estufas chimeneas etc A sistemas de extracción del aire campanas respiraderos etc incluso si está entubado Queda prohibido instalar válvulas de interrupción y de tiraje El escape de productos de combustión debe estar previst...

Страница 123: ...para prevenir cualquier tipo de riesgo 6 2 1 1 Conexión a tierra Es obligatorio que la instalación disponga de una conexión a tierra y de un interruptor diferencial en cumplimiento con las leyes vigentes Fig 6 2 El conducto de salida de humos debe poseer su propia conexión a tierra 6 2 2 Instalación del panel de control El panel de control de la estufa se puede instalar sobre una pared de cartón y...

Страница 124: ...mente mientras el cronotermostato está en el estado llamada Esta operación se vuelve necesaria ante la posibilidad que se produzca un corte de alimentación eléctrica o cuando la estufa se apaga manualmente Para evitar la superposición de franjas horarias de funcionamiento se aconseja desactivar programar en OFF el temporizador de la estufa 6 2 4 Canalización aire caliente El aparato està equipado ...

Страница 125: ...FLyQ SRGUtD DSDUHFHU XQ PHQVDMH GH HUURU GH FRPXQLFDFLyQ SRU DOJXQRV segundos Ignorarlo y apagar la estufa con el interruptor de seguridad esperar algunos segundos y volverla a encender ES POSIBLE PROGRAMAR DOS CONFIGURACIONES DIFERENTES CONFIGURACIÓN 1 por defecto LFKD FRQ JXUDFLyQ SXHGH XWLOL DUVH SDUD HQFHQGHU DSDJDU OD HVWXID PDQXDOPHQWH R HQ HO PRGR SURJUDPDGR La estufa modula la potencia en ...

Страница 126: ...126 USO Y MANTENIMIENTO USO Y MANTENIMIENTO ...

Страница 127: ...su selección Todos los botones son de tipo capacitivo por lo tanto no necesitan ser presionados para su activación HV VX FLHQWH WRFDU OD VXSHU FLH 7 1 1 Led de estado ICONO AVISO DESCRIPCIÓN Pellet acabándose Indica que es necesario recargar el depósito de pellet Mantenimiento Indica que es necesario realizar un mantenimiento también puede aparecer cuando se presiona de modo repetido el botón ON A...

Страница 128: ...ratura ambiente por debajo de la cual la estufa se vuelve a encender 0 5 5 0 C 9 Temperatura anticongelación Temperatura mínima por debajo de la cual la estufa se HQFLHQGH VyOR HQ OD FRQ JXUDFLyQ OFF 3 20 C 10 Bloqueo botonera Programa el modo de bloqueo de los datos OFF Lo Hi 11 Luminosidad del visor Programa el grado de luminosidad del visor OFF 1 5 12 Modo visor Programa el modo de visualizació...

Страница 129: ...HV OFF exclue totalmente la turbina de aire y la estufa sólo funcionará por convección natural sólo para los modelos que lo tienen 1 mínima 5 máxima Auto funcionamiento automático la estufa seleccionará en modo autónomo la velocidad del ventilador y la potencia de la estufa en base a la temperatura del ambiente Hi funcionamiento ultra rápido el cual utilizar solo si hay necesidad de rescaldar rápi...

Страница 130: ...sicionar el interruptor en la posición OFF 0 J Asegurarse de no tocar el panel de mando cuando se conecta la estufa a la red eléctrica El funcionamiento de la estufa está supeditado a una alimentación eléctrica correcta En caso de IDOWD GH HQHUJtD HOpFWULFD QR HQFHQGHU OD HVWXID 8 3 PROGRAMACIONES INICIALES Antes de utilizar la estufa es necesario programar el idioma la fecha y la hora corriente 8...

Страница 131: ... temperatura leìda por la sonda ambiente 3 Se visualiza la hora actual 4 Se visualizan las horas de autonomía que faltan antes de recargar el depósito de alimentación Si la función abastecimiento a sido activada o el símbolo aparece si se está en modo leña e Presionar el botón SDUD FRQ UPDU ORV GDWRV SURJUDPDGRV 8 3 4 Programación del volumen Es posible programar el nivel de volumen del timbre elé...

Страница 132: ...volver a cerrar la puerta La estufa regula automáticamente la necesidad de aire comburente PELIGRO 3DUD HQFHQGHU HO IXHJR QXQFD XVH DOFRKRO JDVROLQD TXHURVHQR X RWURV FRPEXVWLEOHV OtTXLGRV 0DQWpQJDORV DOHMDGRV GHO IXHJR 1R XVH SDVWLOODV SDUD HQFHQGHU HO IXHJR GHULYDGDV GHO SHWUyOHR R GH RULJHQ TXtPLFR Use exclusivamente pastillas de tipo ecológico Si durante el período de funcionamiento con leña e...

Страница 133: ...ID UHDOL DUi XQ FLFOR DXWRPiWLFR GH OLPSLH D GHO EUDVHUR Para realizar un nuevo encendido se aconseja esperar a que la estufa esté completamente enfriada 9 5 2 Apagado con pellet Para apagar la estufa cuando está en el estado de funcionamiento con pellets mantener presionado el botón durante algunos segundos el icono con forma de llama se apagará O QDOL DU OD FRPEXVWLyQ OD HVWXID UHDOL DUi XQ FLFO...

Страница 134: ...tón i 3DUSDGHDUi HO YDORU GH OD WHPSHUDWXUD GHVHDGD PRGL FDU HO YDORU FRQ ORV ERWRQHV y presionar el botón j Presionar el botón SDUD FRQ UPDU ORV GDWRV SURJUDPDGRV 10 1 2 VLJQDU ORV SURJUDPDV D ORV GtDV Con esta función se pueden asignar hasta tres programas diferentes a un solo día a Usando los botones ir al menú setup y pulsar el botón b Seleccionar la contraseña 7 con el botón FRQ UPDU FRQ HO E...

Страница 135: ...FRQ HO ERWyQ c Seleccionar el submenú 8 FRQ UPDU FRQ HO ERWyQ d 3DUSDGHDUi HO YDORU PRGL FDUOR FRQ ORV ERWRQHV y 0 5 5 0 C e Presionar el botón SDUD FRQ UPDU HO GDWR SURJUDPDGR 10 4 FUNCIÓN AUTONOMÍA Con esta función se pueden visualizar las horas de autonomía restantes antes de realizar la carga de pellets HVSOD DQGR FRQ ODV WHFODV ÀHFKD HQ HO VtPEROR el visor mostrará las horas de autonomía esti...

Страница 136: ...RWRQHV OFF 3 20 C e Presionar el botón SDUD FRQ UPDU HO GDWR SURJUDPDGR 10 9 ACTIVACIÓN MANUAL DEL SISTEMA DE CARGA DE PELLET En el momento del primer encendido o si el depósito está totalmente vacío una vez cargado el pellet en el depósito es posible activar manualmente el sistema de carga para que el pellet llene el circuito correctamente a 0HGLDQWH ODV WHFODV ÀHFKD ir al menú Setup y pulsar la ...

Страница 137: ...iento sonda pellet Sonda pellet defectuosa o desconectada E106 Mal funcionamiento sonda de temperatura Sonda aire defectuosa E107 Mal funcionamiento sonda de la cámara de combustión Sonda cámara de combustión defectuosa E108 Error de seguridad térmica Problemas de recalentamiento del depósito de pellet E109 Error de presión o en el control del aire Sistema de expulsión de humos sucio Juntas estanc...

Страница 138: ...uerpos extraños del brasero Si están bloqueados es necesaria la activación manual del sistema mecánico de limpieza del brasero a 0HGLDQWH ODV WHFODV ÀHFKD ir al menú Setup y pulsar la tecla b Seleccionar la contraseña 7 con la tecla FRQ UPDU FRQ OD WHFOD c Seleccionar el submenú 32 FRQ UPDU FRQ OD WHFOD d Seleccionar la contraseña 54 e Mantener pulsada la tecla para activar el sistema de carga man...

Страница 139: ...RIO 12 2 1 Limpieza interna del hogar La estufa necesita una simple pero frecuente y atenta limpieza para garantizar siempre un UHQGLPLHQWR H FLHQWH XQ IXQFLRQDPLHQWR UHJXODU Efectuar la limpieza con el aparato apagado y frío Usar la manija para abrir la portezuela del hogar Fig 12 1 Sacar la ceniza que se deposita dentro del brasero usando para ello una paleta o un aspirador de cenizas de tipo bi...

Страница 140: ...tales de estufas No limpiar el vidrio durante el funcionamiento de la estufa y no utilizar esponjas abrasivas No humedecer la guarnición de la portezuela porque podría deteriorarse 12 2 4 Limpieza de la chimenea Debe realizarse por lo menos dos veces por año al comienzo y a la mitad de la estación de invierno o bien cuando sea necesario Fig 12 8 Si hay tramos horizontales es necesario quitar los p...

Страница 141: ...la y braseros X Conducto de evacuación humos X Ventiladores X a cargo del centro de Asistencia Técnica Autorizado 13 DESGUACE Y ELIMINACIÓN El desguace y la eliminación de la estufa quedan exclusivamente a cargo y bajo la responsabilidad del propietario quien deberá cumplir con las leyes vigentes en el propio país en materia de seguridad respeto y tutela del medioambiente Desmantelamiento y elimin...

Страница 142: ......

Страница 143: ......

Страница 144: ...s Recht vor die Eigenschaften ihrer Produkte ohne Vorbescheid zu ändern Palazzetti décline toute responsabilité en cas d erreurs dans la présente documentation et conserve la faculté de modifier sans préavis les caractéristiques de l appareil La empresa Palazzetti no se responsabiliza de los errores eventuales de este manual y tiene el derecho de modificar sin previo aviso las características de sus...

Отзывы: