background image

24 


4.


Once the information has been entered, click 

Apply

 at the bottom of the page. 

DHCP Reservation 

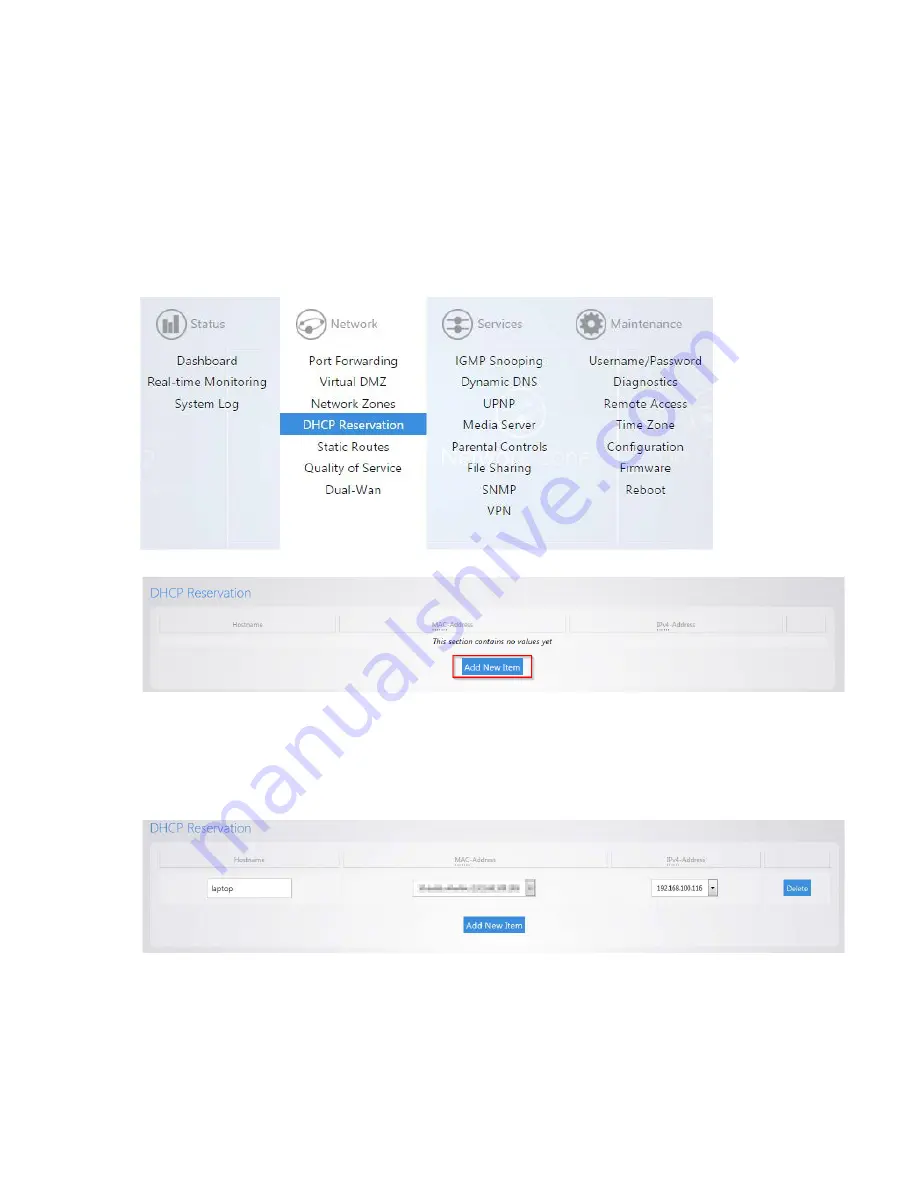
DHCP reservation allows the router to continually assign the same IP address to a device. To create a 

DHCP reservation, take the following steps. 

1.


Click 

DHCP Reservation


2.


Click 

Add New Item


3.


For the 

Hostname

 field, fill out a name. For the 

MAC-address

 field, click the drop down 

menu and select the device you would like to make a reservation for. You can also 
manually enter the mac address of the device. When entering the mac address, use 
colons. For example, 

aa:bb:cc:dd:ee:ff

. In the 

IPv4-Address

 field, select 

custom

 and 

enter the IP address that you would like to assign to the device.  


4.


Click 

Apply

 when finished. You may need to restart the network card of your device in 

order for it to receive the new IP address.  


Содержание RK-1

Страница 1: ...RK 1 High Speed Gigabit AV Router User Manual V1 0...

Страница 2: ...aution symbols that are affixed to this equipment Comply with all instructions that accompany this equipment Upon completion of any service or repairs to this product ask the service technician to per...

Страница 3: ...e Monitoring 14 Isolated Guest network 15 Virtual DMZ 17 Changing the IP address of the LAN Zone 17 VLAN settings 20 Static Route 22 DHCP Reservation 24 Quality of service 25 Dual Wan 28 Dynamic DNS 2...

Страница 4: ...his manual in its entirety Customer Service and Technical Support Pakedge Device Software Inc is committed to providing you with exceptional support on all of our products If you wish to speak with on...

Страница 5: ...assembly the operating ambient temperature of the rack environment may be greater than room temperature Make sure you install the equipment somewhere within the recommended temperature range For rack...

Страница 6: ...1 2 LINK ACT Blue USB is connected Flashing Blue USB is being accessed Off No device connected WAN 1 2 LINK ACT Blue Port is online link established Flashing Blue Activity Off No device connected LAN...

Страница 7: ...conds to factory default the settings USB 1 2 USB A Up to 5Gbps USB 3 0 USB port used for file sharing WAN 1 2 RJ 45 10 100 1000 Mbps Ethernet WAN port used for the internet connection from the ISP LA...

Страница 8: ...168 1 99 or you can simply type pakedgerouter com Note For best results we recommend using Mozilla Firefox as your web browser If you are using Internet Explorer please use version 9 or newer 3 Enter...

Страница 9: ...1 as well as the CPU and memory usage If there is new firmware available for the RK 1 you will see a message alerting you with an option to download it Under Network you will find a summary of the net...

Страница 10: ...es PPPoE Used by DSL companies such as AT T Determine what type of internet connection you have from your Internet Service Provider ISP and then follow one of the three instruction sets below to conne...

Страница 11: ...10 2 Edit the WAN Zone 3 Select Static Address for the Protocol 4 Click on Switch Protocol to switch the WAN Zone to Static...

Страница 12: ...rom the netmask drop down menu to enter a custom subnet mask Click Apply The router now has the Static IP configured on it Connecting to the Internet Continued PPPoE To configure the router using a PP...

Страница 13: ...col 5 Enter the username that the ISP assigned under the PAP CHAP username field Enter the password in the PAP CHAP password field For the Use custom DNS servers enter the DNS server you would like to...

Страница 14: ...non Public IP address positioned above the RK 1 in the network If the RK 1 is positioned behind another router this feature should be disabled Port Forwarding Port forwarding allows services inside th...

Страница 15: ...Internal port For the internal IP address select custom and enter 192 168 1 50 Leave the enable box checked Click Apply The Port forward information will be saved in this section Real Time Monitoring...

Страница 16: ...1 has an isolated guest network option When enabled port 5 on the router will be turned into a guest network port Any devices connected on that port will be placed on the Guest network The Guest netw...

Страница 17: ...e toggle on off switch under the Isolated Guest network zone 3 You will get a message letting you know that port 5 will be turned into the Isolation Guest network port Click OK to enable the isolated...

Страница 18: ...down menu If the device is not listed you can select custom to manually enter the IP address of the device you would like to place in the DMZ Click Apply to finalize the configuration Note When you en...

Страница 19: ...18 1 Click on Network Zones 2 Click Edit 3 Enter the new IP address you wish to use in the IP Address field In the following example we change the IP address of the router to 192 168 10 99...

Страница 20: ...tes the amount of IP addresses that the router can hand out 5 The Lease time field allows you to view modify DHCP IP address lease time The following format must be used A D represents days an H repre...

Страница 21: ...orks to increase efficiency on your network The RK 1 will come with VLANs 2 6 To modify any of the VLAN settings take the following steps 1 Click Network Zones 2 VLANs 2 6 will be displayed towards th...

Страница 22: ...t VLAN ID Enable Inter VLAN Routing allows this VLAN to communicate with other VLANs Unchecking this option would give VLAN2 internet access only VLAN 2 would not be able to communicate with any other...

Страница 23: ...P address lease time The following format must be used A D represents days an H represents hours and an M represents minutes For example if you wanted to change the lease time to be 3 days 2 hours and...

Страница 24: ...is the IP Address traffic should be forwarded to in order to reach that new network 192 168 1 111 An example of this would be the WAN IP address of a second router connecting to the LAN of the RK 1 In...

Страница 25: ...field fill out a name For the MAC address field click the drop down menu and select the device you would like to make a reservation for You can also manually enter the mac address of the device When...

Страница 26: ...at it is sent ahead of other data that can function properly with some latency such as ordinary web traffic To configure QoS take the following steps 1 Click Quality of Service 2 Check Enable 3 You ca...

Страница 27: ...e IP address the policy will apply to If you select all the policy will apply to all devices on the network If your device is listed in the drop down menu you can select it otherwise select custom and...

Страница 28: ...oth 10 The Ports column allows you to select which ports the data you are prioritizing uses Click the drop down menu and select custom 11 You can then fill in the port number that your application use...

Страница 29: ...lows you to use two wan ports on the router in redundancy mode If WAN1 loses internet access WAN2 will take over To configure Dual Wan take the following steps 1 Click Dual Wan 2 Check the enable box...

Страница 30: ...tname while having a dynamically changing IP address The RK 1 has two options for DDNS The first is under the Pakedge DDNS tab Pakedge offers its own DDNS service that works alongside our BakPak cloud...

Страница 31: ...ntials scroll down to the HostName field Pakedge DDNS uses the name BakPakddns com namespace where name is a name you choose Enter a name you would like to use and click Check Availability to have the...

Страница 32: ...le we can click Claim Hostname 8 Scroll towards the top and you will see a message stating that you have claimed your name The RK 1 is now using the name we have claimed 9 You can click on Status Chec...

Страница 33: ...e using at any given time by simply entering a new hostname into the router that is available for use and then clicking claim hostname 12 You can change the BakPak user on the router at any given time...

Страница 34: ...a non pakedge DDNS take the following steps 1 Click Dynamic DNS 2 Click Other Dynamic DNS 3 Check the enable box For the Service drop down menu select your DDNS provider For the Hostname enter the ful...

Страница 35: ...for changed IP every field The Force update every field indicates when the router will force an update with the DDNS provider The Force time unit indicates the unit of time that is used for the Force...

Страница 36: ...p traffic from going out to the internet To configure the parental controls take the following steps 1 From the Services menu click on Parental Controls 2 You will see two tabs on this page One is Blo...

Страница 37: ...sites by clicking on Add New Item 6 Click Apply when you are finished The websites you entered will now be blocked 7 If you use the Block Websites feature the RK 1 will also need to use a secondary IP...

Страница 38: ...Add New Item in the bottom box 10 Enter a name in the description field 11 For the Clients Devices hit the drop down menu and you will see a list of devices that the router has discovered on the netwo...

Страница 39: ...y You can set the start time and stop time You can also select which days you wish the policy to apply on Click Apply towards the bottom to finalize the settings 15 You can block a device from complet...

Страница 40: ...File Sharing File sharing allows you to connect a USB drive onto the router and share resources The RK 1 offers both Local and Remote file sharing Local File Sharing allows you to share the contents...

Страница 41: ...e enable box Click Apply 3 You can now access the USB drive over the local network 4 You will be prompted to enter a username and password when attempting to access the USB drive By default the userna...

Страница 42: ...the drive and not write to it 6 Once you have enabled the file sharing and connected a USB drive into the RK 1 you will see your drive listed in the file shares menu 7 You can rename the Disk Name Do...

Страница 43: ...change the username and password used to remotely access the USB drive Simply enter the new credentials and click Apply 4 Click Apply to finalize the settings 5 To remotely access the USB drive enter...

Страница 44: ...e USB drive to view the files and folders inside of it Click on a folder to view the contents of it In our example we will click on a folder titled Folder one 9 You will see the contents of the folder...

Страница 45: ...ad to retrieve the file from the USB drive You can also click Delete to remove it 11 You can upload a file onto the USB drive remotely Click on file upload icon 12 Navigate to the file you want to upl...

Страница 46: ...45 13 Click Upload 14 Your file will now be on USB drive...

Страница 47: ...46 15 You can create folders as well Simply enter the folder name and click Create Folder As an example we will create a folder titled Folder two...

Страница 48: ...47 16 The folder will now be displayed 17 To return to the previous directory click the Back button 18 You can click RK 1 fileshare to return to the root of the USB drive...

Страница 49: ...w you how to map the USB drive on the RK 1 on various operating systems Mac OS X Take the following steps to map the USB drive on Mac OS X 1 Click Go at the upper left 2 Click Connect to Server 3 In t...

Страница 50: ...guest or registered user Select registered user In the username and password field enter the credentials you have configured on the RK 1 5 The USB drive will now be mapped on your computer and you wil...

Страница 51: ...50 Windows 7 Take the following steps to map the USB drive on the RK 1 in windows 7 1 Click the start button at the bottom left hand side Click Computer 2 Click Map Network Drive...

Страница 52: ...51 3 Click Browse 4 Click on RK 1 to expand it Click on the folder you want to map underneath it to select it Click OK...

Страница 53: ...52 5 Check the box titled Connect using different credentials Click Finish 6 Enter the username and password to access the folder Click OK 7 You will now have access to the files on the USB drive...

Страница 54: ...8 10 Take the following steps to map the USB drive on the RK 1 for windows 8 1 Press the windows button on your computer Type computer and press enter 2 Click Computer towards the top 3 Click Map net...

Страница 55: ...54 4 Click Browse 5 You will see the RK 1 You will also see all of the folders on the USB drive connected to the RK 1...

Страница 56: ...55 6 Select the folder you want to map and click OK 7 Enter the credentials to access the folder...

Страница 57: ...56 8 Your folder field will have auto populated with the name of the folder Click Finish 9 You will now have access to the files on the USB drive 10 Your folder will now show up as a mapped drive...

Страница 58: ...57...

Страница 59: ...58 Windows XP Take the following steps to map a USB drive in Windows XP 1 Click My Computer 2 Click Tools Map Network Drive...

Страница 60: ...59 3 Click Browse 4 Select the folder you want to map Click OK 5 Click Finish...

Страница 61: ...60 6 Enter the credentials to access the folder 7 You will now have access to the folder...

Страница 62: ...61 8 Your folder will now be mapped on your computer...

Страница 63: ...box Port sets the HTTP port used for media access Friendly Name is the name that will be shown for this media server instance Root Container describes the type of media files to be accessed through th...

Страница 64: ...y to finalize the settings VPN The RK 1 supports Point to Point Tunnel Protocol VPN You can connect to the router remotely and have access to all network resources To configure the VPN take the follow...

Страница 65: ...sword Click Apply to finalize the settings 7 When you connect to the VPN you will have full access to all of your devices on the network Note When you connect to the VPN you will receive an IP address...

Страница 66: ...ed into the RK 1 navigate to Maintenance Username Password 2 Enter the password you would like to use for the router There are no specified requirements for the password You will need to enter the pas...

Страница 67: ...ew password Diagnostics The Diagnostics page allows you to easily troubleshoot your network Ping Ping allows you to test communication between two devices on the network To ping from the RK 1 take the...

Страница 68: ...in instead 3 After a few moments your ping results will be displayed Traceroute A traceroute allows you to see how many routers or hops there are between the router and a certain destination To perfo...

Страница 69: ...different website or IP address you may enter it instead 3 After a few moments your traceroute results will be displayed NSlookup NSlookup allows you to find name server information for domains To pe...

Страница 70: ...ou can type it in instead 3 After a few moments your NSlookup results will be displayed Remote Access The Remote Access page allows you to change the default port used to access the router remotely To...

Страница 71: ...able Secure Web Access option 3 The Support Access section By default this is enabled This allows the support team at Pakedge to perform advanced diagnostics on your router It is recommended that you...

Страница 72: ...71 1 Click Time 2 Select your time zone from the drop down menu 3 Click Apply to finalize your settings...

Страница 73: ...ory Default the router take the following steps 1 Click Configuration 2 Click Factory Default 3 The router will now factory default itself You can also factory default the router by pressing the pin h...

Страница 74: ...take the following steps 1 Click Configuration 2 Click Download Configuration 3 The configuration file will be downloaded to your computer Restore Configuration To restore a configuration from a previ...

Страница 75: ...74 2 Click Browse 3 Once you have selected your backup file click Restore 4 The router will then upload your configuration file and reboot itself...

Страница 76: ...displayed towards the bottom of the page 2 If there is new firmware available for your router you will see a message on the dashboard informing you You can click Download Now to have the router update...

Страница 77: ...u uncheck this box before clicking Update the router will factory default itself and come back up with the new firmware and theRK 1 s default configuration 6 The firmware update will take a few minute...

Страница 78: ...77 2 Click Reboot 3 The router will now reboot...

Страница 79: ...age to living structure failure resulting from accident for example flood electrical shorts insulation misuse abuse neglect mishandling misapplication faulty or improper installation or setup adjustme...

Страница 80: ...uthorized dealer 19 5 Important Warranty Registration Please register your product at www pakedge com It is imperative that Pakedge knows how to reach you promptly if we should discover a safety probl...

Страница 81: ...ut voltage 100V 240V AC 0 9A 50 60Hz Power consumption 15 4 watts Operating temperature 0 40 Storage temperature 10 70 Relative humidity 20 85 non condensing Spanning Tree IEEE 802 1s Spanning Tree Pr...

Страница 82: ...Log Supported Configuration File Download Upload Supports Download Upload configuration File via WEB Upgrade Firmware Supports Upgrade Firmware via WEB Debug PING Supported TRACEROUTE Supported NSLOOK...

Страница 83: ...82...

Страница 84: ...83 pakedgedevice software inc 3847 Breakwater Avenue Hayward CA 94545 17011 Beach Blvd Suite 600 Huntington Beach CA 92647 650 385 8702 www pakedge com sales pakedge com...

Отзывы: