T6M Mobile Transceiver
User Guide
Handbook Part Number: 31-36000TRM
Страница 1: ...T6M Mobile Transceiver User Guide Handbook Part Number 31 36000TRM...
Страница 2: ...cs Northfields Market Deeping Peterborough England Telephone From UK 01778 345434 From outside UK 44 1778 345434 Fax From UK 01778 342877 From outside UK 44 1778 342877 T6M User Guide Page 2 Amendment...
Страница 3: ...eres q DO NOT operate equipment at high volume levels Hearing experts advise against continuous high volume operation If you experience ringing in your ears reduce the volume level or discontinue use...
Страница 4: ...ation on 8 33 kHz channel spacing is restricted to European customers q The mobile transceiver power output must not exceed the output necessary for satisfactory technical operation taking account of...
Страница 5: ...demark of International Business Machines Microsoft Is a registered trademark of Microsoft Corporation in the USA and other countries Windows Is a registered trademark of Microsoft Corporation in the...
Страница 6: ...ng Modes 9 Normal Mode 9 Priority Mode 10 Scan Mode 10 Programming the Transceiver s Personality 10 Section 2 Specification General 11 Dimensions and Weight 12 Supply 12 Receive Circuit 12 Transmit Ci...
Страница 7: ...nd Error Codes 27 Switching On and Off Ignition Sense not Connected 28 Switching On and Off When Ignition Sense is Connected 28 Operating the Radio in Normal Mode 29 Selecting Normal Mode 29 Selecting...
Страница 8: ...Beeps 36 Hold on Scan 37 Installing the Programming Software onto a Laptop or PC 37 Creating a New Personality 37 Saving a Personality 42 Opening a Saved Personality 43 Loading a Personality into the...
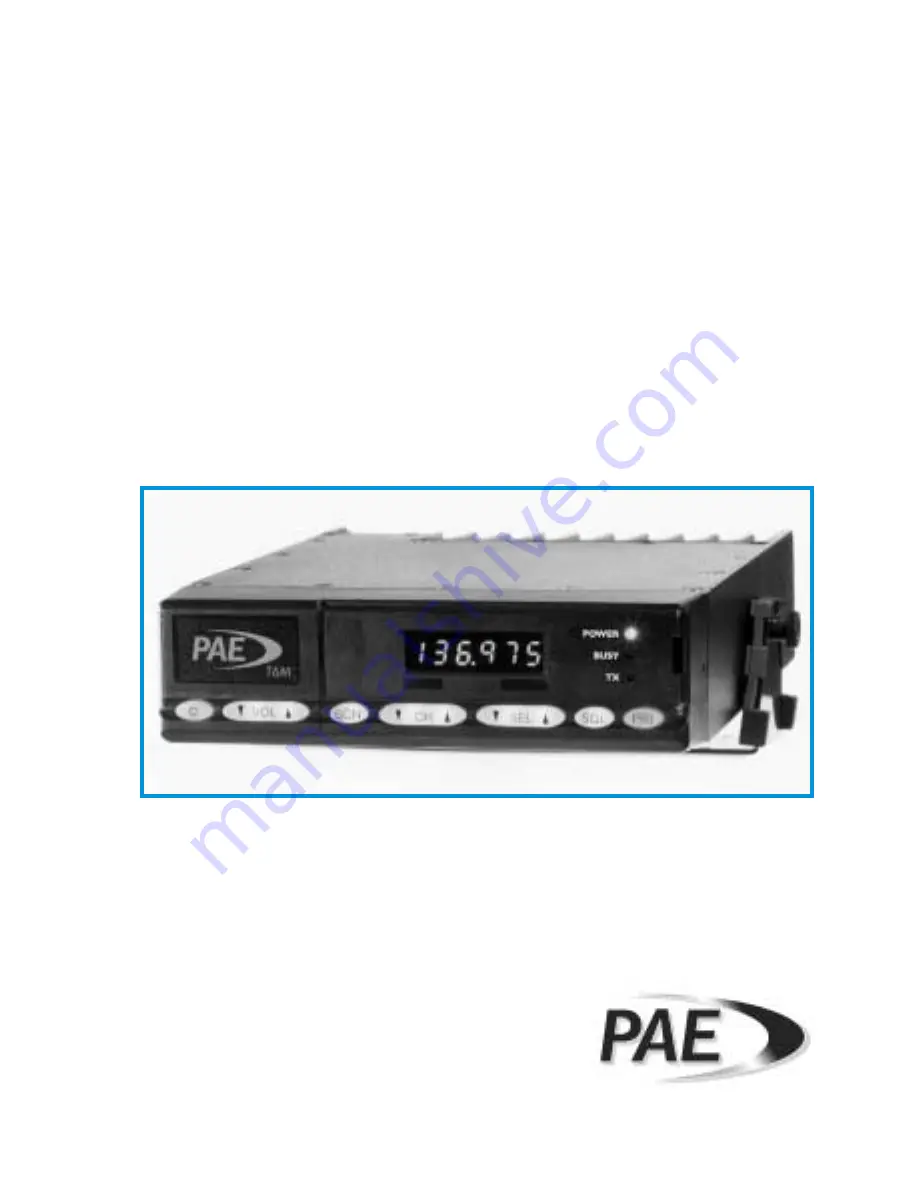
Страница 9: ...118 to 136 9916 MHz The transceiver provides a nominal 8 watt amplitude modulated AM output and operates on both 25 kHz and 8 33 kHz spaced channel frequencies Designed for installation within a vehic...
Страница 10: ...channel frequencies the required operating modes and various secondary options When a T6M is received from PAE the personality is either q A personality programmed to the user s specific requirements...
Страница 11: ...s can be programmed into the radio The channels can have 25 kHz spacing 8 33 kHz spacing or a mixture of both Priority mode allows up to 15 of the stored channels to be allocated to a priority list Ch...
Страница 12: ...lectivity With 8 33 kHz spacing 6 dB at 3 kHz 60 dB at 8 33 kHz With 25 kHz spacing 6 dB at 8 5 kHz 70 dB at 25 kHz Intermodulation suppression 70 dB Spurious response suppression 80 dB Audio power ou...
Страница 13: ...before disconnecting the battery Power saver devices are available that plug into the cigar lighter or accessories socket and prevent loss of memory information on vehicle systems T6M User Guide Page...
Страница 14: ...ntity 6 3 Whip antenna complete with approximately 4 8 m of coaxial cable Selecting a Mounting Location Choose a location for the radio s mounting bracket Avoid mounting in small enclosed spaces for e...
Страница 15: ...sceiver in the bracket using the rubber grips and fixing knobs included in the installation kit The rubber grips can be fitted in two ways One way locks the unit rigidly in the bracket the other provi...
Страница 16: ...t located on the underside of the transceiver Fit the strain relief grommet into place Installing the Loudspeaker Install the loudspeaker where it can be easily heard using the mounting bracket and sc...
Страница 17: ...alled To install the power cable refer to the illustration shown above and 1 Route the power cable to the battery and cut it to the required length If it is necessary to drill a hole in the firewall o...
Страница 18: ...drop If noise is still a problem a dc noise filter should be fitted In some cases a master isolation switch is fitted to the vehicle for example in the case of emergency vehicles and it may be a legal...
Страница 19: ...e the antenna should be mounted in the centre of the roof Alternative positions give degraded performance the numbers on the diagram below giving the order of preference The antenna radiation patterns...
Страница 20: ...centre pin of the coaxial connector and the vehicle chassis 5 Check for low resistance between the body of the connector and the vehicle chassis 6 Connect the antenna feeder cable to the transceiver...
Страница 21: ...es and press the PTT to cause the radio to transmit Measure the PEP and VSWR 5 PEP should be between 7 and 30 Watts dependent on modulation and VSWR less than 1 5 1 6 Carry out a functional check by s...
Страница 22: ...Intentionally Blank T6M User Guide Page 22...
Страница 23: ...be selected using the radio s front panel controls Priority mode is similar to Normal mode but allows faster selection of up to 15 frequently used channels In Scan mode the radio scans a number of pr...
Страница 24: ...when the radio is keyed or when the VOLs or VOLt button is pressed Note that the display can be reinstated by pressing any other button but doing so may also alter other settings Warning Beeps When pr...
Страница 25: ...If a limit has been set and warning sounds have been set the radio produces warning beeps 10 seconds before the transmission time expires Front Panel Display for 25 kHz and 8 33 kHz Channel Spacing Wh...
Страница 26: ...0 MHz 118 1750 MHz 118 1833 MHz 118 1916 MHz 25 kHz 8 33 kHz 8 33 kHz 8 33 kHz 25 kHz 8 33 kHz 8 33 kHz 8 33 kHz 25 kHz 8 33 kHz 8 33 kHz 8 33 kHz 25 kHz 8 33 kHz 8 33 kHz 8 33 kHz 25 kHz 8 33 kHz 8 3...
Страница 27: ...fault on the power amplifier has been detected Switch off the transceiver and switch on again after a few minutes If the fault persists the transceiver should be replaced with a serviceable spare The...
Страница 28: ...button Switching On and Off When Ignition Sense is Connected When ignition sense is connected see Installation procedures the radio switches on when the vehicle s ignition is switched on The radio can...
Страница 29: ...scroll up or down through the channel frequencies that are programmed into the radio Release the button when the required frequency is displayed In conjunction with the CHs and CHt buttons the SELs a...
Страница 30: ...umber between 1 and 20 3 Press the SQL button while the display is showing S and the current level 4 Check that the display shows S OFF 5 Check that after a few seconds the display changes to show the...
Страница 31: ...ty mode by pressing the PRI button When selected the display shows P every few seconds Selecting a Priority Channel Frequency To select the required channel frequency press the SELs or SELt button to...
Страница 32: ...s not resume until the CHs button is pressed again The radio can be programmed with up to 15 scan groups each containing up to 15 channel frequencies Squelch is automatically switched on when scan mod...
Страница 33: ...using the programming kit 70 T6MPMKIT available from PAE The kit contains CD ROM or floppy disk based software and a programming lead A laptop computer or PC must be available to compile the personal...
Страница 34: ...ps on page 36 Warning beeps On or off On See Warning Beeps on page 36 Warning beep volume 1 to 7 3 See Warning Beeps on page 36 Personality description 46 character alphanumeric string Empty string A...
Страница 35: ...ed as priority channels Scan group 1 to 15 or not assigned No scan groups assigned Up to 15 channels can be assigned to each of 15 scan groups A channel frequency can be included in more than one grou...
Страница 36: ...hat the display can be reinstated by pressing any other button but doing so may also alter radio settings Warning Beeps When enabled the following conditions cause a warning beep to be heard when an a...
Страница 37: ...om Windows Explorer select the appropriate drive and run the programme called Setup exe 3 Follow the on screen instructions The programming files are stored in the directory C Program Files PAE unless...
Страница 38: ...sure the box is empty Notes If the Use Channel Strings facility is selected the maximum number of channel frequencies that can be stored is reduced from 760 to 400 Descriptive text is shown on the fre...
Страница 39: ...hold in scan mode is selected if not checked pause in scan mode is selected 10 Busy On Time This is the time a radio must be busy when scan mode is selected before the radio holds or is paused Enter a...
Страница 40: ...r the channel spacing The ICAO format is illustrated on page 26 18 If the frequency is required to be included in the Priority list key in Y in the priority column If not required ensure the column re...
Страница 41: ...was selected from the General page descriptive text maximum of 16 characters can be keyed into the Identity column 22 One frequency channel entry is now complete Further channels can be entered in th...
Страница 42: ...ick method of displaying the frequency is by clicking on the Find Channel box This displays the Find frequency sub page Enter the frequency on the sub page and click on Find it The frequency is then d...
Страница 43: ...ing and display the required personality on screen 6 From the programming menu bar select Program radio and then Personality The programmer automatically verifies the personality is valid and download...
Страница 44: ...e programming lead and reconnect the radio s microphone Printing a Personality Report A personality can be printed as follows 1 From the programming menu select Report then Generate 2 The programmer a...
Страница 45: ...er serviceable parts List of Spares The following spares are available from PAE When ordering the part number should always be quoted 1 Programming kit includes CD ROM or floppy disk and programming l...