background image

User’s Manual 


70 


Pressing the   (Play/Pause) button will extract the video associated with the Text Input and display the first image of 
the event.  Pressing the   button will start playing the “event” video segment.  Pressing 

PLAYBACK

 returns to live 

monitoring. 


NOTE:  It is possible that no recorded image displays on the current screen.  Press the 

DISPLAY

 button and change 

the screen mode to 4x4.  You will be able to easily see the camera have recorded video during target time.


Text Input information will be overlaid on the image while the recorded video is played at regular speed. 


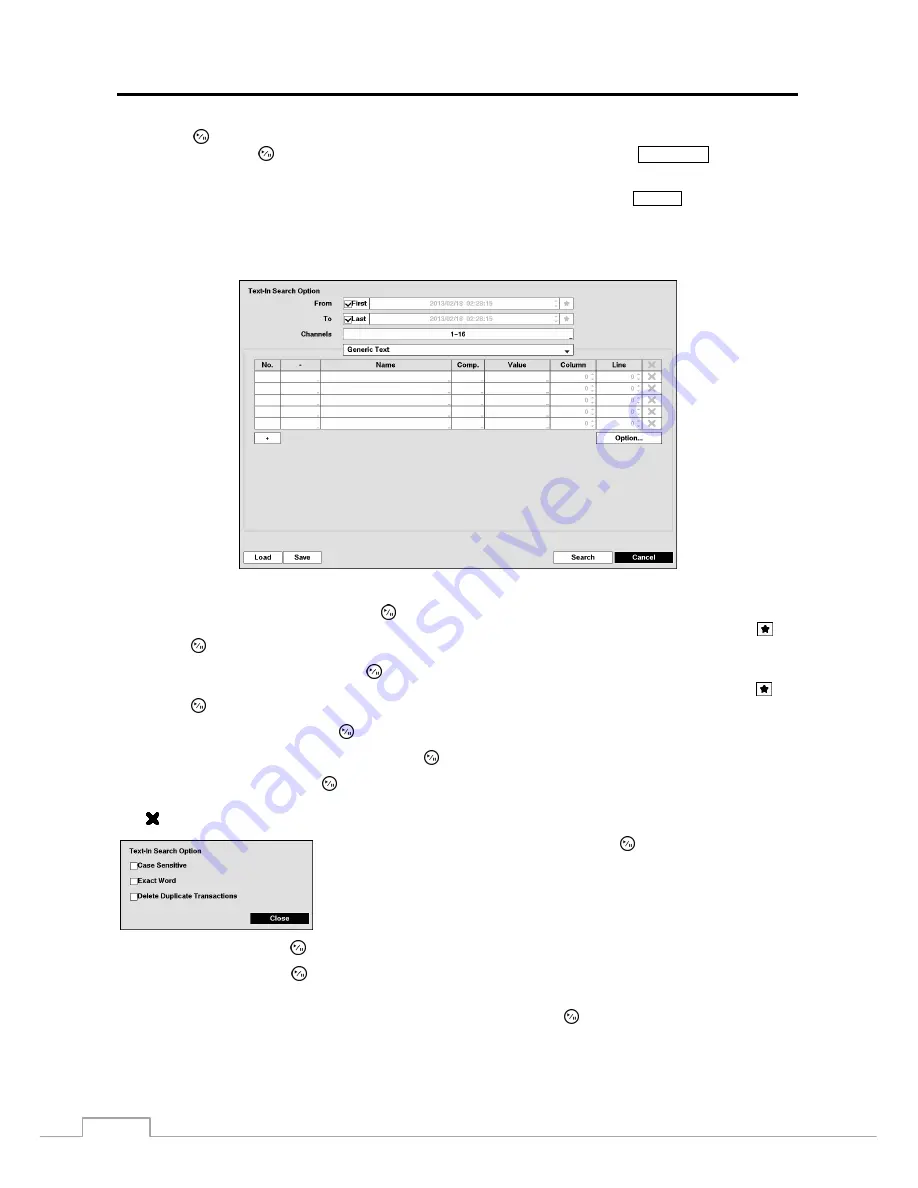
You can also narrow your event search by selecting the 

Option…

 button and setting up the new search condition. 


You can search video from the first to last recorded images, or you can set the start and stop times and dates. 


Highlight the box beside 

From 

and press the   button to toggle between On and Off.  When set to Off, you can enter 

a specific Date and Time.  When set to On, the search will be from the first recorded image.  When highlighting   and 
pressing the 


button the bookmark list displays and the bookmark point you selected will be the starting date and time. 


Highlight the box beside 

To 

and press the   button to toggle between On and Off.  When set to Off, you can enter a 

specific Date and Time.  When set to On, the search will be from the last recorded image.  When highlighting   and 
pressing the 


button the bookmark list displays and the bookmark point you selected will be the ending date and time.


Highlight the 

Channel

 and press the   button.  Select the text-in devices that you want to search for text input. 


Highlight the 

Text Input Device 

box and press the   button.  Select your Text Input Device from the list. 


Highlighting the + and pressing the   button allows you to add a new set of search parameter.  Set up the desired search 
parameter.  Refer to the 

Appendix – Text-In Search Examples

 for further information on setting up search parameters.  

The   column can be used to delete a set of search parameter or entire sets of search parameters. 


Highlighting the 

Option… 

box


and pressing the   button allows you to select 

whether or not the search will find only text strings in which the case matches, 
find only exact words that match with the word you entered during text-in setup, 
or delete transactions duplicated within text input strings. 


Highlight 

Load

 and press the   button to load saved search option settings.  Select the desired search option settings. 


Highlight 

Save

 and press the   button to save the current search option settings.  A virtual keyboard appears that you 

can use to enter the search option name. 


Once you set your desired search conditions, highlight 

Search

 and press the   button to display the search results in 

the 

Text-In


Search

 screen.  Selecting 

Cancel

 exits the screen without saving the changes. 


Содержание PDR960H-16RT

Страница 1: ...PDR960H 8RT S84676 8 Channel Digital Video Recorder User Manual Digital Video Recorder PDR960H 16RT S84677 16 Channel Digital Video Recorder ...

Страница 2: ......

Страница 3: ...NERATES USES AND CAN RADIATE RADIO FREQUENCY ENERGY AND IF NOT INSTALLED AND USED IN ACCORDANCE WITH THE INSTRUCTION MANUAL MAY CAUSE HARMFUL INTERFERENCE TO RADIO COMMUNICATIONS OPERATION OF THIS EQUIPMENT IN A RESIDENTIAL AREA IS LIKELY TO CAUSE HARMFUL INTERFERENCE IN WHICH CASE USERS WILL BE REQUIRED TO CORRECT THE INTERFERENCE AT THEIR OWN EXPENSE WARNING CHANGES OR MODIFICATIONS NOT EXPRESSL...

Страница 4: ...echnician to restore the equipment to its normal operation E If the equipment has been dropped or the cabinet damaged F When the equipment exhibits a distinct change in performance this indicates a need for service 15 Replacement Parts When replacement parts are required be sure the service technician has used replacement parts specified by the manufacturer or that have the same characteristics as...

Страница 5: ...d Connector 6 Chapter 3 Configuration 7 Front Panel Controls 7 Camera Buttons 1 to 16 8 HDD LED 8 Alarm Out LED 8 Network LED 8 Clip Copy LED 8 Power LED 9 PANIC Button 9 ALARM Button 9 CLIP COPY Button 9 ZOOM PTZ Button 9 DISPLAY SPOT Button 9 GROUP SEQUENCE Button 9 PLAYBACK Button 9 MENU CAMEO Button 10 Arrow Buttons 10 PLAY PAUSE Button 10 USB Port 10 ID Button on Remote Control 10 Bookmark Bu...

Страница 6: ...al 40 LAN 41 FEN 43 RTSP 44 WebGuard 45 VNC 45 Notification Setup 46 Callback 46 Mail 47 SNS 49 Schedule 49 Display Setup 50 OSD 50 Main Monitor 51 Spot Monitor 52 Chapter 4 Operation 53 Turning on the Power 53 Live Monitoring 53 Live Monitoring Menu 54 Active Cameo Mode 56 Zoom Mode 56 PTZ Mode 56 Event Monitoring 57 Covert Camera 58 Spot Monitoring 58 Status Monitoring 59 Recording Video 60 Pani...

Страница 7: ... DVR front panel 7 Figure 4 Infrared remote control 8 Figure 5 Login screen 11 Figure 6 Logout screen 11 Figure 7 Setup screen 12 Figure 8 System General setup screen 13 Figure 9 System Date Time setup screen 20 Figure 10 System User setup screen 22 Figure 11 System Storage setup screen 24 Figure 12 System System Event setup screen 25 Figure 13 Record General setup screen 26 Figure 14 Record Sched...

Страница 8: ...setup screen 49 Figure 36 Notification Schedule setup screen 49 Figure 37 Display OSD setup screen 50 Figure 38 Display Main Monitor setup screen 51 Figure 39 Display Spot Monitor setup screen 52 Figure 40 Live Monitoring menu 53 Figure 41 PTZ Select Camera menu 56 Figure 42 PTZ Preset menu 57 Figure 43 Sequence menu 58 Figure 44 Event Status Event Status screen 59 Figure 45 Event Status Storage s...

Страница 9: ... DVD RW Drive IR Remote Control Self diagnostics with automatic notification including hard disk drive S M A R T protocol Technical Overview In addition to replacing both a time lapse VCR and a multiplexer in a security installation your DVR has many features that make it much more powerful and easier to use than even the most advanced VCR The DVR converts analog NTSC or PAL video to digital image...

Страница 10: ...there is an eSATA port that can be used to record video to an external hard disk drive Figure 1 Typical DVR installation NOTE This manual covers the 8 and 16 channel digital video recorders The DVRs are identical except for the number of cameras and alarms that can be connected and the number of cameras that can be displayed For simplicity the illustrations and descriptions in this manual refer to...

Страница 11: ...other items that make up part of your system Figure 2 16 Channel DVR rear panel Video Input Video Loop Through Audio In Out eSATA Port Alarm Input Output RS485 Port RS232 Port Factory Reset Switch Video Out Network Port Power Cord Connector Your DVR can be used with either NTSC or PAL equipment NOTE You cannot mix NTSC and PAL equipment For example you cannot use a PAL camera and an NTSC monitor V...

Страница 12: ...nnect a wire press and hold the button above the wire and pull out the wire AI 1 to 16 Alarm In You can use external devices to signal the DVR to react to events Mechanical or electrical switches can be wired to the AI Alarm In and GND Ground connectors The threshold voltage of electrical switches for NC Normally Closed is above 2 4V and for NO Normally Open is below 0 3V and should be stable at l...

Страница 13: ...lose any settings you have saved To reset the unit you will need a straightened paperclip 1 Turn the DVR off 2 Turn it on again 3 While the DVR is initializing the front panel LEDs will blink When the front panel LEDs blink poke the straightened paperclip into the unlabeled hole to the left of the HDMI connector 4 Hold the reset switch until the DVR s internal buzzer sounds twice 5 Release the res...

Страница 14: ...nector is not designed to be connected directly with cable or wire intended for outdoor use Power Cord Connector WARNING ROUTE POWER CORDS SO THAT THEY ARE NOT A TRIPPING HAZARD MAKE CERTAIN THE POWER CORD WILL NOT BE PINCHED OR ABRADED BY FURNITURE DO NOT INSTALL POWER CORDS UNDER RUGS OR CARPET THE POWER CORD HAS A GROUNDING PIN IF YOUR POWER OUTLET DOES NOT HAVE A GROUNDING PIN RECEPTACLE DO NO...

Страница 15: ...the buttons have multiple functions The buttons on the infrared remote control while laid out differently perform the same functions as those on the front panel The following describes each button and control Take a few minutes to review the descriptions You will use these to initially set up your DVR and for daily operations NOTE The infrared sensor on the DVR is just to the right of the camera b...

Страница 16: ...on 1 zooms in the screen and the button 2 zooms out the screen pressing the button 3 focuses near and button 4 focuses far and pressing the button 5 moves to the preset and button 6 saves the preset HDD LED The HDD LED flickers when the DVR is recording or searching video on the hard disk drive Alarm Out LED The Alarm Out LED is lit when alarm output or internal buzzer is activated Network LED The...

Страница 17: ...arrow buttons or MENU CAMEO button allows you to control properly configured cameras DISPLAY SPOT Button Pressing the DISPLAY SPOT button toggles between different display formats The available formats are PIP 2x2 1 5 1 7 3x3 and 4x4 2x2 1 5 1 7 3x3 and 4x4 on a Spot Monitor Pressing and holding the button for three seconds or longer allows you to select which cameras will display on the Spot moni...

Страница 18: ...eed Pressing the button again toggles the playback speed from and The screen displays and respectively When in the pause mode pressing the button moves to the next image and pressing the button moves to the previous image PLAY PAUSE Button In the live monitoring mode pressing the button freezes the current screen and the screen displays icon When in the playback mode pressing the button plays back...

Страница 19: ... press the button to save the changes and exit the screen If you do not wish to save the changes highlight Cancel and press the button to exit the screen Press the MENU button or move the mouse pointer on the right edge of the screen and then select Login in the Live Monitoring menu to enter the setup screens The Login screen appears Select a User and enter the password by pressing the appropriate...

Страница 20: ...ow keys to highlight the character you want in the name or title and press the button That character appears in the title bar and the cursor moves to the next position Pressing toggles between the upper and lower case keyboards backspaces and deletes entered characters Pressing toggles between different keyboard layouts You can use up to 31 characters including spaces in your title Special charact...

Страница 21: ... the software connect a USB device containing the upgrade package file to the DVR Highlight Upgrade and press the button The Upgrade screen appears The screen displays the upgrade package file names that are available The rui indicates that the file is for software upgrades and ofi indicates that the file is for optical drive firmware upgrades Select the desired file and press the button Highlight...

Страница 22: ...he remote site You can scroll through the log pages by using the Up and Down arrows or you can go directly to a log page by entering the log page number in the box at the bottom left of the screen Highlight Close and press the button to exit the screen To export the system log information connect the USB device to the DVR Highlight Export and press the button Highlight the box beside File name and...

Страница 23: ...basic operation Select either Quick wizard or Network wizard and select the Next button to start the selected setup wizard NOTE Selecting the Cancel button throughout the screens exits the Quick Setup Wizard without saving your changes and returns to the main setup screen If you selected the Quick wizard selecting the Next button starts the Quick Setup Wizard ...

Страница 24: ... map Use Daylight Saving Time Selecting the box sets the system to use daylight saving time NOTE The Date Time will be set and the clock will start when you click the Next button Record Method Setup Select the desired recording mode from Motion Event Record Recommended Continuous Motion Event Record Continuous Record NOTE You should understand each recording mode before setting the DVR s recording...

Страница 25: ...ality and recording speed of each camera channel will be set as show below according to the Record Method and Record Video Quality you set HVQPP SRP LRTPP Motion Event Record Very High 30 ips High 5 ips Standard 3 ips Continuous Motion Event Record Very High 30 ips Time Very High 30 ips Event High 5 ips Time Very High 30 ips Event Standard 3 ips Time High 5 ips Event Continuous Record Very High 30...

Страница 26: ...User s Manual 18 If you selected the Go to Network Setup select the Next button to start the Network Setup Wizard Internet Connection Select whether or not your DVR is connected to the Internet ...

Страница 27: ...The network configuration you set should be tested by selecting Test otherwise the Next button will cannot be selected and you cannot move to the next step Use DSL PPPoE Setup Selecting the box allows you to set up the DSL network Entering the ID and password for DSL connection is required FEN Setup FEN Name Enter the DVR name to be registered on the FEN server NOTE The FEN Name you entered should...

Страница 28: ... of the time will highlight Use the Up and Down arrow buttons to change the number Use the Left and Right arrow buttons to move between hour minutes and seconds Once you have the correct time press the button Highlight the Format box beside Time and press the button Select from the three available time formats and press the button to save your selected format NOTE The clock will not start running ...

Страница 29: ...ation from 30 minutes to 1 day at various time intervals Last Sync Time displays the last time the DVR was synchronized with the time server Highlight Run as Server and press the button Pressing the button toggles between On and Off When it is On the DVR you are setting up will run as a time server Highlighting Holiday and pressing the button displays the Holiday screen You can set up holidays by ...

Страница 30: ...and save it in a secure place If the password is forgotten the unit must be reset using the Factory Reset Button and all data settings will be lost Highlighting a User Name and pressing the button allows you to add or change the password assigned to that user You can also change the group to which the user is assigned The column can be used to delete a User Name or an entire Group If the is grayed...

Страница 31: ...ime on a local system or a PC running RAS Data Clear The user can clear all video data or format disks on a local system or a PC running RAS PTZ Setup The user can establish all PTZ settings on a local system or a PC running RAS Alarm Out Setup The user can establish all Alarm Out settings on a local system or a PC running RAS Covert Camera Setup The user can establish all Covert Camera settings o...

Страница 32: ...cting Partition CD DVD Burn NOTE The DVR does NOT support USB hard disk drives with a version lower than 2 0 The Information column displays whether the device is being used or not Other indicates the device has been used for another DVR Highlight the box in the Information column for the desired storage device and press the button You will be able to check the model name serial number and the tim...

Страница 33: ...set to On you can select the day time range and interval that you want the DVR to run self diagnostics on the recorder The Interval can be selectable from 1 min to 7 days or Never Highlight the and press the button to add a schedule item The box allows you to delete a check recording schedule Highlight the Settings box beside Check Alarm In and press the button You can select the interval that you...

Страница 34: ...le storage space has been used Highlight the Event Record Dwell box and set the length of time you would like to record for the associated event You can set the dwell from 5 seconds to 30 minutes Refer to Event Actions screen in this chapter for information regarding event recording The DVR can record up to four audio inputs Highlighting Record Audio and pressing the button toggles between On and ...

Страница 35: ...d to stop the panic recording You can set the dwell from 5 minutes to 1 hour Select No Limit if you want to stop panic recording manually Highlighting the Panic Recording ips and pressing the button allows you to set the images per second for Panic recording You can select from 1 00 to 30 00 ips 25 00 ips PAL Highlighting the Panic Recording Quality and pressing the button allows you to set the re...

Страница 36: ...vent and the DVR is not recording When the DVR is in the Pre Event mode the red and display when any event occurs and the DVR starts recoding When the DVR is in the Time Event mode the DVR will follow the Time settings and the icon displays at the top left corner of the screen The DVR follows the Event settings and the icon displays Highlight the box under the Channels heading and press the button...

Страница 37: ...ng the button allows you to set the length of time you would like to record for the associated event Advanced Mode Only Pre Event Figure 16 Record Pre Event setup screen When the DVR is in the Event Record mode it is possible to have it record images before the event occurs The Pre Event screen allows you to define how to handle pre event recording If you do not have Event set up in the Record Sch...

Страница 38: ...can set up motion zones one block at a time in groups of 8 or 16 individual block groups 8 and 16 channel DVR respectively A block group is positioned within the image area using the Up and Down arrow buttons and individual blocks within the block groups are selected or cleared using the camera buttons Press the button to display the menu screen The menu on the setup screen has the following funct...

Страница 39: ...t logging and remote notification of motions detected after the motion dwell time by adjusting the motion ignoring dwell intervals Highlight the box beside Motion Ignoring Interval and press the button A list of intervals ranging from 1 to 10 seconds or Never appears The DVR will not log and notify motion events occurred during the preset interval range NOTE The record action for motion events wil...

Страница 40: ... report a Video Loss The DVR will not consider any signal loss from a camera to be a Video Loss if the detected signal loss is shorter than the interval set on this screen Highlight the box under the Actions and press the button The DVR can be set to react to video loss differently for each camera Each camera can be associated with another camera trigger an Alarm Out connector sound the DVR s inte...

Страница 41: ...rt a Video Blind The DVR will not consider any blinded camera to be a Video Blind if the detected blindness is less than the Activation Time set on this screen Highlight the box under the Actions and press the button The DVR can be set to react to video blind differently for each camera Each camera can be associated with another camera trigger an Alarm Out connector sound the DVR s internal buzzer...

Страница 42: ...etected from several channels at the same time Highlight the box beside Port and press the button Select from None RS232 RS485 USB Serial 1 8 and LAN 1 16 NOTE If you have set the Port as None you will not be able to make any changes to the screen When using the USB to serial text in device do NOT remove the USB cable from the port while the system is running Text in data might be lost when the te...

Страница 43: ...an be created using and a capital letter e g J for NL New Line M for CR Carriage Return Refer to the device manufacturer s documentation for Line Delimiter character s Highlight the box beside Ignore String and press the button Use the virtual keyboard to enter any strings of text that you want the DVR to ignore Refer to the device manufacturer s documentation for text strings that the device send...

Страница 44: ...tle and status icons on the covert video When selecting the Covert 2 the DVR displays only camera title on the covert video A user who does not have Covert Camera View authority cannot view video from cameras set to Covert 1 or Covert 2 in both the live monitoring and playback modes You can select the width resolution supported by the camera between 720 and 960 by highlighting the box under the Mo...

Страница 45: ...ll need to connect the camera to the RS232 or RS485 connector on the back of the DVR following the camera manufacturer s instructions You can assign IDs to each camera by highlighting the box under the ID heading and pressing the button Change the number by highlighting it and using the Up and Down arrow buttons to increase and decrease the number The PTZ ID number can be set from 0 to 256 Highlig...

Страница 46: ...put Highlight Enable Audio Out and press the button This toggles between enabling and disabling audio out Alarm Out Figure 25 Device Alarm Out setup screen Highlighting the box beside Dwell Time and pressing the button allows you to set the dwell time of the alarm output Dwell times range from 5 seconds to 30 minutes Each alarm output can be given its own title by highlighting Title and pressing t...

Страница 47: ...ive during the scheduled time When set to Event the Alarm Out is only active when there is an Event during the scheduled time The Channels box allows you to set which alarm outputs will be active You can also select the DVR s internal buzzer The box allows you to delete an alarm output schedule You will be asked to confirm whether or not you really wish to delete the schedule Remote Control Figure...

Страница 48: ... Highlight the box beside Network Bandwidth Limit and press the Up and Down arrow buttons to set the desired maximum bandwidth from 100Kbps to 1Gbps NOTE When limiting the network bandwidth the remote watch image on the PC running RAS or WebGuard might not be displayed properly The DVR supports two way audio communication between a local system and a PC running RAS Highlighting the box beside Remo...

Страница 49: ... Subnet Mask 255 255 255 0 NOTE You will need to get the appropriate IP Address Gateway and Subnet Mask from your network administrator Highlight the box beside DNS Server Press the Up and Down arrow buttons to set the IP address of the DNS server Highlight the Port Number Setup box and press the button The Port Number Setup screen appears NOTE You will need to get the appropriate Port Numbers for...

Страница 50: ...ton to test the current LAN settings you made Selecting DHCP from the Type and highlighting Save button reads the current IP address of the DVR configured by DHCP Dynamic Host Configuration Protocol network Highlight Auto Default and press the button to toggle between On and Off When it is On the DVR will obtain the IP address of the DNS server automatically NOTE Selecting Auto will only be enable...

Страница 51: ...of IP address if you already set up the DNS Server when setting up the LAN Highlight the box beside Port and press the button Set the port number of the FEN server using the Up and Down arrow buttons to increase or decrease the numbers Highlight the box beside FEN Name and press the button A virtual keyboard appears allowing you to enter the DVR name to be registered on the FEN server Highlight th...

Страница 52: ... to toggle between On and Off When set to on you can access a remote DVR using a Blackberry or other mobile devices NOTE Selecting Use Mobile sets the WebGuard service to be enabled automatically regardless of your WebGuard settings When using NAT Network Address Translation or firewall services opening all UDP ports allows you to access a DVR using Blackberry and Android devices You can access a ...

Страница 53: ... WebGuard by using the Up and Down arrow buttons to increase or decrease the numbers VNC Figure 32 Network VNC setup screen Highlight Use VNC Virtual Network Computing and press the button to toggle between On and Off You will be able to change the settings if Use VNC is enabled NOTE VNC service allows you to access the DVR and control it remotely using a PC or mobile devices via Ethernet Highligh...

Страница 54: ...ws Pressing the m or key displays the Live Monitoring menu or Search menu on the screen It is the same as pressing the MENU button on the front panel Enter or Return Pressing the Enter or Return key selects the highlighted item or completes an entry that you have made during system setup It is the same as pressing the Play Pause button on the front panel d or PageUp or PageDown Pressing the d or P...

Страница 55: ...the group has been expanded and all of the Recipient Names within that group are displayed below the Group Name If there is a in front of the Group Name it indicates that the group has been collapsed and all of the Recipient Names within that group are hidden To collapse or expand a group highlight the column in front of the desired group and press the button The column can be used to delete a Rec...

Страница 56: ...hen setting up the LAN Highlight the box beside Port and press the button Use the arrow buttons to enter the SMTP Server port number obtained from your system administrator The default port number is 25 Highlight Use SSL TLS and press the button to toggle between On and Off When it is On the DVR can send an email via an SMTP server requiring SSL Secure Sockets Layer authentication NOTE This produc...

Страница 57: ...S account highlight the and press the button Highlight the box beside Type and press the button Selecting Twitter from the Type allows you to post a tweet on Twitter when an event occurs Highlight the box beside User Name Password and press the button A virtual keyboard appears allowing you to enter the user name and password The SNS accounts can be deleted by highlighting the beside the account a...

Страница 58: ... you select should be enabled in the Notification setup screen and the DVR should be registered in the RAS Remote Administration System NOTE The Notify action for system events you made in the System Event setup screen on the System menu will not be affected by your Notification Schedule settings Highlight the box beside Summary Email Interval and select the interval that you want the DVR to send ...

Страница 59: ...y and using the Left and Right arrow buttons Highlighting OSD Margin and pressing the button displays how OSD text will be displayed on the monitor You can adjust the horizontal and vertical margins so that text and icons will not be hidden beyond the edges of the monitor Main Monitor Figure 38 Display Main Monitor setup screen Highlight the box beside Mode and press the button You can select betw...

Страница 60: ...nnected to the HDMI and VGA connectors for simultaneous operation it is recommended to use monitors supported with the same resolution If monitors unsupported with the same resolution are connected video cannot be displayed on the monitor with the resolution you have set Highlight Fit To Screen and press the button Pressing the button toggles between On and Off When it is On the DVR will resize vi...

Страница 61: ...er Once you have installed the DVR following the instructions in Chapter 2 Installation it is ready to record Live Monitoring As soon as the DVR completes its initialization process it will begin showing live video on the attached monitor and playing live audio through the attached speaker The default mode is to display all cameras at once Pressing any camera button will cause that camera to displ...

Страница 62: ... one of the multiview formats i e 2x2 1 5 1 7 3x3 or 4x4 NOTE In the 1 5 or 1 7 display mode the main channel indicates the channel displayed on the large screen which is displayed in the top left You can select the camera you want to display on the main channel screen Select a channel on the screen and click the right mouse button to display the Camera Menu Selecting Go To Main swaps the selected...

Страница 63: ...enu Zoom and choosing the camera number zooms the current image of the selected camera on the screen It is the same as pressing the ZOOM button Selecting Zoom again in the Camera Menu again exits the Zoom mode Refer to the following Zoom Mode section for details Audio Selecting Camera Menu Audio toggles audio output On and Off Color Control Selecting Camera Menu Color Control and choosing the came...

Страница 64: ...umber does not exist on the current screen the active cameo is replaced by the camera number You can change the screen layout in this way Zoom Mode You can enlarge an area of the video by pressing the ZOOM button For a few seconds after pressing the ZOOM button a rectangle displays on the screen A rectangle shows the area that will be enlarged You can move the rectangle around using the arrow butt...

Страница 65: ...bottom of the screen and the following PTZ toolbar will display Clicking on the left side exits the toolbar If you want to display the toolbar again position the mouse pointer at the bottom of the screen Change the toolbar location by clicking the empty space on the left side of the toolbar and drag it to where you want it located on the screen Use the arrow buttons on the toolbar to pan or tilt t...

Страница 66: ...ot Monitor sequentially Select Sequence again to stop sequencing on the Spot Monitor Any cameras that are Off have lost video or are set to Covert unless the user has authority to view covert cameras will be excluded from the sequence When the Spot Monitor is in the sequence mode you can set the camera s display dwell time Refer to Chapter 3 Configuration Display Screen section for details Figure ...

Страница 67: ...hted when each event is detected based on the settings you made in the System Event setup screen on the System menu Panic Record will be highlighted while the DVR is in the panic recording mode Disk Almost Full will be highlighted when the DVR is not in the Recycle mode and the level of disk usage reaches the Disk Almost Full percentage you made in the System Event setup screen on the System menu ...

Страница 68: ...u have installed the DVR following the instructions in Chapter 2 Installation it is ready to record The DVR will start recording based on the settings you made in the Record setup screen See Chapter3 Configuration Recycle On or Recycle Off The factory default is Recycle On It does this by recording over the oldest video once the hard disk is full Setting the DVR to Recycle Off causes it to stop re...

Страница 69: ...t has been selected for playback Figure 46 Select Playback Camera menu When playing video for the first time the DVR will display the most recent image When playing video subsequent times the DVR will start playing video from the last recalled image Recorded audio will be played when the DVR displays a camera with recorded audio in full screen mode NOTE Only the administrator and users with Covert...

Страница 70: ...nges the screen from the current camera group to the next camera group and the screen displays page number You can use a mouse for convenient playback control Position the mouse pointer on the playback screen and the following Record Table Search Compact View Mode screen will display The individual controls on the toolbar perform the following functions as described below Go to the previous image ...

Страница 71: ...ing the selected time a message appears alerting you that no image was recorded at that time The button and arrow buttons can now be used to review the surrounding video Bookmark Selecting Bookmark in the Search menu adds the current playback point to the bookmark list See the following Bookmarks section for details Display Full Screen Selecting Display Full Screen and choosing the camera number b...

Страница 72: ...he screen while in the search mode Export A B Clip Copy Selecting Export A B Clip Copy will set the starting point of the video to be clip copied and the icon displays at the bottom left corner of the screen Selecting A B Clip Copy again will set the ending point of the video to be clip copied and displays the Clip Copy screen See the following Clip Copy section for details Clip Copy Select Export...

Страница 73: ...the button will start playing the event video segment Pressing PLAYBACK returns to live monitoring NOTE It is possible that no recorded image displays on the current screen Press the DISPLAY button and change the screen mode to 4x4 You will be able to easily see the camera have recorded video during target time You can also narrow your event search by selecting the Option button and setting up the...

Страница 74: ... reports of motion Highlight the box beside Video Loss and press the button You can select the cameras for which you want any reports of lost video Highlight the box beside Video Blind and press the button You can select the cameras for which you want any reports of blind video Highlight the box beside Text In and press the button You can select the text in devices which you want any reports of te...

Страница 75: ...plays only the toolbar Selecting the icon in the Compact view mode switches to the Standard view mode and selecting the icon in the Expanded view mode switches to the Standard view mode Selecting or located at the bottom zooms the record table Selecting displays eight hours 12 hours with 1920x1080 resolution 1 minute based and selecting displays 24 hours 3 minute based at once To move to earlier o...

Страница 76: ...in the top left corner exits the Record Table Search screen Motion Search Figure 50 Motion Search screen The Motion Search can be selected from the Search menu while the DVR displays the camera full screen The Motion Search screen displays a list of motion events Use the arrow buttons to highlight the event for which you would like to see video and press the Play Pause button to display the video ...

Страница 77: ...hich you want to search for motion is nearly identical to setting up the DVR for Motion Please refer to Motion Screen in Chapter 3 Configuration for more detailed instructions on setting up the detection blocks When setting the Museum Search Zone the zone should be placed inside of the border line of the target object If the selected block is placed on the border line the sensitivity of the Museum...

Страница 78: ...e search will be from the last recorded image When highlighting and pressing the button the bookmark list displays and the bookmark point you selected will be the ending date and time Highlight the Channel and press the button Select the text in devices that you want to search for text input Highlight the Text Input Device box and press the button Select your Text Input Device from the list Highli...

Страница 79: ...rosoft Windows 2000 XP Vista or 7 Refer to the Appendix USB Hard Disk Drive Preparation for information on preparing the external drive for clip copy Selecting A B Clip Copy in the Search Export menu or pressing the CLIP COPY button during playback will set the starting point of the video to be clip copied and the icon displays at the bottom left corner of the screen Selecting A B Clip Copy in the...

Страница 80: ...e FAT 16 or FAT32 format NOTE While copying video clips on the DVD RW the recording speed might decrease While copying video clips on the DVD RW the DVR will stop archiving video data until clip copy is finished When the error message Firmware update of the optical drive is required displays update the firmware of the installed DVD RW drive Please follow the instructions described in Chapter 3 Con...

Страница 81: ...opy you cannot shut the system down clear data on the storage device or format the storage device CAUTION Do NOT disconnect the USB cable or the power from the external drive while copying video clips If the external drive is shut down or the USB cable is disconnected while copying video clips THE DVR SYSTEM MAY NOT WORK NORMALLY OR THE EXTERNAL DRIVE COULD BE DAMAGED and you will get an error mes...

Страница 82: ...User s Manual 74 ...

Страница 83: ...and right click an unallocated region of the USB hard disk drive Then click Create Partition 6 In the Create Partition wizard click Next then Primary Partition and follow the instructions on the screen Make sure that the FAT32 is selected for the file system NOTE The partition size should be less than 32GB because of Microsoft limitations After formatting is complete the USB hard disk drive will b...

Страница 84: ...omparison value is located at 17th Unit price mark will be ignored automatically 28th Qty and 40th amount characters including spaces from the left but the value of amount category is located on a different line from Item In this case you can enter 17 28 and 40 in each Column box and enter 1 in the Line box for the next line For example if you want to search for Coke with a Qty Quantity of more th...

Страница 85: ...nd PASSWORD and clicking the LOGIN button logs in using the selected mode You will need to enter the DVR IP address in the DVR ADDRESS field when running the WebGuard program by entering http www dvronline net Selecting the Use DVRNS option allows you to enter the DVR name registered on the FEN server instead of the IP address You must enter the FEN server address and port number in the SETUP sett...

Страница 86: ...t with elevated administrator permissions Restart your computer to apply the changes Web Monitoring Mode WebWatch is a remote web monitoring program that allows you to monitor live video transmitted in real time from the remote DVR Click the to log out the WebGuard program Click the to access to the web search mode Position the mouse pointer on the WebWatch logo to see the version of the WebGuard ...

Страница 87: ...e audio from the connected remote site through the attached speaker and click the button again stop monitoring live audio Clicking both and allows two way communication Clicking the disables audio communication Aspect Ratio Changes the image aspect ratio Anti Aliasing Screen Enhances image display quality by eliminating stair stepping aliasing effects in the enlarged image NOTE A camera name chang...

Страница 88: ...lay You can adjust the display speed by changing the image drawing mode and select OSD information to be displayed on the screen Click the to save any video clip of recorded data as an executable file or click the to save the current image in a bitmap or JPEG file format NOTE When saving as an executable file selecting the Exclude Player option will reduce the file size and its saving time You can...

Страница 89: ...ange using a search menu such as Event Log Search Text In Search or Motion Search it is possible for the DVR to have two overlapping start and stop times You will be asked to select one of the overlapping start and stop times from the search time ranges as follows From four o clock of the first segment to five o clock of the first segment From four o clock of the first segment to five o clock of t...

Страница 90: ...g used 21 Unsupported file system 405 Unsupported file system 22 Verify failed 500 System is busy clip copying System Log Notices Boot Up Clear All Data Shutdown Clear Disk Restart Format Disk Upgrade Disk Full Upgrade Fail Disk Config Change Power Failure Disk No serial number Time Change Disk No Removed Time Zone Change Auto Deletion Time Sync Search Begin Time Sync Fail Search End Disk Bad Clip...

Страница 91: ...rage System Event RECORD General Schedule Pre Event EVENT Motion Alarm In Video Loss Video Blind Text In CAMERA General PTZ DEVICE Audio Alarm Out Remote Control NETWORK General LAN FEN RTSP WebGuard VNC NOTIFICATION Callback Mail SNS Schedule DISPLAY OSD Main Monitor Spot Monitor ...

Страница 92: ...gher than the upgrade package file version you should reset the DVR first using the Factory Reset When using the Factory Reset you will lose any settings you have saved Specifications VIDEO Signal Format NTSC or PAL Auto Detect Video Input Composite 8 or 16 looping inputs 1 Vp p auto terminating 75 Ohms Monitor Outputs HDMI 1 HDMI VGA 1 SPOT 1 BNC 1 Vp p 75 Ohms Video Resolution HDMI 1920x1080 144...

Страница 93: ...in DVD RW drive USB hard disk drive or flash drive When installing an internal DVD RW drive connect the SATA I O cable to the SATA ODD socket GENERAL Dimensions W x H x D 16 9 x 3 5 x 15 7 430mm x 88mm x 400mm Unit Weight 14 20 lbs 6 44kg Shipping Weight 21 20 lbs 9 62kg Shipping Dimensions W x H x D 23 2 x 11 4 x 21 3 590mm x 290mm x 540mm Operating Temperature 41 F to 104 F 5 C to 40 C Operating...

Страница 94: ......

Страница 95: ... read the Owner s Manual before installing the device x Never place the Equipment in a confined space eg bookcase built in cabinet unless proper ventilation is available It is advised to leave a 10cm space around the unit x To prevent fire or shock hazard do not expose the Equipment to water Ensure that objects filled with liquid eg vases are not placed on or near the Equipment x Avoid keeping or ...

Страница 96: ... must return the Equipment to Pacific Communications The consumer will be responsible for the collection and freight costs of returning the Equipment to Pacific Communications or to any designated Pacific Communications Authorised Service Centre for repair or replacement The consumer will also be responsible for the freight costs to deliver any new or repaired Equipment to the consumer e This warr...

Страница 97: ......

Страница 98: ...V1 0 ISO 14001 Environmental Management System in use Fibre sourced from pulp suppliers who use sustainable forestry techniques ...

Отзывы: