


ALDERLEA T6-LE_260319-28
23
100000087
D
D
D
D
Baffle tube
Brick rail tabs
D
D
D
D
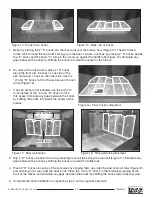
1. Begin by placing the 2 "E" bricks into the rear corners of the firebox floor (Figure 14). These trimmed
bricks will fit around the two bolts coming up in the back corners. Continue by placing 2 "D" bricks beside
the "E" bricks and the short "C" brick in the center up against the baffle tube (Figure 15). Eliminate any
gaps between the bricks by shifting the bricks in toward the center of the firebox.
2. On units with an ash dump, place 4 "D" bricks
along the front row; 3 bricks on one side of the
ash dump and 1 brick on the other side. Use the
"A" and "B" bricks to fill in the area around the ash
dump (Figure 16).
• If an ash dump is not installed, use the extra "D"
brick instead of the "A" and "B" bricks to fill in
this space. Eliminate any gaps between the bricks
by shifting the bricks in towards the center of the
firebox.
3. Slip 4 "D" bricks up behind the two protruding brick rail tabs along the rear wall (Figure 17). Eliminate any
gaps between the bricks by shifting the bricks in toward the baffle tube.
4. Place 2 "D" bricks along one of the side walls by slipping them up under the side brick rail tabs (Figure 18)
and pushing to the rear, past the back brick. Place two more "D" bricks in the remaining opening at the
front of the firebox and eliminate any gaps between the bricks by shifting the bricks toward the rear wall.
5. Complete the brick installation by repeating step 4 on the opposite side wall.
Figure 17: Rear wall bricks.
Figure 18: Side wall brick placement.
E
E
E
E
C
D
D
E
E
C
D
D
D
D
D
D
B
A
Figure 14: Corner floor bricks.
Figure 15: Back row of bricks.
Figure 16: Floor bricks completed.
Содержание ALDERLEA T6 LE
Страница 25: ...ALDERLEA T6 LE_260319 28 25 100000087 ...


