-
-
-
-
-
-
-
-
-
-
-
-
-
-
-
-
-
-
-
-
-
-
-
-
-
-
-
-
-
-
-
-
-
-
-
-
-
-
-
-
-
-
-
-
-
-
-
-
-
-
▲
I
NSTRUCTION
M
ANUAL
MEGA
-
T400S
Abrasive Cutter
3601 E. 34th St. Tucson, AZ 85713 USA Tel. +1
-
520
-
882
-
6598 Fax +1
-
520
-
882
-
6599 email: [email protected] Web: https://www.metallographic.com
Please read this instruction manual carefully and follow all installation, operating and safety guidelines.
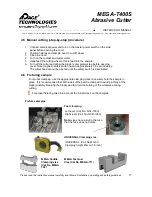
For proper clamping, use the appropriate clamping vises to securely hold the sample in
place. It is recommended that both sides of the part be clamped to avoid pinching of the
blade (possibly breaking the blade) and to minimize burning of the workpiece during
cutting.
For proper fixturing, take into account the initial stress on the samples.
!
Fixture examples
4.6 Fixturing sample
17
Fast clamping
Left lever (Cat. No. QCL
-
1000)
Right lever (Cat. No. QCR
-
1000)
Note:
vises have a slot in them so
that the face does not rotate
UNIVERSAL Clamping vise
UNIVERSAL (Cat. No.MG
-
01)
Clamping height 45mm (1.8 inch)
MEGA Saddle
Clamping vise
(Cat No. MEGA
702)
MEGA Fastener
Vise (Cat No. MEGA
-
711)
17
4.5 Manual cutting (step
-
by
-
step procedure)
1.
Connect electrical power and turn on the master power switch on the side
panel before opening the hood.
2.
Position fixtures and sample near to cut
-
off wheel.
3.
Close the hood.
4.
Turn on the coolant and cutter motor.
5.
Hand feed the cutting wheel or table feed into the sample.
6.
Turn off the cutter and allow the blade to completely stop before opening
cover. Note magnetic safety switch has an approximately 3
-
5 second delay.
The cutter hood cannot be opened until the safety switch is deactivated.


