background image

www.pstechnik.de

32

After stopping the recording, you can select a certain range of the timeline 

for the playback by setting a marker. To set a marker, push the play line to the 

desired starting point in the timeline. The CUT IN-button sets the Cut in point 

at the current location of the play line. The CUT OUT-button sets the cut out 

point at the place selected by the play line.

Start and stop marker points are marked with two triangles. When clicking 

on one of the triangles the curser jumps to the start or stop point. 

Playback of the marked area on the timeline by typing SAVE M. This function 

should be used for playout on an external recorder. The


playback

 progress 

is displayed in the Image field. 

If markers are set, only the selected range is 

saved. If there are no markers, the entire timeline is transferred. To save the 

whole record type SAVE ALL.

By typing on one of the direct links you can switch to the depending menu 

directly for changes.

Use the Skip buttons to switch among the takes.

NOTE:

The optimum operating temperature is b45 °C – +55°C / 

+113  °F – +131  °F.  If the temperature rises to +60 °C / +140 °F, the tempera-

ture display begins to flash red and you must take immediate action to cool the 

camera sufficiently!

5.5.3. 

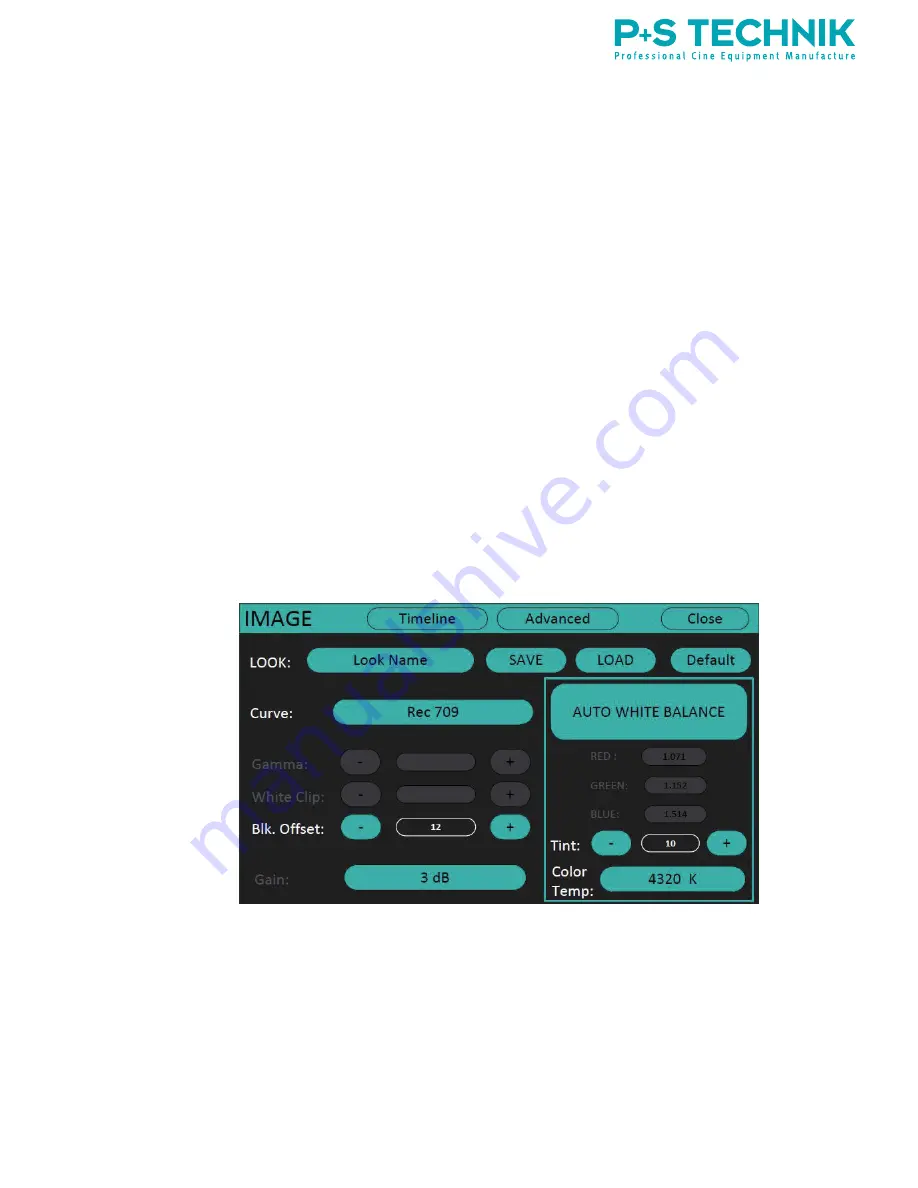
Image

NOTE: Not all functions are implemented yet.

In this menu, you can adjust the white balance, contrast and saturation of the 

image on the HD-SDI OUT of the PS-Cam X35. You can save your setting 

by pressing the “Save” button at a desired Look position. An input window 

opens in which you can enter a desired name. 

NOTE:

the desired target position must be selected via the Look drop-down menu. 

The position of the Look rotary switch on the camera has no effect on the 

save operation!

Содержание PS-Cam X35

Страница 1: ...product please read the instructions carefully and save this manual for future use Subject to technical change without any prior notice Art No 27750 v1310 PS Cam X35 MK1 Version 1 6 1 MK2 Version 2 0...

Страница 2: ...ibilities 12 3 Camera Views 13 4 Setup 16 4 1 Setting the Control Unit 16 4 1 1 Removing 16 4 1 2 Setting 16 4 2 Connecting the power supply or battery 16 4 2 1 Power Supply 17 4 2 2 On Board Battery...

Страница 3: ...tion Recording20 5 1 4 Types of record modes 22 5 2 Control Unit 24 5 3 Menu Structure 25 5 4 Info Menu 25 5 5 Main Menu 26 5 5 1 Settings 26 5 5 2 Timeline 30 5 5 3 Image 32 5 5 4 Advanced 33 5 5 5 M...

Страница 4: ...www pstechnik de 4 10 Quick References 46 10 1 Short specification List 47 10 2 Connector pin assignment list 47 10 3 Control Unit Menu pattern 48 11 Manufacturer Information 49...

Страница 5: ...k of fire or shock hazard and annoying interference use the recommended accessories only FCC Note This equipment has been tested and found to comply with the limits for a class A digital device pursua...

Страница 6: ...ries that conform with the volt age range of the device Any auxiliary equipment must not exceed the maximum permitted power Ensure safe transport in the cases provided for this purpose Keep all ventil...

Страница 7: ...er technology It provides slow motion capabilities up to 750 fps 1 500 fps MK2 maximum to capture amazing results especially in human action The onboard memory 18 GB allows recording of more than 4 mi...

Страница 8: ...o useful chapters to provide you a fast access to the information you need depending on your current task Annexed to the regular user manual you find some patterns and tables with additionally informa...

Страница 9: ...ntable IMS Mount inte grated 15mm LWS Handgrip 23358 AB Mount 27887 PS CAM X35 Manual 27750 To operate the PS Cam X35 you need the following accessories File Recorder Power supply 12 24 volt and power...

Страница 10: ...ic LCD Display 5 6 28042 PS Cam X35 Light protection eye piece hood incl lens set only for TV Logic LCD Display 5 6 Note Power supply cable 28035 for monitor needed when used with PS Cam X35 11487 Eye...

Страница 11: ...nting options quick lock plate shoulder pad 27908 PS Cam X35 Low Mode Interface Plate for low mode moun ting and accessories 23020 Cable Clamp with Rosette Electric Accessories planned Extension Cable...

Страница 12: ...Accessories 27751 PS Cam X35 Transport Case 27750 PS Cam X35 User Manual Free Download from www pstechnik de 2 3 Upgrade possibilities Art No Description 27683 9GB to 36GB Extension 27864 18GB to 36G...

Страница 13: ...era Views PS Cam X35 left side PS Cam X35 right side focus hook hand grip RUN button left side Control Unit recess covered right side Control Unit access with Control Unit RUN button Ventilation 2x 24...

Страница 14: ...ors Cooke lenses connector iCooke not active yet Interchangeable Mount System IMS HD SDI out viewfinder monitor 15 mm rod support Status f light sync I TC out 12V out I 12V out HU R232 I Ambient TC wi...

Страница 15: ...www pstechnik de 15 PS Cam X35 top PS Cam X35 bottom multi purpose mounting surface ventilation base mounting surface optional Quick Lock inserts mounted...

Страница 16: ...remove it NOTE The two screws are hidden To reach the screws put the Allen Key into the marked holes in the Control Unit and unscrew them 4 1 2 Setting 1 Place the control unit in the housing gently V...

Страница 17: ...ide top 24 V 3 pin Fischer female right side NOTE When you run the PS Cam X35 with a small battery there might be not enough power to run the camera and several equipment For appropriate power cables...

Страница 18: ...void unintentional starts and shut downs the PS Cam X35 has a security toggle switch to switch it on off For changing its position you have to pull the lever backwards To start and shut down the PS Ca...

Страница 19: ...amily It provides frame accurate synchronization between the PS Cam X35 and any other camera system using the Ambient ClockIt technology The current time code format is LTC Depending on following case...

Страница 20: ...res using existing and future proofed HD SDI recorders on the market Every HD supporting recorder can be attached such as Sony HDCAM SR AJA Kipro or the PS DigiMag Other recorder examples are Cine Dec...

Страница 21: ...ilm mode Min Sec at 1920 x 1080 Recording Time Download Time Playback Time FPS 18GB 36GB FPS 18GB 36GB FPS 18GB 36GB 24 25 04 08 08 17 25 04 08 08 17 25 04 08 08 17 50 02 04 04 08 50 02 04 04 08 60 01...

Страница 22: ...is stopped the camera continues to record for 30 percent of the possible recording duration before actually stopping Trigger 50 50 This is a combination of the Sequence and Ring Buffer modes When rec...

Страница 23: ...cording Timelapse is already activated The first interval will be recorded with the pressing the record but ton Stop Motion It is possible to record a defined number of pictures burst rate per trigger...

Страница 24: ...ed Control Unit is booting illuminated green Control Unit is ready to operate Scroll wheel with SET button navigating within a submenu by scrolling changing numerical values by scrolling confirm setti...

Страница 25: ...ump back to the previous window NOTE The shown layout of the menu may differ from the version on your camera If you have any questions or problems related to this please con tact our helpdesk or servi...

Страница 26: ...s TIMELINE Control your recording and playback IMAGE PROCESSING IMAGE Set primary image settings for HD stream ADVANCED Set advanced image settings for HD stream MOTION EFFECT Set recording effects li...

Страница 27: ...Single Link SL 1080 30 Single Link SL 1080 50 Dual Link DL 1080 60 Dual Link DL Rec Speed Pressing the Rec Speed line a window opens showing a selection of val ues representing frame rates in frames...

Страница 28: ...s also limited to certain values Choosing a shorter shutter is always possible Trigger 30 70 50 50 70 30 In this mode you can make a decision how much percent of the recordable frames will still be re...

Страница 29: ...de up to 750 fps above 750 fps use AUTO Mode Only experts should use MANUAL Mode Timecode Leads you to the Timecode Submenu Engineering Leads you to the Engineering Submenu Test Signal The following t...

Страница 30: ...nently Type ON to active the fan control Type OFF to deactivate the fan control Ambient Temperature For an optimal temperature management of the PS Cam X35 three dif ferent ambient temperatures can be...

Страница 31: ...lay and the chosen segment display The recording is started by pressing the record button which disables every button except the stop button Four features indicate that recording has begun The blue li...

Страница 32: ...d If there are no markers the entire timeline is transferred To save the whole record type SAVE ALL By typing on one of the direct links you can switch to the depending menu directly for changes Use t...

Страница 33: ...opens a window in which you can enter the desired value The fields are for fine adjustment Gain You can select from three different values 0 dB 3 dB 6 dB Auto White Balance Pressing the button starts...

Страница 34: ...ndow in which you can enter the desired value The fields are for fine adjustment Adaptive Detail Pressing the middle empty field opens a window in which you can enter the desired value The fields are...

Страница 35: ...ffect submenus Ramping Time Lapse Stop Tricks Ramping NOTE Currently there is just a jump ramping function available Please keep in touch with P S TECHNIK for a firmware update 1 Start FPS 2 Delay run...

Страница 36: ...it You can also type on the value and use the hand wheel to change it You can save six different ramps for later recording use Timelapse StopMotion 1 Chose Mode Off Timelapse StopTricks 2 Set interva...

Страница 37: ...switch to the TIMELINE menu of the Con trol Unit In the main menu by pressing the TIMELINE field button Stop the recording by pressing the Stop field button in the display or the white Stop Hard butt...

Страница 38: ...HD RAW RAW Viewfinder HD HD RAW HD With except of the RAW standard mode the HD SDI outputs for monitor and viewfinder provide a HD signal So you can use a wide range of HD monitors and viewfinders wi...

Страница 39: ...www pstechnik de 39 7 1 HD Workflow...

Страница 40: ...s for editorial process Components FLUID capture module the debayering software of P S RAW and Weiss cam RAW with the Epoch card is FLUID It is available soon as Rev 1 Fluid runs only on Windows curre...

Страница 41: ...ell a different story What is the difference to high speed cameras The X35 is a 24 fps normal speed camera with high picture quality that s capable to shoot slow motion up to 750 fps 1 500 fps MK2 In...

Страница 42: ...operator resources budget Effective to tell a story differently What is the ease or difficulty in switching between high speed and normal speed recording Switch the operation in the menu to another f...

Страница 43: ...de does not window the sensor like other cameras The resolution and the image size remains at 1080 with 21 1 x 11 9 mm What is the IR filter transmission The IR filter blocks at 690 nm What are the re...

Страница 44: ...6W 5 6 High Resolution LCD Monitor http www tvlogicusa com product product php idx 55 P S Technik provides a X35 solution with a P S Technik made eyepiece and hood for this viewfinder There are some o...

Страница 45: ...24 2 mm High Definition 720p 14 1 x 7 9 mm diagonal 16 1 mm Frame Rates Standard Speed 24 60 fps Motion Effect Range with continuous Setting 750 fps 1 500 fps MK2 max 1 24 75 150 300 750 fps 1 500 MK...

Страница 46: ...Status Sensor active out 1 BNC Cam Sync via 1 Triax Time Code Synchroniza tion via 5 pin Lemo Ambient compatible HD RAW Option planned 2 BNC RAW in HD SDI Input Cam Sync 1 BNC Time Code Synchroniza ti...

Страница 47: ...o 11 T stops Sensitivity 640 ASA Frame Rates Standard Speed 24 60 fps direct HD SDI out put All Speed Range 1 750 fps 1 500 fps MK 2 continuously adjustable Capture Processing Dynamic Picture Quality...

Страница 48: ...Cam Sync out Power in 12 30V 2pin Fischer back panel 1 Ground 2 24V External Control Interface 8 pin Lemo back panel 1 Ground 2 V Batt 3 TXD 4 RXD 5 Power On 6 Can L 7 Can H 8 ACBMoDe 12V out 2 4 pin...

Страница 49: ...www pstechnik de 49 10 3 Control Unit Menu pattern...

Страница 50: ...09 82 30 Fax 49 0 89 45 09 82 40 Email support pstechnik de Web www pstechnik de Please find worldwide authorised representation and dealer on our website www pstechnik de in the rental section or se...

Отзывы: