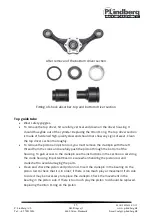
background image


10 

MAN 9052454 EN V1 

P. Lindberg A/S 

Sdr. Ringvej 1 

www.p-lindberg.dk 

Tel.: +45 70212626 

6600 Vejen, Denmark 

E-mail: [email protected] 

Service and maintenance of the post driver 

 
The petrol-driven post driver is manufactured and designed to provide many years of 
problem-free operation. Always ensure that the post driver is stored properly. Never 
rest the post driver horizontally on its side or resting on the engine. It is 
recommended that it is stored horizontally. If this is not possible, position it on a level 
surface with the cylinder and tank guard as support at an angle, so that the top 
handle is the highest point. 
 
Every time 

1.


Check the engine’s oil level and maintain the machine in an upright position. If you lie 
the machine down, it will show an incorrect reading. Use SAE 10W-30 as a supplement, 
if required. 

2.


Check the engine’s air filter; if it is very soiled, clean or replace. 

3.


Check all of the post driver’s fittings and tighten if necessary. If bolts are fitted with 
new thread lock, the bolt and the area around the bolt entry must be cleaned using a 
degreasing agent to remove all of the lubricant remnants, If there are remnants of 
lubricant the thread lock will not work. 

4.


Inspect the cylinder and driver for deposits and foreign bodies. 

5.


Check for fuel leaks. 

 
After 10 hours of operation 

1.


Change the engine oil. Dispose of the old oil in accordance with local guidelines. 

2.


Important! Do not overfill. Always check the oil level while the machine is in the 
vertical position. 

3.


Check all of the engine and post driver’s bolts and tighten if necessary. Replace 
or re-fit bolts with new thread lock. Follow the above guidelines relating to 
thread lock.  

 
After three months or 25 hours of operation 

1.


Change the engine oil. Dispose of the old oil in accordance with local guidelines. 
Do not overfill! 

2.


Replace the air cleaner elements. This must be carried out more often if the 
post driver is used in dusty conditions. 

3.


Check all of the engine and post driver’s bolts and tighten if necessary. Replace 
or re-fit bolts with new thread lock. Follow the above guidelines relating to 
thread lock. 


Содержание 9052454

Страница 1: ...9052454 DK N P lehammer 4 takt S Stolpdrivare 4 takt D Pfahlramme 4 Takt GB Postdriver 4 stroke www p lindberg dk www p lindberg no www p lindberg se www p lindberg de Original Manual DK S D GB...

Страница 2: ......
Страница 3: ...nualen al anden anvendelse betragtes som forkert Indhold Tekniske specifikationer 1 Overblik over udstyret 2 Sikkerheds og brugervejledning 4 Sikkerhedsadvarsler 4 Brugervejledning til p lehammer 6 Se...

Страница 4: ...2 MAN 9052454 DK V4 P Lindberg A S Sdr Ringvej 1 www p lindberg dk Tlf 70212626 DK 6600 Vejen e mail salg p lindberg dk Overblik over udstyret...

Страница 5: ...3 MAN 9052454 DK V4 P Lindberg A S Sdr Ringvej 1 www p lindberg dk Tlf 70212626 DK 6600 Vejen e mail salg p lindberg dk...

Страница 6: ...voksne som har l st og forst et manualen Lad aldrig b rn eller uinstruerede personer benytte maskinen Lad aldrig maskinen k re uden opsyn benyttes maskinen ikke b r den slukkes for at forhindre uauto...

Страница 7: ...maskinen er i brug Beskyttelses udstyr omfatter men er ikke begr nset til H rev rn klasse 4 mere end 22db d mpning Slagfast jenbeskyttelse med sidev rn Beskyttelseshandsker og st vler 4 Vibrationsfar...

Страница 8: ...ren er designet til at v re s effektiv som muligt samtidig med at den er ekstremt kraftfuld og let Det er vigtigt at forst at p lehammeren er en kraftfuld maskine Ved korrekt brug og vedligeholdelse v...

Страница 9: ...n p en afsikret plan overflade i et bent areal Oprethold en god og sikker kropsholdning balance Start aldrig p lehammeren andre steder end hvor der er bent og god udluftning Det anbefales aldrig at st...

Страница 10: ...rt som beskrevet i ovenst ende Indtag en stabil kropsholdning med v gten fordelt ligeligt p begge f dder med et mellemrum p mindst skulderbrede Vigtigt Hold altid en god balance under nedramning L ft...

Страница 11: ...nst ende procedure Vigtigt Slip altid gash ndtaget helt for at stoppe hammerbev gelsen helt f r maskinen fjernes fra p len Maskinen kan lades k rende det er ikke n dvendigt at t nde og slukke maskinen...

Страница 12: ...olt indgangen reng res med en form for affedter for at fjerne alle rester af sm remiddel er der rester af sm remiddel vil skruesikringen ikke virke 4 Tjek cylinder og hammer visuelt for aflejringer og...

Страница 13: ...m relse ringen op i mod krumtapshusets sider m ikke overstige 12 mm Vigtigt Overfyld ikke krumtapshuset med sm relse dette kan skade hammeren samt motoren Eksempel p sm relsesring 3 Er sm relsen meget...

Страница 14: ...te med skruesikring Husk at reng re b de bolte og huller med en form for affedter for at fjerne alle sm rerester ellers vil limen ikke v re effektivt Hvis du oplever problemer med p lehammerens ydelse...

Страница 15: ...or at fjerne stemplet og plejlstangen er det n dvendigt at fjerne krumtapspinden med venstre gevind fra krumtappen og forsigtigt skubbe stemplet igennem bunden af huset For at f adgang til krumtapspin...

Страница 16: ...acering af venstre gevind krumtapspind Stempel med korrekt placeret plejlstang Reng r og tjek cylinderen og krumtapshuset for skade og slitage Udskift de skadede dele der m tte forefindes Fjern de ind...

Страница 17: ...e pinden for meget 4 P f r et lag EP 0 fedt p ydersiden af den vre hammer og skub den forsigtigt tilbage i huset med O ringen mod toppen 5 P den nedre hammer sektion p f res et lag EP 0 fedt p den ned...

Страница 18: ...e hammerdel med ny skruesikring boltene og omr det omkring disse skal reng res med en form for affedter for at fjerne rester af fedt sm relse ellers vil skruesikringen ikke virke hvis der er fedt sm r...

Страница 19: ...l v re ca 4 5 skefulde synligt fedt i krumtapshuset Der skal v re plads til at delene kan bev ge sig frit 4 Hvis der er for lidt sm relse i maskinen vil det for rsage reduceret maskinydelse Luk krumta...

Страница 20: ...s den forskubbede fl kkede p l kommer til syne Med et til p len egnet sk rev rkt j sk res p len over lige under den forskubbede fl kkede top C N r den forskubbede fl kkede top er fjernet lad da den ne...

Страница 21: ...S Sdr Ringvej 1 www p lindberg dk Tlf 70212626 DK 6600 Vejen e mail salg p lindberg dk EU overensstemmelseserkl ring Vi forbeholder os ret til uden foreg ende varsel at ndre de tekniske parametre og...

Страница 22: ...om manualen beskriver all annan anv ndning anses som felaktig Inneh ll Tekniska specifikationer 1 verblick ver utrustningen 2 S kerhets och bruksanvisning 4 S kerhetsanvisningar 4 Bruksanvisning stolp...

Страница 23: ...2454 SE V4 P Lindberg Myrangatan 4 www p lindberg se Tel 010 209 70 50 745 37 Enk ping e mail order p lindberg se verblick ver utrustningen Starthandtag Primer boll Bensintank Avgasr r Oljep fyllning...

Страница 24: ...3 MAN 9052454 SE V4 P Lindberg Myrangatan 4 www p lindberg se Tel 010 209 70 50 745 37 Enk ping e mail order p lindberg se B rhandtag Gasreglage Stoppknapp Fj drat handtag...

Страница 25: ...ren b r endast anv ndas av vuxna som l st och f rst tt manualen L t aldrig barn anv nda maskinen L t aldrig maskinen k ras obevakad N r anv ndning r klar ska maskinen st ngas av f r att f rhindra obeh...

Страница 26: ...den som k r maskinen k nner av domningar stickningar sm rta klumpighet f rsvagat grepp vit hud eller andra symtom st ng omedelbart av maskinen och kontakta l kare Fortsatt anv ndning av maskinen komme...

Страница 27: ...ft F re start F lj dessa riktlinjer varje g ng maskinen anv nds Kontrollera motorolja Anv nd 10W 30 olja Viktigt verfyll inte olja h ll alltid stolpdrivaren i upprest position f r att kontrollera olje...

Страница 28: ...samma startmetoder som vid start av kall motor men utan choke H ll gashandtaget i max hastighet position Dra 3 5 g nger i startsn ret F lj ovanst ende s ker uppstart proceduren och starta maskinen med...

Страница 29: ...inska trycket ned t och skapa on diga stopdrivaren N r stolpen har n tt nskat djup sl pp gashandtaget helt och avl gsna stolpdrivaren g vidare till n sta stolpe och upprepa samma procedur Viktigt Sl p...

Страница 30: ...a hand om olja enligt din kommuns riktlinjer Viktigt verfyll inte Kontrollera alltid oljeniv n n r maskinen st r i lodr t position Kontrollera alla motorns och stolpdrivarens bultar eftersp nn om det...

Страница 31: ...l p ring av fett r sm rjmedlet mycket m rkt svart i f rg eller r fullt av avlagringar kr ver stolpdrivaren ytterligare underh ll Detta beskrivs i detalj i avsnittet Service stolpdrivare Om det gamla f...

Страница 32: ...ed Loctite Blue 243 Kom ih g att reng ra bultar och h l med en typ av avfettningsmedel f r att avl gsna alla fettrester Om du upplever problem med stolpdrivarens prestanda se fels kningsavsnittet i de...

Страница 33: ...n vre hammardelen noggrant I syfte att avl gsna kolven och vevstaken r det n dv ndigt att avl gsna vevtappen med v nsterg ngorna p vevaxeln och f rsiktigt trycka kolven genom botten av h ljet F r att...

Страница 34: ...er p lindberg se Placering av v nstra vevaxeln Packning med korrekt placerad vevst ng Reng r och kontrollera cylindrar och vevhus f r skador och slitage Byt ut skadade delar Ta bort de inre fj drarna...

Страница 35: ...utsidan av den vre hammaren och skjut f rsiktigt huset tillbaka in med O ring mot toppen 5 P nedre hammarsektionen applicera ett skikt EP 0 fett p den nedre slagenheten och skjut enheten in i styrhyl...

Страница 36: ...med ny Loctite bultarna och omr det kring dem m ste reng ras med ett slags avfettningsmedel f r att avl gsna kvarvarande fett Loctiten fungerar inte om det r fett kvar Bultarna m ste dras t till 14 50...

Страница 37: ...fett i vevhuset Det m ste finnas utrymme f r delarna att r ra sig fritt 4 Om det finns f r lite fett i maskinen kommer det att orsaka minskad prestanda St ng vevhuset och kontrollera visuellt m ngden...

Страница 38: ...Myrangatan 4 www p lindberg se Tel 010 209 70 50 745 37 Enk ping e mail order p lindberg se EU f rs kran om verensst mmelse Vi f rbeh ller oss r tten att utan f rvarning ndra tekniska parametrar och s...

Страница 39: ...ndbuch beschrieben verwendet werden Jegliche andere Art der Anwendung wird als falsch angesehen Inhalt Technische Daten 1 Ger te bersicht 2 Sicherheits und Bedienungsanleitung 4 Sicherheitshinweise 4...

Страница 40: ...2454 DE V1 P Lindberg GmbH Flensburger Str 3 www p lindberg de Tel 04604 9888 975 D 24969 Gro enwiehe E mail kontakt p lindberg de Ger te bersicht Startgriff Pumpball Benzintank Auspuff leinf llloch k...

Страница 41: ...3 MAN 9052454 DE V1 P Lindberg GmbH Flensburger Str 3 www p lindberg de Tel 04604 9888 975 D 24969 Gro enwiehe E mail kontakt p lindberg de Tragegriff Gefederter Griff Halbgasschalter Stoppschalter...

Страница 42: ...n die das Handbuch gelesen und verstanden haben bedient werden Lassen Sie niemals Kinder oder ungeschulte Personen die Maschine benutzen Lassen Sie die Maschine niemals unbeaufsichtigt laufen Wird die...

Страница 43: ...en Sie bei der Verwendung des Ger ts darauf R cksicht Zur Schutzausr stung z hlt unter anderem Geh rschutz Klasse 4 mehr als 22db D mmwert Schlagfester Augenschutz mit Seitenvisier Schutzhandschuhe un...

Страница 44: ...enungsanleitung f r die Pfahlramme Die Pfahlramme ist f r eine so effiziente Nutzung wie m glich konzipiert Sie ist au erdem sehr stark und leicht Es ist wichtig zu begreifen dass die Pfahlramme eine...

Страница 45: ...e gesamte empfohlene Sicherheitsausr stung Sichere Inbetriebnahme der benzinbetriebenen Pfahlramme Stellen Sie die Maschine auf eine gesicherte ebene Oberfl che in einem offenen Bereich Sorgen Sie f r...

Страница 46: ...sition max Geschwindigkeit Ziehen Sie 3 5 Mal an der Startschnur F hren Sie den oben beschriebenen Prozess f r eine sichere Inbetriebnahme durch und starten Sie die Maschine w hrend der Choker auf OPE...

Страница 47: ...ew nschte Tiefe eingerammt m ssen der Gashebel ganz losgelassen und die Maschine vorsichtig vom Pfahl entfernt werden Gehen Sie zum n chsten Pfahl und wiederholen Sie den oben beschriebenen Vorgang Wi...

Страница 48: ...lieren Sie alle Verbindungen der Pfahlramme und ziehen Sie diese falls n tig nach Werden Bolzen mit einer neuen Schraubsicherung montiert m ssen die Bolzen sowie der Bereich um das Bolzenloch mit eine...

Страница 49: ...t sein Es muss sich ein Ring aus Schmiermittel in Richtung des Kurbelwellengeh uses gebildet haben 2 Misst der oben genannte Ring weniger als 6 mm ist dies ein Zeichen daf r dass zu wenig Schmiermitte...

Страница 50: ...ammers 4 Wechseln Sie alle Dichtungen und Versiegelungen Wichtig Die Schmiermittelmenge und der Schmiermitteltyp f r die Pfahlramme sind wichtig f r die Leistung und die Lebensdauer der Maschine Zu we...

Страница 51: ...hrungsgeh use entfernt in anderen F llen bleibt sie an ihrem Platz am oberen F hrungsgeh use Entfernen Sie den Sto d mpfer und untersuchen Sie Gummidichtungen und Stahlkomponenten auf Abnutzungen und...

Страница 52: ...dem Linksgewinde von der Kurbelwelle entfernt und der Stempel vorsichtig unten aus dem Geh use geschoben werden Lesen Sie den Abschnitt ber die Wartung des Kurbelwellengeh uses um zum Kurbelwellenspl...

Страница 53: ...chen Gegenstand wieder in das Geh use zur ck 3 Tragen Sie ein wenig EP 0 Schmiermittel auf den Kurbelwellensplint auf und setzen Sie ihn ein Passen Sie besonders darauf auf dass kein Fett auf das Gewi...

Страница 54: ...l Fettreste zu entfernen da die Schraubsicherung bei Schmiermittel Fettr ckst nden nicht funktioniert Die Bolzen werden mit 14 50 Nm festgezogen 11 F llen Sie circa 4 L ffel 80 ml frisches EP 0 Schmie...

Страница 55: ...reduzierte Maschinenleistung und eine unn tige Belastung von Motor und Getriebe Stempel zur Folge Im Kurbelwellengeh use m ssen ca 4 5 L ffel Schmiermittel sichtbar sein Es muss genug Platz vorhanden...

Страница 56: ...Teil zu zerlegen B Lassen Sie den unteren Teil ber den Pfahl gleiten sodass der verschobene gesplitterte Pfahl sichtbar wird Der Pfahl wird mit einem f r den Pfahl geeigneten Schneidewerkzeug direkt...

Страница 57: ...r Str 3 www p lindberg de Tel 04604 9888 975 D 24969 Gro enwiehe E mail kontakt p lindberg de EU Konformit tserkl rung Wir behalten uns das Recht vor ohne vorherige Information technische Parameter od...

Страница 58: ...the manual All other use is deemed incorrect Contents Technical specifications 1 Equipment overview 2 Safety instructions and user instructions 4 Safety warnings 4 Post driver user instructions 6 Ser...

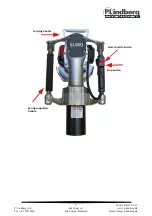
Страница 59: ...9052454 EN V1 P Lindberg A S Sdr Ringvej 1 www p lindberg dk Tel 45 70212626 6600 Vejen Denmark E mail salg p lindberg dk Equipment overview Start handle Primer bulb Petrol tank Exhaust Oil filling c...

Страница 60: ...MAN 9052454 EN V1 P Lindberg A S Sdr Ringvej 1 www p lindberg dk Tel 45 70212626 6600 Vejen Denmark E mail salg p lindberg dk Carrying handle Spring supported handle Start throttle button Stop button...

Страница 61: ...chine for the first time The post driver should only be used by adults who have read and understood the manual Never allow children or untrained people to use the machine Never allow the machine to op...

Страница 62: ...achine Personal protective equipment includes but is not limited to Ear defenders class 4 more than 22 dB noise reduction Impact resistant eye protection with side protection Protective gloves and boo...

Страница 63: ...driver is designed to be extremely powerful and light and as efficient as possible It is important that you are aware that the post driver is a powerful machine As long as it is used properly and mai...

Страница 64: ...areas that are open and which have good ventilation It is recommended that the machine is never started indoors Important When you pull on the start cord never wrap the start cord around your hand or...

Страница 65: ...ead apart by at least a shoulder width Important Always maintain a good balance when driving posts Lift the post driver onto the post and ensure that the post sits correctly and is centred in the post...

Страница 66: ...throttle to stop the driver movement before removing the machine from the post The machine can be left running as it is not necessary to switch on off the machine Filling the petrol driven post driver...

Страница 67: ...sary If bolts are fitted with new thread lock the bolt and the area around the bolt entry must be cleaned using a degreasing agent to remove all of the lubricant remnants If there are remnants of lubr...

Страница 68: ...his indicates that the level of lubricant is too low Never add more than a spoonful of EP 0 The ring of lubricant up against the crank housing sides must not exceed 12 mm Important Do not overfill the...

Страница 69: ...lean both bolts and holes with a form of degreaser to remove remnants of lubricant otherwise the adhesive will not be effective If you have problems with the post driver s performance please refer to...

Страница 70: ...oughly To remove the piston and piston rod you must remove the crankpin with the left thread from the crank and carefully push the piston through the bottom of the housing To gain access to the crankp...

Страница 71: ...Positioning of left threaded crankpin Piston with correctly positioned piston rod Clean and check the cylinder and crank housing for damage and wear Replace any damaged parts Remove the inner springs...

Страница 72: ...ase on the outside of the top driver and push it carefully back inside the housing with the O ring against the top 5 On the bottom driver section apply a layer of EP 0 grease on the bottom impact unit...

Страница 73: ...bottom driver section using new thread lock The bolts and the area around these must be cleaned using a degreasing agent to remove all of the lubricant remnants If there are remnants of lubricant the...

Страница 74: ...ine s output and load the engine and gear pistons function There must be 4 5 spoonfulls of grease visible in the crank housing There must be space so that the parts can move freely 4 If there is insuf...

Страница 75: ...ost so that the displaced split post becomes visible Using a cutting tool that is suitable cut across the post just below the displaced split top C Once the displaced split top has been removed allow...

Страница 76: ...dr Ringvej 1 www p lindberg dk Tel 45 70212626 6600 Vejen Denmark E mail salg p lindberg dk EU Declaration of Conformity We retain the right to change the technical parameters and specifications of th...

Отзывы: