OMZ-1000-HF (HFT)
Plate Removal Instructions
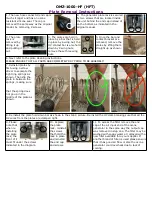
1. The new hose connector/end cap is
much stronger and has an ozone
resistant silicone seal. The cap is
removed the same way as the original
model, by removing 2 screws.
2. The generator plate rack is secured
by two screws that are located inside
the unit behind the end cap instead of
on the bottom as indicated in the
original manual.
3. The plate
rack is
removed by
lifting it up
and pulling it
out.
4. The plates are held in
place by a bar that is held
in place by a wing nut, the
HV contact bar is also held
down by 2 wing nuts,
remove these three wing
nuts.
5. Once the bar and
contact bracket are
removed, remove the
plates by lifting them
straight up as shown.
6. Next refer to the plate cleaning instructions.
PLEASE ENSURE THAT ALL PARTS ARE COMPLETELY DRY PRIOR TO RE ASSEMBLY!
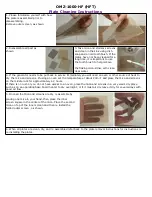
7. Reinstall plates by
first using a screw
driver to separate the
tight ring springs as
shown. Then slip the
plate in between the
springs, making sure
that the spring does
not go up in the
middle of the plate as
shown.
8. Re install the plate hold down bar as shown in the step 4 picture. Re install the HV clamp making sure that all the
HV wires from the plates are clamped tight.
9. Please
note that
when re
installing
the plate
rack, the
front of it
must fit under the screws
indicated in the diagram.
10. Replace
the plate
rack, reinstall
the screws
that hold the
rack in place
and reinstall
the end cap
and screws.
11. To access the filter remove the end
cap at the air input end of the ozone
generator in the same way the output cap
was removed in step one. The filter may be
washed with soapy water or replaced with a
new filter available thru your supplier. If
another brand of filter is used please ensure
that it has good air flow or else the ozone
generator could overheat due to lack of
cooling.


