background image

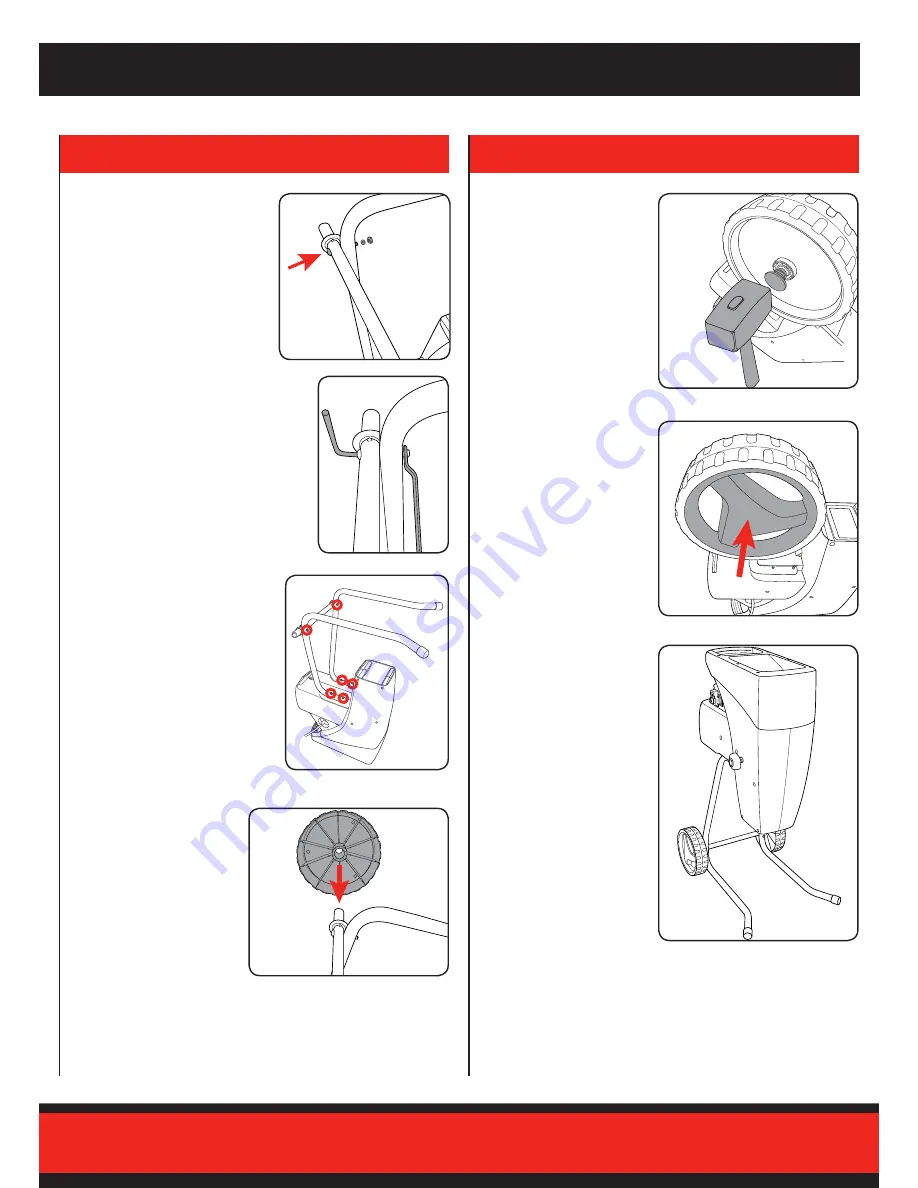
9.   Fit a wheel plug onto each 

end of the axle to secure 

the wheels on the axle. 

Use a rubber mallet (not 

included) and lightly tap the 

plugs into position on the 

axle.

10.  Push the hub caps onto the 

centre of the wheels so it 

clicks into place.

11.   Once fully assembled, 

carefully lift the shredder  

into its correct position 

supported by the stand and 

wheels..

5.   Secure the axle onto the legs 

using 2 bolts, nuts & washers.

  a.   Place the bolt through the hole 

in the axle followed by the leg.

  b.   Fit a flat washer over each bolt, attach 

the nut onto the bolt and tighten using 

the hex wrench and hex key (only 

partially tighten at this stage).

  c.   Repeat for the opposite leg.

6.   Securely tighten the 4 nuts on the 

base of the shredder followed by 

the 2 bolts & Nuts on the wheel 

axle.

   Ensure the stand and axle are 

secure and do not wobble.

7.   Fit a wheel onto each side  

of the axle.

Содержание SSH-2440

Страница 1: ...as set out within the instruction manual If the tool is disassembled or tampered with in any way Professional industrial or high frequency use TO ENSURE A SPEEDY RESPONSE PLEASE HAVE THE MODEL NUMBER AND DATE OF PURCHASE AVAILABLE A CUSTOMER SERVICE REPRESENTATIVE WILL TAKE YOUR CALL AND ANSWER ANY QUESTIONS YOU MAY HAVE RELATING TO THE WARRANTY POLICY OR PROCEDURE OZITO Australia New Zealand Head...

Страница 2: ...ver each of the 4 threads Lightly tighten using the hex wrench supplied 4 Fit the wheel axle to the base of the legs ensuring that it is positioned towards the rear of the shredder 1 On off switch 2 Transport handle 3 Reset button overload protector 4 Direction control switch 5 Hopper 6 Cutting adjustment Knob 7 Discharge chute 8 Stand 9 Wheels 10 Collection bag 11 Hex key 12 Hex wrench SILENT SHR...

Страница 3: ... by the stand and wheels 5 Secure the axle onto the legs using 2 bolts nuts washers a Place the bolt through the hole in the axle followed by the leg b Fit a flat washer over each bolt attach the nut onto the bolt and tighten using the hex wrench and hex key only partially tighten at this stage c Repeat for the opposite leg 6 Securely tighten the 4 nuts on the base of the shredder followed by the ...

Страница 4: ...that the shredder is cutting efficiently by feeding some material into the feeding hopper Do this by following the instructions outlined in the Shredding section Note When shredding hard material it may need to be put through the shredder twice firstly to crush the material and secondly to cut it In order to crush material the cutting adjustment knob will need to be loosened by turning it anti clo...

Страница 5: ...ill automatically pull the material through the rolling cutter head shred it and extract it through the discharge chute Shredding tips Following the below procedures will improve operation and prolong the life of the shredder Branches and twigs should be shredded shortly after they are cut They become extremely hard once dry and the maximum cutting diameter is reduced Garden waste such as fresh fo...

Страница 6: ...cting material Periodically check that all nuts and screws are secure Spray the rolling cutter head after each use with a spray lubricant to protect against corrosion Always clean the shredder after each use Brush away dirt and plant residue which may be caught in the roller cutter Wipe clean the outside of the shredder with a cloth which has been moistened with a mild detergent and water Store th...

Страница 7: ...he shredder on Pull the material from the hopper Carefully refeed thick branched material making sure the blade does not immediately grasp the pre cut notches again The rolling cutter head is blocked Set the direction switch to the reverse position and switch the shredder on The cutter head will now run backwards and release the blocked material Material is not being shredded sufficiently Ensure t...

Страница 8: ...Use of a cord suitable for outdoor use reduces the risk of electric shock f If operating a power tool in a damp location is unavoidable use a residual current device RCD protected supply Use of an RCD reduces the risk of electric shock 3 Personal safety a Stay alert watch what you are doing and use common sense when operating a power tool Do not use a power tool while you are tired or under the in...

Отзывы: